const{Browser,By,until,Builder}=require("selenium-webdriver");constpath=require("path");constassert=require('node:assert');describe('File Upload Test',function(){letdriver;before(asyncfunction(){driver=newBuilder().forBrowser(Browser.CHROME).build();});after(async()=>awaitdriver.quit());it('Should be able to upload a file successfully',asyncfunction(){constimage=path.resolve('./test/resources/selenium-snapshot.png')awaitdriver.manage().setTimeouts({implicit:5000});// Navigate to URL
awaitdriver.get('https://the-internet.herokuapp.com/upload');// Upload snapshot
awaitdriver.findElement(By.id("file-upload")).sendKeys(image);awaitdriver.findElement(By.id("file-submit")).submit();constrevealed=awaitdriver.findElement(By.id('uploaded-files'))awaitdriver.wait(until.elementIsVisible(revealed),2000);constdata=awaitdriver.findElement(By.css('h3'));assert.equal(awaitdata.getText(),`File Uploaded!`);});});
```java
import org.openqa.selenium.By
import org.openqa.selenium.chrome.ChromeDriver
fun main() {
val driver = ChromeDriver()
driver.get("https://the-internet.herokuapp.com/upload")
driver.findElement(By.id("file-upload")).sendKeys("selenium-snapshot.jpg")
driver.findElement(By.id("file-submit")).submit()
if(driver.pageSource.contains("File Uploaded!")) {
println("file uploaded")
}
else{
println("file not uploaded")
}
}
```
2 - 查询网络元素
根据提供的定位值定位元素.
One of the most fundamental aspects of using Selenium is obtaining element references to work with.
Selenium offers a number of built-in locator strategies to uniquely identify an element.
There are many ways to use the locators in very advanced scenarios. For the purposes of this documentation,
let’s consider this HTML snippet:
<olid="vegetables"><liclass="potatoes">…
<liclass="onions">…
<liclass="tomatoes"><span>Tomato is a Vegetable</span>…
</ol><ulid="fruits"><liclass="bananas">…
<liclass="apples">…
<liclass="tomatoes"><span>Tomato is a Fruit</span>…
</ul>
First matching element
Many locators will match multiple elements on the page. The singular find element method will return a reference to the
first element found within a given context.
Evaluating entire DOM
When the find element method is called on the driver instance, it
returns a reference to the first element in the DOM that matches with the provided locator.
This value can be stored and used for future element actions. In our example HTML above, there are
two elements that have a class name of “tomatoes” so this method will return the element in the “vegetables” list.
# frozen_string_literal: truerequire'spec_helper'RSpec.describe'Element Finders'dolet(:driver){start_session}context'without executing finders',skip:'these are just examples, not actual tests'doit'finds the first matching element'dodriver.find_element(class:'tomatoes')endit'uses a subset of the dom to find an element'dofruits=driver.find_element(id:'fruits')fruits.find_element(class:'tomatoes')endit'uses an optimized locator'dodriver.find_element(css:'#fruits .tomatoes')endit'finds all matching elements'dodriver.find_elements(tag_name:'li')endit'gets an element from a collection'doelements=driver.find_elements(:tag_name,'p')elements.each{|e|putse.text}endit'finds element from element'doelement=driver.find_element(:tag_name,'div')elements=element.find_elements(:tag_name,'p')elements.each{|e|putse.text}endit'find active element'dodriver.find_element(css:'[name="q"]').send_keys('webElement')driver.switch_to.active_element.attribute('title')endendend
Rather than finding a unique locator in the entire DOM, it is often useful to narrow the search to the scope
of another located element. In the above example there are two elements with a class name of “tomatoes” and
it is a little more challenging to get the reference for the second one.
One solution is to locate an element with a unique attribute that is an ancestor of the desired element and not an
ancestor of the undesired element, then call find element on that object:
# frozen_string_literal: truerequire'spec_helper'RSpec.describe'Element Finders'dolet(:driver){start_session}context'without executing finders',skip:'these are just examples, not actual tests'doit'finds the first matching element'dodriver.find_element(class:'tomatoes')endit'uses a subset of the dom to find an element'dofruits=driver.find_element(id:'fruits')fruits.find_element(class:'tomatoes')endit'uses an optimized locator'dodriver.find_element(css:'#fruits .tomatoes')endit'finds all matching elements'dodriver.find_elements(tag_name:'li')endit'gets an element from a collection'doelements=driver.find_elements(:tag_name,'p')elements.each{|e|putse.text}endit'finds element from element'doelement=driver.find_element(:tag_name,'div')elements=element.find_elements(:tag_name,'p')elements.each{|e|putse.text}endit'find active element'dodriver.find_element(css:'[name="q"]').send_keys('webElement')driver.switch_to.active_element.attribute('title')endendend
Java and C# WebDriver, WebElement and ShadowRoot classes all implement a SearchContext interface, which is
considered a role-based interface. Role-based interfaces allow you to determine whether a particular
driver implementation supports a given feature. These interfaces are clearly defined and try
to adhere to having only a single role of responsibility.
Evaluating the Shadow DOM
The Shadow DOM is an encapsulated DOM tree hidden inside an element.
With the release of v96 in Chromium Browsers, Selenium can now allow you to access this tree
with easy-to-use shadow root methods. NOTE: These methods require Selenium 4.0 or greater.
# frozen_string_literal: truerequire'spec_helper'RSpec.describe'Element Finders'dolet(:driver){start_session}context'without executing finders',skip:'these are just examples, not actual tests'doit'finds the first matching element'dodriver.find_element(class:'tomatoes')endit'uses a subset of the dom to find an element'dofruits=driver.find_element(id:'fruits')fruits.find_element(class:'tomatoes')endit'uses an optimized locator'dodriver.find_element(css:'#fruits .tomatoes')endit'finds all matching elements'dodriver.find_elements(tag_name:'li')endit'gets an element from a collection'doelements=driver.find_elements(:tag_name,'p')elements.each{|e|putse.text}endit'finds element from element'doelement=driver.find_element(:tag_name,'div')elements=element.find_elements(:tag_name,'p')elements.each{|e|putse.text}endit'find active element'dodriver.find_element(css:'[name="q"]').send_keys('webElement')driver.switch_to.active_element.attribute('title')endendend
There are several use cases for needing to get references to all elements that match a locator, rather
than just the first one. The plural find elements methods return a collection of element references.
If there are no matches, an empty list is returned. In this case,
references to all fruits and vegetable list items will be returned in a collection.
# frozen_string_literal: truerequire'spec_helper'RSpec.describe'Element Finders'dolet(:driver){start_session}context'without executing finders',skip:'these are just examples, not actual tests'doit'finds the first matching element'dodriver.find_element(class:'tomatoes')endit'uses a subset of the dom to find an element'dofruits=driver.find_element(id:'fruits')fruits.find_element(class:'tomatoes')endit'uses an optimized locator'dodriver.find_element(css:'#fruits .tomatoes')endit'finds all matching elements'dodriver.find_elements(tag_name:'li')endit'gets an element from a collection'doelements=driver.find_elements(:tag_name,'p')elements.each{|e|putse.text}endit'finds element from element'doelement=driver.find_element(:tag_name,'div')elements=element.find_elements(:tag_name,'p')elements.each{|e|putse.text}endit'find active element'dodriver.find_element(css:'[name="q"]').send_keys('webElement')driver.switch_to.active_element.attribute('title')endendend
Often you get a collection of elements but want to work with a specific element, which means you
need to iterate over the collection and identify the one you want.
fromseleniumimportwebdriverfromselenium.webdriver.common.byimportBydriver=webdriver.Firefox()# Navigate to Urldriver.get("https://www.example.com")# Get all the elements available with tag name 'p'elements=driver.find_elements(By.TAG_NAME,'p')foreinelements:print(e.text)
usingOpenQA.Selenium;usingOpenQA.Selenium.Firefox;usingSystem.Collections.Generic;namespaceFindElementsExample{classFindElementsExample{publicstaticvoidMain(string[]args){IWebDriverdriver=newFirefoxDriver();try{// Navigate to Urldriver.Navigate().GoToUrl("https://example.com");// Get all the elements available with tag name 'p'IList<IWebElement>elements=driver.FindElements(By.TagName("p"));foreach(IWebElementeinelements){System.Console.WriteLine(e.Text);}}finally{driver.Quit();}}}}
# frozen_string_literal: truerequire'spec_helper'RSpec.describe'Element Finders'dolet(:driver){start_session}context'without executing finders',skip:'these are just examples, not actual tests'doit'finds the first matching element'dodriver.find_element(class:'tomatoes')endit'uses a subset of the dom to find an element'dofruits=driver.find_element(id:'fruits')fruits.find_element(class:'tomatoes')endit'uses an optimized locator'dodriver.find_element(css:'#fruits .tomatoes')endit'finds all matching elements'dodriver.find_elements(tag_name:'li')endit'gets an element from a collection'doelements=driver.find_elements(:tag_name,'p')elements.each{|e|putse.text}endit'finds element from element'doelement=driver.find_element(:tag_name,'div')elements=element.find_elements(:tag_name,'p')elements.each{|e|putse.text}endit'find active element'dodriver.find_element(css:'[name="q"]').send_keys('webElement')driver.switch_to.active_element.attribute('title')endendend
const{Builder,By}=require('selenium-webdriver');(asyncfunctionexample(){letdriver=awaitnewBuilder().forBrowser('firefox').build();try{// Navigate to Url
awaitdriver.get('https://www.example.com');// Get all the elements available with tag 'p'
letelements=awaitdriver.findElements(By.css('p'));for(leteofelements){console.log(awaite.getText());}}finally{awaitdriver.quit();}})();
importorg.openqa.selenium.Byimportorg.openqa.selenium.firefox.FirefoxDriverfunmain(){valdriver=FirefoxDriver()try{driver.get("https://example.com")// Get all the elements available with tag name 'p'
valelements=driver.findElements(By.tagName("p"))for(elementinelements){println("Paragraph text:"+element.text)}}finally{driver.quit()}}
Find Elements From Element
It is used to find the list of matching child WebElements within the context of parent element.
To achieve this, the parent WebElement is chained with ‘findElements’ to access child elements
importorg.openqa.selenium.By;importorg.openqa.selenium.WebDriver;importorg.openqa.selenium.WebElement;importorg.openqa.selenium.chrome.ChromeDriver;importjava.util.List;publicclassfindElementsFromElement{publicstaticvoidmain(String[]args){WebDriverdriver=newChromeDriver();try{driver.get("https://example.com");// Get element with tag name 'div'WebElementelement=driver.findElement(By.tagName("div"));// Get all the elements available with tag name 'p'List<WebElement>elements=element.findElements(By.tagName("p"));for(WebElemente:elements){System.out.println(e.getText());}}finally{driver.quit();}}}
fromseleniumimportwebdriverfromselenium.webdriver.common.byimportBydriver=webdriver.Chrome()driver.get("https://www.example.com")##get elements from parent element using TAG_NAME# Get element with tag name 'div'element=driver.find_element(By.TAG_NAME,'div')# Get all the elements available with tag name 'p'elements=element.find_elements(By.TAG_NAME,'p')foreinelements:print(e.text)##get elements from parent element using XPATH##NOTE: in order to utilize XPATH from current element, you must add "." to beginning of path# Get first element of tag 'ul'element=driver.find_element(By.XPATH,'//ul')# get children of tag 'ul' with tag 'li'elements=driver.find_elements(By.XPATH,'.//li')foreinelements:print(e.text)
usingOpenQA.Selenium;usingOpenQA.Selenium.Chrome;usingSystem.Collections.Generic;namespaceFindElementsFromElement{classFindElementsFromElement{publicstaticvoidMain(string[]args){IWebDriverdriver=newChromeDriver();try{driver.Navigate().GoToUrl("https://example.com");// Get element with tag name 'div'IWebElementelement=driver.FindElement(By.TagName("div"));// Get all the elements available with tag name 'p'IList<IWebElement>elements=element.FindElements(By.TagName("p"));foreach(IWebElementeinelements){System.Console.WriteLine(e.Text);}}finally{driver.Quit();}}}}
# frozen_string_literal: truerequire'spec_helper'RSpec.describe'Element Finders'dolet(:driver){start_session}context'without executing finders',skip:'these are just examples, not actual tests'doit'finds the first matching element'dodriver.find_element(class:'tomatoes')endit'uses a subset of the dom to find an element'dofruits=driver.find_element(id:'fruits')fruits.find_element(class:'tomatoes')endit'uses an optimized locator'dodriver.find_element(css:'#fruits .tomatoes')endit'finds all matching elements'dodriver.find_elements(tag_name:'li')endit'gets an element from a collection'doelements=driver.find_elements(:tag_name,'p')elements.each{|e|putse.text}endit'finds element from element'doelement=driver.find_element(:tag_name,'div')elements=element.find_elements(:tag_name,'p')elements.each{|e|putse.text}endit'find active element'dodriver.find_element(css:'[name="q"]').send_keys('webElement')driver.switch_to.active_element.attribute('title')endendend
const{Builder,By}=require('selenium-webdriver');(asyncfunctionexample(){letdriver=newBuilder().forBrowser('chrome').build();awaitdriver.get('https://www.example.com');// Get element with tag name 'div'
letelement=driver.findElement(By.css("div"));// Get all the elements available with tag name 'p'
letelements=awaitelement.findElements(By.css("p"));for(leteofelements){console.log(awaite.getText());}})();
importorg.openqa.selenium.Byimportorg.openqa.selenium.chrome.ChromeDriverfunmain(){valdriver=ChromeDriver()try{driver.get("https://example.com")// Get element with tag name 'div'
valelement=driver.findElement(By.tagName("div"))// Get all the elements available with tag name 'p'
valelements=element.findElements(By.tagName("p"))for(einelements){println(e.text)}}finally{driver.quit()}}
Get Active Element
It is used to track (or) find DOM element which has the focus in the current browsing context.
importorg.openqa.selenium.*;importorg.openqa.selenium.chrome.ChromeDriver;publicclassactiveElementTest{publicstaticvoidmain(String[]args){WebDriverdriver=newChromeDriver();try{driver.get("http://www.google.com");driver.findElement(By.cssSelector("[name='q']")).sendKeys("webElement");// Get attribute of current active elementStringattr=driver.switchTo().activeElement().getAttribute("title");System.out.println(attr);}finally{driver.quit();}}}
fromseleniumimportwebdriverfromselenium.webdriver.common.byimportBydriver=webdriver.Chrome()driver.get("https://www.google.com")driver.find_element(By.CSS_SELECTOR,'[name="q"]').send_keys("webElement")# Get attribute of current active elementattr=driver.switch_to.active_element.get_attribute("title")print(attr)
usingOpenQA.Selenium;usingOpenQA.Selenium.Chrome;namespaceActiveElement{classActiveElement{publicstaticvoidMain(string[]args){IWebDriverdriver=newChromeDriver();try{// Navigate to Urldriver.Navigate().GoToUrl("https://www.google.com");driver.FindElement(By.CssSelector("[name='q']")).SendKeys("webElement");// Get attribute of current active elementstringattr=driver.SwitchTo().ActiveElement().GetAttribute("title");System.Console.WriteLine(attr);}finally{driver.Quit();}}}}
# frozen_string_literal: truerequire'spec_helper'RSpec.describe'Element Finders'dolet(:driver){start_session}context'without executing finders',skip:'these are just examples, not actual tests'doit'finds the first matching element'dodriver.find_element(class:'tomatoes')endit'uses a subset of the dom to find an element'dofruits=driver.find_element(id:'fruits')fruits.find_element(class:'tomatoes')endit'uses an optimized locator'dodriver.find_element(css:'#fruits .tomatoes')endit'finds all matching elements'dodriver.find_elements(tag_name:'li')endit'gets an element from a collection'doelements=driver.find_elements(:tag_name,'p')elements.each{|e|putse.text}endit'finds element from element'doelement=driver.find_element(:tag_name,'div')elements=element.find_elements(:tag_name,'p')elements.each{|e|putse.text}endit'find active element'dodriver.find_element(css:'[name="q"]').send_keys('webElement')driver.switch_to.active_element.attribute('title')endendend
const{Builder,By}=require('selenium-webdriver');(asyncfunctionexample(){letdriver=awaitnewBuilder().forBrowser('chrome').build();awaitdriver.get('https://www.google.com');awaitdriver.findElement(By.css('[name="q"]')).sendKeys("webElement");// Get attribute of current active element
letattr=awaitdriver.switchTo().activeElement().getAttribute("title");console.log(`${attr}`)})();
importorg.openqa.selenium.Byimportorg.openqa.selenium.chrome.ChromeDriverfunmain(){valdriver=ChromeDriver()try{driver.get("https://www.google.com")driver.findElement(By.cssSelector("[name='q']")).sendKeys("webElement")// Get attribute of current active element
valattr=driver.switchTo().activeElement().getAttribute("title")print(attr)}finally{driver.quit()}}
driver.get("https://www.selenium.dev/selenium/web/inputs.html");// Click on the element WebElementcheckInput=driver.findElement(By.name("checkbox_input"));checkInput.click();
packagedev.selenium.elements;importorg.junit.jupiter.api.Test;importorg.openqa.selenium.By;importorg.openqa.selenium.WebDriver;importorg.openqa.selenium.WebElement;importorg.openqa.selenium.chrome.ChromeDriver;importjava.time.Duration;import staticorg.junit.jupiter.api.Assertions.assertEquals;publicclassInteractionTest{@TestpublicvoidinteractWithElements(){WebDriverdriver=newChromeDriver();driver.manage().timeouts().implicitlyWait(Duration.ofMillis(500));// Navigate to Urldriver.get("https://www.selenium.dev/selenium/web/inputs.html");// Click on the element WebElementcheckInput=driver.findElement(By.name("checkbox_input"));checkInput.click();BooleanisChecked=checkInput.isSelected();assertEquals(isChecked,false);//SendKeys// Clear field to empty it from any previous dataWebElementemailInput=driver.findElement(By.name("email_input"));emailInput.clear();//Enter TextStringemail="admin@localhost.dev";emailInput.sendKeys(email);//VerifyStringdata=emailInput.getAttribute("value");assertEquals(data,email);//Clear Element// Clear field to empty it from any previous dataemailInput.clear();data=emailInput.getAttribute("value");assertEquals(data,"");driver.quit();}}
# Navigate to URLdriver.get("https://www.selenium.dev/selenium/web/inputs.html")# Click on the checkboxcheck_input=driver.find_element(By.NAME,"checkbox_input")check_input.click()
fromseleniumimportwebdriverfromselenium.webdriver.common.byimportByimportpytestdeftest_interactions():# Initialize WebDriverdriver=webdriver.Chrome()driver.implicitly_wait(0.5)# Navigate to URLdriver.get("https://www.selenium.dev/selenium/web/inputs.html")# Click on the checkboxcheck_input=driver.find_element(By.NAME,"checkbox_input")check_input.click()is_checked=check_input.is_selected()assertis_checked==False# Handle the email input fieldemail_input=driver.find_element(By.NAME,"email_input")email_input.clear()# Clear fieldemail="admin@localhost.dev"email_input.send_keys(email)# Enter text# Verify inputdata=email_input.get_attribute("value")assertdata==email# Clear the email input field againemail_input.clear()data=email_input.get_attribute("value")assertdata==""# Quit the driverdriver.quit()
// Navigate to Urldriver.Navigate().GoToUrl("https://www.selenium.dev/selenium/web/inputs.html");// Click on the element IWebElementcheckInput=driver.FindElement(By.Name("checkbox_input"));checkInput.Click();
usingSystem;usingMicrosoft.VisualStudio.TestTools.UnitTesting;usingOpenQA.Selenium;usingOpenQA.Selenium.Chrome;namespaceSeleniumDocs.Elements{ [TestClass]publicclassInteractionTest{ [TestMethod]publicvoidTestInteractionCommands(){IWebDriverdriver=newChromeDriver();driver.Manage().Timeouts().ImplicitWait=TimeSpan.FromMilliseconds(500);// Navigate to Urldriver.Navigate().GoToUrl("https://www.selenium.dev/selenium/web/inputs.html");// Click on the element IWebElementcheckInput=driver.FindElement(By.Name("checkbox_input"));checkInput.Click();//VerifyBooleanisChecked=checkInput.Selected;Assert.AreEqual(isChecked,false);//SendKeys// Clear field to empty it from any previous dataIWebElementemailInput=driver.FindElement(By.Name("email_input"));emailInput.Clear();//Enter TextStringemail="admin@localhost.dev";emailInput.SendKeys(email);//VerifyStringdata=emailInput.GetAttribute("value");Assert.AreEqual(data,email);//Clear Element// Clear field to empty it from any previous dataemailInput.Clear();data=emailInput.GetAttribute("value");//VerifyAssert.AreEqual(data,"");//Quit the browserdriver.Quit();}}}
# frozen_string_literal: truerequire'spec_helper'RSpec.describe'Element Interaction'dolet(:driver){start_session}before{driver.get'https://www.selenium.dev/selenium/web/inputs.html'}it'clicks an element'dodriver.find_element(name:'color_input').clickendit'clears and send keys to an element'dodriver.find_element(name:'email_input').cleardriver.find_element(name:'email_input').send_keys'admin@localhost.dev'endend
// Navigate to Url
driver.get("https://www.selenium.dev/selenium/web/inputs.html")// Click the element
driver.findElement(By.name("color_input")).click();
// Clear field to empty it from any previous dataWebElementemailInput=driver.findElement(By.name("email_input"));emailInput.clear();//Enter TextStringemail="admin@localhost.dev";emailInput.sendKeys(email);
packagedev.selenium.elements;importorg.junit.jupiter.api.Test;importorg.openqa.selenium.By;importorg.openqa.selenium.WebDriver;importorg.openqa.selenium.WebElement;importorg.openqa.selenium.chrome.ChromeDriver;importjava.time.Duration;import staticorg.junit.jupiter.api.Assertions.assertEquals;publicclassInteractionTest{@TestpublicvoidinteractWithElements(){WebDriverdriver=newChromeDriver();driver.manage().timeouts().implicitlyWait(Duration.ofMillis(500));// Navigate to Urldriver.get("https://www.selenium.dev/selenium/web/inputs.html");// Click on the element WebElementcheckInput=driver.findElement(By.name("checkbox_input"));checkInput.click();BooleanisChecked=checkInput.isSelected();assertEquals(isChecked,false);//SendKeys// Clear field to empty it from any previous dataWebElementemailInput=driver.findElement(By.name("email_input"));emailInput.clear();//Enter TextStringemail="admin@localhost.dev";emailInput.sendKeys(email);//VerifyStringdata=emailInput.getAttribute("value");assertEquals(data,email);//Clear Element// Clear field to empty it from any previous dataemailInput.clear();data=emailInput.getAttribute("value");assertEquals(data,"");driver.quit();}}
# Handle the email input fieldemail_input=driver.find_element(By.NAME,"email_input")email_input.clear()# Clear fieldemail="admin@localhost.dev"email_input.send_keys(email)# Enter text
fromseleniumimportwebdriverfromselenium.webdriver.common.byimportByimportpytestdeftest_interactions():# Initialize WebDriverdriver=webdriver.Chrome()driver.implicitly_wait(0.5)# Navigate to URLdriver.get("https://www.selenium.dev/selenium/web/inputs.html")# Click on the checkboxcheck_input=driver.find_element(By.NAME,"checkbox_input")check_input.click()is_checked=check_input.is_selected()assertis_checked==False# Handle the email input fieldemail_input=driver.find_element(By.NAME,"email_input")email_input.clear()# Clear fieldemail="admin@localhost.dev"email_input.send_keys(email)# Enter text# Verify inputdata=email_input.get_attribute("value")assertdata==email# Clear the email input field againemail_input.clear()data=email_input.get_attribute("value")assertdata==""# Quit the driverdriver.quit()
//SendKeys// Clear field to empty it from any previous dataIWebElementemailInput=driver.FindElement(By.Name("email_input"));emailInput.Clear();//Enter TextStringemail="admin@localhost.dev";emailInput.SendKeys(email);
usingSystem;usingMicrosoft.VisualStudio.TestTools.UnitTesting;usingOpenQA.Selenium;usingOpenQA.Selenium.Chrome;namespaceSeleniumDocs.Elements{ [TestClass]publicclassInteractionTest{ [TestMethod]publicvoidTestInteractionCommands(){IWebDriverdriver=newChromeDriver();driver.Manage().Timeouts().ImplicitWait=TimeSpan.FromMilliseconds(500);// Navigate to Urldriver.Navigate().GoToUrl("https://www.selenium.dev/selenium/web/inputs.html");// Click on the element IWebElementcheckInput=driver.FindElement(By.Name("checkbox_input"));checkInput.Click();//VerifyBooleanisChecked=checkInput.Selected;Assert.AreEqual(isChecked,false);//SendKeys// Clear field to empty it from any previous dataIWebElementemailInput=driver.FindElement(By.Name("email_input"));emailInput.Clear();//Enter TextStringemail="admin@localhost.dev";emailInput.SendKeys(email);//VerifyStringdata=emailInput.GetAttribute("value");Assert.AreEqual(data,email);//Clear Element// Clear field to empty it from any previous dataemailInput.Clear();data=emailInput.GetAttribute("value");//VerifyAssert.AreEqual(data,"");//Quit the browserdriver.Quit();}}}
# frozen_string_literal: truerequire'spec_helper'RSpec.describe'Element Interaction'dolet(:driver){start_session}before{driver.get'https://www.selenium.dev/selenium/web/inputs.html'}it'clicks an element'dodriver.find_element(name:'color_input').clickendit'clears and send keys to an element'dodriver.find_element(name:'email_input').cleardriver.find_element(name:'email_input').send_keys'admin@localhost.dev'endend
const{By,Browser,Builder}=require('selenium-webdriver');constassert=require("node:assert");describe('Element Interactions',function(){letdriver;before(asyncfunction(){driver=newBuilder().forBrowser(Browser.CHROME).build();});after(async()=>awaitdriver.quit());it('should Clear input and send keys into input field',asyncfunction(){try{awaitdriver.get('https://www.selenium.dev/selenium/web/inputs.html');letinputField=awaitdriver.findElement(By.name('no_type'));awaitinputField.clear();awaitinputField.sendKeys('Selenium');consttext=awaitinputField.getAttribute('value');assert.strictEqual(text,"Selenium");}catch(e){console.log(e)}});});
// Navigate to Url
driver.get("https://www.selenium.dev/selenium/web/inputs.html")//Clear field to empty it from any previous data
driver.findElement(By.name("email_input")).clear()// Enter text
driver.findElement(By.name("email_input")).sendKeys("admin@localhost.dev")
packagedev.selenium.elements;importorg.junit.jupiter.api.Test;importorg.openqa.selenium.By;importorg.openqa.selenium.WebDriver;importorg.openqa.selenium.WebElement;importorg.openqa.selenium.chrome.ChromeDriver;importjava.time.Duration;import staticorg.junit.jupiter.api.Assertions.assertEquals;publicclassInteractionTest{@TestpublicvoidinteractWithElements(){WebDriverdriver=newChromeDriver();driver.manage().timeouts().implicitlyWait(Duration.ofMillis(500));// Navigate to Urldriver.get("https://www.selenium.dev/selenium/web/inputs.html");// Click on the element WebElementcheckInput=driver.findElement(By.name("checkbox_input"));checkInput.click();BooleanisChecked=checkInput.isSelected();assertEquals(isChecked,false);//SendKeys// Clear field to empty it from any previous dataWebElementemailInput=driver.findElement(By.name("email_input"));emailInput.clear();//Enter TextStringemail="admin@localhost.dev";emailInput.sendKeys(email);//VerifyStringdata=emailInput.getAttribute("value");assertEquals(data,email);//Clear Element// Clear field to empty it from any previous dataemailInput.clear();data=emailInput.getAttribute("value");assertEquals(data,"");driver.quit();}}
fromseleniumimportwebdriverfromselenium.webdriver.common.byimportByimportpytestdeftest_interactions():# Initialize WebDriverdriver=webdriver.Chrome()driver.implicitly_wait(0.5)# Navigate to URLdriver.get("https://www.selenium.dev/selenium/web/inputs.html")# Click on the checkboxcheck_input=driver.find_element(By.NAME,"checkbox_input")check_input.click()is_checked=check_input.is_selected()assertis_checked==False# Handle the email input fieldemail_input=driver.find_element(By.NAME,"email_input")email_input.clear()# Clear fieldemail="admin@localhost.dev"email_input.send_keys(email)# Enter text# Verify inputdata=email_input.get_attribute("value")assertdata==email# Clear the email input field againemail_input.clear()data=email_input.get_attribute("value")assertdata==""# Quit the driverdriver.quit()
//Clear Element// Clear field to empty it from any previous dataemailInput.Clear();data=emailInput.GetAttribute("value");
usingSystem;usingMicrosoft.VisualStudio.TestTools.UnitTesting;usingOpenQA.Selenium;usingOpenQA.Selenium.Chrome;namespaceSeleniumDocs.Elements{ [TestClass]publicclassInteractionTest{ [TestMethod]publicvoidTestInteractionCommands(){IWebDriverdriver=newChromeDriver();driver.Manage().Timeouts().ImplicitWait=TimeSpan.FromMilliseconds(500);// Navigate to Urldriver.Navigate().GoToUrl("https://www.selenium.dev/selenium/web/inputs.html");// Click on the element IWebElementcheckInput=driver.FindElement(By.Name("checkbox_input"));checkInput.Click();//VerifyBooleanisChecked=checkInput.Selected;Assert.AreEqual(isChecked,false);//SendKeys// Clear field to empty it from any previous dataIWebElementemailInput=driver.FindElement(By.Name("email_input"));emailInput.Clear();//Enter TextStringemail="admin@localhost.dev";emailInput.SendKeys(email);//VerifyStringdata=emailInput.GetAttribute("value");Assert.AreEqual(data,email);//Clear Element// Clear field to empty it from any previous dataemailInput.Clear();data=emailInput.GetAttribute("value");//VerifyAssert.AreEqual(data,"");//Quit the browserdriver.Quit();}}}
# frozen_string_literal: truerequire'spec_helper'RSpec.describe'Element Interaction'dolet(:driver){start_session}before{driver.get'https://www.selenium.dev/selenium/web/inputs.html'}it'clicks an element'dodriver.find_element(name:'color_input').clickendit'clears and send keys to an element'dodriver.find_element(name:'email_input').cleardriver.find_element(name:'email_input').send_keys'admin@localhost.dev'endend
const{By,Browser,Builder}=require('selenium-webdriver');constassert=require("node:assert");describe('Element Interactions',function(){letdriver;before(asyncfunction(){driver=newBuilder().forBrowser(Browser.CHROME).build();});after(async()=>awaitdriver.quit());it('should Clear input and send keys into input field',asyncfunction(){try{awaitdriver.get('https://www.selenium.dev/selenium/web/inputs.html');letinputField=awaitdriver.findElement(By.name('no_type'));awaitinputField.clear();awaitinputField.sendKeys('Selenium');consttext=awaitinputField.getAttribute('value');assert.strictEqual(text,"Selenium");}catch(e){console.log(e)}});});
// Navigate to Url
driver.get("https://www.selenium.dev/selenium/web/inputs.html")//Clear field to empty it from any previous data
driver.findElement(By.name("email_input")).clear()
To work on a web element using Selenium, we need to first locate it on the web page.
Selenium provides us above mentioned ways, using which we can locate element on the
page. To understand and create locator we will use the following HTML snippet.
<html><body><style>.information{background-color:white;color:black;padding:10px;}</style><h2>Contact Selenium</h2><form><inputtype="radio"name="gender"value="m"/>Male <inputtype="radio"name="gender"value="f"/>Female <br><br><labelfor="fname">First name:</label><br><inputclass="information"type="text"id="fname"name="fname"value="Jane"><br><br><labelfor="lname">Last name:</label><br><inputclass="information"type="text"id="lname"name="lname"value="Doe"><br><br><labelfor="newsletter">Newsletter:</label><inputtype="checkbox"name="newsletter"value="1"/><br><br><inputtype="submit"value="Submit"></form><p>To know more about Selenium, visit the official page
<ahref ="www.selenium.dev">Selenium Official Page</a></p></body></html>
class name
The HTML page web element can have attribute class. We can see an example in the
above shown HTML snippet. We can identify these elements using the class name locator
available in Selenium.
importpytestfromseleniumimportwebdriverfromselenium.webdriver.common.byimportBydeftest_class_name():driver=webdriver.Chrome()driver.get("https://www.selenium.dev/selenium/web/locators_tests/locators.html")element=driver.find_element(By.CLASS_NAME,"information")assertelementisnotNoneassertelement.tag_name=="input"driver.quit()deftest_css_selector(driver):driver=webdriver.Chrome()driver.get("https://www.selenium.dev/selenium/web/locators_tests/locators.html")element=driver.find_element(By.CSS_SELECTOR,"#fname")assertelementisnotNoneassertelement.get_attribute("value")=="Jane"driver.quit()deftest_id(driver):driver=webdriver.Chrome()driver.get("https://www.selenium.dev/selenium/web/locators_tests/locators.html")element=driver.find_element(By.ID,"lname")assertelementisnotNoneassertelement.get_attribute("value")=="Doe"driver.quit()deftest_name(driver):driver=webdriver.Chrome()driver.get("https://www.selenium.dev/selenium/web/locators_tests/locators.html")element=driver.find_element(By.NAME,"newsletter")assertelementisnotNoneassertelement.tag_name=="input"driver.quit()deftest_link_text(driver):driver=webdriver.Chrome()driver.get("https://www.selenium.dev/selenium/web/locators_tests/locators.html")element=driver.find_element(By.LINK_TEXT,"Selenium Official Page")assertelementisnotNoneassertelement.get_attribute("href")=="https://www.selenium.dev/"driver.quit()deftest_partial_link_text(driver):driver=webdriver.Chrome()driver.get("https://www.selenium.dev/selenium/web/locators_tests/locators.html")element=driver.find_element(By.PARTIAL_LINK_TEXT,"Official Page")assertelementisnotNoneassertelement.get_attribute("href")=="https://www.selenium.dev/"driver.quit()deftest_tag_name(driver):driver=webdriver.Chrome()driver.get("https://www.selenium.dev/selenium/web/locators_tests/locators.html")element=driver.find_element(By.TAG_NAME,"a")assertelementisnotNoneassertelement.get_attribute("href")=="https://www.selenium.dev/"driver.quit()deftest_xpath(driver):driver=webdriver.Chrome()driver.get("https://www.selenium.dev/selenium/web/locators_tests/locators.html")element=driver.find_element(By.XPATH,"//input[@value='f']")assertelementisnotNoneassertelement.get_attribute("type")=="radio"driver.quit()
# frozen_string_literal: truerequire'spec_helper'RSpec.describe'Element Locators',skip:'These are reference following the documentation example'doit'finds element by class name'dodriver.find_element(class:'information')endit'finds element by css selector'dodriver.find_element(css:'#fname')endit'finds element by id'dodriver.find_element(id:'lname')endit'find element by name'dodriver.find_element(name:'newsletter')endit'finds element by link text'dodriver.find_element(link_text:'Selenium Official Page')endit'finds element by partial link text'dodriver.find_element(partial_link_text:'Official Page')endit'finds element by tag name'dodriver.find_element(tag_name:'a')endit'finds element by xpath'dodriver.find_element(xpath:"//input[@value='f']")endcontext'with relative locators'doit'finds element above'dodriver.find_element({relative:{tag_name:'input',above:{id:'password'}}})endit'finds element below'dodriver.find_element({relative:{tag_name:'input',below:{id:'email'}}})endit'finds element to the left'dodriver.find_element({relative:{tag_name:'button',left:{id:'submit'}}})endit'finds element to the right'dodriver.find_element({relative:{tag_name:'button',right:{id:'cancel'}}})endit'finds near element'dodriver.find_element({relative:{tag_name:'input',near:{id:'lbl-email'}}})endit'chains relative locators'dodriver.find_element({relative:{tag_name:'button',below:{id:'email'},right:{id:'cancel'}}})endendend
CSS is the language used to style HTML pages. We can use css selector locator strategy
to identify the element on the page. If the element has an id, we create the locator
as css = #id. Otherwise the format we follow is css =[attribute=value] .
Let us see an example from above HTML snippet. We will create locator for First Name
textbox, using css.
importpytestfromseleniumimportwebdriverfromselenium.webdriver.common.byimportBydeftest_class_name():driver=webdriver.Chrome()driver.get("https://www.selenium.dev/selenium/web/locators_tests/locators.html")element=driver.find_element(By.CLASS_NAME,"information")assertelementisnotNoneassertelement.tag_name=="input"driver.quit()deftest_css_selector(driver):driver=webdriver.Chrome()driver.get("https://www.selenium.dev/selenium/web/locators_tests/locators.html")element=driver.find_element(By.CSS_SELECTOR,"#fname")assertelementisnotNoneassertelement.get_attribute("value")=="Jane"driver.quit()deftest_id(driver):driver=webdriver.Chrome()driver.get("https://www.selenium.dev/selenium/web/locators_tests/locators.html")element=driver.find_element(By.ID,"lname")assertelementisnotNoneassertelement.get_attribute("value")=="Doe"driver.quit()deftest_name(driver):driver=webdriver.Chrome()driver.get("https://www.selenium.dev/selenium/web/locators_tests/locators.html")element=driver.find_element(By.NAME,"newsletter")assertelementisnotNoneassertelement.tag_name=="input"driver.quit()deftest_link_text(driver):driver=webdriver.Chrome()driver.get("https://www.selenium.dev/selenium/web/locators_tests/locators.html")element=driver.find_element(By.LINK_TEXT,"Selenium Official Page")assertelementisnotNoneassertelement.get_attribute("href")=="https://www.selenium.dev/"driver.quit()deftest_partial_link_text(driver):driver=webdriver.Chrome()driver.get("https://www.selenium.dev/selenium/web/locators_tests/locators.html")element=driver.find_element(By.PARTIAL_LINK_TEXT,"Official Page")assertelementisnotNoneassertelement.get_attribute("href")=="https://www.selenium.dev/"driver.quit()deftest_tag_name(driver):driver=webdriver.Chrome()driver.get("https://www.selenium.dev/selenium/web/locators_tests/locators.html")element=driver.find_element(By.TAG_NAME,"a")assertelementisnotNoneassertelement.get_attribute("href")=="https://www.selenium.dev/"driver.quit()deftest_xpath(driver):driver=webdriver.Chrome()driver.get("https://www.selenium.dev/selenium/web/locators_tests/locators.html")element=driver.find_element(By.XPATH,"//input[@value='f']")assertelementisnotNoneassertelement.get_attribute("type")=="radio"driver.quit()
# frozen_string_literal: truerequire'spec_helper'RSpec.describe'Element Locators',skip:'These are reference following the documentation example'doit'finds element by class name'dodriver.find_element(class:'information')endit'finds element by css selector'dodriver.find_element(css:'#fname')endit'finds element by id'dodriver.find_element(id:'lname')endit'find element by name'dodriver.find_element(name:'newsletter')endit'finds element by link text'dodriver.find_element(link_text:'Selenium Official Page')endit'finds element by partial link text'dodriver.find_element(partial_link_text:'Official Page')endit'finds element by tag name'dodriver.find_element(tag_name:'a')endit'finds element by xpath'dodriver.find_element(xpath:"//input[@value='f']")endcontext'with relative locators'doit'finds element above'dodriver.find_element({relative:{tag_name:'input',above:{id:'password'}}})endit'finds element below'dodriver.find_element({relative:{tag_name:'input',below:{id:'email'}}})endit'finds element to the left'dodriver.find_element({relative:{tag_name:'button',left:{id:'submit'}}})endit'finds element to the right'dodriver.find_element({relative:{tag_name:'button',right:{id:'cancel'}}})endit'finds near element'dodriver.find_element({relative:{tag_name:'input',near:{id:'lbl-email'}}})endit'chains relative locators'dodriver.find_element({relative:{tag_name:'button',below:{id:'email'},right:{id:'cancel'}}})endendend
We can use the ID attribute available with element in a web page to locate it.
Generally the ID property should be unique for a element on the web page.
We will identify the Last Name field using it.
importpytestfromseleniumimportwebdriverfromselenium.webdriver.common.byimportBydeftest_class_name():driver=webdriver.Chrome()driver.get("https://www.selenium.dev/selenium/web/locators_tests/locators.html")element=driver.find_element(By.CLASS_NAME,"information")assertelementisnotNoneassertelement.tag_name=="input"driver.quit()deftest_css_selector(driver):driver=webdriver.Chrome()driver.get("https://www.selenium.dev/selenium/web/locators_tests/locators.html")element=driver.find_element(By.CSS_SELECTOR,"#fname")assertelementisnotNoneassertelement.get_attribute("value")=="Jane"driver.quit()deftest_id(driver):driver=webdriver.Chrome()driver.get("https://www.selenium.dev/selenium/web/locators_tests/locators.html")element=driver.find_element(By.ID,"lname")assertelementisnotNoneassertelement.get_attribute("value")=="Doe"driver.quit()deftest_name(driver):driver=webdriver.Chrome()driver.get("https://www.selenium.dev/selenium/web/locators_tests/locators.html")element=driver.find_element(By.NAME,"newsletter")assertelementisnotNoneassertelement.tag_name=="input"driver.quit()deftest_link_text(driver):driver=webdriver.Chrome()driver.get("https://www.selenium.dev/selenium/web/locators_tests/locators.html")element=driver.find_element(By.LINK_TEXT,"Selenium Official Page")assertelementisnotNoneassertelement.get_attribute("href")=="https://www.selenium.dev/"driver.quit()deftest_partial_link_text(driver):driver=webdriver.Chrome()driver.get("https://www.selenium.dev/selenium/web/locators_tests/locators.html")element=driver.find_element(By.PARTIAL_LINK_TEXT,"Official Page")assertelementisnotNoneassertelement.get_attribute("href")=="https://www.selenium.dev/"driver.quit()deftest_tag_name(driver):driver=webdriver.Chrome()driver.get("https://www.selenium.dev/selenium/web/locators_tests/locators.html")element=driver.find_element(By.TAG_NAME,"a")assertelementisnotNoneassertelement.get_attribute("href")=="https://www.selenium.dev/"driver.quit()deftest_xpath(driver):driver=webdriver.Chrome()driver.get("https://www.selenium.dev/selenium/web/locators_tests/locators.html")element=driver.find_element(By.XPATH,"//input[@value='f']")assertelementisnotNoneassertelement.get_attribute("type")=="radio"driver.quit()
# frozen_string_literal: truerequire'spec_helper'RSpec.describe'Element Locators',skip:'These are reference following the documentation example'doit'finds element by class name'dodriver.find_element(class:'information')endit'finds element by css selector'dodriver.find_element(css:'#fname')endit'finds element by id'dodriver.find_element(id:'lname')endit'find element by name'dodriver.find_element(name:'newsletter')endit'finds element by link text'dodriver.find_element(link_text:'Selenium Official Page')endit'finds element by partial link text'dodriver.find_element(partial_link_text:'Official Page')endit'finds element by tag name'dodriver.find_element(tag_name:'a')endit'finds element by xpath'dodriver.find_element(xpath:"//input[@value='f']")endcontext'with relative locators'doit'finds element above'dodriver.find_element({relative:{tag_name:'input',above:{id:'password'}}})endit'finds element below'dodriver.find_element({relative:{tag_name:'input',below:{id:'email'}}})endit'finds element to the left'dodriver.find_element({relative:{tag_name:'button',left:{id:'submit'}}})endit'finds element to the right'dodriver.find_element({relative:{tag_name:'button',right:{id:'cancel'}}})endit'finds near element'dodriver.find_element({relative:{tag_name:'input',near:{id:'lbl-email'}}})endit'chains relative locators'dodriver.find_element({relative:{tag_name:'button',below:{id:'email'},right:{id:'cancel'}}})endendend
We can use the NAME attribute available with element in a web page to locate it.
Generally the NAME property should be unique for a element on the web page.
We will identify the Newsletter checkbox using it.
importpytestfromseleniumimportwebdriverfromselenium.webdriver.common.byimportBydeftest_class_name():driver=webdriver.Chrome()driver.get("https://www.selenium.dev/selenium/web/locators_tests/locators.html")element=driver.find_element(By.CLASS_NAME,"information")assertelementisnotNoneassertelement.tag_name=="input"driver.quit()deftest_css_selector(driver):driver=webdriver.Chrome()driver.get("https://www.selenium.dev/selenium/web/locators_tests/locators.html")element=driver.find_element(By.CSS_SELECTOR,"#fname")assertelementisnotNoneassertelement.get_attribute("value")=="Jane"driver.quit()deftest_id(driver):driver=webdriver.Chrome()driver.get("https://www.selenium.dev/selenium/web/locators_tests/locators.html")element=driver.find_element(By.ID,"lname")assertelementisnotNoneassertelement.get_attribute("value")=="Doe"driver.quit()deftest_name(driver):driver=webdriver.Chrome()driver.get("https://www.selenium.dev/selenium/web/locators_tests/locators.html")element=driver.find_element(By.NAME,"newsletter")assertelementisnotNoneassertelement.tag_name=="input"driver.quit()deftest_link_text(driver):driver=webdriver.Chrome()driver.get("https://www.selenium.dev/selenium/web/locators_tests/locators.html")element=driver.find_element(By.LINK_TEXT,"Selenium Official Page")assertelementisnotNoneassertelement.get_attribute("href")=="https://www.selenium.dev/"driver.quit()deftest_partial_link_text(driver):driver=webdriver.Chrome()driver.get("https://www.selenium.dev/selenium/web/locators_tests/locators.html")element=driver.find_element(By.PARTIAL_LINK_TEXT,"Official Page")assertelementisnotNoneassertelement.get_attribute("href")=="https://www.selenium.dev/"driver.quit()deftest_tag_name(driver):driver=webdriver.Chrome()driver.get("https://www.selenium.dev/selenium/web/locators_tests/locators.html")element=driver.find_element(By.TAG_NAME,"a")assertelementisnotNoneassertelement.get_attribute("href")=="https://www.selenium.dev/"driver.quit()deftest_xpath(driver):driver=webdriver.Chrome()driver.get("https://www.selenium.dev/selenium/web/locators_tests/locators.html")element=driver.find_element(By.XPATH,"//input[@value='f']")assertelementisnotNoneassertelement.get_attribute("type")=="radio"driver.quit()
# frozen_string_literal: truerequire'spec_helper'RSpec.describe'Element Locators',skip:'These are reference following the documentation example'doit'finds element by class name'dodriver.find_element(class:'information')endit'finds element by css selector'dodriver.find_element(css:'#fname')endit'finds element by id'dodriver.find_element(id:'lname')endit'find element by name'dodriver.find_element(name:'newsletter')endit'finds element by link text'dodriver.find_element(link_text:'Selenium Official Page')endit'finds element by partial link text'dodriver.find_element(partial_link_text:'Official Page')endit'finds element by tag name'dodriver.find_element(tag_name:'a')endit'finds element by xpath'dodriver.find_element(xpath:"//input[@value='f']")endcontext'with relative locators'doit'finds element above'dodriver.find_element({relative:{tag_name:'input',above:{id:'password'}}})endit'finds element below'dodriver.find_element({relative:{tag_name:'input',below:{id:'email'}}})endit'finds element to the left'dodriver.find_element({relative:{tag_name:'button',left:{id:'submit'}}})endit'finds element to the right'dodriver.find_element({relative:{tag_name:'button',right:{id:'cancel'}}})endit'finds near element'dodriver.find_element({relative:{tag_name:'input',near:{id:'lbl-email'}}})endit'chains relative locators'dodriver.find_element({relative:{tag_name:'button',below:{id:'email'},right:{id:'cancel'}}})endendend
If the element we want to locate is a link, we can use the link text locator
to identify it on the web page. The link text is the text displayed of the link.
In the HTML snippet shared, we have a link available, lets see how will we locate it.
WebDriverdriver=newChromeDriver();driver.findElement(By.linkText("Selenium Official Page"));
driver=webdriver.Chrome()driver.get("https://www.selenium.dev/selenium/web/locators_tests/locators.html")element=driver.find_element(By.LINK_TEXT,"Selenium Official Page")
importpytestfromseleniumimportwebdriverfromselenium.webdriver.common.byimportBydeftest_class_name():driver=webdriver.Chrome()driver.get("https://www.selenium.dev/selenium/web/locators_tests/locators.html")element=driver.find_element(By.CLASS_NAME,"information")assertelementisnotNoneassertelement.tag_name=="input"driver.quit()deftest_css_selector(driver):driver=webdriver.Chrome()driver.get("https://www.selenium.dev/selenium/web/locators_tests/locators.html")element=driver.find_element(By.CSS_SELECTOR,"#fname")assertelementisnotNoneassertelement.get_attribute("value")=="Jane"driver.quit()deftest_id(driver):driver=webdriver.Chrome()driver.get("https://www.selenium.dev/selenium/web/locators_tests/locators.html")element=driver.find_element(By.ID,"lname")assertelementisnotNoneassertelement.get_attribute("value")=="Doe"driver.quit()deftest_name(driver):driver=webdriver.Chrome()driver.get("https://www.selenium.dev/selenium/web/locators_tests/locators.html")element=driver.find_element(By.NAME,"newsletter")assertelementisnotNoneassertelement.tag_name=="input"driver.quit()deftest_link_text(driver):driver=webdriver.Chrome()driver.get("https://www.selenium.dev/selenium/web/locators_tests/locators.html")element=driver.find_element(By.LINK_TEXT,"Selenium Official Page")assertelementisnotNoneassertelement.get_attribute("href")=="https://www.selenium.dev/"driver.quit()deftest_partial_link_text(driver):driver=webdriver.Chrome()driver.get("https://www.selenium.dev/selenium/web/locators_tests/locators.html")element=driver.find_element(By.PARTIAL_LINK_TEXT,"Official Page")assertelementisnotNoneassertelement.get_attribute("href")=="https://www.selenium.dev/"driver.quit()deftest_tag_name(driver):driver=webdriver.Chrome()driver.get("https://www.selenium.dev/selenium/web/locators_tests/locators.html")element=driver.find_element(By.TAG_NAME,"a")assertelementisnotNoneassertelement.get_attribute("href")=="https://www.selenium.dev/"driver.quit()deftest_xpath(driver):driver=webdriver.Chrome()driver.get("https://www.selenium.dev/selenium/web/locators_tests/locators.html")element=driver.find_element(By.XPATH,"//input[@value='f']")assertelementisnotNoneassertelement.get_attribute("type")=="radio"driver.quit()
vardriver=newChromeDriver();driver.FindElement(By.LinkText("Selenium Official Page"));
driver.find_element(link_text:'Selenium Official Page')
# frozen_string_literal: truerequire'spec_helper'RSpec.describe'Element Locators',skip:'These are reference following the documentation example'doit'finds element by class name'dodriver.find_element(class:'information')endit'finds element by css selector'dodriver.find_element(css:'#fname')endit'finds element by id'dodriver.find_element(id:'lname')endit'find element by name'dodriver.find_element(name:'newsletter')endit'finds element by link text'dodriver.find_element(link_text:'Selenium Official Page')endit'finds element by partial link text'dodriver.find_element(partial_link_text:'Official Page')endit'finds element by tag name'dodriver.find_element(tag_name:'a')endit'finds element by xpath'dodriver.find_element(xpath:"//input[@value='f']")endcontext'with relative locators'doit'finds element above'dodriver.find_element({relative:{tag_name:'input',above:{id:'password'}}})endit'finds element below'dodriver.find_element({relative:{tag_name:'input',below:{id:'email'}}})endit'finds element to the left'dodriver.find_element({relative:{tag_name:'button',left:{id:'submit'}}})endit'finds element to the right'dodriver.find_element({relative:{tag_name:'button',right:{id:'cancel'}}})endit'finds near element'dodriver.find_element({relative:{tag_name:'input',near:{id:'lbl-email'}}})endit'chains relative locators'dodriver.find_element({relative:{tag_name:'button',below:{id:'email'},right:{id:'cancel'}}})endendend
letdriver=awaitnewBuilder().forBrowser('chrome').build();constloc=awaitdriver.findElement(By.linkText('Selenium Official Page'));
valdriver=ChromeDriver()valloc:WebElement=driver.findElement(By.linkText("Selenium Official Page"))
partial link text
If the element we want to locate is a link, we can use the partial link text locator
to identify it on the web page. The link text is the text displayed of the link.
We can pass partial text as value.
In the HTML snippet shared, we have a link available, lets see how will we locate it.
importpytestfromseleniumimportwebdriverfromselenium.webdriver.common.byimportBydeftest_class_name():driver=webdriver.Chrome()driver.get("https://www.selenium.dev/selenium/web/locators_tests/locators.html")element=driver.find_element(By.CLASS_NAME,"information")assertelementisnotNoneassertelement.tag_name=="input"driver.quit()deftest_css_selector(driver):driver=webdriver.Chrome()driver.get("https://www.selenium.dev/selenium/web/locators_tests/locators.html")element=driver.find_element(By.CSS_SELECTOR,"#fname")assertelementisnotNoneassertelement.get_attribute("value")=="Jane"driver.quit()deftest_id(driver):driver=webdriver.Chrome()driver.get("https://www.selenium.dev/selenium/web/locators_tests/locators.html")element=driver.find_element(By.ID,"lname")assertelementisnotNoneassertelement.get_attribute("value")=="Doe"driver.quit()deftest_name(driver):driver=webdriver.Chrome()driver.get("https://www.selenium.dev/selenium/web/locators_tests/locators.html")element=driver.find_element(By.NAME,"newsletter")assertelementisnotNoneassertelement.tag_name=="input"driver.quit()deftest_link_text(driver):driver=webdriver.Chrome()driver.get("https://www.selenium.dev/selenium/web/locators_tests/locators.html")element=driver.find_element(By.LINK_TEXT,"Selenium Official Page")assertelementisnotNoneassertelement.get_attribute("href")=="https://www.selenium.dev/"driver.quit()deftest_partial_link_text(driver):driver=webdriver.Chrome()driver.get("https://www.selenium.dev/selenium/web/locators_tests/locators.html")element=driver.find_element(By.PARTIAL_LINK_TEXT,"Official Page")assertelementisnotNoneassertelement.get_attribute("href")=="https://www.selenium.dev/"driver.quit()deftest_tag_name(driver):driver=webdriver.Chrome()driver.get("https://www.selenium.dev/selenium/web/locators_tests/locators.html")element=driver.find_element(By.TAG_NAME,"a")assertelementisnotNoneassertelement.get_attribute("href")=="https://www.selenium.dev/"driver.quit()deftest_xpath(driver):driver=webdriver.Chrome()driver.get("https://www.selenium.dev/selenium/web/locators_tests/locators.html")element=driver.find_element(By.XPATH,"//input[@value='f']")assertelementisnotNoneassertelement.get_attribute("type")=="radio"driver.quit()
# frozen_string_literal: truerequire'spec_helper'RSpec.describe'Element Locators',skip:'These are reference following the documentation example'doit'finds element by class name'dodriver.find_element(class:'information')endit'finds element by css selector'dodriver.find_element(css:'#fname')endit'finds element by id'dodriver.find_element(id:'lname')endit'find element by name'dodriver.find_element(name:'newsletter')endit'finds element by link text'dodriver.find_element(link_text:'Selenium Official Page')endit'finds element by partial link text'dodriver.find_element(partial_link_text:'Official Page')endit'finds element by tag name'dodriver.find_element(tag_name:'a')endit'finds element by xpath'dodriver.find_element(xpath:"//input[@value='f']")endcontext'with relative locators'doit'finds element above'dodriver.find_element({relative:{tag_name:'input',above:{id:'password'}}})endit'finds element below'dodriver.find_element({relative:{tag_name:'input',below:{id:'email'}}})endit'finds element to the left'dodriver.find_element({relative:{tag_name:'button',left:{id:'submit'}}})endit'finds element to the right'dodriver.find_element({relative:{tag_name:'button',right:{id:'cancel'}}})endit'finds near element'dodriver.find_element({relative:{tag_name:'input',near:{id:'lbl-email'}}})endit'chains relative locators'dodriver.find_element({relative:{tag_name:'button',below:{id:'email'},right:{id:'cancel'}}})endendend
We can use the HTML TAG itself as a locator to identify the web element on the page.
From the above HTML snippet shared, lets identify the link, using its html tag “a”.
importpytestfromseleniumimportwebdriverfromselenium.webdriver.common.byimportBydeftest_class_name():driver=webdriver.Chrome()driver.get("https://www.selenium.dev/selenium/web/locators_tests/locators.html")element=driver.find_element(By.CLASS_NAME,"information")assertelementisnotNoneassertelement.tag_name=="input"driver.quit()deftest_css_selector(driver):driver=webdriver.Chrome()driver.get("https://www.selenium.dev/selenium/web/locators_tests/locators.html")element=driver.find_element(By.CSS_SELECTOR,"#fname")assertelementisnotNoneassertelement.get_attribute("value")=="Jane"driver.quit()deftest_id(driver):driver=webdriver.Chrome()driver.get("https://www.selenium.dev/selenium/web/locators_tests/locators.html")element=driver.find_element(By.ID,"lname")assertelementisnotNoneassertelement.get_attribute("value")=="Doe"driver.quit()deftest_name(driver):driver=webdriver.Chrome()driver.get("https://www.selenium.dev/selenium/web/locators_tests/locators.html")element=driver.find_element(By.NAME,"newsletter")assertelementisnotNoneassertelement.tag_name=="input"driver.quit()deftest_link_text(driver):driver=webdriver.Chrome()driver.get("https://www.selenium.dev/selenium/web/locators_tests/locators.html")element=driver.find_element(By.LINK_TEXT,"Selenium Official Page")assertelementisnotNoneassertelement.get_attribute("href")=="https://www.selenium.dev/"driver.quit()deftest_partial_link_text(driver):driver=webdriver.Chrome()driver.get("https://www.selenium.dev/selenium/web/locators_tests/locators.html")element=driver.find_element(By.PARTIAL_LINK_TEXT,"Official Page")assertelementisnotNoneassertelement.get_attribute("href")=="https://www.selenium.dev/"driver.quit()deftest_tag_name(driver):driver=webdriver.Chrome()driver.get("https://www.selenium.dev/selenium/web/locators_tests/locators.html")element=driver.find_element(By.TAG_NAME,"a")assertelementisnotNoneassertelement.get_attribute("href")=="https://www.selenium.dev/"driver.quit()deftest_xpath(driver):driver=webdriver.Chrome()driver.get("https://www.selenium.dev/selenium/web/locators_tests/locators.html")element=driver.find_element(By.XPATH,"//input[@value='f']")assertelementisnotNoneassertelement.get_attribute("type")=="radio"driver.quit()
# frozen_string_literal: truerequire'spec_helper'RSpec.describe'Element Locators',skip:'These are reference following the documentation example'doit'finds element by class name'dodriver.find_element(class:'information')endit'finds element by css selector'dodriver.find_element(css:'#fname')endit'finds element by id'dodriver.find_element(id:'lname')endit'find element by name'dodriver.find_element(name:'newsletter')endit'finds element by link text'dodriver.find_element(link_text:'Selenium Official Page')endit'finds element by partial link text'dodriver.find_element(partial_link_text:'Official Page')endit'finds element by tag name'dodriver.find_element(tag_name:'a')endit'finds element by xpath'dodriver.find_element(xpath:"//input[@value='f']")endcontext'with relative locators'doit'finds element above'dodriver.find_element({relative:{tag_name:'input',above:{id:'password'}}})endit'finds element below'dodriver.find_element({relative:{tag_name:'input',below:{id:'email'}}})endit'finds element to the left'dodriver.find_element({relative:{tag_name:'button',left:{id:'submit'}}})endit'finds element to the right'dodriver.find_element({relative:{tag_name:'button',right:{id:'cancel'}}})endit'finds near element'dodriver.find_element({relative:{tag_name:'input',near:{id:'lbl-email'}}})endit'chains relative locators'dodriver.find_element({relative:{tag_name:'button',below:{id:'email'},right:{id:'cancel'}}})endendend
A HTML document can be considered as a XML document, and then we can use xpath
which will be the path traversed to reach the element of interest to locate the element.
The XPath could be absolute xpath, which is created from the root of the document.
Example - /html/form/input[1]. This will return the male radio button.
Or the xpath could be relative. Example- //input[@name=‘fname’]. This will return the
first name text box. Let us create locator for female radio button using xpath.
importpytestfromseleniumimportwebdriverfromselenium.webdriver.common.byimportBydeftest_class_name():driver=webdriver.Chrome()driver.get("https://www.selenium.dev/selenium/web/locators_tests/locators.html")element=driver.find_element(By.CLASS_NAME,"information")assertelementisnotNoneassertelement.tag_name=="input"driver.quit()deftest_css_selector(driver):driver=webdriver.Chrome()driver.get("https://www.selenium.dev/selenium/web/locators_tests/locators.html")element=driver.find_element(By.CSS_SELECTOR,"#fname")assertelementisnotNoneassertelement.get_attribute("value")=="Jane"driver.quit()deftest_id(driver):driver=webdriver.Chrome()driver.get("https://www.selenium.dev/selenium/web/locators_tests/locators.html")element=driver.find_element(By.ID,"lname")assertelementisnotNoneassertelement.get_attribute("value")=="Doe"driver.quit()deftest_name(driver):driver=webdriver.Chrome()driver.get("https://www.selenium.dev/selenium/web/locators_tests/locators.html")element=driver.find_element(By.NAME,"newsletter")assertelementisnotNoneassertelement.tag_name=="input"driver.quit()deftest_link_text(driver):driver=webdriver.Chrome()driver.get("https://www.selenium.dev/selenium/web/locators_tests/locators.html")element=driver.find_element(By.LINK_TEXT,"Selenium Official Page")assertelementisnotNoneassertelement.get_attribute("href")=="https://www.selenium.dev/"driver.quit()deftest_partial_link_text(driver):driver=webdriver.Chrome()driver.get("https://www.selenium.dev/selenium/web/locators_tests/locators.html")element=driver.find_element(By.PARTIAL_LINK_TEXT,"Official Page")assertelementisnotNoneassertelement.get_attribute("href")=="https://www.selenium.dev/"driver.quit()deftest_tag_name(driver):driver=webdriver.Chrome()driver.get("https://www.selenium.dev/selenium/web/locators_tests/locators.html")element=driver.find_element(By.TAG_NAME,"a")assertelementisnotNoneassertelement.get_attribute("href")=="https://www.selenium.dev/"driver.quit()deftest_xpath(driver):driver=webdriver.Chrome()driver.get("https://www.selenium.dev/selenium/web/locators_tests/locators.html")element=driver.find_element(By.XPATH,"//input[@value='f']")assertelementisnotNoneassertelement.get_attribute("type")=="radio"driver.quit()
# frozen_string_literal: truerequire'spec_helper'RSpec.describe'Element Locators',skip:'These are reference following the documentation example'doit'finds element by class name'dodriver.find_element(class:'information')endit'finds element by css selector'dodriver.find_element(css:'#fname')endit'finds element by id'dodriver.find_element(id:'lname')endit'find element by name'dodriver.find_element(name:'newsletter')endit'finds element by link text'dodriver.find_element(link_text:'Selenium Official Page')endit'finds element by partial link text'dodriver.find_element(partial_link_text:'Official Page')endit'finds element by tag name'dodriver.find_element(tag_name:'a')endit'finds element by xpath'dodriver.find_element(xpath:"//input[@value='f']")endcontext'with relative locators'doit'finds element above'dodriver.find_element({relative:{tag_name:'input',above:{id:'password'}}})endit'finds element below'dodriver.find_element({relative:{tag_name:'input',below:{id:'email'}}})endit'finds element to the left'dodriver.find_element({relative:{tag_name:'button',left:{id:'submit'}}})endit'finds element to the right'dodriver.find_element({relative:{tag_name:'button',right:{id:'cancel'}}})endit'finds near element'dodriver.find_element({relative:{tag_name:'input',near:{id:'lbl-email'}}})endit'chains relative locators'dodriver.find_element({relative:{tag_name:'button',below:{id:'email'},right:{id:'cancel'}}})endendend
The FindElement makes using locators a breeze! For most languages,
all you need to do is utilize webdriver.common.by.By, however in
others it’s as simple as setting a parameter in the FindElement function
# frozen_string_literal: truerequire'spec_helper'RSpec.describe'Element Locators',skip:'These are reference following the documentation example'doit'finds element by class name'dodriver.find_element(class:'information')endit'finds element by css selector'dodriver.find_element(css:'#fname')endit'finds element by id'dodriver.find_element(id:'lname')endit'find element by name'dodriver.find_element(name:'newsletter')endit'finds element by link text'dodriver.find_element(link_text:'Selenium Official Page')endit'finds element by partial link text'dodriver.find_element(partial_link_text:'Official Page')endit'finds element by tag name'dodriver.find_element(tag_name:'a')endit'finds element by xpath'dodriver.find_element(xpath:"//input[@value='f']")endcontext'with relative locators'doit'finds element above'dodriver.find_element({relative:{tag_name:'input',above:{id:'password'}}})endit'finds element below'dodriver.find_element({relative:{tag_name:'input',below:{id:'email'}}})endit'finds element to the left'dodriver.find_element({relative:{tag_name:'button',left:{id:'submit'}}})endit'finds element to the right'dodriver.find_element({relative:{tag_name:'button',right:{id:'cancel'}}})endit'finds near element'dodriver.find_element({relative:{tag_name:'input',near:{id:'lbl-email'}}})endit'chains relative locators'dodriver.find_element({relative:{tag_name:'button',below:{id:'email'},right:{id:'cancel'}}})endendend
The ByChained class enables you to chain two By locators together. For example,
instead of having to locate a parent element, and then a child element of that parent,
you can instead combine those two FindElement functions into one.
packagedev.selenium.elements;importorg.openqa.selenium.By;importorg.openqa.selenium.support.pagefactory.ByAll;importorg.openqa.selenium.support.pagefactory.ByChained;importdev.selenium.BaseTest;importjava.util.List;importorg.openqa.selenium.WebDriver;importorg.openqa.selenium.WebElement;importorg.openqa.selenium.chrome.ChromeDriver;publicclassLocatorsTestextendsBaseTest{publicvoidByAllTest(){// Create instance of ChromeDriverWebDriverdriver=newChromeDriver();// Navigate to Urldriver.get("https://www.selenium.dev/selenium/web/login.html");// get both loginsByexample=newByAll(By.id("password-field"),By.id("username-field"));List<WebElement>login_inputs=driver.findElements(example);//send them both inputlogin_inputs.get(0).sendKeys("username");login_inputs.get(1).sendKeys("password");}publicStringByChainedTest(){// Create instance of ChromeDriverWebDriverdriver=newChromeDriver();// Navigate to Urldriver.get("https://www.selenium.dev/selenium/web/login.html");// Find username-field inside of login-formByexample=newByChained(By.id("login-form"),By.id("username-field"));WebElementusername_input=driver.findElement(example);//return placeholder textStringplaceholder=username_input.getAttribute("placeholder");returnplaceholder;}}
The ByAll class enables you to utilize two By locators at once, finding elements that mach either of your By locators.
For example, instead of having to utilize two FindElement() functions to find the username and password input fields
seperately, you can instead find them together in one clean FindElements()
packagedev.selenium.elements;importorg.openqa.selenium.By;importorg.openqa.selenium.support.pagefactory.ByAll;importorg.openqa.selenium.support.pagefactory.ByChained;importdev.selenium.BaseTest;importjava.util.List;importorg.openqa.selenium.WebDriver;importorg.openqa.selenium.WebElement;importorg.openqa.selenium.chrome.ChromeDriver;publicclassLocatorsTestextendsBaseTest{publicvoidByAllTest(){// Create instance of ChromeDriverWebDriverdriver=newChromeDriver();// Navigate to Urldriver.get("https://www.selenium.dev/selenium/web/login.html");// get both loginsByexample=newByAll(By.id("password-field"),By.id("username-field"));List<WebElement>login_inputs=driver.findElements(example);//send them both inputlogin_inputs.get(0).sendKeys("username");login_inputs.get(1).sendKeys("password");}publicStringByChainedTest(){// Create instance of ChromeDriverWebDriverdriver=newChromeDriver();// Navigate to Urldriver.get("https://www.selenium.dev/selenium/web/login.html");// Find username-field inside of login-formByexample=newByChained(By.id("login-form"),By.id("username-field"));WebElementusername_input=driver.findElement(example);//return placeholder textStringplaceholder=username_input.getAttribute("placeholder");returnplaceholder;}}
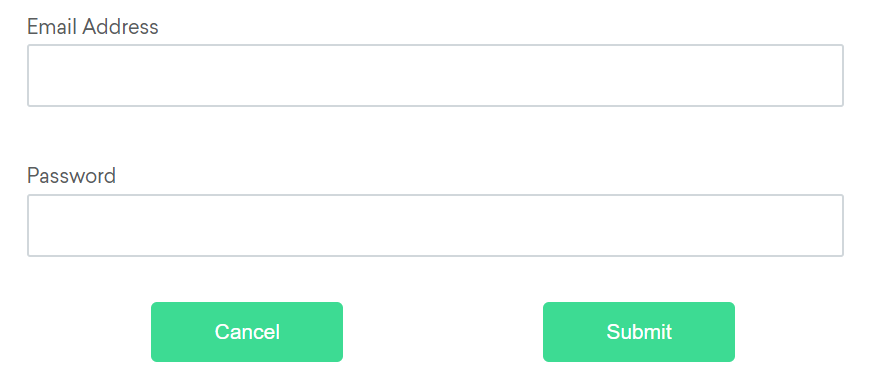
Selenium 4 introduces Relative Locators (previously
called as Friendly Locators). These locators are helpful when it is not easy to construct a locator for
the desired element, but easy to describe spatially where the element is in relation to an element that does have
an easily constructed locator.
How it works
Selenium uses the JavaScript function
getBoundingClientRect()
to determine the size and position of elements on the page, and can use this information to locate neighboring elements. find the relative elements.
Relative locator methods can take as the argument for the point of origin, either a previously located element reference,
or another locator. In these examples we’ll be using locators only, but you could swap the locator in the final method with
an element object and it will work the same.
Let us consider the below example for understanding the relative locators.
Available relative locators
Above
If the email text field element is not easily identifiable for some reason, but the password text field element is,
we can locate the text field element using the fact that it is an “input” element “above” the password element.
# frozen_string_literal: truerequire'spec_helper'RSpec.describe'Element Locators',skip:'These are reference following the documentation example'doit'finds element by class name'dodriver.find_element(class:'information')endit'finds element by css selector'dodriver.find_element(css:'#fname')endit'finds element by id'dodriver.find_element(id:'lname')endit'find element by name'dodriver.find_element(name:'newsletter')endit'finds element by link text'dodriver.find_element(link_text:'Selenium Official Page')endit'finds element by partial link text'dodriver.find_element(partial_link_text:'Official Page')endit'finds element by tag name'dodriver.find_element(tag_name:'a')endit'finds element by xpath'dodriver.find_element(xpath:"//input[@value='f']")endcontext'with relative locators'doit'finds element above'dodriver.find_element({relative:{tag_name:'input',above:{id:'password'}}})endit'finds element below'dodriver.find_element({relative:{tag_name:'input',below:{id:'email'}}})endit'finds element to the left'dodriver.find_element({relative:{tag_name:'button',left:{id:'submit'}}})endit'finds element to the right'dodriver.find_element({relative:{tag_name:'button',right:{id:'cancel'}}})endit'finds near element'dodriver.find_element({relative:{tag_name:'input',near:{id:'lbl-email'}}})endit'chains relative locators'dodriver.find_element({relative:{tag_name:'button',below:{id:'email'},right:{id:'cancel'}}})endendend
If the password text field element is not easily identifiable for some reason, but the email text field element is,
we can locate the text field element using the fact that it is an “input” element “below” the email element.
# frozen_string_literal: truerequire'spec_helper'RSpec.describe'Element Locators',skip:'These are reference following the documentation example'doit'finds element by class name'dodriver.find_element(class:'information')endit'finds element by css selector'dodriver.find_element(css:'#fname')endit'finds element by id'dodriver.find_element(id:'lname')endit'find element by name'dodriver.find_element(name:'newsletter')endit'finds element by link text'dodriver.find_element(link_text:'Selenium Official Page')endit'finds element by partial link text'dodriver.find_element(partial_link_text:'Official Page')endit'finds element by tag name'dodriver.find_element(tag_name:'a')endit'finds element by xpath'dodriver.find_element(xpath:"//input[@value='f']")endcontext'with relative locators'doit'finds element above'dodriver.find_element({relative:{tag_name:'input',above:{id:'password'}}})endit'finds element below'dodriver.find_element({relative:{tag_name:'input',below:{id:'email'}}})endit'finds element to the left'dodriver.find_element({relative:{tag_name:'button',left:{id:'submit'}}})endit'finds element to the right'dodriver.find_element({relative:{tag_name:'button',right:{id:'cancel'}}})endit'finds near element'dodriver.find_element({relative:{tag_name:'input',near:{id:'lbl-email'}}})endit'chains relative locators'dodriver.find_element({relative:{tag_name:'button',below:{id:'email'},right:{id:'cancel'}}})endendend
If the cancel button is not easily identifiable for some reason, but the submit button element is,
we can locate the cancel button element using the fact that it is a “button” element to the “left of” the submit element.
# frozen_string_literal: truerequire'spec_helper'RSpec.describe'Element Locators',skip:'These are reference following the documentation example'doit'finds element by class name'dodriver.find_element(class:'information')endit'finds element by css selector'dodriver.find_element(css:'#fname')endit'finds element by id'dodriver.find_element(id:'lname')endit'find element by name'dodriver.find_element(name:'newsletter')endit'finds element by link text'dodriver.find_element(link_text:'Selenium Official Page')endit'finds element by partial link text'dodriver.find_element(partial_link_text:'Official Page')endit'finds element by tag name'dodriver.find_element(tag_name:'a')endit'finds element by xpath'dodriver.find_element(xpath:"//input[@value='f']")endcontext'with relative locators'doit'finds element above'dodriver.find_element({relative:{tag_name:'input',above:{id:'password'}}})endit'finds element below'dodriver.find_element({relative:{tag_name:'input',below:{id:'email'}}})endit'finds element to the left'dodriver.find_element({relative:{tag_name:'button',left:{id:'submit'}}})endit'finds element to the right'dodriver.find_element({relative:{tag_name:'button',right:{id:'cancel'}}})endit'finds near element'dodriver.find_element({relative:{tag_name:'input',near:{id:'lbl-email'}}})endit'chains relative locators'dodriver.find_element({relative:{tag_name:'button',below:{id:'email'},right:{id:'cancel'}}})endendend
If the submit button is not easily identifiable for some reason, but the cancel button element is,
we can locate the submit button element using the fact that it is a “button” element “to the right of” the cancel element.
# frozen_string_literal: truerequire'spec_helper'RSpec.describe'Element Locators',skip:'These are reference following the documentation example'doit'finds element by class name'dodriver.find_element(class:'information')endit'finds element by css selector'dodriver.find_element(css:'#fname')endit'finds element by id'dodriver.find_element(id:'lname')endit'find element by name'dodriver.find_element(name:'newsletter')endit'finds element by link text'dodriver.find_element(link_text:'Selenium Official Page')endit'finds element by partial link text'dodriver.find_element(partial_link_text:'Official Page')endit'finds element by tag name'dodriver.find_element(tag_name:'a')endit'finds element by xpath'dodriver.find_element(xpath:"//input[@value='f']")endcontext'with relative locators'doit'finds element above'dodriver.find_element({relative:{tag_name:'input',above:{id:'password'}}})endit'finds element below'dodriver.find_element({relative:{tag_name:'input',below:{id:'email'}}})endit'finds element to the left'dodriver.find_element({relative:{tag_name:'button',left:{id:'submit'}}})endit'finds element to the right'dodriver.find_element({relative:{tag_name:'button',right:{id:'cancel'}}})endit'finds near element'dodriver.find_element({relative:{tag_name:'input',near:{id:'lbl-email'}}})endit'chains relative locators'dodriver.find_element({relative:{tag_name:'button',below:{id:'email'},right:{id:'cancel'}}})endendend
If the relative positioning is not obvious, or it varies based on window size, you can use the near method to
identify an element that is at most 50px away from the provided locator.
One great use case for this is to work with a form element that doesn’t have an easily constructed locator,
but its associated input label element does.
# frozen_string_literal: truerequire'spec_helper'RSpec.describe'Element Locators',skip:'These are reference following the documentation example'doit'finds element by class name'dodriver.find_element(class:'information')endit'finds element by css selector'dodriver.find_element(css:'#fname')endit'finds element by id'dodriver.find_element(id:'lname')endit'find element by name'dodriver.find_element(name:'newsletter')endit'finds element by link text'dodriver.find_element(link_text:'Selenium Official Page')endit'finds element by partial link text'dodriver.find_element(partial_link_text:'Official Page')endit'finds element by tag name'dodriver.find_element(tag_name:'a')endit'finds element by xpath'dodriver.find_element(xpath:"//input[@value='f']")endcontext'with relative locators'doit'finds element above'dodriver.find_element({relative:{tag_name:'input',above:{id:'password'}}})endit'finds element below'dodriver.find_element({relative:{tag_name:'input',below:{id:'email'}}})endit'finds element to the left'dodriver.find_element({relative:{tag_name:'button',left:{id:'submit'}}})endit'finds element to the right'dodriver.find_element({relative:{tag_name:'button',right:{id:'cancel'}}})endit'finds near element'dodriver.find_element({relative:{tag_name:'input',near:{id:'lbl-email'}}})endit'chains relative locators'dodriver.find_element({relative:{tag_name:'button',below:{id:'email'},right:{id:'cancel'}}})endendend
You can also chain locators if needed. Sometimes the element is most easily identified as being both above/below one element and right/left of another.
# frozen_string_literal: truerequire'spec_helper'RSpec.describe'Element Locators',skip:'These are reference following the documentation example'doit'finds element by class name'dodriver.find_element(class:'information')endit'finds element by css selector'dodriver.find_element(css:'#fname')endit'finds element by id'dodriver.find_element(id:'lname')endit'find element by name'dodriver.find_element(name:'newsletter')endit'finds element by link text'dodriver.find_element(link_text:'Selenium Official Page')endit'finds element by partial link text'dodriver.find_element(partial_link_text:'Official Page')endit'finds element by tag name'dodriver.find_element(tag_name:'a')endit'finds element by xpath'dodriver.find_element(xpath:"//input[@value='f']")endcontext'with relative locators'doit'finds element above'dodriver.find_element({relative:{tag_name:'input',above:{id:'password'}}})endit'finds element below'dodriver.find_element({relative:{tag_name:'input',below:{id:'email'}}})endit'finds element to the left'dodriver.find_element({relative:{tag_name:'button',left:{id:'submit'}}})endit'finds element to the right'dodriver.find_element({relative:{tag_name:'button',right:{id:'cancel'}}})endit'finds near element'dodriver.find_element({relative:{tag_name:'input',near:{id:'lbl-email'}}})endit'chains relative locators'dodriver.find_element({relative:{tag_name:'button',below:{id:'email'},right:{id:'cancel'}}})endendend
driver.get("https://www.selenium.dev/selenium/web/inputs.html");// isDisplayed // Get boolean value for is element displaybooleanisEmailVisible=driver.findElement(By.name("email_input")).isDisplayed();
packagedev.selenium.elements;importorg.junit.jupiter.api.Test;importorg.openqa.selenium.By;importorg.openqa.selenium.Rectangle;importorg.openqa.selenium.WebDriver;importorg.openqa.selenium.WebElement;importorg.openqa.selenium.chrome.ChromeDriver;importjava.time.Duration;import staticorg.junit.jupiter.api.Assertions.assertEquals;publicclassInformationTest{@TestpublicvoidinformationWithElements(){WebDriverdriver=newChromeDriver();driver.manage().timeouts().implicitlyWait(Duration.ofMillis(500));// Navigate to Urldriver.get("https://www.selenium.dev/selenium/web/inputs.html");// isDisplayed // Get boolean value for is element displaybooleanisEmailVisible=driver.findElement(By.name("email_input")).isDisplayed();assertEquals(isEmailVisible,true);// isEnabled// returns true if element is enabled else returns falsebooleanisEnabledButton=driver.findElement(By.name("button_input")).isEnabled();assertEquals(isEnabledButton,true);// isSelected// returns true if element is checked else returns falsebooleanisSelectedCheck=driver.findElement(By.name("checkbox_input")).isSelected();assertEquals(isSelectedCheck,true);// TagName// returns TagName of the elementStringtagNameInp=driver.findElement(By.name("email_input")).getTagName();assertEquals(tagNameInp,"input");// GetRect// Returns height, width, x and y coordinates referenced elementRectangleres=driver.findElement(By.name("range_input")).getRect();// Rectangle class provides getX,getY, getWidth, getHeight methodsassertEquals(res.getX(),10);// Retrieves the computed style property 'font-size' of fieldStringcssValue=driver.findElement(By.name("color_input")).getCssValue("font-size");assertEquals(cssValue,"13.3333px");// GetText// Retrieves the text of the elementStringtext=driver.findElement(By.tagName("h1")).getText();assertEquals(text,"Testing Inputs");// FetchAttributes// identify the email text boxWebElementemailTxt=driver.findElement(By.name(("email_input")));// fetch the value property associated with the textboxStringvalueInfo=emailTxt.getAttribute("value");assertEquals(valueInfo,"admin@localhost");driver.quit();}}
// Navigate to Urldriver.Url="https://www.selenium.dev/selenium/web/inputs.html";// isDisplayed // Get boolean value for is element displayboolisEmailVisible=driver.FindElement(By.Name("email_input")).Displayed;
usingSystem;usingSystem.Drawing;usingMicrosoft.VisualStudio.TestTools.UnitTesting;usingOpenQA.Selenium;usingOpenQA.Selenium.Chrome;namespaceSeleniumDocs.Elements{ [TestClass]publicclassInformationTest{ [TestMethod]publicvoidTestInformationCommands(){WebDriverdriver=newChromeDriver();driver.Manage().Timeouts().ImplicitWait=TimeSpan.FromMilliseconds(500);// Navigate to Urldriver.Url="https://www.selenium.dev/selenium/web/inputs.html";// isDisplayed // Get boolean value for is element displayboolisEmailVisible=driver.FindElement(By.Name("email_input")).Displayed;Assert.AreEqual(isEmailVisible,true);// isEnabled// returns true if element is enabled else returns falseboolisEnabledButton=driver.FindElement(By.Name("button_input")).Enabled;Assert.AreEqual(isEnabledButton,true);// isSelected// returns true if element is checked else returns falseboolisSelectedCheck=driver.FindElement(By.Name("checkbox_input")).Selected;Assert.AreEqual(isSelectedCheck,true);// TagName// returns TagName of the elementstringtagNameInp=driver.FindElement(By.Name("email_input")).TagName;Assert.AreEqual(tagNameInp,"input");// Get Location and Size// Get LocationIWebElementrangeElement=driver.FindElement(By.Name("range_input"));Pointpoint=rangeElement.Location;Assert.IsNotNull(point.X);// Get Sizeintheight=rangeElement.Size.Height;Assert.IsNotNull(height);// Retrieves the computed style property 'font-size' of fieldstringcssValue=driver.FindElement(By.Name("color_input")).GetCssValue("font-size");Assert.AreEqual(cssValue,"13.3333px");// GetText// Retrieves the text of the elementstringtext=driver.FindElement(By.TagName("h1")).Text;Assert.AreEqual(text,"Testing Inputs");// FetchAttributes// identify the email text boxIWebElementemailTxt=driver.FindElement(By.Name("email_input"));// fetch the value property associated with the textboxstringvalueInfo=emailTxt.GetAttribute("value");Assert.AreEqual(valueInfo,"admin@localhost");//Quit the driverdriver.Quit();}}}
# frozen_string_literal: truerequire'spec_helper'RSpec.describe'Element Information'dolet(:driver){start_session}let(:url){'https://www.selenium.dev/selenium/web/inputs.html'}before{driver.get(url)}it'checks if an element is displayed'dodisplayed_value=driver.find_element(name:'email_input').displayed?expect(displayed_value).tobe_truthyendit'checks if an element is enabled'doenabled_value=driver.find_element(name:'email_input').enabled?expect(enabled_value).tobe_truthyendit'checks if an element is selected'doselected_value=driver.find_element(name:'email_input').selected?expect(selected_value).tobe_falseyendit'gets the tag name of an element'dotag_name=driver.find_element(name:'email_input').tag_nameexpect(tag_name).not_tobe_emptyendit'gets the size and position of an element'dosize=driver.find_element(name:'email_input').sizeexpect(size.width).tobe_positiveexpect(size.height).tobe_positiveendit'gets the css value of an element'docss_value=driver.find_element(name:'email_input').css_value('background-color')expect(css_value).not_tobe_emptyendit'gets the text of an element'dotext=driver.find_element(xpath:'//h1').textexpect(text).toeq('Testing Inputs')endit'gets the attribute value of an element'doattribute_value=driver.find_element(name:'number_input').attribute('value')expect(attribute_value).not_tobe_emptyendend
// Resolves Promise and returns boolean value
letresult=awaitdriver.findElement(By.name("email_input")).isDisplayed();
const{By,Builder}=require('selenium-webdriver');constassert=require("assert");describe('Element Information Test',function(){letdriver;before(asyncfunction(){driver=awaitnewBuilder().forBrowser('chrome').build();});beforeEach(async()=>{awaitdriver.get('https://www.selenium.dev/selenium/web/inputs.html');})it('Check if element is displayed',asyncfunction(){// Resolves Promise and returns boolean value
letresult=awaitdriver.findElement(By.name("email_input")).isDisplayed();assert.equal(result,true);});it('Check if button is enabled',asyncfunction(){// Resolves Promise and returns boolean value
letelement=awaitdriver.findElement(By.name("button_input")).isEnabled();assert.equal(element,true);});it('Check if checkbox is selected',asyncfunction(){// Returns true if element ins checked else returns false
letisSelected=awaitdriver.findElement(By.name("checkbox_input")).isSelected();assert.equal(isSelected,true);});it('Should return the tagname',asyncfunction(){// Returns TagName of the element
letvalue=awaitdriver.findElement(By.name('email_input')).getTagName();assert.equal(value,"input");});it('Should be able to fetch element size and position ',asyncfunction(){// Returns height, width, x and y position of the element
letobject=awaitdriver.findElement(By.name('range_input')).getRect();assert.ok(object.height!==null)assert.ok(object.width!==null)assert.ok(object.y!==null)assert.ok(object.x!==null)});it('Should be able to fetch attributes and properties ',asyncfunction(){// identify the email text box
constemailElement=awaitdriver.findElement(By.xpath('//input[@name="email_input"]'));//fetch the attribute "name" associated with the textbox
constnameAttribute=awaitemailElement.getAttribute("name");assert.equal(nameAttribute,"email_input")});after(async()=>awaitdriver.quit());});describe('Element Information Test',function(){letdriver;before(asyncfunction(){driver=awaitnewBuilder().forBrowser('chrome').build();});it('Should return the css specified CSS value',asyncfunction(){awaitdriver.get('https://www.selenium.dev/selenium/web/colorPage.html');// Returns background color of the element
letvalue=awaitdriver.findElement(By.id('namedColor')).getCssValue('background-color');assert.equal(value,"rgba(0, 128, 0, 1)");});it('Should return the css specified CSS value',asyncfunction(){awaitdriver.get('https://www.selenium.dev/selenium/web/linked_image.html');// Returns text of the element
lettext=awaitdriver.findElement(By.id('justanotherLink')).getText();assert.equal(text,"Just another link.");});after(async()=>awaitdriver.quit());});
//navigates to url
driver.get("https://www.selenium.dev/selenium/web/inputs.html")//returns true if element is displayed else returns false
valflag=driver.findElement(By.name("email_input")).isDisplayed()
packagedev.selenium.elements;importorg.junit.jupiter.api.Test;importorg.openqa.selenium.By;importorg.openqa.selenium.Rectangle;importorg.openqa.selenium.WebDriver;importorg.openqa.selenium.WebElement;importorg.openqa.selenium.chrome.ChromeDriver;importjava.time.Duration;import staticorg.junit.jupiter.api.Assertions.assertEquals;publicclassInformationTest{@TestpublicvoidinformationWithElements(){WebDriverdriver=newChromeDriver();driver.manage().timeouts().implicitlyWait(Duration.ofMillis(500));// Navigate to Urldriver.get("https://www.selenium.dev/selenium/web/inputs.html");// isDisplayed // Get boolean value for is element displaybooleanisEmailVisible=driver.findElement(By.name("email_input")).isDisplayed();assertEquals(isEmailVisible,true);// isEnabled// returns true if element is enabled else returns falsebooleanisEnabledButton=driver.findElement(By.name("button_input")).isEnabled();assertEquals(isEnabledButton,true);// isSelected// returns true if element is checked else returns falsebooleanisSelectedCheck=driver.findElement(By.name("checkbox_input")).isSelected();assertEquals(isSelectedCheck,true);// TagName// returns TagName of the elementStringtagNameInp=driver.findElement(By.name("email_input")).getTagName();assertEquals(tagNameInp,"input");// GetRect// Returns height, width, x and y coordinates referenced elementRectangleres=driver.findElement(By.name("range_input")).getRect();// Rectangle class provides getX,getY, getWidth, getHeight methodsassertEquals(res.getX(),10);// Retrieves the computed style property 'font-size' of fieldStringcssValue=driver.findElement(By.name("color_input")).getCssValue("font-size");assertEquals(cssValue,"13.3333px");// GetText// Retrieves the text of the elementStringtext=driver.findElement(By.tagName("h1")).getText();assertEquals(text,"Testing Inputs");// FetchAttributes// identify the email text boxWebElementemailTxt=driver.findElement(By.name(("email_input")));// fetch the value property associated with the textboxStringvalueInfo=emailTxt.getAttribute("value");assertEquals(valueInfo,"admin@localhost");driver.quit();}}
usingSystem;usingSystem.Drawing;usingMicrosoft.VisualStudio.TestTools.UnitTesting;usingOpenQA.Selenium;usingOpenQA.Selenium.Chrome;namespaceSeleniumDocs.Elements{ [TestClass]publicclassInformationTest{ [TestMethod]publicvoidTestInformationCommands(){WebDriverdriver=newChromeDriver();driver.Manage().Timeouts().ImplicitWait=TimeSpan.FromMilliseconds(500);// Navigate to Urldriver.Url="https://www.selenium.dev/selenium/web/inputs.html";// isDisplayed // Get boolean value for is element displayboolisEmailVisible=driver.FindElement(By.Name("email_input")).Displayed;Assert.AreEqual(isEmailVisible,true);// isEnabled// returns true if element is enabled else returns falseboolisEnabledButton=driver.FindElement(By.Name("button_input")).Enabled;Assert.AreEqual(isEnabledButton,true);// isSelected// returns true if element is checked else returns falseboolisSelectedCheck=driver.FindElement(By.Name("checkbox_input")).Selected;Assert.AreEqual(isSelectedCheck,true);// TagName// returns TagName of the elementstringtagNameInp=driver.FindElement(By.Name("email_input")).TagName;Assert.AreEqual(tagNameInp,"input");// Get Location and Size// Get LocationIWebElementrangeElement=driver.FindElement(By.Name("range_input"));Pointpoint=rangeElement.Location;Assert.IsNotNull(point.X);// Get Sizeintheight=rangeElement.Size.Height;Assert.IsNotNull(height);// Retrieves the computed style property 'font-size' of fieldstringcssValue=driver.FindElement(By.Name("color_input")).GetCssValue("font-size");Assert.AreEqual(cssValue,"13.3333px");// GetText// Retrieves the text of the elementstringtext=driver.FindElement(By.TagName("h1")).Text;Assert.AreEqual(text,"Testing Inputs");// FetchAttributes// identify the email text boxIWebElementemailTxt=driver.FindElement(By.Name("email_input"));// fetch the value property associated with the textboxstringvalueInfo=emailTxt.GetAttribute("value");Assert.AreEqual(valueInfo,"admin@localhost");//Quit the driverdriver.Quit();}}}
# frozen_string_literal: truerequire'spec_helper'RSpec.describe'Element Information'dolet(:driver){start_session}let(:url){'https://www.selenium.dev/selenium/web/inputs.html'}before{driver.get(url)}it'checks if an element is displayed'dodisplayed_value=driver.find_element(name:'email_input').displayed?expect(displayed_value).tobe_truthyendit'checks if an element is enabled'doenabled_value=driver.find_element(name:'email_input').enabled?expect(enabled_value).tobe_truthyendit'checks if an element is selected'doselected_value=driver.find_element(name:'email_input').selected?expect(selected_value).tobe_falseyendit'gets the tag name of an element'dotag_name=driver.find_element(name:'email_input').tag_nameexpect(tag_name).not_tobe_emptyendit'gets the size and position of an element'dosize=driver.find_element(name:'email_input').sizeexpect(size.width).tobe_positiveexpect(size.height).tobe_positiveendit'gets the css value of an element'docss_value=driver.find_element(name:'email_input').css_value('background-color')expect(css_value).not_tobe_emptyendit'gets the text of an element'dotext=driver.find_element(xpath:'//h1').textexpect(text).toeq('Testing Inputs')endit'gets the attribute value of an element'doattribute_value=driver.find_element(name:'number_input').attribute('value')expect(attribute_value).not_tobe_emptyendend
// Resolves Promise and returns boolean value
letelement=awaitdriver.findElement(By.name("button_input")).isEnabled();
const{By,Builder}=require('selenium-webdriver');constassert=require("assert");describe('Element Information Test',function(){letdriver;before(asyncfunction(){driver=awaitnewBuilder().forBrowser('chrome').build();});beforeEach(async()=>{awaitdriver.get('https://www.selenium.dev/selenium/web/inputs.html');})it('Check if element is displayed',asyncfunction(){// Resolves Promise and returns boolean value
letresult=awaitdriver.findElement(By.name("email_input")).isDisplayed();assert.equal(result,true);});it('Check if button is enabled',asyncfunction(){// Resolves Promise and returns boolean value
letelement=awaitdriver.findElement(By.name("button_input")).isEnabled();assert.equal(element,true);});it('Check if checkbox is selected',asyncfunction(){// Returns true if element ins checked else returns false
letisSelected=awaitdriver.findElement(By.name("checkbox_input")).isSelected();assert.equal(isSelected,true);});it('Should return the tagname',asyncfunction(){// Returns TagName of the element
letvalue=awaitdriver.findElement(By.name('email_input')).getTagName();assert.equal(value,"input");});it('Should be able to fetch element size and position ',asyncfunction(){// Returns height, width, x and y position of the element
letobject=awaitdriver.findElement(By.name('range_input')).getRect();assert.ok(object.height!==null)assert.ok(object.width!==null)assert.ok(object.y!==null)assert.ok(object.x!==null)});it('Should be able to fetch attributes and properties ',asyncfunction(){// identify the email text box
constemailElement=awaitdriver.findElement(By.xpath('//input[@name="email_input"]'));//fetch the attribute "name" associated with the textbox
constnameAttribute=awaitemailElement.getAttribute("name");assert.equal(nameAttribute,"email_input")});after(async()=>awaitdriver.quit());});describe('Element Information Test',function(){letdriver;before(asyncfunction(){driver=awaitnewBuilder().forBrowser('chrome').build();});it('Should return the css specified CSS value',asyncfunction(){awaitdriver.get('https://www.selenium.dev/selenium/web/colorPage.html');// Returns background color of the element
letvalue=awaitdriver.findElement(By.id('namedColor')).getCssValue('background-color');assert.equal(value,"rgba(0, 128, 0, 1)");});it('Should return the css specified CSS value',asyncfunction(){awaitdriver.get('https://www.selenium.dev/selenium/web/linked_image.html');// Returns text of the element
lettext=awaitdriver.findElement(By.id('justanotherLink')).getText();assert.equal(text,"Just another link.");});after(async()=>awaitdriver.quit());});
//navigates to url
driver.get("https://www.selenium.dev/selenium/web/inputs.html")//returns true if element is enabled else returns false
valattr=driver.findElement(By.name("button_input")).isEnabled()
// isSelected// returns true if element is checked else returns falsebooleanisSelectedCheck=driver.findElement(By.name("checkbox_input")).isSelected();
packagedev.selenium.elements;importorg.junit.jupiter.api.Test;importorg.openqa.selenium.By;importorg.openqa.selenium.Rectangle;importorg.openqa.selenium.WebDriver;importorg.openqa.selenium.WebElement;importorg.openqa.selenium.chrome.ChromeDriver;importjava.time.Duration;import staticorg.junit.jupiter.api.Assertions.assertEquals;publicclassInformationTest{@TestpublicvoidinformationWithElements(){WebDriverdriver=newChromeDriver();driver.manage().timeouts().implicitlyWait(Duration.ofMillis(500));// Navigate to Urldriver.get("https://www.selenium.dev/selenium/web/inputs.html");// isDisplayed // Get boolean value for is element displaybooleanisEmailVisible=driver.findElement(By.name("email_input")).isDisplayed();assertEquals(isEmailVisible,true);// isEnabled// returns true if element is enabled else returns falsebooleanisEnabledButton=driver.findElement(By.name("button_input")).isEnabled();assertEquals(isEnabledButton,true);// isSelected// returns true if element is checked else returns falsebooleanisSelectedCheck=driver.findElement(By.name("checkbox_input")).isSelected();assertEquals(isSelectedCheck,true);// TagName// returns TagName of the elementStringtagNameInp=driver.findElement(By.name("email_input")).getTagName();assertEquals(tagNameInp,"input");// GetRect// Returns height, width, x and y coordinates referenced elementRectangleres=driver.findElement(By.name("range_input")).getRect();// Rectangle class provides getX,getY, getWidth, getHeight methodsassertEquals(res.getX(),10);// Retrieves the computed style property 'font-size' of fieldStringcssValue=driver.findElement(By.name("color_input")).getCssValue("font-size");assertEquals(cssValue,"13.3333px");// GetText// Retrieves the text of the elementStringtext=driver.findElement(By.tagName("h1")).getText();assertEquals(text,"Testing Inputs");// FetchAttributes// identify the email text boxWebElementemailTxt=driver.findElement(By.name(("email_input")));// fetch the value property associated with the textboxStringvalueInfo=emailTxt.getAttribute("value");assertEquals(valueInfo,"admin@localhost");driver.quit();}}
usingSystem;usingSystem.Drawing;usingMicrosoft.VisualStudio.TestTools.UnitTesting;usingOpenQA.Selenium;usingOpenQA.Selenium.Chrome;namespaceSeleniumDocs.Elements{ [TestClass]publicclassInformationTest{ [TestMethod]publicvoidTestInformationCommands(){WebDriverdriver=newChromeDriver();driver.Manage().Timeouts().ImplicitWait=TimeSpan.FromMilliseconds(500);// Navigate to Urldriver.Url="https://www.selenium.dev/selenium/web/inputs.html";// isDisplayed // Get boolean value for is element displayboolisEmailVisible=driver.FindElement(By.Name("email_input")).Displayed;Assert.AreEqual(isEmailVisible,true);// isEnabled// returns true if element is enabled else returns falseboolisEnabledButton=driver.FindElement(By.Name("button_input")).Enabled;Assert.AreEqual(isEnabledButton,true);// isSelected// returns true if element is checked else returns falseboolisSelectedCheck=driver.FindElement(By.Name("checkbox_input")).Selected;Assert.AreEqual(isSelectedCheck,true);// TagName// returns TagName of the elementstringtagNameInp=driver.FindElement(By.Name("email_input")).TagName;Assert.AreEqual(tagNameInp,"input");// Get Location and Size// Get LocationIWebElementrangeElement=driver.FindElement(By.Name("range_input"));Pointpoint=rangeElement.Location;Assert.IsNotNull(point.X);// Get Sizeintheight=rangeElement.Size.Height;Assert.IsNotNull(height);// Retrieves the computed style property 'font-size' of fieldstringcssValue=driver.FindElement(By.Name("color_input")).GetCssValue("font-size");Assert.AreEqual(cssValue,"13.3333px");// GetText// Retrieves the text of the elementstringtext=driver.FindElement(By.TagName("h1")).Text;Assert.AreEqual(text,"Testing Inputs");// FetchAttributes// identify the email text boxIWebElementemailTxt=driver.FindElement(By.Name("email_input"));// fetch the value property associated with the textboxstringvalueInfo=emailTxt.GetAttribute("value");Assert.AreEqual(valueInfo,"admin@localhost");//Quit the driverdriver.Quit();}}}
# frozen_string_literal: truerequire'spec_helper'RSpec.describe'Element Information'dolet(:driver){start_session}let(:url){'https://www.selenium.dev/selenium/web/inputs.html'}before{driver.get(url)}it'checks if an element is displayed'dodisplayed_value=driver.find_element(name:'email_input').displayed?expect(displayed_value).tobe_truthyendit'checks if an element is enabled'doenabled_value=driver.find_element(name:'email_input').enabled?expect(enabled_value).tobe_truthyendit'checks if an element is selected'doselected_value=driver.find_element(name:'email_input').selected?expect(selected_value).tobe_falseyendit'gets the tag name of an element'dotag_name=driver.find_element(name:'email_input').tag_nameexpect(tag_name).not_tobe_emptyendit'gets the size and position of an element'dosize=driver.find_element(name:'email_input').sizeexpect(size.width).tobe_positiveexpect(size.height).tobe_positiveendit'gets the css value of an element'docss_value=driver.find_element(name:'email_input').css_value('background-color')expect(css_value).not_tobe_emptyendit'gets the text of an element'dotext=driver.find_element(xpath:'//h1').textexpect(text).toeq('Testing Inputs')endit'gets the attribute value of an element'doattribute_value=driver.find_element(name:'number_input').attribute('value')expect(attribute_value).not_tobe_emptyendend
// Returns true if element ins checked else returns false
letisSelected=awaitdriver.findElement(By.name("checkbox_input")).isSelected();
const{By,Builder}=require('selenium-webdriver');constassert=require("assert");describe('Element Information Test',function(){letdriver;before(asyncfunction(){driver=awaitnewBuilder().forBrowser('chrome').build();});beforeEach(async()=>{awaitdriver.get('https://www.selenium.dev/selenium/web/inputs.html');})it('Check if element is displayed',asyncfunction(){// Resolves Promise and returns boolean value
letresult=awaitdriver.findElement(By.name("email_input")).isDisplayed();assert.equal(result,true);});it('Check if button is enabled',asyncfunction(){// Resolves Promise and returns boolean value
letelement=awaitdriver.findElement(By.name("button_input")).isEnabled();assert.equal(element,true);});it('Check if checkbox is selected',asyncfunction(){// Returns true if element ins checked else returns false
letisSelected=awaitdriver.findElement(By.name("checkbox_input")).isSelected();assert.equal(isSelected,true);});it('Should return the tagname',asyncfunction(){// Returns TagName of the element
letvalue=awaitdriver.findElement(By.name('email_input')).getTagName();assert.equal(value,"input");});it('Should be able to fetch element size and position ',asyncfunction(){// Returns height, width, x and y position of the element
letobject=awaitdriver.findElement(By.name('range_input')).getRect();assert.ok(object.height!==null)assert.ok(object.width!==null)assert.ok(object.y!==null)assert.ok(object.x!==null)});it('Should be able to fetch attributes and properties ',asyncfunction(){// identify the email text box
constemailElement=awaitdriver.findElement(By.xpath('//input[@name="email_input"]'));//fetch the attribute "name" associated with the textbox
constnameAttribute=awaitemailElement.getAttribute("name");assert.equal(nameAttribute,"email_input")});after(async()=>awaitdriver.quit());});describe('Element Information Test',function(){letdriver;before(asyncfunction(){driver=awaitnewBuilder().forBrowser('chrome').build();});it('Should return the css specified CSS value',asyncfunction(){awaitdriver.get('https://www.selenium.dev/selenium/web/colorPage.html');// Returns background color of the element
letvalue=awaitdriver.findElement(By.id('namedColor')).getCssValue('background-color');assert.equal(value,"rgba(0, 128, 0, 1)");});it('Should return the css specified CSS value',asyncfunction(){awaitdriver.get('https://www.selenium.dev/selenium/web/linked_image.html');// Returns text of the element
lettext=awaitdriver.findElement(By.id('justanotherLink')).getText();assert.equal(text,"Just another link.");});after(async()=>awaitdriver.quit());});
//navigates to url
driver.get("https://www.selenium.dev/selenium/web/inputs.html")//returns true if element is checked else returns false
valattr=driver.findElement(By.name("checkbox_input")).isSelected()
packagedev.selenium.elements;importorg.junit.jupiter.api.Test;importorg.openqa.selenium.By;importorg.openqa.selenium.Rectangle;importorg.openqa.selenium.WebDriver;importorg.openqa.selenium.WebElement;importorg.openqa.selenium.chrome.ChromeDriver;importjava.time.Duration;import staticorg.junit.jupiter.api.Assertions.assertEquals;publicclassInformationTest{@TestpublicvoidinformationWithElements(){WebDriverdriver=newChromeDriver();driver.manage().timeouts().implicitlyWait(Duration.ofMillis(500));// Navigate to Urldriver.get("https://www.selenium.dev/selenium/web/inputs.html");// isDisplayed // Get boolean value for is element displaybooleanisEmailVisible=driver.findElement(By.name("email_input")).isDisplayed();assertEquals(isEmailVisible,true);// isEnabled// returns true if element is enabled else returns falsebooleanisEnabledButton=driver.findElement(By.name("button_input")).isEnabled();assertEquals(isEnabledButton,true);// isSelected// returns true if element is checked else returns falsebooleanisSelectedCheck=driver.findElement(By.name("checkbox_input")).isSelected();assertEquals(isSelectedCheck,true);// TagName// returns TagName of the elementStringtagNameInp=driver.findElement(By.name("email_input")).getTagName();assertEquals(tagNameInp,"input");// GetRect// Returns height, width, x and y coordinates referenced elementRectangleres=driver.findElement(By.name("range_input")).getRect();// Rectangle class provides getX,getY, getWidth, getHeight methodsassertEquals(res.getX(),10);// Retrieves the computed style property 'font-size' of fieldStringcssValue=driver.findElement(By.name("color_input")).getCssValue("font-size");assertEquals(cssValue,"13.3333px");// GetText// Retrieves the text of the elementStringtext=driver.findElement(By.tagName("h1")).getText();assertEquals(text,"Testing Inputs");// FetchAttributes// identify the email text boxWebElementemailTxt=driver.findElement(By.name(("email_input")));// fetch the value property associated with the textboxStringvalueInfo=emailTxt.getAttribute("value");assertEquals(valueInfo,"admin@localhost");driver.quit();}}
usingSystem;usingSystem.Drawing;usingMicrosoft.VisualStudio.TestTools.UnitTesting;usingOpenQA.Selenium;usingOpenQA.Selenium.Chrome;namespaceSeleniumDocs.Elements{ [TestClass]publicclassInformationTest{ [TestMethod]publicvoidTestInformationCommands(){WebDriverdriver=newChromeDriver();driver.Manage().Timeouts().ImplicitWait=TimeSpan.FromMilliseconds(500);// Navigate to Urldriver.Url="https://www.selenium.dev/selenium/web/inputs.html";// isDisplayed // Get boolean value for is element displayboolisEmailVisible=driver.FindElement(By.Name("email_input")).Displayed;Assert.AreEqual(isEmailVisible,true);// isEnabled// returns true if element is enabled else returns falseboolisEnabledButton=driver.FindElement(By.Name("button_input")).Enabled;Assert.AreEqual(isEnabledButton,true);// isSelected// returns true if element is checked else returns falseboolisSelectedCheck=driver.FindElement(By.Name("checkbox_input")).Selected;Assert.AreEqual(isSelectedCheck,true);// TagName// returns TagName of the elementstringtagNameInp=driver.FindElement(By.Name("email_input")).TagName;Assert.AreEqual(tagNameInp,"input");// Get Location and Size// Get LocationIWebElementrangeElement=driver.FindElement(By.Name("range_input"));Pointpoint=rangeElement.Location;Assert.IsNotNull(point.X);// Get Sizeintheight=rangeElement.Size.Height;Assert.IsNotNull(height);// Retrieves the computed style property 'font-size' of fieldstringcssValue=driver.FindElement(By.Name("color_input")).GetCssValue("font-size");Assert.AreEqual(cssValue,"13.3333px");// GetText// Retrieves the text of the elementstringtext=driver.FindElement(By.TagName("h1")).Text;Assert.AreEqual(text,"Testing Inputs");// FetchAttributes// identify the email text boxIWebElementemailTxt=driver.FindElement(By.Name("email_input"));// fetch the value property associated with the textboxstringvalueInfo=emailTxt.GetAttribute("value");Assert.AreEqual(valueInfo,"admin@localhost");//Quit the driverdriver.Quit();}}}
# frozen_string_literal: truerequire'spec_helper'RSpec.describe'Element Information'dolet(:driver){start_session}let(:url){'https://www.selenium.dev/selenium/web/inputs.html'}before{driver.get(url)}it'checks if an element is displayed'dodisplayed_value=driver.find_element(name:'email_input').displayed?expect(displayed_value).tobe_truthyendit'checks if an element is enabled'doenabled_value=driver.find_element(name:'email_input').enabled?expect(enabled_value).tobe_truthyendit'checks if an element is selected'doselected_value=driver.find_element(name:'email_input').selected?expect(selected_value).tobe_falseyendit'gets the tag name of an element'dotag_name=driver.find_element(name:'email_input').tag_nameexpect(tag_name).not_tobe_emptyendit'gets the size and position of an element'dosize=driver.find_element(name:'email_input').sizeexpect(size.width).tobe_positiveexpect(size.height).tobe_positiveendit'gets the css value of an element'docss_value=driver.find_element(name:'email_input').css_value('background-color')expect(css_value).not_tobe_emptyendit'gets the text of an element'dotext=driver.find_element(xpath:'//h1').textexpect(text).toeq('Testing Inputs')endit'gets the attribute value of an element'doattribute_value=driver.find_element(name:'number_input').attribute('value')expect(attribute_value).not_tobe_emptyendend
// Returns TagName of the element
letvalue=awaitdriver.findElement(By.name('email_input')).getTagName();
const{By,Builder}=require('selenium-webdriver');constassert=require("assert");describe('Element Information Test',function(){letdriver;before(asyncfunction(){driver=awaitnewBuilder().forBrowser('chrome').build();});beforeEach(async()=>{awaitdriver.get('https://www.selenium.dev/selenium/web/inputs.html');})it('Check if element is displayed',asyncfunction(){// Resolves Promise and returns boolean value
letresult=awaitdriver.findElement(By.name("email_input")).isDisplayed();assert.equal(result,true);});it('Check if button is enabled',asyncfunction(){// Resolves Promise and returns boolean value
letelement=awaitdriver.findElement(By.name("button_input")).isEnabled();assert.equal(element,true);});it('Check if checkbox is selected',asyncfunction(){// Returns true if element ins checked else returns false
letisSelected=awaitdriver.findElement(By.name("checkbox_input")).isSelected();assert.equal(isSelected,true);});it('Should return the tagname',asyncfunction(){// Returns TagName of the element
letvalue=awaitdriver.findElement(By.name('email_input')).getTagName();assert.equal(value,"input");});it('Should be able to fetch element size and position ',asyncfunction(){// Returns height, width, x and y position of the element
letobject=awaitdriver.findElement(By.name('range_input')).getRect();assert.ok(object.height!==null)assert.ok(object.width!==null)assert.ok(object.y!==null)assert.ok(object.x!==null)});it('Should be able to fetch attributes and properties ',asyncfunction(){// identify the email text box
constemailElement=awaitdriver.findElement(By.xpath('//input[@name="email_input"]'));//fetch the attribute "name" associated with the textbox
constnameAttribute=awaitemailElement.getAttribute("name");assert.equal(nameAttribute,"email_input")});after(async()=>awaitdriver.quit());});describe('Element Information Test',function(){letdriver;before(asyncfunction(){driver=awaitnewBuilder().forBrowser('chrome').build();});it('Should return the css specified CSS value',asyncfunction(){awaitdriver.get('https://www.selenium.dev/selenium/web/colorPage.html');// Returns background color of the element
letvalue=awaitdriver.findElement(By.id('namedColor')).getCssValue('background-color');assert.equal(value,"rgba(0, 128, 0, 1)");});it('Should return the css specified CSS value',asyncfunction(){awaitdriver.get('https://www.selenium.dev/selenium/web/linked_image.html');// Returns text of the element
lettext=awaitdriver.findElement(By.id('justanotherLink')).getText();assert.equal(text,"Just another link.");});after(async()=>awaitdriver.quit());});
//navigates to url
driver.get("https://www.selenium.dev/selenium/web/inputs.html")//returns TagName of the element
valattr=driver.findElement(By.name("email_input")).getTagName()
位置和大小
用于获取参照元素的尺寸和坐标。
提取的数据主体包含以下详细信息:
元素左上角的X轴位置
元素左上角的y轴位置
元素的高度
元素的宽度
// GetRect// Returns height, width, x and y coordinates referenced elementRectangleres=driver.findElement(By.name("range_input")).getRect();
packagedev.selenium.elements;importorg.junit.jupiter.api.Test;importorg.openqa.selenium.By;importorg.openqa.selenium.Rectangle;importorg.openqa.selenium.WebDriver;importorg.openqa.selenium.WebElement;importorg.openqa.selenium.chrome.ChromeDriver;importjava.time.Duration;import staticorg.junit.jupiter.api.Assertions.assertEquals;publicclassInformationTest{@TestpublicvoidinformationWithElements(){WebDriverdriver=newChromeDriver();driver.manage().timeouts().implicitlyWait(Duration.ofMillis(500));// Navigate to Urldriver.get("https://www.selenium.dev/selenium/web/inputs.html");// isDisplayed // Get boolean value for is element displaybooleanisEmailVisible=driver.findElement(By.name("email_input")).isDisplayed();assertEquals(isEmailVisible,true);// isEnabled// returns true if element is enabled else returns falsebooleanisEnabledButton=driver.findElement(By.name("button_input")).isEnabled();assertEquals(isEnabledButton,true);// isSelected// returns true if element is checked else returns falsebooleanisSelectedCheck=driver.findElement(By.name("checkbox_input")).isSelected();assertEquals(isSelectedCheck,true);// TagName// returns TagName of the elementStringtagNameInp=driver.findElement(By.name("email_input")).getTagName();assertEquals(tagNameInp,"input");// GetRect// Returns height, width, x and y coordinates referenced elementRectangleres=driver.findElement(By.name("range_input")).getRect();// Rectangle class provides getX,getY, getWidth, getHeight methodsassertEquals(res.getX(),10);// Retrieves the computed style property 'font-size' of fieldStringcssValue=driver.findElement(By.name("color_input")).getCssValue("font-size");assertEquals(cssValue,"13.3333px");// GetText// Retrieves the text of the elementStringtext=driver.findElement(By.tagName("h1")).getText();assertEquals(text,"Testing Inputs");// FetchAttributes// identify the email text boxWebElementemailTxt=driver.findElement(By.name(("email_input")));// fetch the value property associated with the textboxStringvalueInfo=emailTxt.getAttribute("value");assertEquals(valueInfo,"admin@localhost");driver.quit();}}
usingSystem;usingSystem.Drawing;usingMicrosoft.VisualStudio.TestTools.UnitTesting;usingOpenQA.Selenium;usingOpenQA.Selenium.Chrome;namespaceSeleniumDocs.Elements{ [TestClass]publicclassInformationTest{ [TestMethod]publicvoidTestInformationCommands(){WebDriverdriver=newChromeDriver();driver.Manage().Timeouts().ImplicitWait=TimeSpan.FromMilliseconds(500);// Navigate to Urldriver.Url="https://www.selenium.dev/selenium/web/inputs.html";// isDisplayed // Get boolean value for is element displayboolisEmailVisible=driver.FindElement(By.Name("email_input")).Displayed;Assert.AreEqual(isEmailVisible,true);// isEnabled// returns true if element is enabled else returns falseboolisEnabledButton=driver.FindElement(By.Name("button_input")).Enabled;Assert.AreEqual(isEnabledButton,true);// isSelected// returns true if element is checked else returns falseboolisSelectedCheck=driver.FindElement(By.Name("checkbox_input")).Selected;Assert.AreEqual(isSelectedCheck,true);// TagName// returns TagName of the elementstringtagNameInp=driver.FindElement(By.Name("email_input")).TagName;Assert.AreEqual(tagNameInp,"input");// Get Location and Size// Get LocationIWebElementrangeElement=driver.FindElement(By.Name("range_input"));Pointpoint=rangeElement.Location;Assert.IsNotNull(point.X);// Get Sizeintheight=rangeElement.Size.Height;Assert.IsNotNull(height);// Retrieves the computed style property 'font-size' of fieldstringcssValue=driver.FindElement(By.Name("color_input")).GetCssValue("font-size");Assert.AreEqual(cssValue,"13.3333px");// GetText// Retrieves the text of the elementstringtext=driver.FindElement(By.TagName("h1")).Text;Assert.AreEqual(text,"Testing Inputs");// FetchAttributes// identify the email text boxIWebElementemailTxt=driver.FindElement(By.Name("email_input"));// fetch the value property associated with the textboxstringvalueInfo=emailTxt.GetAttribute("value");Assert.AreEqual(valueInfo,"admin@localhost");//Quit the driverdriver.Quit();}}}
# frozen_string_literal: truerequire'spec_helper'RSpec.describe'Element Information'dolet(:driver){start_session}let(:url){'https://www.selenium.dev/selenium/web/inputs.html'}before{driver.get(url)}it'checks if an element is displayed'dodisplayed_value=driver.find_element(name:'email_input').displayed?expect(displayed_value).tobe_truthyendit'checks if an element is enabled'doenabled_value=driver.find_element(name:'email_input').enabled?expect(enabled_value).tobe_truthyendit'checks if an element is selected'doselected_value=driver.find_element(name:'email_input').selected?expect(selected_value).tobe_falseyendit'gets the tag name of an element'dotag_name=driver.find_element(name:'email_input').tag_nameexpect(tag_name).not_tobe_emptyendit'gets the size and position of an element'dosize=driver.find_element(name:'email_input').sizeexpect(size.width).tobe_positiveexpect(size.height).tobe_positiveendit'gets the css value of an element'docss_value=driver.find_element(name:'email_input').css_value('background-color')expect(css_value).not_tobe_emptyendit'gets the text of an element'dotext=driver.find_element(xpath:'//h1').textexpect(text).toeq('Testing Inputs')endit'gets the attribute value of an element'doattribute_value=driver.find_element(name:'number_input').attribute('value')expect(attribute_value).not_tobe_emptyendend
const{By,Builder}=require('selenium-webdriver');constassert=require("assert");describe('Element Information Test',function(){letdriver;before(asyncfunction(){driver=awaitnewBuilder().forBrowser('chrome').build();});beforeEach(async()=>{awaitdriver.get('https://www.selenium.dev/selenium/web/inputs.html');})it('Check if element is displayed',asyncfunction(){// Resolves Promise and returns boolean value
letresult=awaitdriver.findElement(By.name("email_input")).isDisplayed();assert.equal(result,true);});it('Check if button is enabled',asyncfunction(){// Resolves Promise and returns boolean value
letelement=awaitdriver.findElement(By.name("button_input")).isEnabled();assert.equal(element,true);});it('Check if checkbox is selected',asyncfunction(){// Returns true if element ins checked else returns false
letisSelected=awaitdriver.findElement(By.name("checkbox_input")).isSelected();assert.equal(isSelected,true);});it('Should return the tagname',asyncfunction(){// Returns TagName of the element
letvalue=awaitdriver.findElement(By.name('email_input')).getTagName();assert.equal(value,"input");});it('Should be able to fetch element size and position ',asyncfunction(){// Returns height, width, x and y position of the element
letobject=awaitdriver.findElement(By.name('range_input')).getRect();assert.ok(object.height!==null)assert.ok(object.width!==null)assert.ok(object.y!==null)assert.ok(object.x!==null)});it('Should be able to fetch attributes and properties ',asyncfunction(){// identify the email text box
constemailElement=awaitdriver.findElement(By.xpath('//input[@name="email_input"]'));//fetch the attribute "name" associated with the textbox
constnameAttribute=awaitemailElement.getAttribute("name");assert.equal(nameAttribute,"email_input")});after(async()=>awaitdriver.quit());});describe('Element Information Test',function(){letdriver;before(asyncfunction(){driver=awaitnewBuilder().forBrowser('chrome').build();});it('Should return the css specified CSS value',asyncfunction(){awaitdriver.get('https://www.selenium.dev/selenium/web/colorPage.html');// Returns background color of the element
letvalue=awaitdriver.findElement(By.id('namedColor')).getCssValue('background-color');assert.equal(value,"rgba(0, 128, 0, 1)");});it('Should return the css specified CSS value',asyncfunction(){awaitdriver.get('https://www.selenium.dev/selenium/web/linked_image.html');// Returns text of the element
lettext=awaitdriver.findElement(By.id('justanotherLink')).getText();assert.equal(text,"Just another link.");});after(async()=>awaitdriver.quit());});
// Navigate to url
driver.get("https://www.selenium.dev/selenium/web/inputs.html")// Returns height, width, x and y coordinates referenced element
valres=driver.findElement(By.name("range_input")).rect// Rectangle class provides getX,getY, getWidth, getHeight methods
println(res.getX())
获取元素CSS值
获取当前浏览上下文中元素的特定计算样式属性的值。
// Retrieves the computed style property 'font-size' of fieldStringcssValue=driver.findElement(By.name("color_input")).getCssValue("font-size");
packagedev.selenium.elements;importorg.junit.jupiter.api.Test;importorg.openqa.selenium.By;importorg.openqa.selenium.Rectangle;importorg.openqa.selenium.WebDriver;importorg.openqa.selenium.WebElement;importorg.openqa.selenium.chrome.ChromeDriver;importjava.time.Duration;import staticorg.junit.jupiter.api.Assertions.assertEquals;publicclassInformationTest{@TestpublicvoidinformationWithElements(){WebDriverdriver=newChromeDriver();driver.manage().timeouts().implicitlyWait(Duration.ofMillis(500));// Navigate to Urldriver.get("https://www.selenium.dev/selenium/web/inputs.html");// isDisplayed // Get boolean value for is element displaybooleanisEmailVisible=driver.findElement(By.name("email_input")).isDisplayed();assertEquals(isEmailVisible,true);// isEnabled// returns true if element is enabled else returns falsebooleanisEnabledButton=driver.findElement(By.name("button_input")).isEnabled();assertEquals(isEnabledButton,true);// isSelected// returns true if element is checked else returns falsebooleanisSelectedCheck=driver.findElement(By.name("checkbox_input")).isSelected();assertEquals(isSelectedCheck,true);// TagName// returns TagName of the elementStringtagNameInp=driver.findElement(By.name("email_input")).getTagName();assertEquals(tagNameInp,"input");// GetRect// Returns height, width, x and y coordinates referenced elementRectangleres=driver.findElement(By.name("range_input")).getRect();// Rectangle class provides getX,getY, getWidth, getHeight methodsassertEquals(res.getX(),10);// Retrieves the computed style property 'font-size' of fieldStringcssValue=driver.findElement(By.name("color_input")).getCssValue("font-size");assertEquals(cssValue,"13.3333px");// GetText// Retrieves the text of the elementStringtext=driver.findElement(By.tagName("h1")).getText();assertEquals(text,"Testing Inputs");// FetchAttributes// identify the email text boxWebElementemailTxt=driver.findElement(By.name(("email_input")));// fetch the value property associated with the textboxStringvalueInfo=emailTxt.getAttribute("value");assertEquals(valueInfo,"admin@localhost");driver.quit();}}
usingSystem;usingSystem.Drawing;usingMicrosoft.VisualStudio.TestTools.UnitTesting;usingOpenQA.Selenium;usingOpenQA.Selenium.Chrome;namespaceSeleniumDocs.Elements{ [TestClass]publicclassInformationTest{ [TestMethod]publicvoidTestInformationCommands(){WebDriverdriver=newChromeDriver();driver.Manage().Timeouts().ImplicitWait=TimeSpan.FromMilliseconds(500);// Navigate to Urldriver.Url="https://www.selenium.dev/selenium/web/inputs.html";// isDisplayed // Get boolean value for is element displayboolisEmailVisible=driver.FindElement(By.Name("email_input")).Displayed;Assert.AreEqual(isEmailVisible,true);// isEnabled// returns true if element is enabled else returns falseboolisEnabledButton=driver.FindElement(By.Name("button_input")).Enabled;Assert.AreEqual(isEnabledButton,true);// isSelected// returns true if element is checked else returns falseboolisSelectedCheck=driver.FindElement(By.Name("checkbox_input")).Selected;Assert.AreEqual(isSelectedCheck,true);// TagName// returns TagName of the elementstringtagNameInp=driver.FindElement(By.Name("email_input")).TagName;Assert.AreEqual(tagNameInp,"input");// Get Location and Size// Get LocationIWebElementrangeElement=driver.FindElement(By.Name("range_input"));Pointpoint=rangeElement.Location;Assert.IsNotNull(point.X);// Get Sizeintheight=rangeElement.Size.Height;Assert.IsNotNull(height);// Retrieves the computed style property 'font-size' of fieldstringcssValue=driver.FindElement(By.Name("color_input")).GetCssValue("font-size");Assert.AreEqual(cssValue,"13.3333px");// GetText// Retrieves the text of the elementstringtext=driver.FindElement(By.TagName("h1")).Text;Assert.AreEqual(text,"Testing Inputs");// FetchAttributes// identify the email text boxIWebElementemailTxt=driver.FindElement(By.Name("email_input"));// fetch the value property associated with the textboxstringvalueInfo=emailTxt.GetAttribute("value");Assert.AreEqual(valueInfo,"admin@localhost");//Quit the driverdriver.Quit();}}}
# frozen_string_literal: truerequire'spec_helper'RSpec.describe'Element Information'dolet(:driver){start_session}let(:url){'https://www.selenium.dev/selenium/web/inputs.html'}before{driver.get(url)}it'checks if an element is displayed'dodisplayed_value=driver.find_element(name:'email_input').displayed?expect(displayed_value).tobe_truthyendit'checks if an element is enabled'doenabled_value=driver.find_element(name:'email_input').enabled?expect(enabled_value).tobe_truthyendit'checks if an element is selected'doselected_value=driver.find_element(name:'email_input').selected?expect(selected_value).tobe_falseyendit'gets the tag name of an element'dotag_name=driver.find_element(name:'email_input').tag_nameexpect(tag_name).not_tobe_emptyendit'gets the size and position of an element'dosize=driver.find_element(name:'email_input').sizeexpect(size.width).tobe_positiveexpect(size.height).tobe_positiveendit'gets the css value of an element'docss_value=driver.find_element(name:'email_input').css_value('background-color')expect(css_value).not_tobe_emptyendit'gets the text of an element'dotext=driver.find_element(xpath:'//h1').textexpect(text).toeq('Testing Inputs')endit'gets the attribute value of an element'doattribute_value=driver.find_element(name:'number_input').attribute('value')expect(attribute_value).not_tobe_emptyendend
awaitdriver.get('https://www.selenium.dev/selenium/web/colorPage.html');// Returns background color of the element
letvalue=awaitdriver.findElement(By.id('namedColor')).getCssValue('background-color');
const{By,Builder}=require('selenium-webdriver');constassert=require("assert");describe('Element Information Test',function(){letdriver;before(asyncfunction(){driver=awaitnewBuilder().forBrowser('chrome').build();});beforeEach(async()=>{awaitdriver.get('https://www.selenium.dev/selenium/web/inputs.html');})it('Check if element is displayed',asyncfunction(){// Resolves Promise and returns boolean value
letresult=awaitdriver.findElement(By.name("email_input")).isDisplayed();assert.equal(result,true);});it('Check if button is enabled',asyncfunction(){// Resolves Promise and returns boolean value
letelement=awaitdriver.findElement(By.name("button_input")).isEnabled();assert.equal(element,true);});it('Check if checkbox is selected',asyncfunction(){// Returns true if element ins checked else returns false
letisSelected=awaitdriver.findElement(By.name("checkbox_input")).isSelected();assert.equal(isSelected,true);});it('Should return the tagname',asyncfunction(){// Returns TagName of the element
letvalue=awaitdriver.findElement(By.name('email_input')).getTagName();assert.equal(value,"input");});it('Should be able to fetch element size and position ',asyncfunction(){// Returns height, width, x and y position of the element
letobject=awaitdriver.findElement(By.name('range_input')).getRect();assert.ok(object.height!==null)assert.ok(object.width!==null)assert.ok(object.y!==null)assert.ok(object.x!==null)});it('Should be able to fetch attributes and properties ',asyncfunction(){// identify the email text box
constemailElement=awaitdriver.findElement(By.xpath('//input[@name="email_input"]'));//fetch the attribute "name" associated with the textbox
constnameAttribute=awaitemailElement.getAttribute("name");assert.equal(nameAttribute,"email_input")});after(async()=>awaitdriver.quit());});describe('Element Information Test',function(){letdriver;before(asyncfunction(){driver=awaitnewBuilder().forBrowser('chrome').build();});it('Should return the css specified CSS value',asyncfunction(){awaitdriver.get('https://www.selenium.dev/selenium/web/colorPage.html');// Returns background color of the element
letvalue=awaitdriver.findElement(By.id('namedColor')).getCssValue('background-color');assert.equal(value,"rgba(0, 128, 0, 1)");});it('Should return the css specified CSS value',asyncfunction(){awaitdriver.get('https://www.selenium.dev/selenium/web/linked_image.html');// Returns text of the element
lettext=awaitdriver.findElement(By.id('justanotherLink')).getText();assert.equal(text,"Just another link.");});after(async()=>awaitdriver.quit());});
// Navigate to Url
driver.get("https://www.selenium.dev/selenium/web/colorPage.html")// Retrieves the computed style property 'color' of linktext
valcssValue=driver.findElement(By.id("namedColor")).getCssValue("background-color")
文本内容
获取特定元素渲染后的文本内容。
// GetText// Retrieves the text of the elementStringtext=driver.findElement(By.tagName("h1")).getText();
packagedev.selenium.elements;importorg.junit.jupiter.api.Test;importorg.openqa.selenium.By;importorg.openqa.selenium.Rectangle;importorg.openqa.selenium.WebDriver;importorg.openqa.selenium.WebElement;importorg.openqa.selenium.chrome.ChromeDriver;importjava.time.Duration;import staticorg.junit.jupiter.api.Assertions.assertEquals;publicclassInformationTest{@TestpublicvoidinformationWithElements(){WebDriverdriver=newChromeDriver();driver.manage().timeouts().implicitlyWait(Duration.ofMillis(500));// Navigate to Urldriver.get("https://www.selenium.dev/selenium/web/inputs.html");// isDisplayed // Get boolean value for is element displaybooleanisEmailVisible=driver.findElement(By.name("email_input")).isDisplayed();assertEquals(isEmailVisible,true);// isEnabled// returns true if element is enabled else returns falsebooleanisEnabledButton=driver.findElement(By.name("button_input")).isEnabled();assertEquals(isEnabledButton,true);// isSelected// returns true if element is checked else returns falsebooleanisSelectedCheck=driver.findElement(By.name("checkbox_input")).isSelected();assertEquals(isSelectedCheck,true);// TagName// returns TagName of the elementStringtagNameInp=driver.findElement(By.name("email_input")).getTagName();assertEquals(tagNameInp,"input");// GetRect// Returns height, width, x and y coordinates referenced elementRectangleres=driver.findElement(By.name("range_input")).getRect();// Rectangle class provides getX,getY, getWidth, getHeight methodsassertEquals(res.getX(),10);// Retrieves the computed style property 'font-size' of fieldStringcssValue=driver.findElement(By.name("color_input")).getCssValue("font-size");assertEquals(cssValue,"13.3333px");// GetText// Retrieves the text of the elementStringtext=driver.findElement(By.tagName("h1")).getText();assertEquals(text,"Testing Inputs");// FetchAttributes// identify the email text boxWebElementemailTxt=driver.findElement(By.name(("email_input")));// fetch the value property associated with the textboxStringvalueInfo=emailTxt.getAttribute("value");assertEquals(valueInfo,"admin@localhost");driver.quit();}}
usingSystem;usingSystem.Drawing;usingMicrosoft.VisualStudio.TestTools.UnitTesting;usingOpenQA.Selenium;usingOpenQA.Selenium.Chrome;namespaceSeleniumDocs.Elements{ [TestClass]publicclassInformationTest{ [TestMethod]publicvoidTestInformationCommands(){WebDriverdriver=newChromeDriver();driver.Manage().Timeouts().ImplicitWait=TimeSpan.FromMilliseconds(500);// Navigate to Urldriver.Url="https://www.selenium.dev/selenium/web/inputs.html";// isDisplayed // Get boolean value for is element displayboolisEmailVisible=driver.FindElement(By.Name("email_input")).Displayed;Assert.AreEqual(isEmailVisible,true);// isEnabled// returns true if element is enabled else returns falseboolisEnabledButton=driver.FindElement(By.Name("button_input")).Enabled;Assert.AreEqual(isEnabledButton,true);// isSelected// returns true if element is checked else returns falseboolisSelectedCheck=driver.FindElement(By.Name("checkbox_input")).Selected;Assert.AreEqual(isSelectedCheck,true);// TagName// returns TagName of the elementstringtagNameInp=driver.FindElement(By.Name("email_input")).TagName;Assert.AreEqual(tagNameInp,"input");// Get Location and Size// Get LocationIWebElementrangeElement=driver.FindElement(By.Name("range_input"));Pointpoint=rangeElement.Location;Assert.IsNotNull(point.X);// Get Sizeintheight=rangeElement.Size.Height;Assert.IsNotNull(height);// Retrieves the computed style property 'font-size' of fieldstringcssValue=driver.FindElement(By.Name("color_input")).GetCssValue("font-size");Assert.AreEqual(cssValue,"13.3333px");// GetText// Retrieves the text of the elementstringtext=driver.FindElement(By.TagName("h1")).Text;Assert.AreEqual(text,"Testing Inputs");// FetchAttributes// identify the email text boxIWebElementemailTxt=driver.FindElement(By.Name("email_input"));// fetch the value property associated with the textboxstringvalueInfo=emailTxt.GetAttribute("value");Assert.AreEqual(valueInfo,"admin@localhost");//Quit the driverdriver.Quit();}}}
# frozen_string_literal: truerequire'spec_helper'RSpec.describe'Element Information'dolet(:driver){start_session}let(:url){'https://www.selenium.dev/selenium/web/inputs.html'}before{driver.get(url)}it'checks if an element is displayed'dodisplayed_value=driver.find_element(name:'email_input').displayed?expect(displayed_value).tobe_truthyendit'checks if an element is enabled'doenabled_value=driver.find_element(name:'email_input').enabled?expect(enabled_value).tobe_truthyendit'checks if an element is selected'doselected_value=driver.find_element(name:'email_input').selected?expect(selected_value).tobe_falseyendit'gets the tag name of an element'dotag_name=driver.find_element(name:'email_input').tag_nameexpect(tag_name).not_tobe_emptyendit'gets the size and position of an element'dosize=driver.find_element(name:'email_input').sizeexpect(size.width).tobe_positiveexpect(size.height).tobe_positiveendit'gets the css value of an element'docss_value=driver.find_element(name:'email_input').css_value('background-color')expect(css_value).not_tobe_emptyendit'gets the text of an element'dotext=driver.find_element(xpath:'//h1').textexpect(text).toeq('Testing Inputs')endit'gets the attribute value of an element'doattribute_value=driver.find_element(name:'number_input').attribute('value')expect(attribute_value).not_tobe_emptyendend
awaitdriver.get('https://www.selenium.dev/selenium/web/linked_image.html');// Returns text of the element
lettext=awaitdriver.findElement(By.id('justanotherLink')).getText();
const{By,Builder}=require('selenium-webdriver');constassert=require("assert");describe('Element Information Test',function(){letdriver;before(asyncfunction(){driver=awaitnewBuilder().forBrowser('chrome').build();});beforeEach(async()=>{awaitdriver.get('https://www.selenium.dev/selenium/web/inputs.html');})it('Check if element is displayed',asyncfunction(){// Resolves Promise and returns boolean value
letresult=awaitdriver.findElement(By.name("email_input")).isDisplayed();assert.equal(result,true);});it('Check if button is enabled',asyncfunction(){// Resolves Promise and returns boolean value
letelement=awaitdriver.findElement(By.name("button_input")).isEnabled();assert.equal(element,true);});it('Check if checkbox is selected',asyncfunction(){// Returns true if element ins checked else returns false
letisSelected=awaitdriver.findElement(By.name("checkbox_input")).isSelected();assert.equal(isSelected,true);});it('Should return the tagname',asyncfunction(){// Returns TagName of the element
letvalue=awaitdriver.findElement(By.name('email_input')).getTagName();assert.equal(value,"input");});it('Should be able to fetch element size and position ',asyncfunction(){// Returns height, width, x and y position of the element
letobject=awaitdriver.findElement(By.name('range_input')).getRect();assert.ok(object.height!==null)assert.ok(object.width!==null)assert.ok(object.y!==null)assert.ok(object.x!==null)});it('Should be able to fetch attributes and properties ',asyncfunction(){// identify the email text box
constemailElement=awaitdriver.findElement(By.xpath('//input[@name="email_input"]'));//fetch the attribute "name" associated with the textbox
constnameAttribute=awaitemailElement.getAttribute("name");assert.equal(nameAttribute,"email_input")});after(async()=>awaitdriver.quit());});describe('Element Information Test',function(){letdriver;before(asyncfunction(){driver=awaitnewBuilder().forBrowser('chrome').build();});it('Should return the css specified CSS value',asyncfunction(){awaitdriver.get('https://www.selenium.dev/selenium/web/colorPage.html');// Returns background color of the element
letvalue=awaitdriver.findElement(By.id('namedColor')).getCssValue('background-color');assert.equal(value,"rgba(0, 128, 0, 1)");});it('Should return the css specified CSS value',asyncfunction(){awaitdriver.get('https://www.selenium.dev/selenium/web/linked_image.html');// Returns text of the element
lettext=awaitdriver.findElement(By.id('justanotherLink')).getText();assert.equal(text,"Just another link.");});after(async()=>awaitdriver.quit());});
// Navigate to URL
driver.get("https://www.selenium.dev/selenium/web/linked_image.html")// retrieves the text of the element
valtext=driver.findElement(By.id("justanotherlink")).getText()
获取特性或属性
获取与 DOM 属性关联的运行时的值。
它返回与该元素的 DOM 特性或属性关联的数据。
// FetchAttributes// identify the email text boxWebElementemailTxt=driver.findElement(By.name(("email_input")));// fetch the value property associated with the textboxStringvalueInfo=emailTxt.getAttribute("value");
packagedev.selenium.elements;importorg.junit.jupiter.api.Test;importorg.openqa.selenium.By;importorg.openqa.selenium.Rectangle;importorg.openqa.selenium.WebDriver;importorg.openqa.selenium.WebElement;importorg.openqa.selenium.chrome.ChromeDriver;importjava.time.Duration;import staticorg.junit.jupiter.api.Assertions.assertEquals;publicclassInformationTest{@TestpublicvoidinformationWithElements(){WebDriverdriver=newChromeDriver();driver.manage().timeouts().implicitlyWait(Duration.ofMillis(500));// Navigate to Urldriver.get("https://www.selenium.dev/selenium/web/inputs.html");// isDisplayed // Get boolean value for is element displaybooleanisEmailVisible=driver.findElement(By.name("email_input")).isDisplayed();assertEquals(isEmailVisible,true);// isEnabled// returns true if element is enabled else returns falsebooleanisEnabledButton=driver.findElement(By.name("button_input")).isEnabled();assertEquals(isEnabledButton,true);// isSelected// returns true if element is checked else returns falsebooleanisSelectedCheck=driver.findElement(By.name("checkbox_input")).isSelected();assertEquals(isSelectedCheck,true);// TagName// returns TagName of the elementStringtagNameInp=driver.findElement(By.name("email_input")).getTagName();assertEquals(tagNameInp,"input");// GetRect// Returns height, width, x and y coordinates referenced elementRectangleres=driver.findElement(By.name("range_input")).getRect();// Rectangle class provides getX,getY, getWidth, getHeight methodsassertEquals(res.getX(),10);// Retrieves the computed style property 'font-size' of fieldStringcssValue=driver.findElement(By.name("color_input")).getCssValue("font-size");assertEquals(cssValue,"13.3333px");// GetText// Retrieves the text of the elementStringtext=driver.findElement(By.tagName("h1")).getText();assertEquals(text,"Testing Inputs");// FetchAttributes// identify the email text boxWebElementemailTxt=driver.findElement(By.name(("email_input")));// fetch the value property associated with the textboxStringvalueInfo=emailTxt.getAttribute("value");assertEquals(valueInfo,"admin@localhost");driver.quit();}}
// FetchAttributes// identify the email text boxIWebElementemailTxt=driver.FindElement(By.Name("email_input"));// fetch the value property associated with the textboxstringvalueInfo=emailTxt.GetAttribute("value");
usingSystem;usingSystem.Drawing;usingMicrosoft.VisualStudio.TestTools.UnitTesting;usingOpenQA.Selenium;usingOpenQA.Selenium.Chrome;namespaceSeleniumDocs.Elements{ [TestClass]publicclassInformationTest{ [TestMethod]publicvoidTestInformationCommands(){WebDriverdriver=newChromeDriver();driver.Manage().Timeouts().ImplicitWait=TimeSpan.FromMilliseconds(500);// Navigate to Urldriver.Url="https://www.selenium.dev/selenium/web/inputs.html";// isDisplayed // Get boolean value for is element displayboolisEmailVisible=driver.FindElement(By.Name("email_input")).Displayed;Assert.AreEqual(isEmailVisible,true);// isEnabled// returns true if element is enabled else returns falseboolisEnabledButton=driver.FindElement(By.Name("button_input")).Enabled;Assert.AreEqual(isEnabledButton,true);// isSelected// returns true if element is checked else returns falseboolisSelectedCheck=driver.FindElement(By.Name("checkbox_input")).Selected;Assert.AreEqual(isSelectedCheck,true);// TagName// returns TagName of the elementstringtagNameInp=driver.FindElement(By.Name("email_input")).TagName;Assert.AreEqual(tagNameInp,"input");// Get Location and Size// Get LocationIWebElementrangeElement=driver.FindElement(By.Name("range_input"));Pointpoint=rangeElement.Location;Assert.IsNotNull(point.X);// Get Sizeintheight=rangeElement.Size.Height;Assert.IsNotNull(height);// Retrieves the computed style property 'font-size' of fieldstringcssValue=driver.FindElement(By.Name("color_input")).GetCssValue("font-size");Assert.AreEqual(cssValue,"13.3333px");// GetText// Retrieves the text of the elementstringtext=driver.FindElement(By.TagName("h1")).Text;Assert.AreEqual(text,"Testing Inputs");// FetchAttributes// identify the email text boxIWebElementemailTxt=driver.FindElement(By.Name("email_input"));// fetch the value property associated with the textboxstringvalueInfo=emailTxt.GetAttribute("value");Assert.AreEqual(valueInfo,"admin@localhost");//Quit the driverdriver.Quit();}}}
# frozen_string_literal: truerequire'spec_helper'RSpec.describe'Element Information'dolet(:driver){start_session}let(:url){'https://www.selenium.dev/selenium/web/inputs.html'}before{driver.get(url)}it'checks if an element is displayed'dodisplayed_value=driver.find_element(name:'email_input').displayed?expect(displayed_value).tobe_truthyendit'checks if an element is enabled'doenabled_value=driver.find_element(name:'email_input').enabled?expect(enabled_value).tobe_truthyendit'checks if an element is selected'doselected_value=driver.find_element(name:'email_input').selected?expect(selected_value).tobe_falseyendit'gets the tag name of an element'dotag_name=driver.find_element(name:'email_input').tag_nameexpect(tag_name).not_tobe_emptyendit'gets the size and position of an element'dosize=driver.find_element(name:'email_input').sizeexpect(size.width).tobe_positiveexpect(size.height).tobe_positiveendit'gets the css value of an element'docss_value=driver.find_element(name:'email_input').css_value('background-color')expect(css_value).not_tobe_emptyendit'gets the text of an element'dotext=driver.find_element(xpath:'//h1').textexpect(text).toeq('Testing Inputs')endit'gets the attribute value of an element'doattribute_value=driver.find_element(name:'number_input').attribute('value')expect(attribute_value).not_tobe_emptyendend
// identify the email text box
constemailElement=awaitdriver.findElement(By.xpath('//input[@name="email_input"]'));//fetch the attribute "name" associated with the textbox
constnameAttribute=awaitemailElement.getAttribute("name");
const{By,Builder}=require('selenium-webdriver');constassert=require("assert");describe('Element Information Test',function(){letdriver;before(asyncfunction(){driver=awaitnewBuilder().forBrowser('chrome').build();});beforeEach(async()=>{awaitdriver.get('https://www.selenium.dev/selenium/web/inputs.html');})it('Check if element is displayed',asyncfunction(){// Resolves Promise and returns boolean value
letresult=awaitdriver.findElement(By.name("email_input")).isDisplayed();assert.equal(result,true);});it('Check if button is enabled',asyncfunction(){// Resolves Promise and returns boolean value
letelement=awaitdriver.findElement(By.name("button_input")).isEnabled();assert.equal(element,true);});it('Check if checkbox is selected',asyncfunction(){// Returns true if element ins checked else returns false
letisSelected=awaitdriver.findElement(By.name("checkbox_input")).isSelected();assert.equal(isSelected,true);});it('Should return the tagname',asyncfunction(){// Returns TagName of the element
letvalue=awaitdriver.findElement(By.name('email_input')).getTagName();assert.equal(value,"input");});it('Should be able to fetch element size and position ',asyncfunction(){// Returns height, width, x and y position of the element
letobject=awaitdriver.findElement(By.name('range_input')).getRect();assert.ok(object.height!==null)assert.ok(object.width!==null)assert.ok(object.y!==null)assert.ok(object.x!==null)});it('Should be able to fetch attributes and properties ',asyncfunction(){// identify the email text box
constemailElement=awaitdriver.findElement(By.xpath('//input[@name="email_input"]'));//fetch the attribute "name" associated with the textbox
constnameAttribute=awaitemailElement.getAttribute("name");assert.equal(nameAttribute,"email_input")});after(async()=>awaitdriver.quit());});describe('Element Information Test',function(){letdriver;before(asyncfunction(){driver=awaitnewBuilder().forBrowser('chrome').build();});it('Should return the css specified CSS value',asyncfunction(){awaitdriver.get('https://www.selenium.dev/selenium/web/colorPage.html');// Returns background color of the element
letvalue=awaitdriver.findElement(By.id('namedColor')).getCssValue('background-color');assert.equal(value,"rgba(0, 128, 0, 1)");});it('Should return the css specified CSS value',asyncfunction(){awaitdriver.get('https://www.selenium.dev/selenium/web/linked_image.html');// Returns text of the element
lettext=awaitdriver.findElement(By.id('justanotherLink')).getText();assert.equal(text,"Just another link.");});after(async()=>awaitdriver.quit());});
// Navigate to URL
driver.get("https://www.selenium.dev/selenium/web/inputs.html")//fetch the value property associated with the textbox
valattr=driver.findElement(By.name("email_input")).getAttribute("value")