Selenium Grid 允许通过将客户端发送的命令路由到远程浏览器实例来在远程机器上执行 WebDriver 脚本。
Grid 的目标:
- 提供一种在多台机器上并行运行测试的简单方法
- 允许在不同的浏览器版本上进行测试
- 启用跨平台测试
感兴趣? 通过以下部分了解Grid的工作原理, 以及如何设置自己的.
Selenium Grid 允许通过将客户端发送的命令路由到远程浏览器实例来在远程机器上执行 WebDriver 脚本。
Grid 的目标:
感兴趣? 通过以下部分了解Grid的工作原理, 以及如何设置自己的.
Page being translated from English to Chinese. Do you speak Chinese? Help us to translate it by sending us pull requests!
--selenium-manager true.java -jar selenium-server-<version>.jar standalone*想知道如何将您的测试指向 http://localhost:4444吗?
请查看 RemoteWebDriver section。
要了解更多不同的配置选项,请查看以下各小节。
Grid由六个不同的组件组成,这使您可以以不同的方式部署它。
根据您的需求,您可以单独启动每个组件(分布式),将它们分组为Hub和Node,或者全部在单个机器上运行(独立)。
Standalone 可以将所有 Grid 组件 无缝地整合成一个单独的实体。在 Standalone 模式下运行 Grid,只需一个命令即可获得一个完整的 Grid,并在一个进程中运行。Standalone 只能在一台机器上运行。
Standalone 模式也是最容易启动 Selenium Grid 的模式。默认情况下,服务器将在 http://localhost:4444 上监听 RemoteWebDriver 请求,并且服务器将从系统 PATH 中检测可以使用的驱动程序。
java -jar selenium-server-<version>.jar standalone
成功启动 Standalone 模式的 Grid 后,将你的 WebDriver 测试指向 http://localhost:4444。
Standalone 的常见用途包括:
RemoteWebDriver 开发或调试测试Hub和Node是最常用的角色,因为它允许:
一个Hub由以下组件组成: 路由器(Router)、分发器(Distributor)、会话映射(Session Map)、新会话队列(New Session Queue)和事件总线(Event Bus)。
java -jar selenium-server-<version>.jar hub
默认情况下,服务器将在 http://localhost:4444 上监听RemoteWebDriver请求。
在启动时,Node将从系统的PATH中检测可用的驱动程序。
以下命令假设Node正在运行的机器与Hub在同一台机器上。
java -jar selenium-server-<version>.jar node
Node 1
java -jar selenium-server-<version>.jar node --port 5555
Node 2
java -jar selenium-server-<version>.jar node --port 6666
Hub和Nodes通过HTTP和事件总线(事件总线位于Hub内部)进行通信。
Node通过事件总线向Hub发送消息以开始注册过程。当Hub收到消息时,通过HTTP与Node联系以确认其存在。
要成功将Node注册到Hub,重要的是要在Hub机器上公开事件总线端口(默认为4442和4443)。这也适用于Node端口。有了这个,Hub和Node都能够通信。
如果Hub使用默认端口,则可以使用 --hub 注册Node。
java -jar selenium-server-<version>.jar node --hub http://<hub-ip>:4444
当Hub未使用默认端口时,需要使用--publish-events和--subscribe-events。
例如,如果Hub使用端口8886、8887和8888。
java -jar selenium-server-<version>.jar hub --publish-events tcp://<hub-ip>:8886 --subscribe-events tcp://<hub-ip>:8887 --port 8888
Node需要使用这些端口才能成功注册。
java -jar selenium-server-<version>.jar node --publish-events tcp://<hub-ip>:8886 --subscribe-events tcp://<hub-ip>:8887
在使用分布式Grid时,每个组件都需要单独启动,并且理想情况下应该在不同的机器上。
默认端口为:4442、4443和5557。
java -jar selenium-server-<version>.jar event-bus --publish-events tcp://<event-bus-ip>:4442 --subscribe-events tcp://<event-bus-ip>:4443 --port 5557
默认端口为5559。
java -jar selenium-server-<version>.jar sessionqueue --port 5559
默认会话映射端口为5556。会话映射与事件总线进行交互。
java -jar selenium-server-<version>.jar sessions --publish-events tcp://<event-bus-ip>:4442 --subscribe-events tcp://<event-bus-ip>:4443 --port 5556
默认分配器端口为5553。分配器 与 新会话队列、会话映射、事件总线 和 Node(s) 进行交互。
java -jar selenium-server-<version>.jar distributor --publish-events tcp://<event-bus-ip>:4442 --subscribe-events tcp://<event-bus-ip>:4443 --sessions http://<sessions-ip>:5556 --sessionqueue http://<new-session-queue-ip>:5559 --port 5553 --bind-bus false
默认路由器端口为4444。路由器 与 新会话队列、会话映射和分配器 进行交互。
java -jar selenium-server-<version>.jar router --sessions http://<sessions-ip>:5556 --distributor http://<distributor-ip>:5553 --sessionqueue http://<new-session-queue-ip>:5559 --port 4444
默认 Node 端口是 5555.
java -jar selenium-server-<version>.jar node --publish-events tcp://<event-bus-ip>:4442 --subscribe-events tcp://<event-bus-ip>:4443
向测试中添加 Metadata 并通过GraphQL进行消费,或通过 Selenium Grid UI 可视化其部分内容(例如se:name)。
可以通过在 capability 前加上 se: 来添加元数据。以下是一个Java的快速示例。
ChromeOptions chromeOptions = new ChromeOptions();
chromeOptions.setCapability("browserVersion", "100");
chromeOptions.setCapability("platformName", "Windows");
// Showing a test name instead of the session id in the Grid UI
chromeOptions.setCapability("se:name", "My simple test");
// Other type of metadata can be seen in the Grid UI by clicking on the
// session info or via GraphQL
chromeOptions.setCapability("se:sampleMetadata", "Sample metadata value");
WebDriver driver = new RemoteWebDriver(new URL("http://gridUrl:4444"), chromeOptions);
driver.get("http://www.google.com");
driver.quit();
启动 Grid 后,主要有两种方式查询其状态,通过 Grid UI 或通过 API 调用。
可以通过打开您喜欢的浏览器并前往http://localhost:4444。
API 调用可以通过 http://localhost:4444/status 端点或使用 GraphQL
为简单起见,本页中显示的所有命令示例均假定组件正在运行在本地。更详细的示例和用法可以在配置组件 部分。
默认情况下,Grid 将使用 AsyncHttpClient。 AsyncHttpClient 是一个建立在 Netty 之上的开源库。 它允许异步执行 HTTP 请求和响应。 此外,它还提供 WebSocket 支持。 因此它很合适。
然而,AsyncHttpClient 从 2021 年 6 月开始就没有主动维护了。恰逢 Java 11+ 提供了内置的 HTTP 和 WebSocket 客户端。
目前,Selenium 计划将支持的最低版本升级到 Java 11。然而,这需要大量的工作。为了确保用户体验不受影响,将其与主要发布版本和相应的公告对齐是至关重要的。
要使用 Java 11 客户端,您需要下载 selenium-http-jdk-client jar文件并使用 --ext 参数使其在 Grid jar 的类路径中可用。
jar文件可以直接从 repo1.maven.org 下载,然后使用以下方式启动Grid:
java -Dwebdriver.http.factory=jdk-http-client -jar selenium-server-<version>.jar --ext selenium-http-jdk-client-<version>.jar standalone
下载 selenium-http-jdk-client jar 文件的替代方法是使用 Coursier。
java -Dwebdriver.http.factory=jdk-http-client -jar selenium-server-<version>.jar --ext $(coursier fetch -p org.seleniumhq.selenium:selenium-http-jdk-client:<version>) standalone
如果您使用的是集线器/节点模式或分布式模式,则需要为每个组件设置 -Dwebdriver.http.factory=jdk-http-client 和 --ext 参数。
选择 Grid 角色取决于需要支持什么操作系统和浏览器、需要执行多少个并行会话、可用机器的数量以及这些机器的配置(CPU、RAM)。
并发创建会话依赖于 分配器 的可用处理器。 例如,如果一台机器有 4 个 CPU,则 分配器 最多只能同时创建 4 个会话。
默认情况下,Node 支持的最大并发会话数受可用 CPU 数量的限制。 例如,如果 Node 机器有 8 个 CPU,它最多可以运行 8 个并发浏览器会话(Safari 除外,它始终是一个)。 此外,预计每个浏览器会话应使用大约 1GB 的 RAM。
通常,建议 Nodes 尽可能小。 与其让机器有 32 个 CPU 和 32GB RAM 来运行 32 个并发浏览器会话,不如有 32 个小的 Node,以便更好地隔离进程。 有了这个,如果一个 Node 发生故障,它将以孤立的方式进行。 Docker 是实现这种方法的好工具。
请注意,默认值(每个浏览器 1 个 CPU/1GB RAM)是建议值,它们不适用于您的上下文。 建议将它们用作参考,但持续测量性能将有助于确定您的环境的理想值。
Grid 大小与支持的并发会话数量和 Node 数量有关,没有“一刀切”的说法。 下面提到的尺寸是粗略的估计,不同环境之间可能会有所不同。 例如,当 Hub 具有足够的资源时,具有 120 个 Nodes 的 Hub/Node 可能运行良好。 以下值并非一成不变,欢迎提供反馈!
Standalone 或 Hub/Node 不超过5个 Nodes.
Hub/Node 介于6到60个 Nodes 之间。
Hub/Node 介于60到100个 Nodes 之间, Distributed 超过100个 Nodes。
必须使用适当的防火墙权限保护Selenium Grid免受外部访问。
以下一种或多种情况可能会导致你的 Grid 处于一个不安全的状态:
Grid 基础设施的开放访问请参阅 Detectify 上的这篇博文,它提供了一个很好的公开暴露的 Grid 如何被滥用的概述:不要让你的 Grid 暴露在外
Grid 的内部组件如何相互关联。Grid 设置。Grid 中的关键概念。什么情况下可以使用 Selenium Grid ?
Selenium Grid 可以并行地在多台计算机(称为节点)上运行测试案例. 对于大型和长时间运行的测试案例,这可以节省几分钟、几小时甚至几天的时间.
这有效的缩短了测试结果的反馈时间,使得在测试的应用程序发生变化时能够更快地得到测试结果.
Grid 可以并行地运行测试,支持多种不同的浏览器类型,并且可以同时运行多个相同浏览器的实例.
举个例子,假设一个拥有六个节点的Grid. 第一台计算机拥有Firefox的最新版本,第二台拥有Firefox的上一个版本,第三台运行最新版Chrome,而其余三台机器是Mac Mini,允许在最新版本的Safari上并行运行三个测试.
执行时间可以用一个简单的公式来表示:
测试次数 × 平均测试时间 / 节点数 = 总执行时间
   15      *       45s        /        1        =      11m 15s   // 没有Grid
   15      *       45s        /        5        =      2m 15s    // 5节点的Grid
   15      *       45s        /        15       =      45s       // 15节点的Grid
  100      *       120s       /        15       =      13m 20s   // 如果没有Grid, 需要3个多小时
在测试案例执行时,Grid 会按照测试配置将测试分配到相应的浏览器上运行.
即使对于比较复杂的 Selenium 测试案例,这样的配置也可以极大地加快执行时间.
Selenium Grid 是 Selenium 项目中的重要组成部分,由同一团队的核心Selenium开发人员并行维护.
由于意识到测试执行速度的重要性,Grid 自设计之初就成为 Selenium 项目的关键部分.
Selenium Grid 4 是对以前版本的彻底重写。除了对性能和标准合规性进行全面改进外,还分解了 Grid 的不同功能以反映更现代的计算和软件开发时代。 Selenium Grid 4 专为容器化和云分布式可扩展性而构建,是现代时代的全新解决方案。
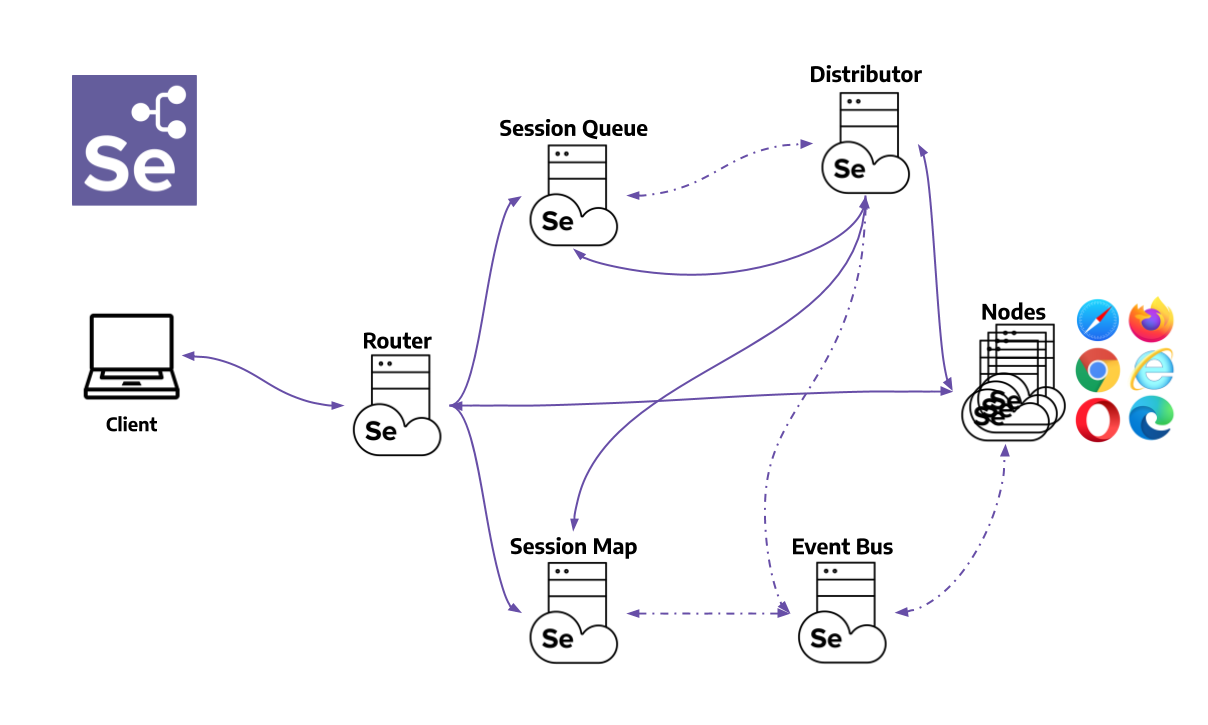
路由器 是 Grid 的入口点,接收所有外部请求,并将它们转发给正确的组件。
如果路由器收到新的会话请求,它将被转发到新会话队列。
如果请求属于一个已经存在的session,路由器会查询Session Map得到session运行所在的Node ID,然后将请求直接转发给Node。
路由器通过将请求发送到能够更好地处理它们的组件来平衡网格中的负载,而不会使过程中不需要的任何组件过载。
分发器有两个主要职责:
Node通过事件总线发送Node注册事件来注册到分发器。分发器读取它,然后尝试通过 HTTP 到达Node以确认它的存在。如果请求成功,Distributor注册节点并通过 GridModel 跟踪所有Node功能。
当一个新的会话请求被发送到路由器时,它被转发到新会话队列,它将在队列中等待。 Distributor 将轮询新会话队列以查找未决的新会话请求,然后找到可以创建会话的合适Node。会话创建后,分发器将会话 ID 与正在执行会话的Node之间的关系存储在会话映射中。
会话映射 是一个数据存储,用于保存会话 ID 和运行会话的Node之间的关系。它支持路由器在将请求转发到Node的过程中进行查询。路由器将向会话映射询问与会话 ID 关联的Node。
新会话队列按先进先出的顺序保存所有新会话请求。它具有可配置的参数,用于设置请求超时和请求重试间隔(检查超时的频率)。
路由器将新会话请求添加到新会话队列中并等待响应。新会话队列定期检查队列中是否有任何请求超时,如果是,则立即拒绝并将其删除。
分发器定期检查是否有可用的插槽。如果有可用的插槽,则分发器会轮询新会话队列以查找第一个匹配的请求。然后,分发器尝试创建新会话。
一旦请求的功能与任何空闲Node插槽的功能匹配,分发器将尝试获取可用插槽。如果所有插槽都已忙碌,则分发器将将请求发送回队列。如果请求在重试或添加到队列的前面时超时,则会被拒绝。
成功创建会话后,分发器将会话信息发送到新会话队列,该信息然后被发送回路由器,最终发送给客户端。
一个Grid可以包含多个Node。每个Node管理它所在机器上可用浏览器的插槽。
Node通过事件总线向分发器注册自己,并将其配置作为注册消息发送。
默认情况下,Node会自动注册其所在机器上路径中可用的所有浏览器驱动程序。它还为基于Chromium的浏览器和Firefox创建每个可用CPU一个插槽。对于Safari,只创建一个插槽。通过特定的配置,它可以在Docker容器中运行会话或转发命令。
Node仅执行接收到的命令,不评估、不做出判断或控制任何除命令和响应流之外的东西。Node所在的机器不需要与其他组件具有相同的操作系统。例如,Windows节点可能具有在Edge上提供IE模式作为浏览器选项的能力,而在Linux或Mac上则不可能,网格可以配置多个具有Windows、Mac或Linux的Node。
事件总线作为节点、分发器、新会话队列和会话映射之间的通信路径。Grid 的大部分内部通信都通过消息进行,避免了频繁的HTTP调用。在完全分布式模式下启动Grid 时,事件总线应该是第一个组件。
Help命令显示基于当前代码实现的信息. 因此, 如果文档没有更新, 它将提供准确的信息. 这是了解任何新版本Grid4配置的最便捷方法.
Info命令提供以下主题的详细文档:
通过运行以下命令快速获取配置帮助:
java -jar selenium-server-<version>.jar info config
获取构建网格服务器的详细信息, 用于安全通信和节点注册.
java -jar selenium-server-<version>.jar info security
默认情况下, 网格使用本地会话表来存储会话信息. 网格支持额外的存储选项, 比如Redis和JDBC-SQL支持的数据库. 要设置不同的会话存储, 请使用以下命令获取设置步骤:
java -jar selenium-server-<version>.jar info sessionmap
默认情况下, 追踪是启用的. 要通过Jaeger导出追踪并将其可视化, 请使用以下命令进行说明:
java -jar selenium-server-<version>.jar info tracing
java -jar selenium-server-<version>.jar --config-help
上述命令将显示所有可用的命令及其描述.
在Selenium后面键入–help的配置选项, 以获取特定组件的配置信息.
java -jar selenium-server-<version>.jar standalone --help
java -jar selenium-server-<version>.jar hub --help
java -jar selenium-server-<version>.jar sessions --help
java -jar selenium-server-<version>.jar sessionqueue --help
java -jar selenium-server-<version>.jar distributor --help
java -jar selenium-server-<version>.jar router --help
java -jar selenium-server-<version>.jar node --help
Page being translated from English to Chinese. Do you speak Chinese? Help us to translate it by sending us pull requests!
Different sections are available to configure a Grid. Each section has options can be configured through command line arguments.
A complete description of the component to section mapping can be seen below.
Note that this documentation could be outdated if an option was modified or added but has not been documented yet. In case you bump into this situation, please check the “Config help” section and feel free to send us a pull request updating this page.
| Standalone | Hub | Node | Distributor | Router | Sessions | SessionQueue | |
|---|---|---|---|---|---|---|---|
| Distributor | |||||||
| Docker | |||||||
| Events | |||||||
| Logging | |||||||
| Network | |||||||
| Node | |||||||
| Router | |||||||
| Relay | |||||||
| Server | |||||||
| SessionQueue | |||||||
| Sessions |
| Option | Type | Value/Example | Description |
|---|---|---|---|
--healthcheck-interval | int | 120 | How often, in seconds, will the health check run for all Nodes. This ensures the server can ping all the Nodes successfully. |
--distributor | uri | http://localhost:5553 | Url of the distributor. |
--distributor-host | string | localhost | Host on which the distributor is listening. |
--distributor-implementation | string | org.openqa.selenium.grid.distributor.local.LocalDistributor | Full class name of non-default distributor implementation |
--distributor-port | int | 5553 | Port on which the distributor is listening. |
--reject-unsupported-caps | boolean | false | Allow the Distributor to reject a request immediately if the Grid does not support the requested capability. Rejecting requests immediately is suitable for a Grid setup that does not spin up Nodes on demand. |
--slot-matcher | string | org.openqa.selenium.grid.data.DefaultSlotMatcher | Full class name of non-default slot matcher to use. This is used to determine whether a Node can support a particular session. |
--slot-selector | string | org.openqa.selenium.grid.distributor.selector.DefaultSlotSelector | Full class name of non-default slot selector. This is used to select a slot in a Node once the Node has been matched. |
--newsession-threadpool-size | int | 24 | The Distributor uses a fixed-sized thread pool to create new sessions as it consumes new session requests from the queue. This allows configuring the size of the thread pool. The default value is no. of available processors * 3. Note: If the no. of threads is way greater than the available processors it will not always increase the performance. A high number of threads causes more context switching which is an expensive operation. |
--purge-nodes-interval | int | 30 | How often, in seconds, will the Distributor purge Nodes that have been down for a while. This is calculated based on the heartbeat received from a particular node. |
| Option | Type | Value/Example | Description |
|---|---|---|---|
--docker-assets-path | string | /opt/selenium/assets | Absolute path where assets will be stored |
--docker- | string[] | selenium/standalone-firefox:latest '{"browserName": "firefox"}' | Docker configs which map image name to stereotype capabilities (example `-D selenium/standalone-firefox:latest ‘{“browserName”: “firefox”}’) |
--docker-devices | string[] | /dev/kvm:/dev/kvm | Exposes devices to a container. Each device mapping declaration must have at least the path of the device in both host and container separated by a colon like in this example: /device/path/in/host:/device/path/in/container |
--docker-host | string | localhost | Host name where the Docker daemon is running |
--docker-port | int | 2375 | Port where the Docker daemon is running |
--docker-url | string | http://localhost:2375 | URL for connecting to the Docker daemon |
--docker-video-image | string | selenium/video:latest | Docker image to be used when video recording is enabled |
--docker-host-config-keys | string[] | Dns DnsOptions DnsSearch ExtraHosts Binds | Specify which docker host configuration keys should be passed to browser containers. Keys name can be found in the Docker API documentation, or by running docker inspect the node-docker container. |
| Option | Type | Value/Example | Description |
|---|---|---|---|
--bind-bus | boolean | false | Whether the connection string should be bound or connected. When true, the component will be bound to the Event Bus (as in the Event Bus will also be started by the component, typically by the Distributor and the Hub). When false, the component will connect to the Event Bus. |
--events-implementation | string | org.openqa.selenium.events.zeromq.ZeroMqEventBus | Full class name of non-default event bus implementation |
--publish-events | string | tcp://*:4442 | Connection string for publishing events to the event bus |
--subscribe-events | string | tcp://*:4443 | Connection string for subscribing to events from the event bus |
| Option | Type | Value/Example | Description |
|---|---|---|---|
--http-logs | boolean | false | Enable http logging. Tracing should be enabled to log http logs. |
--log-encoding | string | UTF-8 | Log encoding |
--log | string | Windows path example :'\path\to\file\gridlog.log'or 'C:\path\path\to\file\gridlog.log'Linux/Unix/MacOS path example : '/path/to/file/gridlog.log' | File to write out logs. Ensure the file path is compatible with the operating system’s file path. |
--log-level | string | “INFO” | Log level. Default logging level is INFO. Log levels are described here https://docs.oracle.com/en/java/javase/11/docs/api/java.logging/java/util/logging/Level.html |
--plain-logs | boolean | true | Use plain log lines |
--structured-logs | boolean | false | Use structured logs |
--tracing | boolean | true | Enable trace collection |
--log-timestamp-format | string | HH:mm:ss.SSS | Allows the configure log timestamp format |
| Option | Type | Value/Example | Description |
|---|---|---|---|
--relax-checks | boolean | false | Relax checks on origin header and content type of incoming requests, in contravention of strict W3C spec compliance. |
| Option | Type | Value/Example | Description | |
|---|---|---|---|---|
--detect-drivers | boolean | true | Autodetect which drivers are available on the current system, and add them to the Node. | |
--driver-configuration | string[] | display-name="Firefox Nightly" max-sessions=2 webdriver-path="/usr/local/bin/geckodriver" stereotype="{\"browserName\": \"firefox\", \"browserVersion\": \"86\", \"moz:firefoxOptions\": {\"binary\":\"/Applications/Firefox Nightly.app/Contents/MacOS/firefox-bin\"}}" | List of configured drivers a Node supports. It is recommended to provide this type of configuration through a toml config file to improve readability | |
--driver-factory | string[] | org.openqa.selenium.example.LynxDriverFactory '{"browserName": "lynx"}' | Mapping of fully qualified class name to a browser configuration that this matches against. | |
--driver-implementation | string[] | "firefox" | Drivers that should be checked. If specified, will skip autoconfiguration. | |
--node-implementation | string | "org.openqa.selenium.grid.node.local.LocalNodeFactory" | Full classname of non-default Node implementation. This is used to manage a session’s lifecycle. | |
--grid-url | string | https://grid.example.com | Public URL of the Grid as a whole (typically the address of the Hub or the Router) | |
--heartbeat-period | int | 60 | How often, in seconds, will the Node send heartbeat events to the Distributor to inform it that the Node is up. | |
--max-sessions | int | 8 | Maximum number of concurrent sessions. Default value is the number of available processors. | |
--override-max-sessions | boolean | false | The # of available processors is the recommended max sessions value (1 browser session per processor). Setting this flag to true allows the recommended max value to be overwritten. Session stability and reliability might suffer as the host could run out of resources. | |
--register-cycle | int | 10 | How often, in seconds, the Node will try to register itself for the first time to the Distributor. | |
--register-period | int | 120 | How long, in seconds, will the Node try to register to the Distributor for the first time. After this period is completed, the Node will not attempt to register again. | |
--session-timeout | int | 300 | Let X be the session-timeout in seconds. The Node will automatically kill a session that has not had any activity in the last X seconds. This will release the slot for other tests. | |
--vnc-env-var | string[] | SE_START_XVFB SE_START_VNC SE_START_NO_VNC | Environment variable to check in order to determine if a vnc stream is available or not. | |
--no-vnc-port | int | 7900 | If VNC is available, sets the port where the local noVNC stream can be obtained | |
--drain-after-session-count | int | 1 | Drain and shutdown the Node after X sessions have been executed. Useful for environments like Kubernetes. A value higher than zero enables this feature. | |
--hub | string | http://localhost:4444 | The address of the Hub in a Hub-and-Node configuration. Can be a hostname or IP address (hostname), in which case the Hub will be assumed to be http://hostname:4444, the --grid-url will be the same --publish-events will be tcp://hostname:4442 and --subscribe-events will be tcp://hostname:4443. If hostname contains a port number, that will be used for --grid-url but the URIs for the event bus will remain the same. Any of these default values may be overridden but setting the correct flags. If the hostname has a protocol (such as https) that will be used too. | |
--enable-cdp | boolean | true | Enable CDP proxying in Grid. A Grid admin can disable CDP if the network doesnot allow websockets. True by default. | |
--enable-managed-downloads | boolean | false | This causes the Node to auto manage files downloaded for a given session on the Node. | |
--selenium-manager | boolean | false | When drivers are not available on the current system, use Selenium Manager. False by default. | |
--connection-limit-per-session | int | 10 | Let X be the maximum number of websocket connections per session.This will ensure one session is not able to exhaust the connection limit of the host. |
| Option | Type | Value/Example | Description |
|---|---|---|---|
--service-url | string | http://localhost:4723 | URL for connecting to the service that supports WebDriver commands like an Appium server or a cloud service. |
--service-host | string | localhost | Host name where the service that supports WebDriver commands is running |
--service-port | int | 4723 | Port where the service that supports WebDriver commands is running |
--service-status-endpoint | string | /status | Optional, endpoint to query the WebDriver service status, an HTTP 200 response is expected |
--service-protocol-version | string | HTTP/1.1 | Optional, enforce a specific protocol version in HttpClient when communicating with the endpoint service status |
--service-configuration | string[] | max-sessions=2 stereotype='{"browserName": "safari", "platformName": "iOS", "appium:platformVersion": "14.5"}}' | Configuration for the service where calls will be relayed to. It is recommended to provide this type of configuration through a toml config file to improve readability. |
| Option | Type | Value/Example | Description |
|---|---|---|---|
--password | string | myStrongPassword | Password clients must use to connect to the server. Both this and the username need to be set in order to be used. |
--username | string | admin | User name clients must use to connect to the server. Both this and the password need to be set in order to be used. |
--sub-path | string | my_company/selenium_grid | A sub-path that should be considered for all user facing routes on the Hub/Router/Standalone. |
--disable-ui | boolean | true | Disable the Grid UI. |
| Option | Type | Value/Example | Description |
|---|---|---|---|
--allow-cors | boolean | true | Whether the Selenium server should allow web browser connections from any host |
--host | string | localhost | Server IP or hostname: usually determined automatically. |
--bind-host | boolean | true | Whether the server should bind to the host address/name, or only use it to" report its reachable url. Helpful in complex network topologies where the server cannot report itself with the current IP/hostname but rather an external IP or hostname (e.g. inside a Docker container) |
--https-certificate | path | /path/to/cert.pem | Server certificate for https. Get more detailed information by running “java -jar selenium-server.jar info security” |
--https-private-key | path | /path/to/key.pkcs8 | Private key for https. Get more detailed information by running “java -jar selenium-server.jar info security” |
--max-threads | int | 24 | Maximum number of listener threads. Default value is: (available processors) * 3. |
--port | int | 4444 | Port to listen on. There is no default as this parameter is used by different components, for example, Router/Hub/Standalone will use 4444 and Node will use 5555. |
| Option | Type | Value/Example | Description |
|---|---|---|---|
--sessionqueue | uri | http://localhost:1237 | Address of the session queue server. |
-sessionqueue-host | string | localhost | Host on which the session queue server is listening. |
--sessionqueue-port | int | 1234 | Port on which the session queue server is listening. |
--session-request-timeout | int | 300 | Timeout in seconds. A new incoming session request is added to the queue. Requests sitting in the queue for longer than the configured time will timeout. |
--session-retry-interval | int | 5 | Retry interval in seconds. If all slots are busy, new session request will be retried after the given interval. |
--maximum-response-delay | int | 8 | How often, in seconds, will the the SessionQueue response in case there is no data, to reduce the http requests while polling for new session requests. |
| Option | Type | Value/Example | Description |
|---|---|---|---|
--sessions | uri | http://localhost:1234 | Address of the session map server. |
--sessions-host | string | localhost | Host on which the session map server is listening. |
--sessions-port | int | 1234 | Port on which the session map server is listening. |
All the options mentioned above can be used when starting the Grid components. They are a good way of exploring the Grid options, and trying out values to find a suitable configuration.
We recommend the use of Toml files to configure a Grid. Configuration files improve readability, and you can also check them in source control.
When needed, you can combine a Toml file configuration with CLI arguments.
To pass config options as command-line flags, identify the valid options for the component and follow the template below.
java -jar selenium-server-<version>.jar <component> --<option> value
java -jar selenium-server-<version>.jar standalone --max-sessions 4 --port 4444
java -jar selenium-server-<version>.jar hub --session-request-timeout 500 --port 3333 --tracing false
java -jar selenium-server-<version>.jar node --max-sessions 4 --log-level "fine" --port 7777 --driver-implementation "firefox" --driver-implementation "edge"
java -jar selenium-server-<version>.jar distributor --sessions http://localhost:5556 --sessionqueue http://localhost:5559 --bind-bus false
Important: Custom capabilities need to be set in the configuration in all Nodes. They also need to be included always in every session request.
java -jar selenium-server-<version>.jar hub
truejava -jar selenium-server-<version>.jar node --detect-drivers false --driver-configuration display-name="Chrome (custom capability true)" max-sessions=1 stereotype='{"browserName":"chrome","gsg:customcap":true}' --port 6161
falsejava -jar selenium-server-<version>.jar node --detect-drivers false --driver-configuration display-name="Chrome (custom capability true)" max-sessions=1 stereotype='{"browserName":"chrome","gsg:customcap":false}' --port 6262
ChromeOptions options = new ChromeOptions();
options.setCapability("gsg:customcap", true);
WebDriver driver = new RemoteWebDriver(new URL("http://localhost:4444"), options);
driver.get("https://selenium.dev");
driver.quit();
Set the custom capability to false in order to match the Node B.
At times a test may need to access files that were downloaded by it on the Node. To retrieve such files, following can be done.
java -jar selenium-server-<version>.jar hub
java -jar selenium-server-<version>.jar node --enable-managed-downloads true
Tests that want to use this feature should set the capability "se:downloadsEnabled"to true
options.setCapability("se:downloadsEnabled", true);
"se:downloadsEnabled" against ONLY those nodes which were started with --enable-managed-downloads trueNote: Currently this capability is ONLY supported on:
EdgeFirefox andChrome browserGET from is /session/<sessionId>/se/files.{
"value": {
"names": [
"Red-blue-green-channel.jpg"
]
}
}
In the response the list of file names appear under the key names.
POST from is /session/<sessionId>/se/files with a payload of the form {"name": "fileNameGoesHere}{
"value": {
"filename": "Red-blue-green-channel.jpg",
"contents": "Base64EncodedStringContentsOfDownloadedFileAsZipGoesHere"
}
}
filename - The file name that was downloaded.contents - Base64 encoded zipped contents of the file.The below mentioned curl example can be used to list all the files that were downloaded by the current session in the Node, and which can be retrieved locally.
curl -X GET "http://localhost:4444/session/90c0149a-2e75-424d-857a-e78734943d4c/se/files"
A sample response would look like below:
{
  "value": {
    "names": [
      "Red-blue-green-channel.jpg"
    ]
  }
}
Assuming the downloaded file is named Red-blue-green-channel.jpg, and using curl, the
file could be downloaded with the following command:
curl -H "Accept: application/json" \
-H "Content-Type: application/json; charset=utf-8" \
-X POST -d '{"name":"Red-blue-green-channel.jpg"}' \
"http://localhost:4444/session/18033434-fa4f-4d11-a7df-9e6d75920e19/se/files"
A sample response would look like below:
{
  "value": {
    "filename": "Red-blue-green-channel.jpg",
    "contents": "UEsDBBQACAgIAJpagVYAAAAAAAAAAAAAAAAaAAAAUmVkLWJsAAAAAAAAAAAAUmVkLWJsdWUtZ3JlZW4tY2hhbm5lbC5qcGdQSwUGAAAAAAEAAQBIAAAAcNkAAAAA"
  }
}
Below is an example in Java that does the following:
import com.google.common.collect.ImmutableMap;

import org.openqa.selenium.By;
import org.openqa.selenium.io.Zip;
import org.openqa.selenium.json.Json;
import org.openqa.selenium.remote.RemoteWebDriver;
import org.openqa.selenium.remote.http.HttpClient;
import org.openqa.selenium.remote.http.HttpRequest;
import org.openqa.selenium.remote.http.HttpResponse;

import java.io.File;
import java.net.URL;
import java.nio.file.Files;
import java.util.List;
import java.util.Map;
import java.util.Optional;
import java.util.concurrent.TimeUnit;

import static org.openqa.selenium.remote.http.Contents.asJson;
import static org.openqa.selenium.remote.http.Contents.string;
import static org.openqa.selenium.remote.http.HttpMethod.GET;
import static org.openqa.selenium.remote.http.HttpMethod.POST;

public class DownloadsSample {

  public static void main(String[] args) throws Exception {
    // Assuming the Grid is running locally.
    URL gridUrl = new URL("http://localhost:4444");
    ChromeOptions options = new ChromeOptions();
    options.setCapability("se:downloadsEnabled", true);
    RemoteWebDriver driver = new RemoteWebDriver(gridUrl, options);
    try {
      demoFileDownloads(driver, gridUrl);
    } finally {
      driver.quit();
    }
  }

	private static void demoFileDownloads(RemoteWebDriver driver, URL gridUrl) throws Exception {
		driver.get("https://www.selenium.dev/selenium/web/downloads/download.html");
		// Download the two available files on the page
		driver.findElement(By.id("file-1")).click();
		driver.findElement(By.id("file-2")).click();

		// The download happens in a remote Node, which makes it difficult to know when the file
		// has been completely downloaded. For demonstration purposes, this example uses a
		// 10-second sleep which should be enough time for a file to be downloaded.
		// We strongly recommend to avoid hardcoded sleeps, and ideally, to modify your
		// application under test, so it offers a way to know when the file has been completely
		// downloaded.
		TimeUnit.SECONDS.sleep(10);

		//This is the endpoint which will provide us with list of files to download and also to
		//let us download a specific file.
		String downloadsEndpoint = String.format("/session/%s/se/files", driver.getSessionId());

		String fileToDownload;

		try (HttpClient client = HttpClient.Factory.createDefault().createClient(gridUrl)) {
			// To list all files that are were downloaded on the remote node for the current session
			// we trigger GET request.
			HttpRequest request = new HttpRequest(GET, downloadsEndpoint);
			HttpResponse response = client.execute(request);
			Map<String, Object> jsonResponse = new Json().toType(string(response), Json.MAP_TYPE);
			@SuppressWarnings("unchecked")
			Map<String, Object> value = (Map<String, Object>) jsonResponse.get("value");
			@SuppressWarnings("unchecked")
			List<String> names = (List<String>) value.get("names");
			// Let's say there were "n" files downloaded for the current session, we would like
			// to retrieve ONLY the first file.
			fileToDownload = names.get(0);
		}

		// Now, let's download the file
		try (HttpClient client = HttpClient.Factory.createDefault().createClient(gridUrl)) {
			// To retrieve a specific file from one or more files that were downloaded by the current session
			// on a remote node, we use a POST request.
			HttpRequest request = new HttpRequest(POST, downloadsEndpoint);
			request.setContent(asJson(ImmutableMap.of("name", fileToDownload)));
			HttpResponse response = client.execute(request);
			Map<String, Object> jsonResponse = new Json().toType(string(response), Json.MAP_TYPE);
			@SuppressWarnings("unchecked")
			Map<String, Object> value = (Map<String, Object>) jsonResponse.get("value");
			// The returned map would contain 2 keys,
			// filename - This represents the name of the file (same as what was provided by the test)
			// contents - Base64 encoded String which contains the zipped file.
			String zippedContents = value.get("contents").toString();
			// The file contents would always be a zip file and has to be unzipped.
			File downloadDir = Zip.unzipToTempDir(zippedContents, "download", "");
			// Read the file contents
			File downloadedFile = Optional.ofNullable(downloadDir.listFiles()).orElse(new File[]{})[0];
			String fileContent = String.join("", Files.readAllLines(downloadedFile.toPath()));
			System.out.println("The file which was "
					+ "downloaded in the node is now available in the directory: "
					+ downloadDir.getAbsolutePath() + " and has the contents: " + fileContent);
		}
	}


}
CLI选项 中 显示的所有选项都可以通过 TOML 文件进行配置. 此页面显示不同Grid组件的配置示例.
请注意, 如果修改或添加了选项, 但尚未记录, 则此文档可能已过时. 如果您遇到这种情况, 请查看 “配置帮助” 部分, 并随时向我们发送更新此页面的请求.
Selenium Grid对配置文件使用 TOML 格式. 配置文件由多个部分组成, 每个部分都有选项及其各自的值.
有关详细的使用指南, 请参阅TOML文档 . 如果出现解析错误, 请使用 TOML linter 验证配置.
一般配置结构具有以下模式:
[section1]
option1="value"

[section2]
option2=["value1","value2"]
option3=true
下面是一些使用Toml文件配置的 Grid组件示例, 该组件可以 从下面的方式开始:
java -jar selenium-server-<version>.jar <component> --config /path/to/file/<file-name>.toml
单机服务器, 在端口4449上运行, 新会话请求超时500秒.
[server]
port = 4449

[sessionqueue]
session-request-timeout = 500
默认情况下仅启用Firefox 和Chrome的单机服务器或节点.
[node]
drivers = ["chrome", "firefox"]
max-sessions = 3
具有定制驱动程序的单机或节点服务器, 允许使用Firefox试用或者每日构建的功能, 并且有不同的浏览器版本.
[node]
detect-drivers = false
[[node.driver-configuration]]
max-sessions = 100
display-name = "Firefox Nightly"
stereotype = "{\"browserName\": \"firefox\", \"browserVersion\": \"93\", \"platformName\": \"MAC\", \"moz:firefoxOptions\": {\"binary\": \"/Applications/Firefox Nightly.app/Contents/MacOS/firefox-bin\"}}"
[[node.driver-configuration]]
display-name = "Chrome Beta"
stereotype = "{\"browserName\": \"chrome\", \"browserVersion\": \"94\", \"platformName\": \"MAC\", \"goog:chromeOptions\": {\"binary\": \"/Applications/Google Chrome Beta.app/Contents/MacOS/Google Chrome Beta\"}}"
[[node.driver-configuration]]
display-name = "Chrome Dev"
stereotype = "{\"browserName\": \"chrome\", \"browserVersion\": \"95\", \"platformName\": \"MAC\", \"goog:chromeOptions\": {\"binary\": \"/Applications/Google Chrome Dev.app/Contents/MacOS/Google Chrome Dev\"}}"
webdriver-executable = '/path/to/chromedriver/95/chromedriver'
单机或节点服务器能够在Docker容器中运行每个新会话.
禁用驱动程序检测,
则最多有2个并发会话.
原型配置需要映射一个Docker映像,
Docker的守护进程需要通过http/tcp公开.
此外, 可以通过 devices 属性定义在主机上可访问的哪些设备文件将在容器中可用.
有关 docker 设备映射如何工作的更多信息, 请参阅 docker 文档.
[node]
detect-drivers = false
max-sessions = 2

[docker]
configs = [
    "selenium/standalone-chrome:93.0", "{\"browserName\": \"chrome\", \"browserVersion\": \"91\"}",
    "selenium/standalone-firefox:92.0", "{\"browserName\": \"firefox\", \"browserVersion\": \"92\"}"
]
#Optionally define all device files that should be mapped to docker containers
#devices = [
#    "/dev/kvm:/dev/kvm"
#]
url = "http://localhost:2375"
video-image = "selenium/video:latest"
连接到支持WebDriver外部服务 的Selenium Grid非常有用. 这种服务的一个例子可以是 云提供商或Appium服务器. 这样, Grid可以实现对本地不存在的平台和版本的更多覆盖.
下面是一个将Appium服务器连接到Grid的示例.
[node]
detect-drivers = false

[relay]
# Default Appium/Cloud server endpoint
url = "http://localhost:4723/wd/hub"
status-endpoint = "/status"
# Optional, enforce a specific protocol version in HttpClient when communicating with the endpoint service status (e.g. HTTP/1.1, HTTP/2)
protocol-version = "HTTP/1.1"
# Stereotypes supported by the service. The initial number is "max-sessions", and will allocate
# that many test slots to that particular configuration
configs = [
  "5", "{\"browserName\": \"chrome\", \"platformName\": \"android\", \"appium:platformVersion\": \"11\"}"
]
通过配置包含用户名和密码的 路由器/集线器/单机的方式, 可以使用这样的基本身份验证保护Grid. 加载Grid UI或者开始一个新的会话时 需要此用户/密码组合.
[router]
username = "admin"
password = "myStrongPassword"
下面是一个Java示例, 演示如何使用配置的用户和密码启动会话.
ClientConfig clientConfig = ClientConfig.defaultConfig()
  .baseUrl(new URL("http://localhost:4444"))
  .authenticateAs(new UsernameAndPassword("admin", "myStrongPassword"));
HttpCommandExecutor executor = new HttpCommandExecutor(clientConfig);
RemoteWebDriver driver = new RemoteWebDriver(executor, new ChromeOptions());
在其他语言中, 您可以使用 URL http://admin:myStrongPassword@localhost:4444
重要提示: 自定义功能需要在所有节点的配置中进行设置. 并且在每次会话请求中都必须包含这些功能.
[node]
detect-drivers = false

[[node.driver-configuration]]
display-name = "firefox"
stereotype = '{"browserName": "firefox", "platformName": "macOS", "browserVersion":"96", "networkname:applicationName":"node_1", "nodename:applicationName":"app_1" }'
max-sessions = 5
这里有一个 Java 示例, 展示了如何匹配那个节点
FirefoxOptions options = new FirefoxOptions();
options.setCapability("networkname:applicationName", "node_1");
options.setCapability("nodename:applicationName", "app_1");
options.setBrowserVersion("96");
options.setPlatformName("macOS");
WebDriver driver = new RemoteWebDriver(new URL("http://localhost:4444"), options);
driver.get("https://selenium.dev");
driver.quit();
节点可以被设置为自动管理下载.
这将导致节点会把特定会话中下载的所有文件保存到一个临时目录中,
之后可以从节点中获取这些文件.
要启用此功能, 请使用以下配置:
[node]
enable-managed-downloads = true
有关完整示例, 请参阅CLI章节 .
Page being translated from English to Chinese. Do you speak Chinese? Help us to translate it by sending us pull requests!
The Grid is designed as a set of components that all fulfill a role in maintaining the Grid. It can seem quite complicated, but hopefully this document can help clear up any confusion.
The main components of the Grid are:
While discussing the Grid, there are some other useful concepts to keep in mind:
There are two main communication mechanisms used within the Grid:
How do we pick which communication mechanism to use? After all, we could model the entire Grid in an event-based way, and it would work out just fine.
The answer is that if the action being performed is synchronous (eg. most WebDriver calls), or if missing the response would be problematic, the Grid uses a synchronous call. If, instead, we want to broadcast information to anyone who’s interested, or if missing the response doesn’t matter, then we prefer to use the event bus.
One interesting thing to note is that the async calls are more decoupled from their listeners than the synchronous calls are.
Although the Grid is designed to allow components to start up in any order, conceptually the order in which components starts is:
You can picture the dependencies between components this way, where a “✅” indicates that there is a synchronous dependency between the components.
| Event Bus | Distributor | Node | Router | Session Map | Session Queue | |
|---|---|---|---|---|---|---|
| Event Bus | X | |||||
| Distributor | ✅ | X | ✅ | ✅ | ||
| Node | ✅ | X | ||||
| Router | ✅ | X | ✅ | |||
| Session Map | X | |||||
| Session Queue | ✅ | X |
The process of registering a new Node to the Grid is lightweight.
GET the /status endpoint of the Node. It
is from this information that the Grid is set up.The Distributor will use the same /status endpoint to check the Node
on a regular basis, but the Node should continue sending heart beat
events even after started so that a Distributor without a persistent
store of the Grid state can be restarted and will (eventually) be up
to date and correct.
The Node Status is a JSON blob with the following fields:
| Name | Type | Description |
|---|---|---|
| availability | string | A string which is one of up, draining, or down. The important one is draining, which indicates that no new sessions should be sent to the Node, and once the last session on it closes, the Node will exit or restart. |
| externalUrl | string | The URI that the other components in the Grid should connect to. |
| lastSessionCreated | integer | The epoch timestamp of when the last session was created on this Node. The Distributor will attempt to send new sessions to the Node that has been idle longest if all other things are equal. |
| maxSessionCount | integer | Although a session count can be inferred by counting the number of available slots, this integer value is used to determine the maximum number of sessions that should be running simultaneously on the Node before it is considered “full”. |
| nodeId | string | A UUID used to identify this instance of the Node. |
| osInfo | object | An object with arch, name, and version fields. This is used by the Grid UI and the GraphQL queries. |
| slots | array | An array of Slot objects (described below) |
| version | string | The version of the Node (for Selenium, this will match the Selenium version number) |
It is recommended to put values in all fields.
The Slot object represents a single slot within a Node. A “slot” is where a single session may be run. It is possible that a Node will have more slots than it can run concurrently. For example, a node may be able to run up 10 sessions, but they could be any combination of Chrome, Edge, or Firefox; in this case, the Node would indicate a “max session count” of 10, and then also say it has 10 slots for Chrome, 10 for Edge, and 10 for Firefox.
| Name | Type | Description |
|---|---|---|
| id | string | UUID to refer to the slot |
| lastStarted | string | When the slot last had a session started, in ISO-8601 format |
| stereotype | object | The minimal set of capabilities this slot will match against. A minimal example is {"browserName": "firefox"} |
| session | object | The Session object (see below) |
This represents a running session within a slot
| Name | Type | Description |
|---|---|---|
| capabilities | object | The actual capabilities provided by the session. Will match the return value from the new session command |
| startTime | string | The start time of the session in ISO-8601 format |
| stereotype | object | The minimal set of capabilities this slot will match against. A minimal example is {"browserName": "firefox"} |
| uri | string | The URI used by the Node to communicate with the session |
Page being translated from English to Chinese. Do you speak Chinese? Help us to translate it by sending us pull requests!
Grid aids in scaling and distributing tests by executing tests on various browser and operating system combinations.
Observability has three pillars: traces, metrics and logs. Since Selenium Grid 4 is designed to be fully distributed, observability will make it easier to understand and debug the internals.
A single request or transaction spans multiple services and components. Tracing tracks the request lifecycle as each service executes the request. It is useful in debugging in an error scenario. Some key terms used in tracing context are:
Trace Tracing allows one to trace a request through multiple services, starting from its origin to its final destination. This request’s journey helps in debugging, monitoring the end-to-end flow, and identifying failures. A trace depicts the end-to-end request flow. Each trace has a unique id as its identifier.
Span Each trace is made up of timed operations called spans. A span has a start and end time and it represents operations done by a service. The granularity of span depends on how it is instrumented. Each span has a unique identifier. All spans within a trace have the same trace id.
Span Attributes Span attributes are key-value pairs which provide additional information about each span.
Events Events are timed-stamped logs within a span. They provide additional context to the existing spans. Events also contain key-value pairs as event attributes.
Logging is essential to debug an application. Logging is often done in a human-readable format. But for machines to search and analyze the logs, it has to have a well-defined format. Structured logging is a common practice of recording logs consistently in a fixed format. It commonly contains fields like:
Logs and events are closely related. Events encapsulate all the possible information available to do a single unit of work. Logs are essentially subsets of an event. At the crux, both aid in debugging. Refer following resources for detailed understanding:
Selenium server is instrumented with tracing using OpenTelemetry. Every request to the server is traced from start to end. Each trace consists of a series of spans as a request is executed within the server. Most spans in the Selenium server consist of two events:
Running Selenium server
All spans, events and their respective attributes are part of a trace. Tracing works while running the server in all of the above-mentioned modes.
By default, tracing is enabled in the Selenium server. Selenium server exports the traces via two exporters:
java -jar selenium-server-4.0.0-<selenium-version>.jar standalone --log-level FINE
Detailed instructions of visualizing traces using Jaeger UI can be obtained by running the command :
java -jar selenium-server-4.0.0-<selenium-version>.jar info tracing
A very good example and scripts to run the server and send traces to Jaeger
Tracing has to be enabled for event logging as well, even if one does not wish to export traces to visualize them.
By default, tracing is enabled. No additional parameters need to be passed to see logs on the console.
All events within a span are logged at FINE level. Error events are logged at WARN level.
All event logs have the following fields :
| Field | Field value | Description |
|---|---|---|
| Event time | eventId | Timestamp of the event record in epoch nanoseconds. |
| Trace Id | tracedId | Each trace is uniquely identified by a trace id. |
| Span Id | spanId | Each span within a trace is uniquely identified by a span id. |
| Span Kind | spanKind | Span kind is a property of span indicating the type of span. It helps in understanding the nature of the unit of work done by the Span. |
| Event name | eventName | This maps to the log message. |
| Event attributes | eventAttributes | This forms the crux of the event logs, based on the operation executed, it has JSON formatted key-value pairs. This also includes a handler class attribute, to show the logger class. |
Sample log
FINE [LoggingOptions$1.lambda$export$1] - {
  "traceId": "fc8aef1d44b3cc8bc09eb8e581c4a8eb",
  "spanId": "b7d3b9865d3ddd45",
  "spanKind": "INTERNAL",
  "eventTime": 1597819675128886121,
  "eventName": "Session request execution complete",
  "attributes": {
    "http.status_code": 200,
    "http.handler_class": "org.openqa.selenium.grid.router.HandleSession",
    "http.url": "\u002fsession\u002fdd35257f104bb43fdfb06242953f4c85",
    "http.method": "DELETE",
    "session.id": "dd35257f104bb43fdfb06242953f4c85"
  }
}
In addition to the above fields, based on OpenTelemetry specification error logs consist of :
| Field | Field value | Description |
|---|---|---|
| Exception type | exception.type | The class name of the exception. |
| Exception message | exception.message | Reason for the exception. |
| Exception stacktrace | exception.stacktrace | Prints the call stack at the point of time when the exception was thrown. Helps in understanding the origin of the exception. |
Sample error log
WARN [LoggingOptions$1.lambda$export$1] - {
  "traceId": "7efa5ea57e02f89cdf8de586fe09f564",
  "spanId": "914df6bc9a1f6e2b",
  "spanKind": "INTERNAL",
  "eventTime": 1597820253450580272,
  "eventName": "exception",
  "attributes": {
    "exception.type": "org.openqa.selenium.ScriptTimeoutException",
    "exception.message": "Unable to execute request: java.sql.SQLSyntaxErrorException: Table 'mysql.sessions_mappa' doesn't exist ..." (full message will be printed),
    "exception.stacktrace": "org.openqa.selenium.ScriptTimeoutException: java.sql.SQLSyntaxErrorException: Table 'mysql.sessions_mappa' doesn't exist\nBuild info: version: '4.0.0-alpha-7', revision: 'Unknown'\nSystem info: host: 'XYZ-MacBook-Pro.local', ip: 'fe80:0:0:0:10d5:b63a:bdc6:1aff%en0', os.name: 'Mac OS X', os.arch: 'x86_64', os.version: '10.13.6', java.version: '11.0.7'\nDriver info: driver.version: unknown ...." (full stack will be printed),
    "http.handler_class": "org.openqa.selenium.grid.distributor.remote.RemoteDistributor",
    "http.url": "\u002fsession",
    "http.method": "POST"
  }
}
Note: Logs are pretty printed above for readability. Pretty printing for logs is turned off in Selenium server.
The steps above should set you up for seeing traces and logs.
GraphQL 是一种用于API的查询语言, 也是用于使用现有数据完成这些查询的运行时. 其仅仅是使用户能够准确地获取所需.
枚举是表示字段的可能值的集合.
例如, Node对象具有一个称为status的字段. 状态是一个枚举 (特别是Status类型) , 因为它可能是UP , DRAINING 或 UNAVAILABLE.
标量是基本类型的值: Int, Float, String, Boolean, 或 ID.
在调用GraphQL API时, 必须指定嵌套子字段, 直到只返回标量.
网格模式的结构如下:
{
    session(id: "<session-id>") : {
        id,
        capabilities,
        startTime,
        uri,
        nodeId,
        nodeUri,
        sessionDurationMillis
        slot : {
            id,
            stereotype,
            lastStarted
        }
    }
    grid: {
        uri,
        totalSlots,
        nodeCount,
        maxSession,
        sessionCount,
        version,
        sessionQueueSize
    }
    sessionsInfo: {
        sessionQueueRequests,
        sessions: [
            {
                id,
                capabilities,
                startTime,
                uri,
                nodeId,
                nodeUri,
                sessionDurationMillis
                slot : {
                    id,
                    stereotype,
                    lastStarted
                }
            }
        ]
    }
    nodesInfo: {
        nodes : [
            {
                id,
                uri,
                status,
                maxSession,
                slotCount,
                sessions: [
                    {
                        id,
                        capabilities,
                        startTime,
                        uri,
                        nodeId,
                        nodeUri,
                        sessionDurationMillis
                        slot : {
                            id,
                            stereotype,
                            lastStarted
                        }
                    }
                ],
                sessionCount,
                stereotypes,
                version,
                osInfo: {
                    arch,
                    name,
                    version
                }
            }
        ]
    }
}
查询GraphQL的最佳方法是使用curl请求. GraphQL允许您仅获取所需的数据, 仅此而已.
下面给出了一些GraphQL查询的示例. 您可以根据需要构建自己的查询.
maxSession 和 sessionCount 的数量:curl -X POST -H "Content-Type: application/json" --data '{"query": "{ grid { maxSession, sessionCount } }"}' -s <LINK_TO_GRAPHQL_ENDPOINT>
通常在本地机器上 <LINK_TO_GRAPHQL_ENDPOINT> 会是 http://localhost:4444/graphql
curl -X POST -H "Content-Type: application/json" --data '{"query":"{ grid { uri, maxSession, sessionCount }, nodesInfo { nodes { id, uri, status, sessions { id, capabilities, startTime, uri, nodeId, nodeUri, sessionDurationMillis, slot { id, stereotype, lastStarted } }, slotCount, sessionCount }} }"}' -s <LINK_TO_GRAPHQL_ENDPOINT>
curl -X POST -H "Content-Type: application/json" --data '{"query":"{ grid { sessionCount } }"}' -s <LINK_TO_GRAPHQL_ENDPOINT>
curl -X POST -H "Content-Type: application/json" --data '{"query":"{ grid { maxSession } }"}' -s <LINK_TO_GRAPHQL_ENDPOINT>
curl -X POST -H "Content-Type: application/json" --data '{"query":"{ sessionsInfo { sessions { id, capabilities, startTime, uri, nodeId, nodeId, sessionDurationMillis } } }"}' -s <LINK_TO_GRAPHQL_ENDPOINT>
curl -X POST -H "Content-Type: application/json" --data '{"query":"{ sessionsInfo { sessions { id, slot { id, stereotype, lastStarted } } } }"}' -s <LINK_TO_GRAPHQL_ENDPOINT>
curl -X POST -H "Content-Type: application/json" --data '{"query":"{ session (id: \"<session-id>\") { id, capabilities, startTime, uri, nodeId, nodeUri, sessionDurationMillis, slot { id, stereotype, lastStarted } } } "}' -s <LINK_TO_GRAPHQL_ENDPOINT>
curl -X POST -H "Content-Type: application/json" --data '{"query": "{ nodesInfo { nodes { stereotypes } } }"}' -s <LINK_TO_GRAPHQL_ENDPOINT>
curl -X POST -H "Content-Type: application/json" --data '{"query": "{ nodesInfo { nodes { status } } }"}' -s <LINK_TO_GRAPHQL_ENDPOINT>
curl -X POST -H "Content-Type: application/json" --data '{"query": "{ nodesInfo { nodes { uri } } }"}' -s <LINK_TO_GRAPHQL_ENDPOINT>
curl -X POST -H "Content-Type: application/json" --data '{"query":"{ sessionsInfo { sessionQueueRequests } }"}' -s <LINK_TO_GRAPHQL_ENDPOINT>
curl -X POST -H "Content-Type: application/json" --data '{"query":"{ grid { sessionQueueSize } }"}' -s <LINK_TO_GRAPHQL_ENDPOINT>
Grid状态提供Grid的当前状态. 它包含每个注册节点的详细信息. 对于每个节点, 状态包括有关节点可用性、会话和插槽的信息.
cURL GET 'http://localhost:4444/status'
删除会话会终止 WebDriver 会话、退出驱动程序并将其从活动会话映射中删除。任何使用删除的会话标识或重新使用驱动程序实例的请求都会出错。
cURL --request DELETE 'http://localhost:4444/session/<session-id>'
在 Standalone 模式下, Grid URL是独立服务器的地址.
在 Hub-Node 模式下, Grid URL是集线器服务器的地址.
在完全分布式模式下, Grid URL是路由服务器的地址.
以上所有模式的默认URL皆为http://localhost:4444.
要从网格中删除节点,请使用下面列出的 cURL 命令。该命令不会停止正在该节点上运行的任何会话。除非显式终止, 否则节点将继续运行。分发器不再知道该节点,因此任何匹配的新会话请求都不会转发到该节点。
在 Standalone 模式下,分发器 URL 是独立服务器地址。
在 Hub-Node 模式下, 分发器 URL 是 Hub 服务器的地址。
cURL --request DELETE 'http://localhost:4444/se/grid/distributor/node/<node-id>' --header 'X-REGISTRATION-SECRET: <secret> '
在完全分布式模式下, URL是分发器的地址。
cURL --request DELETE 'http://localhost:4444/se/grid/distributor/node/<node-id>' --header 'X-REGISTRATION-SECRET: <secret>'
如果在设置Grid时未配置注册密码, 则使用
cURL --request DELETE 'http://<Router-URL>/se/grid/distributor/node/<node-id>' --header 'X-REGISTRATION-SECRET;'
节点释放命令用于优雅地关闭节点。在所有正在进行的会话结束后,会停止该节点。并且,它不会接受任何新的会话请求。
在 Standalone 模式下,分发器 URL 是独立服务器地址。
在 Hub-Node 模式下, 分发器 URL 是 Hub 服务器的地址。
cURL --request POST 'http://localhost:4444/se/grid/distributor/node/<node-id>/drain' --header 'X-REGISTRATION-SECRET: <secret> '
在完全分布式模式下, URL是分发服务器的地址。
cURL --request POST 'http://localhost:4444/se/grid/distributor/node/<node-id>/drain' --header 'X-REGISTRATION-SECRET: <secret>'
如果在设置Grid时未配置注册密码, 则使用
cURL --request POST 'http://<Router-URL>/se/grid/distributor/node/<node-id>/drain' --header 'X-REGISTRATION-SECRET;'
本节中的端点适用于 Hub-Node 模式和节点独立运行的完全分布式网格模式。在一个节点的情况下, 默认节点的URL为 http://localhost:5555 。 如果有多个节点,请使用 Grid 状态 获取所有节点的详细信息并查找节点地址。
节点状态本质上是节点的健康检查。分发程序会定期 ping 节点状态,并相应地更新 Grid 模型。状态包括有关可用性、会话和插槽的信息。
cURL --request GET 'http://localhost:5555/status'
分发器将 释放 命令传递给由node-id标识的相应节点。要直接释放节点,请使用下面列出的cuRL命令。 两个端点都有效并产生相同的结果。释放会等待持续中的会话完成后才停止节点。
cURL --request POST 'http://localhost:5555/se/grid/node/drain' --header 'X-REGISTRATION-SECRET: <secret>'
如果在设置Grid时未配置注册密码,则使用
cURL --request POST 'http://<node-URL>/se/grid/node/drain' --header 'X-REGISTRATION-SECRET;'
要检查会话是否属于某一节点, 请使用下面列出的cURL命令.
cURL --request GET 'http://localhost:5555/se/grid/node/owner/<session-id>' --header 'X-REGISTRATION-SECRET: <secret>'
如果在设置Grid时未配置注册密码, 则使用
cURL --request GET 'http://<node-URL>/se/grid/node/owner/<session-id>' --header 'X-REGISTRATION-SECRET;'
如果会话属于该节点, 则返回true, 否则返回false。
删除会话会终止 WebDriver 会话、退出驱动程序并将其从活动会话映射中删除。任何使用删除的会话标识或重新使用驱动程序实例的请求都会出错。
cURL --request DELETE 'http://localhost:5555/se/grid/node/session/<session-id>' --header 'X-REGISTRATION-SECRET: <secret>'
如果在设置Grid时未配置注册密码, 则使用
cURL --request DELETE 'http://<node-URL>/se/grid/node/session/<session-id>' --header 'X-REGISTRATION-SECRET;'
新会话请求队列保存新会话请求。要清除队列,请使用下面列出的 cURL 命令。清除队列会拒绝队列中的所有请求。对于每个此类请求,服务器都会向相应的客户端返回错误响应。清除命令的结果是被删除请求的总数。
在 Standalone 模式下, 队列URL是独立服务器的地址。 在 Hub-Node 模式下, 队列URL是集线器服务器的地址。
cURL --request DELETE 'http://localhost:4444/se/grid/newsessionqueue/queue' --header 'X-REGISTRATION-SECRET: <secret>'
在完全分布式模式下, 队列URL是新会话队列服务器的地址。
cURL --request DELETE 'http://localhost:4444/se/grid/newsessionqueue/queue' --header 'X-REGISTRATION-SECRET: <secret>'
如果在设置Grid时未配置注册密码, 则使用
cURL --request DELETE 'http://<Router-URL>/se/grid/newsessionqueue/queue' --header 'X-REGISTRATION-SECRET;'
新会话请求队列保存新会话请求。 要获取队列中的当前请求, 请使用下面列出的cURL命令。 响应会返回队列中的请求总数以及请求内容。
在 Standalone 模式下, 队列URL是独立服务器的地址。 在 Hub-Node 模式下, 队列URL是集线器服务器的地址。
cURL --request GET 'http://localhost:4444/se/grid/newsessionqueue/queue'
在完全分布式模式下, 队列URL是新会话队列服务器的地址。
cURL --request GET 'http://localhost:4444/se/grid/newsessionqueue/queue'
Page being translated from English to Chinese. Do you speak Chinese? Help us to translate it by sending us pull requests!
There are times when we would like a Node to be customized to our needs.
For e.g., we may like to do some additional setup before a session begins execution and some clean-up after a session runs to completion.
Following steps can be followed for this:
Create a class that extends org.openqa.selenium.grid.node.Node
Add a static method (this will be our factory method) to the newly created class whose signature looks like this:
public static Node create(Config config). Here:
Node is of type org.openqa.selenium.grid.node.NodeConfig is of type org.openqa.selenium.grid.config.ConfigWithin this factory method, include logic for creating your new Class.
To wire in this new customized logic into the hub, start the node and pass in the fully qualified class name of the above class to the argument --node-implementation
Let’s see an example of all this:
java -jar command.java -jar custom_node-server.jar node \
--node-implementation org.seleniumhq.samples.DecoratedLoggingNode
Note: If you are using Maven as a build tool, please prefer using maven-shade-plugin instead of maven-assembly-plugin because maven-assembly plugin seems to have issues with being able to merge multiple Service Provider Interface files (META-INF/services)
java -jar selenium-server-4.6.0.jar \
--ext custom_node-1.0-SNAPSHOT.jar node \
--node-implementation org.seleniumhq.samples.DecoratedLoggingNode
Below is a sample that just prints some messages on to the console whenever there’s an activity of interest (session created, session deleted, a webdriver command executed etc.,) on the Node.
package org.seleniumhq.samples;

import java.net.URI;
import java.util.UUID;
import org.openqa.selenium.Capabilities;
import org.openqa.selenium.NoSuchSessionException;
import org.openqa.selenium.WebDriverException;
import org.openqa.selenium.grid.config.Config;
import org.openqa.selenium.grid.data.CreateSessionRequest;
import org.openqa.selenium.grid.data.CreateSessionResponse;
import org.openqa.selenium.grid.data.NodeId;
import org.openqa.selenium.grid.data.NodeStatus;
import org.openqa.selenium.grid.data.Session;
import org.openqa.selenium.grid.log.LoggingOptions;
import org.openqa.selenium.grid.node.HealthCheck;
import org.openqa.selenium.grid.node.Node;
import org.openqa.selenium.grid.node.local.LocalNodeFactory;
import org.openqa.selenium.grid.security.Secret;
import org.openqa.selenium.grid.security.SecretOptions;
import org.openqa.selenium.grid.server.BaseServerOptions;
import org.openqa.selenium.internal.Either;
import org.openqa.selenium.remote.SessionId;
import org.openqa.selenium.remote.http.HttpRequest;
import org.openqa.selenium.remote.http.HttpResponse;
import org.openqa.selenium.remote.tracing.Tracer;

public class DecoratedLoggingNode extends Node {

  private Node node;

  protected DecoratedLoggingNode(Tracer tracer, NodeId nodeId, URI uri, Secret registrationSecret, Duration sessionTimeout) {
    super(tracer, nodeId, uri, registrationSecret, sessionTimeout);
  }

  public static Node create(Config config) {
    LoggingOptions loggingOptions = new LoggingOptions(config);
    BaseServerOptions serverOptions = new BaseServerOptions(config);
    URI uri = serverOptions.getExternalUri();
    SecretOptions secretOptions = new SecretOptions(config);
    NodeOptions nodeOptions = new NodeOptions(config);
    Duration sessionTimeout = nodeOptions.getSessionTimeout();

    // Refer to the foot notes for additional context on this line.
    Node node = LocalNodeFactory.create(config);

    DecoratedLoggingNode wrapper = new DecoratedLoggingNode(loggingOptions.getTracer(),
        node.getId(),
        uri,
        secretOptions.getRegistrationSecret(),
        sessionTimeout);
    wrapper.node = node;
    return wrapper;
  }

  @Override
  public Either<WebDriverException, CreateSessionResponse> newSession(
      CreateSessionRequest sessionRequest) {
    System.out.println("Before newSession()");
    try {
      return this.node.newSession(sessionRequest);
    } finally {
      System.out.println("After newSession()");
    }
  }

  @Override
  public HttpResponse executeWebDriverCommand(HttpRequest req) {
    try {
      System.out.println("Before executeWebDriverCommand(): " + req.getUri());
      return node.executeWebDriverCommand(req);
    } finally {
      System.out.println("After executeWebDriverCommand()");
    }
  }

  @Override
  public Session getSession(SessionId id) throws NoSuchSessionException {
    try {
      System.out.println("Before getSession()");
      return node.getSession(id);
    } finally {
      System.out.println("After getSession()");
    }
  }

  @Override
  public HttpResponse uploadFile(HttpRequest req, SessionId id) {
    try {
      System.out.println("Before uploadFile()");
      return node.uploadFile(req, id);
    } finally {
      System.out.println("After uploadFile()");
    }
  }

  @Override
  public void stop(SessionId id) throws NoSuchSessionException {
    try {
      System.out.println("Before stop()");
      node.stop(id);
    } finally {
      System.out.println("After stop()");
    }
  }

  @Override
  public boolean isSessionOwner(SessionId id) {
    try {
      System.out.println("Before isSessionOwner()");
      return node.isSessionOwner(id);
    } finally {
      System.out.println("After isSessionOwner()");
    }
  }

  @Override
  public boolean isSupporting(Capabilities capabilities) {
    try {
      System.out.println("Before isSupporting");
      return node.isSupporting(capabilities);
    } finally {
      System.out.println("After isSupporting()");
    }
  }

  @Override
  public NodeStatus getStatus() {
    try {
      System.out.println("Before getStatus()");
      return node.getStatus();
    } finally {
      System.out.println("After getStatus()");
    }
  }

  @Override
  public HealthCheck getHealthCheck() {
    try {
      System.out.println("Before getHealthCheck()");
      return node.getHealthCheck();
    } finally {
      System.out.println("After getHealthCheck()");
    }
  }

  @Override
  public void drain() {
    try {
      System.out.println("Before drain()");
      node.drain();
    } finally {
      System.out.println("After drain()");
    }

  }

  @Override
  public boolean isReady() {
    try {
      System.out.println("Before isReady()");
      return node.isReady();
    } finally {
      System.out.println("After isReady()");
    }
  }
}
Foot Notes:
In the above example, the line Node node = LocalNodeFactory.create(config); explicitly creates a LocalNode.
There are basically 2 types of user facing implementations of org.openqa.selenium.grid.node.Node available.
These classes are good starting points to learn how to build a custom Node and also to learn the internals of a Node.
org.openqa.selenium.grid.node.local.LocalNode - Used to represent a long running Node and is the default implementation that gets wired in when you start a node.LocalNodeFactory.create(config);, where:LocalNodeFactory belongs to org.openqa.selenium.grid.node.localConfig belongs to org.openqa.selenium.grid.configorg.openqa.selenium.grid.node.k8s.OneShotNode - This is a special reference implementation wherein the Node gracefully shuts itself down after servicing one test session. This class is currently not available as part of any pre-built maven artifact.Page being translated from English to Chinese. Do you speak Chinese? Help us to translate it by sending us pull requests!
Selenium Grid allows you to persist information related to currently running sessions into an external data store. The external data store could be backed by your favourite database (or) Redis Cache system.
For the sake of this illustration, we are going to work with PostGreSQL database.
We will spin off a PostGreSQL database as a docker container using a docker compose file.
You can skip this step if you already have a PostGreSQL database instance available at your disposal.
init.sql with the below contents:CREATE TABLE IF NOT EXISTS sessions_map(
session_ids varchar(256),
session_caps text,
session_uri varchar(256),
session_stereotype text,
session_start varchar(256)
);
init.sql, create a file named docker-compose.yml with its contents as below:version: '3.8'
services:
db:
image: postgres:9.6-bullseye
restart: always
environment:
- POSTGRES_USER=seluser
- POSTGRES_PASSWORD=seluser
- POSTGRES_DB=selenium_sessions
ports:
- "5432:5432"
volumes:
- ./init.sql:/docker-entrypoint-initdb.d/init.sql
We can now start our database container by running:
docker-compose up -d
Our database name is selenium_sessions with its username and password set to seluser
If you are working with an already running PostGreSQL DB instance, then you just need to create a database named selenium_sessions and the table sessions_map using the above mentioned SQL statement.
sessions.toml with the below contents:[sessions]
implementation = "org.openqa.selenium.grid.sessionmap.jdbc.JdbcBackedSessionMap"
jdbc-url = "jdbc:postgresql://localhost:5432/selenium_sessions"
jdbc-user = "seluser"
jdbc-password = "seluser"
Note: If you plan to use an existing PostGreSQL DB instance, then replace localhost:5432 with the actual host and port number of your instance.
distributed.sh) that we will use to bring up our distributed Grid.SE_VERSION=<current_selenium_version>
JAR_NAME=selenium-server-${SE_VERSION}.jar
PUBLISH="--publish-events tcp://localhost:4442"
SUBSCRIBE="--subscribe-events tcp://localhost:4443"
SESSIONS="--sessions http://localhost:5556"
SESSIONS_QUEUE="--sessionqueue http://localhost:5559"
echo 'Starting Event Bus'
java -jar $JAR_NAME event-bus $PUBLISH $SUBSCRIBE --port 5557 &
echo 'Starting New Session Queue'
java -jar $JAR_NAME sessionqueue --port 5559 &
echo 'Starting Sessions Map'
java -jar $JAR_NAME \
--ext $(coursier fetch -p org.seleniumhq.selenium:selenium-session-map-jdbc:${SE_VERSION} org.postgresql:postgresql:42.3.1) \
sessions $PUBLISH $SUBSCRIBE --port 5556 --config sessions.toml &
echo 'Starting Distributor'
java -jar $JAR_NAME distributor $PUBLISH $SUBSCRIBE $SESSIONS $SESSIONS_QUEUE --port 5553 --bind-bus false &
echo 'Starting Router'
java -jar $JAR_NAME router $SESSIONS --distributor http://localhost:5553 $SESSIONS_QUEUE --port 4444 &
echo 'Starting Node'
java -jar $JAR_NAME node $PUBLISH $SUBSCRIBE &
At this point the current directory should contain the following files:
docker-compose.ymlinit.sqlsessions.tomldistributed.shYou can now spawn the Grid by running distributed.sh shell script and quickly run a test. You will notice that the Grid now stores session information into the PostGreSQL database.
In the line which spawns a SessionMap on a machine:
export SE_VERSION=<current_selenium_version>
java -jar selenium-server-${SE_VERSION}.jar \
--ext $(coursier fetch -p org.seleniumhq.selenium:selenium-session-map-jdbc:${SE_VERSION} org.postgresql:postgresql:42.3.1) \
sessions --publish-events tcp://localhost:4442 \
--subscribe-events tcp://localhost:4443 \
--port 5556 --config sessions.toml
localhost with the actual hostname of the machine where your Event-Bus is running.coursier are basically the GAV (Group Artifact Version) Maven co-ordinates of:sessions.toml is the configuration file that we created earlier.We will spin off a Redis Cache docker container using a docker compose file.
You can skip this step if you already have a Redis Cache instance available at your disposal.
docker-compose.yml with its contents as below:version: '3.8'
services:
redis:
image: redis:bullseye
restart: always
ports:
- "6379:6379"
We can now start our Redis container by running:
docker-compose up -d
sessions.toml with the below contents:[sessions]
scheme = "redis"
implementation = "org.openqa.selenium.grid.sessionmap.redis.RedisBackedSessionMap"
hostname = "localhost"
port = 6379
Note: If you plan to use an existing Redis Cache instance, then replace localhost and 6379 with the actual host and port number of your instance.
distributed.sh) that we will use to bring up our distributed grid.SE_VERSION=<current_selenium_version>
JAR_NAME=selenium-server-${SE_VERSION}.jar
PUBLISH="--publish-events tcp://localhost:4442"
SUBSCRIBE="--subscribe-events tcp://localhost:4443"
SESSIONS="--sessions http://localhost:5556"
SESSIONS_QUEUE="--sessionqueue http://localhost:5559"
echo 'Starting Event Bus'
java -jar $JAR_NAME event-bus $PUBLISH $SUBSCRIBE --port 5557 &
echo 'Starting New Session Queue'
java -jar $JAR_NAME sessionqueue --port 5559 &
echo 'Starting Session Map'
java -jar $JAR_NAME \
--ext $(coursier fetch -p org.seleniumhq.selenium:selenium-session-map-redis:${SE_VERSION}) \
sessions $PUBLISH $SUBSCRIBE --port 5556 --config sessions.toml &
echo 'Starting Distributor'
java -jar $JAR_NAME distributor $PUBLISH $SUBSCRIBE $SESSIONS $SESSIONS_QUEUE --port 5553 --bind-bus false &
echo 'Starting Router'
java -jar $JAR_NAME router $SESSIONS --distributor http://localhost:5553 $SESSIONS_QUEUE --port 4444 &
echo 'Starting Node'
java -jar $JAR_NAME node $PUBLISH $SUBSCRIBE &
At this point the current directory should contain the following files:
docker-compose.ymlsessions.tomldistributed.shYou can now spawn the Grid by running distributed.sh shell script and quickly run a test. You will notice that the Grid now stores session information into the Redis instance. You can perhaps make use of a Redis GUI such as TablePlus to see them (Make sure that you have setup a debug point in your test, because the values will get deleted as soon as the test runs to completion).
In the line which spawns a SessionMap on a machine:
export SE_VERSION=<current_selenium_version>
java -jar selenium-server-${SE_VERSION}.jar \
--ext $(coursier fetch -p org.seleniumhq.selenium:selenium-session-map-redis:${SE_VERSION}) \
sessions --publish-events tcp://localhost:4442 \
--subscribe-events tcp://localhost:4443 \
--port 5556 --config sessions.toml
localhost with the actual hostname of the machine where your Event-Bus is running.coursier are basically the GAV (Group Artifact Version) Maven co-ordinates of:sessions.toml is the configuration file that we created earlier.


Learn more or view the full list of sponsors.