Selenium RC (Selenium 1)
Introduction
Selenium RC was the main Selenium project for a long time, before the WebDriver/Selenium merge brought up Selenium 2, a more powerful tool. It is worth to highlight that Selenium 1 is not supported anymore.
How Selenium RC Works
First, we will describe how the components of Selenium RC operate and the role each plays in running your test scripts.
RC Components
Selenium RC components are:
- The Selenium Server which launches and kills browsers, interprets and runs the Selenese commands passed from the test program, and acts as an HTTP proxy, intercepting and verifying HTTP messages passed between the browser and the AUT.
- Client libraries which provide the interface between each programming language and the Selenium RC Server.
Here is a simplified architecture diagram:
The diagram shows the client libraries communicate with the Server passing each Selenium command for execution. Then the server passes the Selenium command to the browser using Selenium-Core JavaScript commands. The browser, using its JavaScript interpreter, executes the Selenium command. This runs the Selenese action or verification you specified in your test script.
Selenium Server
Selenium Server receives Selenium commands from your test program, interprets them, and reports back to your program the results of running those tests.
The RC server bundles Selenium Core and automatically injects it into the browser. This occurs when your test program opens the browser (using a client library API function). Selenium-Core is a JavaScript program, actually a set of JavaScript functions which interprets and executes Selenese commands using the browser’s built-in JavaScript interpreter.
The Server receives the Selenese commands from your test program using simple HTTP GET/POST requests. This means you can use any programming language that can send HTTP requests to automate Selenium tests on the browser.
Client Libraries
The client libraries provide the programming support that allows you to run Selenium commands from a program of your own design. There is a different client library for each supported language. A Selenium client library provides a programming interface (API), i.e., a set of functions, which run Selenium commands from your own program. Within each interface, there is a programming function that supports each Selenese command.
The client library takes a Selenese command and passes it to the Selenium Server for processing a specific action or test against the application under test (AUT). The client library also receives the result of that command and passes it back to your program. Your program can receive the result and store it into a program variable and report it as a success or failure, or possibly take corrective action if it was an unexpected error.
So to create a test program, you simply write a program that runs a set of Selenium commands using a client library API. And, optionally, if you already have a Selenese test script created in the Selenium-IDE, you can generate the Selenium RC code. The Selenium-IDE can translate (using its Export menu item) its Selenium commands into a client-driver’s API function calls. See the Selenium-IDE chapter for specifics on exporting RC code from Selenium-IDE.
Installation
Installation is rather a misnomer for Selenium. Selenium has a set of libraries available in the programming language of your choice. You could download them from the downloads page.
Once you’ve chosen a language to work with, you simply need to:
- Install the Selenium RC Server.
- Set up a programming project using a language specific client driver.
Installing Selenium Server
The Selenium RC server is simply a Java jar file (selenium-server-standalone-
Running Selenium Server
Before starting any tests you must start the server. Go to the directory where Selenium RC’s server is located and run the following from a command-line console.
java -jar selenium-server-standalone-<version-number>.jar
This can be simplified by creating a batch or shell executable file (.bat on Windows and .sh on Linux) containing the command above. Then make a shortcut to that executable on your desktop and simply double-click the icon to start the server.
For the server to run you’ll need Java installed and the PATH environment variable correctly configured to run it from the console. You can check that you have Java correctly installed by running the following on a console.
java -version
If you get a version number (which needs to be 1.5 or later), you’re ready to start using Selenium RC.
Using the Java Client Driver
- Download Selenium java client driver zip from the SeleniumHQ downloads page.
- Extract selenium-java-
.jar file - Open your desired Java IDE (Eclipse, NetBeans, IntelliJ, Netweaver, etc.)
- Create a java project.
- Add the selenium-java-
.jar files to your project as references. - Add to your project classpath the file selenium-java-
.jar. - From Selenium-IDE, export a script to a Java file and include it in your Java project, or write your Selenium test in Java using the selenium-java-client API. The API is presented later in this chapter. You can either use JUnit, or TestNg to run your test, or you can write your own simple main() program. These concepts are explained later in this section.
- Run Selenium server from the console.
- Execute your test from the Java IDE or from the command-line.
For details on Java test project configuration, see the Appendix sections Configuring Selenium RC With Eclipse and Configuring Selenium RC With Intellij.
Using the Python Client Driver
- Install Selenium via PIP, instructions linked at SeleniumHQ downloads page
- Either write your Selenium test in Python or export a script from Selenium-IDE to a python file.
- Run Selenium server from the console
- Execute your test from a console or your Python IDE
For details on Python client driver configuration, see the appendix Python Client Driver Configuration.
Using the .NET Client Driver
- Download Selenium RC from the SeleniumHQ downloads page
- Extract the folder
- Download and install NUnit ( Note: You can use NUnit as your test engine. If you’re not familiar yet with NUnit, you can also write a simple main() function to run your tests; however NUnit is very useful as a test engine.)
- Open your desired .Net IDE (Visual Studio, SharpDevelop, MonoDevelop)
- Create a class library (.dll)
- Add references to the following DLLs: nmock.dll, nunit.core.dll, nunit. framework.dll, ThoughtWorks.Selenium.Core.dll, ThoughtWorks.Selenium.IntegrationTests.dll and ThoughtWorks.Selenium.UnitTests.dll
- Write your Selenium test in a .Net language (C#, VB.Net), or export a script from Selenium-IDE to a C# file and copy this code into the class file you just created.
- Write your own simple main() program or you can include NUnit in your project for running your test. These concepts are explained later in this chapter.
- Run Selenium server from console
- Run your test either from the IDE, from the NUnit GUI or from the command line
For specific details on .NET client driver configuration with Visual Studio, see the appendix .NET client driver configuration.
Using the Ruby Client Driver
- If you do not already have RubyGems, install it from RubyForge.
- Run
gem install selenium-client - At the top of your test script, add
require "selenium/client" - Write your test script using any Ruby test harness (eg Test::Unit, Mini::Test or RSpec).
- Run Selenium RC server from the console.
- Execute your test in the same way you would run any other Ruby script.
For details on Ruby client driver configuration, see the Selenium-Client documentation_
From Selenese to a Program
The primary task for using Selenium RC is to convert your Selenese into a programming language. In this section, we provide several different language-specific examples.
Sample Test Script
Let’s start with an example Selenese test script. Imagine recording the following test with Selenium-IDE.
| open | / | |
| type | q | selenium rc |
| clickAndWait | btnG | |
| assertTextPresent | Results * for selenium rc |
Note: This example would work with the Google search page http://www.google.com
Selenese as Programming Code
Here is the test script exported (via Selenium-IDE) to each of the supported programming languages. If you have at least basic knowledge of an object- oriented programming language, you will understand how Selenium runs Selenese commands by reading one of these examples. To see an example in a specific language, select one of these buttons.
CSharp
        using System;
        using System.Text;
        using System.Text.RegularExpressions;
        using System.Threading;
        using NUnit.Framework;
        using Selenium;

        namespace SeleniumTests
        {
            [TestFixture]
            public class NewTest
            {
                private ISelenium selenium;
                private StringBuilder verificationErrors;

                [SetUp]
                public void SetupTest()
                {
                    selenium = new DefaultSelenium("localhost", 4444, "*firefox", "http://www.google.com/");
                    selenium.Start();
                    verificationErrors = new StringBuilder();
                }

                [TearDown]
                public void TeardownTest()
                {
                    try
                    {
                        selenium.Stop();
                    }
                    catch (Exception)
                    {
                        // Ignore errors if unable to close the browser
                    }
                    Assert.AreEqual("", verificationErrors.ToString());
                }

                [Test]
                public void TheNewTest()
                {
                    selenium.Open("/");
                    selenium.Type("q", "selenium rc");
                    selenium.Click("btnG");
                    selenium.WaitForPageToLoad("30000");
                    Assert.AreEqual("selenium rc - Google Search", selenium.GetTitle());
                }
            }
        }
Java
	  /** Add JUnit framework to your classpath if not already there
	   *  for this example to work
	  */
      package com.example.tests;

      import com.thoughtworks.selenium.*;
      import java.util.regex.Pattern;

      public class NewTest extends SeleneseTestCase {
          public void setUp() throws Exception {
              setUp("http://www.google.com/", "*firefox");
          }
            public void testNew() throws Exception {
                selenium.open("/");
                selenium.type("q", "selenium rc");
                selenium.click("btnG");
                selenium.waitForPageToLoad("30000");
                assertTrue(selenium.isTextPresent("Results * for selenium rc"));
          }
      }
Php
      <?php

      require_once 'PHPUnit/Extensions/SeleniumTestCase.php';

      class Example extends PHPUnit_Extensions_SeleniumTestCase
      {
        function setUp()
        {
          $this->setBrowser("*firefox");
          $this->setBrowserUrl("http://www.google.com/");
        }

        function testMyTestCase()
        {
          $this->open("/");
          $this->type("q", "selenium rc");
          $this->click("btnG");
          $this->waitForPageToLoad("30000");
          $this->assertTrue($this->isTextPresent("Results * for selenium rc"));
        }
      }
      ?>
Python
     from selenium import selenium
      import unittest, time, re

      class NewTest(unittest.TestCase):
          def setUp(self):
              self.verificationErrors = []
              self.selenium = selenium("localhost", 4444, "*firefox",
                      "http://www.google.com/")
              self.selenium.start()

          def test_new(self):
              sel = self.selenium
              sel.open("/")
              sel.type("q", "selenium rc")
              sel.click("btnG")
              sel.wait_for_page_to_load("30000")
              self.failUnless(sel.is_text_present("Results * for selenium rc"))

          def tearDown(self):
              self.selenium.stop()
              self.assertEqual([], self.verificationErrors)
Ruby
      require "selenium/client"
      require "test/unit"

      class NewTest < Test::Unit::TestCase
        def setup
          @verification_errors = []
          if $selenium
            @selenium = $selenium
          else
            @selenium =  Selenium::Client::Driver.new("localhost", 4444, "*firefox", "http://www.google.com/", 60);
            @selenium.start
          end
          @selenium.set_context("test_new")
        end

        def teardown
          @selenium.stop unless $selenium
          assert_equal [], @verification_errors
        end

        def test_new
          @selenium.open "/"
          @selenium.type "q", "selenium rc"
          @selenium.click "btnG"
          @selenium.wait_for_page_to_load "30000"
          assert @selenium.is_text_present("Results * for selenium rc")
        end
      end
In the next section we’ll explain how to build a test program using the generated code.
Programming Your Test
Now we’ll illustrate how to program your own tests using examples in each of the supported programming languages. There are essentially two tasks:
- Generate your script into a programming language from Selenium-IDE, optionally modifying the result.
- Write a very simple main program that executes the generated code.
Optionally, you can adopt a test engine platform like JUnit or TestNG for Java, or NUnit for .NET if you are using one of those languages.
Here, we show language-specific examples. The language-specific APIs tend to differ from one to another, so you’ll find a separate explanation for each.
- Java
- C#
- Python
- Ruby
- Perl, PHP
Java
For Java, people use either JUnit or TestNG as the test engine.
Some development environments like Eclipse have direct support for these via
plug-ins. This makes it even easier. Teaching JUnit or TestNG is beyond the scope of
this document however materials may be found online and there are publications
available. If you are already a “java-shop” chances are your developers will
already have some experience with one of these test frameworks.
You will probably want to rename the test class from “NewTest” to something of your own choosing. Also, you will need to change the browser-open parameters in the statement:
selenium = new DefaultSelenium("localhost", 4444, "*iehta", "http://www.google.com/");
The Selenium-IDE generated code will look like this. This example has comments added manually for additional clarity.
   package com.example.tests;
   // We specify the package of our tests

   import com.thoughtworks.selenium.*;
   // This is the driver's import. You'll use this for instantiating a
   // browser and making it do what you need.

   import java.util.regex.Pattern;
   // Selenium-IDE add the Pattern module because it's sometimes used for
   // regex validations. You can remove the module if it's not used in your
   // script.

   public class NewTest extends SeleneseTestCase {
   // We create our Selenium test case

         public void setUp() throws Exception {
           setUp("http://www.google.com/", "*firefox");
                // We instantiate and start the browser
         }

         public void testNew() throws Exception {
              selenium.open("/");
              selenium.type("q", "selenium rc");
              selenium.click("btnG");
              selenium.waitForPageToLoad("30000");
              assertTrue(selenium.isTextPresent("Results * for selenium rc"));
              // These are the real test steps
        }
   }
C#
The .NET Client Driver works with Microsoft.NET. It can be used with any .NET testing framework like NUnit or the Visual Studio 2005 Team System.
Selenium-IDE assumes you will use NUnit as your testing framework. You can see this in the generated code below. It includes the using statement for NUnit along with corresponding NUnit attributes identifying the role for each member function of the test class.
You will probably have to rename the test class from “NewTest” to something of your own choosing. Also, you will need to change the browser-open parameters in the statement:
selenium = new DefaultSelenium("localhost", 4444, "*iehta", "http://www.google.com/");
The generated code will look similar to this.
    using System;
    using System.Text;
    using System.Text.RegularExpressions;
    using System.Threading;
    using NUnit.Framework;
    using Selenium;

    namespace SeleniumTests

    {
        [TestFixture]

        public class NewTest

        {
        private ISelenium selenium;

        private StringBuilder verificationErrors;

        [SetUp]

        public void SetupTest()

        {
            selenium = new DefaultSelenium("localhost", 4444, "*iehta",
            "http://www.google.com/");

            selenium.Start();

            verificationErrors = new StringBuilder();
        }

        [TearDown]

        public void TeardownTest()
        {
            try
            {
            selenium.Stop();
            }

            catch (Exception)
            {
            // Ignore errors if unable to close the browser
            }

            Assert.AreEqual("", verificationErrors.ToString());
        }
        [Test]

        public void TheNewTest()
        {
            // Open Google search engine.
            selenium.Open("http://www.google.com/");

            // Assert Title of page.
            Assert.AreEqual("Google", selenium.GetTitle());

            // Provide search term as "Selenium OpenQA"
            selenium.Type("q", "Selenium OpenQA");

            // Read the keyed search term and assert it.
            Assert.AreEqual("Selenium OpenQA", selenium.GetValue("q"));

            // Click on Search button.
            selenium.Click("btnG");

            // Wait for page to load.
            selenium.WaitForPageToLoad("5000");

            // Assert that "www.openqa.org" is available in search results.
            Assert.IsTrue(selenium.IsTextPresent("www.openqa.org"));

            // Assert that page title is - "Selenium OpenQA - Google Search"
            Assert.AreEqual("Selenium OpenQA - Google Search",
                         selenium.GetTitle());
        }
        }
    }
You can allow NUnit to manage the execution
of your tests. Or alternatively, you can write a simple main() program that
instantiates the test object and runs each of the three methods, SetupTest(),
TheNewTest(), and TeardownTest() in turn.
Python
Pyunit is the test framework to use for Python.
The basic test structure is:
   from selenium import selenium
   # This is the driver's import.  You'll use this class for instantiating a
   # browser and making it do what you need.

   import unittest, time, re
   # This are the basic imports added by Selenium-IDE by default.
   # You can remove the modules if they are not used in your script.

   class NewTest(unittest.TestCase):
   # We create our unittest test case

       def setUp(self):
           self.verificationErrors = []
           # This is an empty array where we will store any verification errors
           # we find in our tests

           self.selenium = selenium("localhost", 4444, "*firefox",
                   "http://www.google.com/")
           self.selenium.start()
           # We instantiate and start the browser

       def test_new(self):
           # This is the test code.  Here you should put the actions you need
           # the browser to do during your test.

           sel = self.selenium
           # We assign the browser to the variable "sel" (just to save us from
           # typing "self.selenium" each time we want to call the browser).

           sel.open("/")
           sel.type("q", "selenium rc")
           sel.click("btnG")
           sel.wait_for_page_to_load("30000")
           self.failUnless(sel.is_text_present("Results * for selenium rc"))
           # These are the real test steps

       def tearDown(self):
           self.selenium.stop()
           # we close the browser (I'd recommend you to comment this line while
           # you are creating and debugging your tests)

           self.assertEqual([], self.verificationErrors)
           # And make the test fail if we found that any verification errors
           # were found
Ruby
Old (pre 2.0) versions of Selenium-IDE generate Ruby code that requires the old Selenium gem. Therefore, it is advisable to update any Ruby scripts generated by the IDE as follows:
On line 1, change
require "selenium"torequire "selenium/client"On line 11, change
Selenium::SeleniumDriver.newtoSelenium::Client::Driver.new
You probably also want to change the class name to something more informative than “Untitled,” and change the test method’s name to something other than “test_untitled.”
Here is a simple example created by modifying the Ruby code generated by Selenium IDE, as described above.
   # load the Selenium-Client gem
   require "selenium/client"

   # Load Test::Unit, Ruby's default test framework.
   # If you prefer RSpec, see the examples in the Selenium-Client
   # documentation.
   require "test/unit"

   class Untitled < Test::Unit::TestCase

     # The setup method is called before each test.
     def setup

       # This array is used to capture errors and display them at the
       # end of the test run.
       @verification_errors = []

       # Create a new instance of the Selenium-Client driver.
       @selenium = Selenium::Client::Driver.new \
         :host => "localhost",
         :port => 4444,
         :browser => "*chrome",
         :url => "http://www.google.com/",
         :timeout_in_second => 60

       # Start the browser session
       @selenium.start

       # Print a message in the browser-side log and status bar
       # (optional).
       @selenium.set_context("test_untitled")

     end

     # The teardown method is called after each test.
     def teardown

       # Stop the browser session.
       @selenium.stop

       # Print the array of error messages, if any.
       assert_equal [], @verification_errors
     end

     # This is the main body of your test.
     def test_untitled

       # Open the root of the site we specified when we created the
       # new driver instance, above.
       @selenium.open "/"

       # Type 'selenium rc' into the field named 'q'
       @selenium.type "q", "selenium rc"

       # Click the button named "btnG"
       @selenium.click "btnG"

       # Wait for the search results page to load.
       # Note that we don't need to set a timeout here, because that
       # was specified when we created the new driver instance, above.
       @selenium.wait_for_page_to_load

       begin

          # Test whether the search results contain the expected text.
	  # Notice that the star (*) is a wildcard that matches any
	  # number of characters.
	  assert @selenium.is_text_present("Results * for selenium rc")

       rescue Test::Unit::AssertionFailedError

          # If the assertion fails, push it onto the array of errors.
	  @verification_errors << $!

       end
     end
   end
Perl, PHP
The members of the documentation team have not used Selenium RC with Perl or PHP. If you are using Selenium RC with either of these two languages please contact the Documentation Team (see the chapter on contributing). We would love to include some examples from you and your experiences, to support Perl and PHP users.
Learning the API
The Selenium RC API uses naming conventions
that, assuming you understand Selenese, much of the interface
will be self-explanatory. Here, however, we explain the most critical and
possibly less obvious aspects.
Starting the Browser
CSharp
      selenium = new DefaultSelenium("localhost", 4444, "*firefox", "http://www.google.com/");
      selenium.Start();
Java
setUp("http://www.google.com/", "*firefox");
Perl
      my $sel = Test::WWW::Selenium->new( host => "localhost",
                                          port => 4444,
                                          browser => "*firefox",
                                          browser_url => "http://www.google.com/" );
Php
      $this->setBrowser("*firefox");
      $this->setBrowserUrl("http://www.google.com/");
Python
      self.selenium = selenium("localhost", 4444, "*firefox",
                               "http://www.google.com/")
      self.selenium.start()
Ruby
      @selenium = Selenium::ClientDriver.new("localhost", 4444, "*firefox", "http://www.google.com/", 10000);
      @selenium.start
Each of these examples opens the browser and represents that browser by assigning a “browser instance” to a program variable. This program variable is then used to call methods from the browser. These methods execute the Selenium commands, i.e. like open or type or the verify commands.
The parameters required when creating the browser instance are:
host Specifies the IP address of the computer where the server is located. Usually, this is the same machine as where the client is running, so in this case localhost is passed. In some clients this is an optional parameter.
port Specifies the TCP/IP socket where the server is listening waiting for the client to establish a connection. This also is optional in some client drivers.
browser The browser in which you want to run the tests. This is a required parameter.
url The base url of the application under test. This is required by all the client libs and is integral information for starting up the browser-proxy-AUT communication.
Note that some of the client libraries require the browser to be started explicitly by calling
its start() method.
Running Commands
Once you have the browser initialized and assigned to a variable (generally named “selenium”) you can make it run Selenese commands by calling the respective methods from the browser variable. For example, to call the type method of the selenium object:
selenium.type("field-id","string to type")
In the background the browser will actually perform a type operation,
essentially identical to a user typing input into the browser, by
using the locator and the string you specified during the method call.
Reporting Results
Selenium RC does not have its own mechanism for reporting results. Rather, it allows you to build your reporting customized to your needs using features of your chosen programming language. That’s great, but what if you simply want something quick that’s already done for you? Often an existing library or test framework can meet your needs faster than developing your own test reporting code.
Test Framework Reporting Tools
Test frameworks are available for many programming languages. These, along with their primary function of providing a flexible test engine for executing your tests, include library code for reporting results. For example, Java has two commonly used test frameworks, JUnit and TestNG. .NET also has its own, NUnit.
We won’t teach the frameworks themselves here; that’s beyond the scope of this user guide. We will simply introduce the framework features that relate to Selenium along with some techniques you can apply. There are good books available on these test frameworks however along with information on the internet.
Test Report Libraries
Also available are third-party libraries specifically created for reporting test results in your chosen programming language. These often support a variety of formats such as HTML or PDF.
What’s The Best Approach?
Most people new to the testing frameworks will begin with the framework’s built-in reporting features. From there most will examine any available libraries as that’s less time consuming than developing your own. As you begin to use Selenium no doubt you will start putting in your own “print statements” for reporting progress. That may gradually lead to you developing your own reporting, possibly in parallel to using a library or test framework. Regardless, after the initial, but short, learning curve you will naturally develop what works best for your own situation.
Test Reporting Examples
To illustrate, we’ll direct you to some specific tools in some of the other languages supported by Selenium. The ones listed here are commonly used and have been used extensively (and therefore recommended) by the authors of this guide.
Test Reports in Java
If Selenium Test cases are developed using JUnit then JUnit Report can be used to generate test reports.
If Selenium Test cases are developed using TestNG then no external task is required to generate test reports. The TestNG framework generates an HTML report which list details of tests.
ReportNG is a HTML reporting plug-in for the TestNG framework. It is intended as a replacement for the default TestNG HTML report. ReportNG provides a simple, colour-coded view of the test results.
Logging the Selenese Commands
- Logging Selenium can be used to generate a report of all the Selenese commands in your test along with the success or failure of each. Logging Selenium extends the Java client driver to add this Selenese logging ability.
Test Reports for Python
- When using Python Client Driver then HTMLTestRunner can be used to generate a Test Report.
Test Reports for Ruby
- If RSpec framework is used for writing Selenium Test Cases in Ruby then its HTML report can be used to generate a test report.
Adding Some Spice to Your Tests
Now we’ll get to the whole reason for using Selenium RC, adding programming logic to your tests. It’s the same as for any program. Program flow is controlled using condition statements and iteration. In addition you can report progress information using I/O. In this section we’ll show some examples of how programming language constructs can be combined with Selenium to solve common testing problems.
You will find as you transition from the simple tests of the existence of
page elements to tests of dynamic functionality involving multiple web-pages and
varying data that you will require programming logic for verifying expected
results. Basically, the Selenium-IDE does not support iteration and
standard condition statements. You can do some conditions by embedding JavaScript
in Selenese parameters, however
iteration is impossible, and most conditions will be much easier in a
programming language. In addition, you may need exception handling for
error recovery. For these reasons and others, we have written this section
to illustrate the use of common programming techniques to
give you greater ‘verification power’ in your automated testing.
The examples in this section are written in C# and Java, although the code is simple and can be easily adapted to the other supported languages. If you have some basic knowledge of an object-oriented programming language you shouldn’t have difficulty understanding this section.
Iteration
Iteration is one of the most common things people need to do in their tests. For example, you may want to to execute a search multiple times. Or, perhaps for verifying your test results you need to process a “result set” returned from a database.
Using the same Google search example we used earlier, let’s check the Selenium search results. This test could use the Selenese:
| open | / | |
| type | q | selenium rc |
| clickAndWait | btnG | |
| assertTextPresent | Results * for selenium rc | |
| type | q | selenium ide |
| clickAndWait | btnG | |
| assertTextPresent | Results * for selenium ide | |
| type | q | selenium grid |
| clickAndWait | btnG | |
| assertTextPresent | Results * for selenium grid |
The code has been repeated to run the same steps 3 times. But multiple copies of the same code is not good program practice because it’s more work to maintain. By using a programming language, we can iterate over the search results for a more flexible and maintainable solution.
In C#
   // Collection of String values.
   String[] arr = {"ide", "rc", "grid"};

   // Execute loop for each String in array 'arr'.
   foreach (String s in arr) {
       sel.open("/");
       sel.type("q", "selenium " +s);
       sel.click("btnG");
       sel.waitForPageToLoad("30000");
       assertTrue("Expected text: " +s+ " is missing on page."
       , sel.isTextPresent("Results * for selenium " + s));
    }
Condition Statements
To illustrate using conditions in tests we’ll start with an example. A common problem encountered while running Selenium tests occurs when an expected element is not available on page. For example, when running the following line:
selenium.type("q", "selenium " +s);
If element ‘q’ is not on the page then an exception is thrown:
com.thoughtworks.selenium.SeleniumException: ERROR: Element q not found
This can cause your test to abort. For some tests that’s what you want. But often that is not desirable as your test script has many other subsequent tests to perform.
A better approach is to first validate whether the element is really present and then take alternatives when it it is not. Let’s look at this using Java.
   // If element is available on page then perform type operation.
   if(selenium.isElementPresent("q")) {
       selenium.type("q", "Selenium rc");
   } else {
       System.out.printf("Element: " +q+ " is not available on page.")
   }
The advantage of this approach is to continue with test execution even if some UI elements are not available on page.
Executing JavaScript from Your Test
JavaScript comes very handy in exercising an application which is not directly supported by Selenium. The getEval method of Selenium API can be used to execute JavaScript from Selenium RC.
Consider an application having check boxes with no static identifiers. In this case one could evaluate JavaScript from Selenium RC to get ids of all check boxes and then exercise them.
   public static String[] getAllCheckboxIds () {
		String script = "var inputId  = new Array();";// Create array in java script.
		script += "var cnt = 0;"; // Counter for check box ids.
		script += "var inputFields  = new Array();"; // Create array in java script.
		script += "inputFields = window.document.getElementsByTagName('input');"; // Collect input elements.
		script += "for(var i=0; i<inputFields.length; i++) {"; // Loop through the collected elements.
		script += "if(inputFields[i].id !=null " +
		"&& inputFields[i].id !='undefined' " +
		"&& inputFields[i].getAttribute('type') == 'checkbox') {"; // If input field is of type check box and input id is not null.
		script += "inputId[cnt]=inputFields[i].id ;" + // Save check box id to inputId array.
		"cnt++;" + // increment the counter.
		"}" + // end of if.
		"}"; // end of for.
		script += "inputId.toString();" ;// Convert array in to string.
		String[] checkboxIds = selenium.getEval(script).split(","); // Split the string.
		return checkboxIds;
    }
To count number of images on a page:
selenium.getEval("window.document.images.length;");
Remember to use window object in case of DOM expressions as by default selenium window is referred to, not the test window.
Server Options
When the server is launched, command line options can be used to change the default server behaviour.
Recall, the server is started by running the following.
$ java -jar selenium-server-standalone-<version-number>.jar
To see the list of options, run the server with the -h option.
$ java -jar selenium-server-standalone-<version-number>.jar -h
You’ll see a list of all the options you can use with the server and a brief description of each. The provided descriptions will not always be enough, so we’ve provided explanations for some of the more important options.
Proxy Configuration
If your AUT is behind an HTTP proxy which requires authentication then you should configure http.proxyHost, http.proxyPort, http.proxyUser and http.proxyPassword using the following command.
$ java -jar selenium-server-standalone-<version-number>.jar -Dhttp.proxyHost=proxy.com -Dhttp.proxyPort=8080 -Dhttp.proxyUser=username -Dhttp.proxyPassword=password
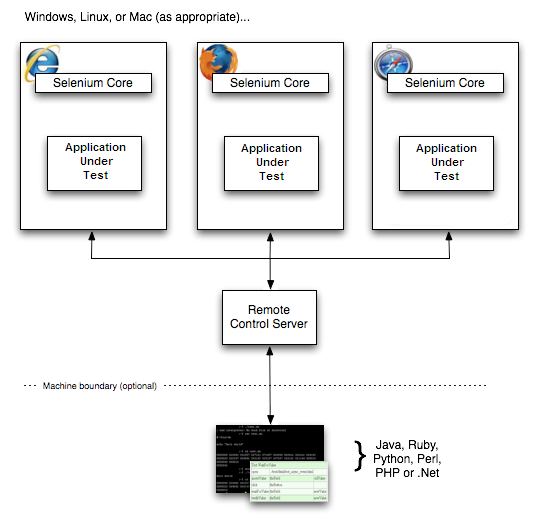
Multi-Window Mode
If you are using Selenium 1.0 you can probably skip this section, since multiwindow mode is the default behavior. However, prior to version 1.0, Selenium by default ran the application under test in a sub frame as shown here.
Some applications didn’t run correctly in a sub frame, and needed to be loaded into the top frame of the window. The multi-window mode option allowed the AUT to run in a separate window rather than in the default frame where it could then have the top frame it required.
For older versions of Selenium you must specify multiwindow mode explicitly with the following option:
-multiwindow
As of Selenium RC 1.0, if you want to run your test within a single frame (i.e. using the standard for earlier Selenium versions) you can state this to the Selenium Server using the option
-singlewindow
Specifying the Firefox Profile
Firefox will not run two instances simultaneously unless you specify a separate profile for each instance. Selenium RC 1.0 and later runs in a separate profile automatically, so if you are using Selenium 1.0, you can probably skip this section. However, if you’re using an older version of Selenium or if you need to use a specific profile for your tests (such as adding an https certificate or having some addons installed), you will need to explicitly specify the profile.
First, to create a separate Firefox profile, follow this procedure. Open the Windows Start menu, select “Run”, then type and enter one of the following:
firefox.exe -profilemanager
firefox.exe -P
Create the new profile using the dialog. Then when you run Selenium Server, tell it to use this new Firefox profile with the server command-line option -firefoxProfileTemplate and specify the path to the profile using its filename and directory path.
-firefoxProfileTemplate "path to the profile"
Warning: Be sure to put your profile in a new folder separate from the default!!! The Firefox profile manager tool will delete all files in a folder if you delete a profile, regardless of whether they are profile files or not.
More information about Firefox profiles can be found in Mozilla’s Knowledge Base
Run Selenese Directly Within the Server Using -htmlSuite
You can run Selenese html files directly within the Selenium Server by passing the html file to the server’s command line. For instance:
   java -jar selenium-server-standalone-<version-number>.jar -htmlSuite "*firefox"
   "http://www.google.com" "c:\absolute\path\to\my\HTMLSuite.html"
   "c:\absolute\path\to\my\results.html"
This will automatically launch your HTML suite, run all the tests and save a nice HTML report with the results.
Note: When using this option, the server will start the tests and wait for a specified number of seconds for the test to complete; if the test doesn’t complete within that amount of time, the command will exit with a non-zero exit code and no results file will be generated.
This command line is very long so be careful when
you type it. Note this requires you to pass in an HTML
Selenese suite, not a single test. Also be aware the -htmlSuite option is incompatible with -interactive
You cannot run both at the same time.
Selenium Server Logging
Server-Side Logs
When launching Selenium server the -log option can be used to record valuable debugging information reported by the Selenium Server to a text file.
java -jar selenium-server-standalone-<version-number>.jar -log selenium.log
This log file is more verbose than the standard console logs (it includes DEBUG level logging messages). The log file also includes the logger name, and the ID number of the thread that logged the message. For example:
   20:44:25 DEBUG [12] org.openqa.selenium.server.SeleniumDriverResourceHandler -
   Browser 465828/:top frame1 posted START NEW
The message format is
TIMESTAMP(HH:mm:ss) LEVEL [THREAD] LOGGER - MESSAGE
This message may be multiline.
Browser-Side Logs
JavaScript on the browser side (Selenium Core) also logs important messages; in many cases, these can be more useful to the end-user than the regular Selenium Server logs. To access browser-side logs, pass the -browserSideLog argument to the Selenium Server.
java -jar selenium-server-standalone-<version-number>.jar -browserSideLog
-browserSideLog must be combined with the -log argument, to log browserSideLogs (as well as all other DEBUG level logging messages) to a file.
Specifying the Path to a Specific Browser
You can specify to Selenium RC a path to a specific browser. This is useful if you have different versions of the same browser and you wish to use a specific one. Also, this is used to allow your tests to run against a browser not directly supported by Selenium RC. When specifying the run mode, use the *custom specifier followed by the full path to the browser’s executable:
*custom <path to browser>
Selenium RC Architecture
Note: This topic tries to explain the technical implementation behind Selenium RC. It’s not fundamental for a Selenium user to know this, but could be useful for understanding some of the problems you might find in the future.
To understand in detail how Selenium RC Server works and why it uses proxy injection
and heightened privilege modes you must first understand the same origin policy_.
The Same Origin Policy
The main restriction that Selenium faces is the Same Origin Policy. This security restriction is applied by every browser in the market and its objective is to ensure that a site’s content will never be accessible by a script from another site. The Same Origin Policy dictates that any code loaded within the browser can only operate within that website’s domain. It cannot perform functions on another website. So for example, if the browser loads JavaScript code when it loads www.mysite.com, it cannot run that loaded code against www.mysite2.com–even if that’s another of your sites. If this were possible, a script placed on any website you open would be able to read information on your bank account if you had the account page opened on other tab. This is called XSS (Cross-site Scripting).
To work within this policy, Selenium-Core (and its JavaScript commands that make all the magic happen) must be placed in the same origin as the Application Under Test (same URL).
Historically, Selenium-Core was limited by this problem since it was implemented in JavaScript. Selenium RC is not, however, restricted by the Same Origin Policy. Its use of the Selenium Server as a proxy avoids this problem. It, essentially, tells the browser that the browser is working on a single “spoofed” website that the Server provides.
Note: You can find additional information about this topic on Wikipedia pages about Same Origin Policy and XSS.
Proxy Injection
The first method Selenium used to avoid the The Same Origin Policy was Proxy Injection. In Proxy Injection Mode, the Selenium Server acts as a client-configured HTTP proxy1, that sits between the browser and the Application Under Test2. It then masks the AUT under a fictional URL (embedding Selenium-Core and the set of tests and delivering them as if they were coming from the same origin).
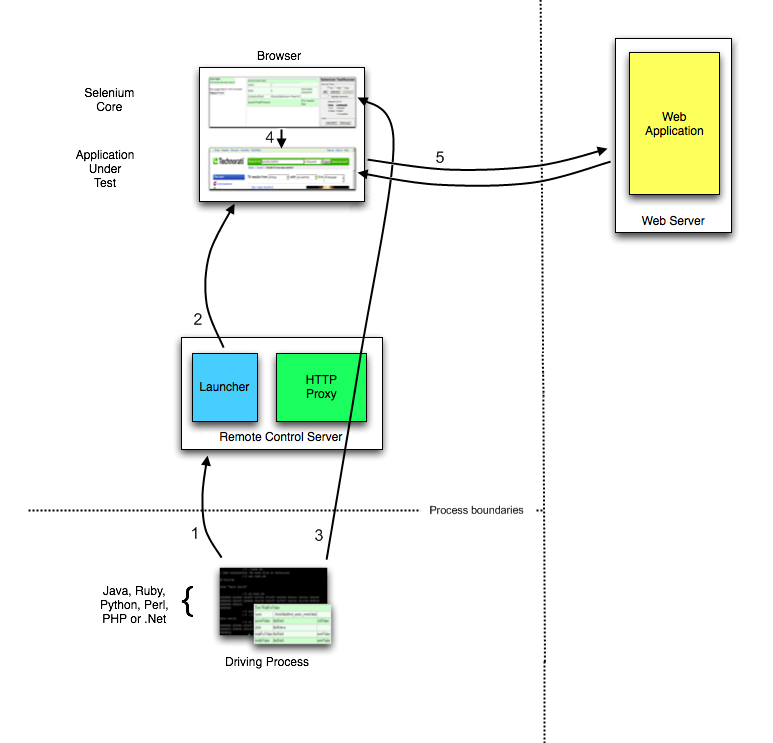
Here is an architectural diagram.
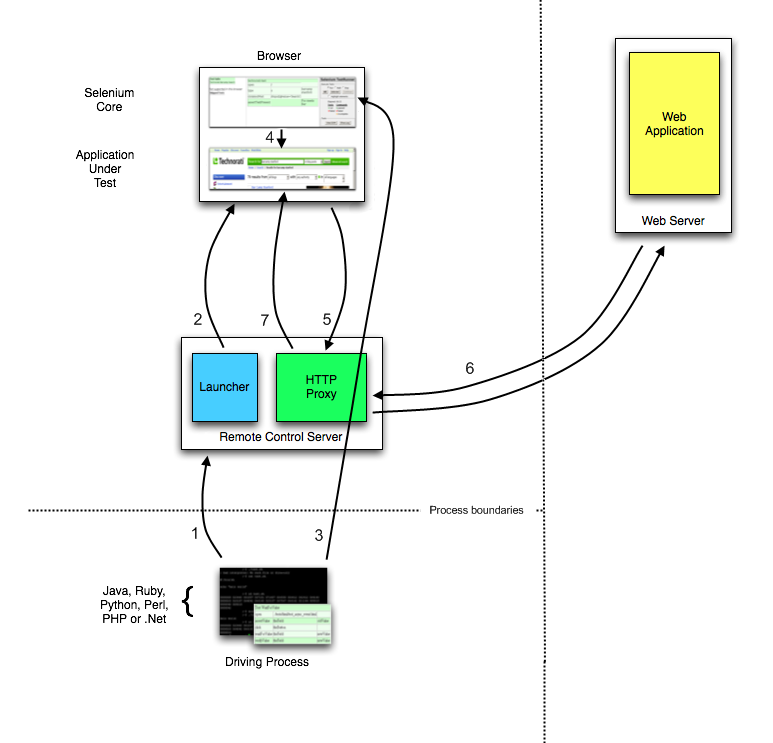
As a test suite starts in your favorite language, the following happens:
- The client/driver establishes a connection with the selenium-RC server.
- Selenium RC server launches a browser (or reuses an old one) with a URL that injects Selenium-Core’s JavaScript into the browser-loaded web page.
- The client-driver passes a Selenese command to the server.
- The Server interprets the command and then triggers the corresponding JavaScript execution to execute that command within the browser. Selenium-Core instructs the browser to act on that first instruction, typically opening a page of the AUT.
- The browser receives the open request and asks for the website’s content from the Selenium RC server (set as the HTTP proxy for the browser to use).
- Selenium RC server communicates with the Web server asking for the page and once it receives it, it sends the page to the browser masking the origin to look like the page comes from the same server as Selenium-Core (this allows Selenium-Core to comply with the Same Origin Policy).
- The browser receives the web page and renders it in the frame/window reserved for it.
Heightened Privileges Browsers
This workflow in this method is very similar to Proxy Injection but the main difference is that the browsers are launched in a special mode called Heightened Privileges, which allows websites to do things that are not commonly permitted (as doing XSS_, or filling file upload inputs and pretty useful stuff for Selenium). By using these browser modes, Selenium Core is able to directly open the AUT and read/interact with its content without having to pass the whole AUT through the Selenium RC server.
Here is the architectural diagram.
As a test suite starts in your favorite language, the following happens:
- The client/driver establishes a connection with the selenium-RC server.
- Selenium RC server launches a browser (or reuses an old one) with a URL that will load Selenium-Core in the web page.
- Selenium-Core gets the first instruction from the client/driver (via another HTTP request made to the Selenium RC Server).
- Selenium-Core acts on that first instruction, typically opening a page of the AUT.
- The browser receives the open request and asks the Web Server for the page. Once the browser receives the web page, renders it in the frame/window reserved for it.
Handling HTTPS and Security Popups
Many applications switch from using HTTP to HTTPS when they need to send encrypted information such as passwords or credit card information. This is common with many of today’s web applications. Selenium RC supports this.
To ensure the HTTPS site is genuine, the browser will need a security certificate. Otherwise, when the browser accesses the AUT using HTTPS, it will assume that application is not ’trusted’. When this occurs the browser displays security popups, and these popups cannot be closed using Selenium RC.
When dealing with HTTPS in a Selenium RC test, you must use a run mode that supports this and handles the security certificate for you. You specify the run mode when your test program initializes Selenium.
In Selenium RC 1.0 beta 2 and later use *firefox or *iexplore for the run mode. In earlier versions, including Selenium RC 1.0 beta 1, use *chrome or *iehta, for the run mode. Using these run modes, you will not need to install any special security certificates; Selenium RC will handle it for you.
In version 1.0 the run modes *firefox or *iexplore are recommended. However, there are additional run modes of *iexploreproxy and *firefoxproxy. These are provided for backwards compatibility only, and should not be used unless required by legacy test programs. Their use will present limitations with security certificate handling and with the running of multiple windows if your application opens additional browser windows.
In earlier versions of Selenium RC, *chrome or *iehta were the run modes that supported HTTPS and the handling of security popups. These were considered ‘experimental modes although they became quite stable and many people used them. If you are using Selenium 1.0 you do not need, and should not use, these older run modes.
Security Certificates Explained
Normally, your browser will trust the application you are testing by installing a security certificate which you already own. You can check this in your browser’s options or Internet properties (if you don’t know your AUT’s security certificate ask your system administrator). When Selenium loads your browser it injects code to intercept messages between the browser and the server. The browser now thinks untrusted software is trying to look like your application. It responds by alerting you with popup messages.
To get around this, Selenium RC, (again when using a run mode that support this) will install its own security certificate, temporarily, to your client machine in a place where the browser can access it. This tricks the browser into thinking it’s accessing a site different from your AUT and effectively suppresses the popups.
Another method used with earlier versions of Selenium was to install the Cybervillians security certificate provided with your Selenium installation. Most users should no longer need to do this however; if you are running Selenium RC in proxy injection mode, you may need to explicitly install this security certificate.
Supporting Additional Browsers and Browser Configurations
The Selenium API supports running against multiple browsers in addition to Internet Explorer and Mozilla Firefox. See the https://selenium.dev website for supported browsers. In addition, when a browser is not directly supported, you may still run your Selenium tests against a browser of your choosing by using the “*custom” run-mode (i.e. in place of *firefox or *iexplore) when your test application starts the browser. With this, you pass in the path to the browsers executable within the API call. This can also be done from the Server in interactive mode.
cmd=getNewBrowserSession&1=*custom c:\Program Files\Mozilla Firefox\MyBrowser.exe&2=http://www.google.com
Running Tests with Different Browser Configurations
Normally Selenium RC automatically configures the browser, but if you launch the browser using the “*custom” run mode, you can force Selenium RC to launch the browser as-is, without using an automatic configuration.
For example, you can launch Firefox with a custom configuration like this:
cmd=getNewBrowserSession&1=*custom c:\Program Files\Mozilla Firefox\firefox.exe&2=http://www.google.com
Note that when launching the browser this way, you must manually configure the browser to use the Selenium Server as a proxy. Normally this just means opening your browser preferences and specifying “localhost:4444” as an HTTP proxy, but instructions for this can differ radically from browser to browser. Consult your browser’s documentation for details.
Be aware that Mozilla browsers can vary in how they start and stop. One may need to set the MOZ_NO_REMOTE environment variable to make Mozilla browsers behave a little more predictably. Unix users should avoid launching the browser using a shell script; it’s generally better to use the binary executable (e.g. firefox-bin) directly.
Troubleshooting Common Problems
When getting started with Selenium RC there’s a few potential problems that are commonly encountered. We present them along with their solutions here.
Unable to Connect to Server
When your test program cannot connect to the Selenium Server, Selenium throws an exception in your test program. It should display this message or a similar one:
    "Unable to connect to remote server (Inner Exception Message:
	No connection could be made because the target machine actively
	refused it )"

	(using .NET and XP Service Pack 2)
If you see a message like this, be sure you started the Selenium Server. If so, then there is a problem with the connectivity between the Selenium Client Library and the Selenium Server.
When starting with Selenium RC, most people begin by running their test program (with a Selenium Client Library) and the Selenium Server on the same machine. To do this use “localhost” as your connection parameter. We recommend beginning this way since it reduces the influence of potential networking problems which you’re getting started. Assuming your operating system has typical networking and TCP/IP settings you should have little difficulty. In truth, many people choose to run the tests this way.
If, however, you do want to run Selenium Server on a remote machine, the connectivity should be fine assuming you have valid TCP/IP connectivity between the two machines.
If you have difficulty connecting, you can use common networking tools like ping, telnet, ifconfig(Unix)/ipconfig (Windows), etc to ensure you have a valid network connection. If unfamilar with these, your system administrator can assist you.
Unable to Load the Browser
Ok, not a friendly error message, sorry, but if the Selenium Server cannot load the browser you will likely see this error.
(500) Internal Server Error
This could be caused by
- Firefox (prior to Selenium 1.0) cannot start because the browser is already open and you did not specify a separate profile. See the section on Firefox profiles under Server Options.
- The run mode you’re using doesn’t match any browser on your machine. Check the parameters you passed to Selenium when you program opens the browser.
- You specified the path to the browser explicitly (using “*custom”–see above) but the path is incorrect. Check to be sure the path is correct. Also check the user group to be sure there are no known issues with your browser and the “*custom” parameters.
Selenium Cannot Find the AUT
If your test program starts the browser successfully, but the browser doesn’t display the website you’re testing, the most likely cause is your test program is not using the correct URL.
This can easily happen. When you use Selenium-IDE to export your script, it inserts a dummy URL. You must manually change the URL to the correct one for your application to be tested.
Firefox Refused Shutdown While Preparing a Profile
This most often occurs when you run your Selenium RC test program against Firefox, but you already have a Firefox browser session running and, you didn’t specify a separate profile when you started the Selenium Server. The error from the test program looks like this:
    Error:  java.lang.RuntimeException: Firefox refused shutdown while
    preparing a profile
Here’s the complete error message from the server:
    16:20:03.919 INFO - Preparing Firefox profile...
    16:20:27.822 WARN - GET /selenium-server/driver/?cmd=getNewBrowserSession&1=*fir
    efox&2=http%3a%2f%2fsage-webapp1.qa.idc.com HTTP/1.1
    java.lang.RuntimeException: Firefox refused shutdown while preparing a profile
            at org.openqa.selenium.server.browserlaunchers.FirefoxCustomProfileLaunc
    her.waitForFullProfileToBeCreated(FirefoxCustomProfileLauncher.java:277)
    ...
    Caused by: org.openqa.selenium.server.browserlaunchers.FirefoxCustomProfileLaunc
    her$FileLockRemainedException: Lock file still present! C:\DOCUME~1\jsvec\LOCALS
    ~1\Temp\customProfileDir203138\parent.lock
To resolve this, see the section on Specifying a Separate Firefox Profile
Versioning Problems
Make sure your version of Selenium supports the version of your browser. For example, Selenium RC 0.92 does not support Firefox 3. At times you may be lucky (I was). But don’t forget to check which browser versions are supported by the version of Selenium you are using. When in doubt, use the latest release version of Selenium with the most widely used version of your browser.
Error message: “(Unsupported major.minor version 49.0)” while starting server
This error says you’re not using a correct version of Java. The Selenium Server requires Java 1.5 or higher.
To check double-check your java version, run this from the command line.
java -version
You should see a message showing the Java version.
   java version "1.5.0_07"
   Java(TM) 2 Runtime Environment, Standard Edition (build 1.5.0_07-b03)
   Java HotSpot(TM) Client VM (build 1.5.0_07-b03, mixed mode)
If you see a lower version number, you may need to update the JRE, or you may simply need to add it to your PATH environment variable.
404 error when running the getNewBrowserSession command
If you’re getting a 404 error while attempting to open a page on “http://www.google.com/selenium-server/", then it must be because the Selenium Server was not correctly configured as a proxy. The “selenium-server” directory doesn’t exist on google.com; it only appears to exist when the proxy is properly configured. Proxy Configuration highly depends on how the browser is launched with firefox, iexplore, opera, or custom.
iexplore: If the browser is launched using *iexplore, you could be having a problem with Internet Explorer’s proxy settings. Selenium Server attempts To configure the global proxy settings in the Internet Options Control Panel. You must make sure that those are correctly configured when Selenium Server launches the browser. Try looking at your Internet Options control panel. Click on the “Connections” tab and click on “LAN Settings”.
- If you need to use a proxy to access the application you want to test,
you’ll need to start Selenium Server with “-Dhttp.proxyHost”;
see the
Proxy Configuration_ for more details. - You may also try configuring your proxy manually and then launching the browser with *custom, or with *iehta browser launcher.
- If you need to use a proxy to access the application you want to test,
you’ll need to start Selenium Server with “-Dhttp.proxyHost”;
see the
custom: When using *custom you must configure the proxy correctly(manually), otherwise you’ll get a 404 error. Double-check that you’ve configured your proxy settings correctly. To check whether you’ve configured the proxy correctly is to attempt to intentionally configure the browser incorrectly. Try configuring the browser to use the wrong proxy server hostname, or the wrong port. If you had successfully configured the browser’s proxy settings incorrectly, then the browser will be unable to connect to the Internet, which is one way to make sure that one is adjusting the relevant settings.
For other browsers (*firefox, *opera) we automatically hard-code the proxy for you, and so there are no known issues with this functionality. If you’re encountering 404 errors and have followed this user guide carefully post your results to user group for some help from the user community.
Permission Denied Error
The most common reason for this error is that your session is attempting to violate the same-origin policy by crossing domain boundaries (e.g., accesses a page from http://domain1 and then accesses a page from http://domain2) or switching protocols (moving from http://domainX to https://domainX).
This error can also occur when JavaScript attempts to find UI objects which are not yet available (before the page has completely loaded), or are no longer available (after the page has started to be unloaded). This is most typically encountered with AJAX pages which are working with sections of a page or subframes that load and/or reload independently of the larger page.
This error can be intermittent. Often it is impossible to reproduce the problem
with a debugger because the trouble stems from race conditions which
are not reproducible when the debugger’s overhead is added to the system.
Permission issues are covered in some detail in the tutorial. Read the section
about the The Same Origin Policy, Proxy Injection carefully.
Handling Browser Popup Windows
There are several kinds of “Popups” that you can get during a Selenium test. You may not be able to close these popups by running Selenium commands if they are initiated by the browser and not your AUT. You may need to know how to manage these. Each type of popup needs to be addressed differently.
HTTP basic authentication dialogs: These dialogs prompt for a username/password to login to the site. To login to a site that requires HTTP basic authentication, use a username and password in the URL, as described in
RFC 1738_, like this: open(“http://myusername:myuserpassword@myexample.com/blah/blah/blah").SSL certificate warnings: Selenium RC automatically attempts to spoof SSL certificates when it is enabled as a proxy; see more on this in the section on HTTPS. If your browser is configured correctly, you should never see SSL certificate warnings, but you may need to configure your browser to trust our dangerous “CyberVillains” SSL certificate authority. Again, refer to the HTTPS section for how to do this.
modal JavaScript alert/confirmation/prompt dialogs: Selenium tries to conceal those dialogs from you (by replacing window.alert, window.confirm and window.prompt) so they won’t stop the execution of your page. If you’re seeing an alert pop-up, it’s probably because it fired during the page load process, which is usually too early for us to protect the page. Selenese contains commands for asserting or verifying alert and confirmation popups. See the sections on these topics in Chapter 4.
On Linux, why isn’t my Firefox browser session closing?
On Unix/Linux you must invoke “firefox-bin” directly, so make sure that executable is on the path. If executing Firefox through a shell script, when it comes time to kill the browser Selenium RC will kill the shell script, leaving the browser running. You can specify the path to firefox-bin directly, like this.
cmd=getNewBrowserSession&1=*firefox /usr/local/firefox/firefox-bin&2=http://www.google.com
Firefox *chrome doesn’t work with custom profile
Check Firefox profile folder -> prefs.js -> user_pref(“browser.startup.page”, 0); Comment this line like this: “//user_pref(“browser.startup.page”, 0);” and try again.
Is it ok to load a custom pop-up as the parent page is loading (i.e., before the parent page’s javascript window.onload() function runs)?
No. Selenium relies on interceptors to determine window names as they are being loaded. These interceptors work best in catching new windows if the windows are loaded AFTER the onload() function. Selenium may not recognize windows loaded before the onload function.
Firefox on Linux
On Unix/Linux, versions of Selenium before 1.0 needed to invoke “firefox-bin” directly, so if you are using a previous version, make sure that the real executable is on the path.
On most Linux distributions, the real firefox-bin is located on:
/usr/lib/firefox-x.x.x/
Where the x.x.x is the version number you currently have. So, to add that path to the user’s path. you will have to add the following to your .bashrc file:
export PATH="$PATH:/usr/lib/firefox-x.x.x/"
If necessary, you can specify the path to firefox-bin directly in your test, like this:
"*firefox /usr/lib/firefox-x.x.x/firefox-bin"
IE and Style Attributes
If you are running your tests on Internet Explorer and you cannot locate
elements using their style attribute.
For example:
//td[@style="background-color:yellow"]
This would work perfectly in Firefox, Opera or Safari but not with IE.
IE interprets the keys in @style as uppercase. So, even if the
source code is in lowercase, you should use:
//td[@style="BACKGROUND-COLOR:yellow"]
This is a problem if your test is intended to work on multiple browsers, but you can easily code your test to detect the situation and try the alternative locator that only works in IE.
Error encountered - “Cannot convert object to primitive value” with shut down of *googlechrome browser
To avoid this error you have to start browser with an option that disables same origin policy checks:
selenium.start("commandLineFlags=--disable-web-security");
Error encountered in IE - “Couldn’t open app window; is the pop-up blocker enabled?”
To avoid this error you have to configure the browser: disable the popup blocker AND uncheck ‘Enable Protected Mode’ option in Tools » Options » Security.
The proxy is a third person in the middle that passes the ball between the two parts. It acts as a “web server” that delivers the AUT to the browser. Being a proxy gives Selenium Server the capability of “lying” about the AUT’s real URL. ↩︎
The browser is launched with a configuration profile that has set localhost:4444 as the HTTP proxy, this is why any HTTP request that the browser does will pass through Selenium server and the response will pass through it and not from the real server. ↩︎


")


