This is the multi-page printable view of this section. Click here to print.
Legacy
- 1: Selenium RC (Selenium 1)
- 2: Selenium 2
- 2.1: Migrating from RC to WebDriver
- 2.2: Backing Selenium with WebDriver
- 2.3: Legacy Firefox Driver
- 2.4: Selenium grid 2
- 2.5: History of Grid Platforms
- 2.6: Remote WebDriver standalone server
- 2.7: Limitations of scaling up tests in Selenium 2
- 2.8: Stealing focus from Firefox in Linux
- 2.9: Untrusted SSL Certificates
- 2.10: WebDriver For Mobile Browsers
- 2.11: Frequently Asked Questions for Selenium 2
- 2.12: Selenium 2.0 Team
- 3: Selenium 3
- 3.1: Grid 3
- 3.2: Setting up your own Grid 3
- 3.3: Components of Grid 3
- 4: Legacy Selenium IDE
- 5: JSON Wire Protocol Specification
- 6: Legacy Selenium Desired Capabilities
- 7: Legacy developer documentation
1 - Selenium RC (Selenium 1)
Introduction
Selenium RC was the main Selenium project for a long time, before the WebDriver/Selenium merge brought up Selenium 2, a more powerful tool. It is worth to highlight that Selenium 1 is not supported anymore.
How Selenium RC Works
First, we will describe how the components of Selenium RC operate and the role each plays in running your test scripts.
RC Components
Selenium RC components are:
- The Selenium Server which launches and kills browsers, interprets and runs the Selenese commands passed from the test program, and acts as an HTTP proxy, intercepting and verifying HTTP messages passed between the browser and the AUT.
- Client libraries which provide the interface between each programming language and the Selenium RC Server.
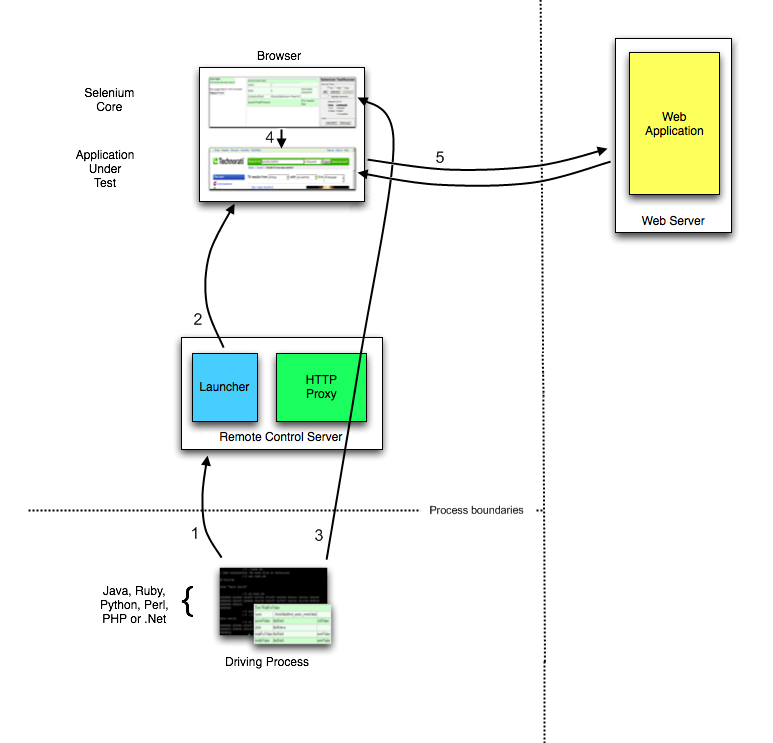
Here is a simplified architecture diagram:
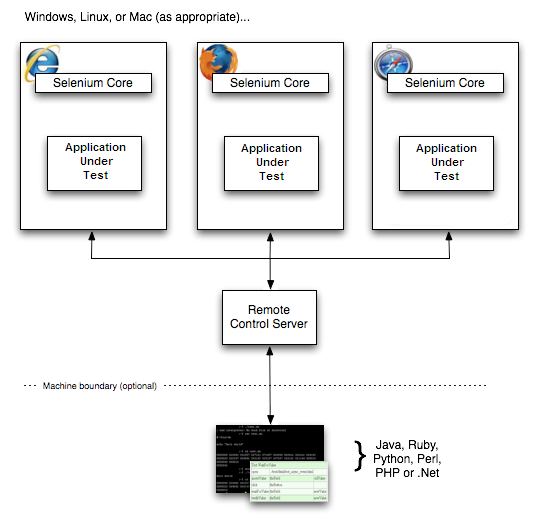
The diagram shows the client libraries communicate with the Server passing each Selenium command for execution. Then the server passes the Selenium command to the browser using Selenium-Core JavaScript commands. The browser, using its JavaScript interpreter, executes the Selenium command. This runs the Selenese action or verification you specified in your test script.
Selenium Server
Selenium Server receives Selenium commands from your test program, interprets them, and reports back to your program the results of running those tests.
The RC server bundles Selenium Core and automatically injects it into the browser. This occurs when your test program opens the browser (using a client library API function). Selenium-Core is a JavaScript program, actually a set of JavaScript functions which interprets and executes Selenese commands using the browser’s built-in JavaScript interpreter.
The Server receives the Selenese commands from your test program using simple HTTP GET/POST requests. This means you can use any programming language that can send HTTP requests to automate Selenium tests on the browser.
Client Libraries
The client libraries provide the programming support that allows you to run Selenium commands from a program of your own design. There is a different client library for each supported language. A Selenium client library provides a programming interface (API), i.e., a set of functions, which run Selenium commands from your own program. Within each interface, there is a programming function that supports each Selenese command.
The client library takes a Selenese command and passes it to the Selenium Server for processing a specific action or test against the application under test (AUT). The client library also receives the result of that command and passes it back to your program. Your program can receive the result and store it into a program variable and report it as a success or failure, or possibly take corrective action if it was an unexpected error.
So to create a test program, you simply write a program that runs a set of Selenium commands using a client library API. And, optionally, if you already have a Selenese test script created in the Selenium-IDE, you can generate the Selenium RC code. The Selenium-IDE can translate (using its Export menu item) its Selenium commands into a client-driver’s API function calls. See the Selenium-IDE chapter for specifics on exporting RC code from Selenium-IDE.
Installation
Installation is rather a misnomer for Selenium. Selenium has a set of libraries available in the programming language of your choice. You could download them from the downloads page.
Once you’ve chosen a language to work with, you simply need to:
- Install the Selenium RC Server.
- Set up a programming project using a language specific client driver.
Installing Selenium Server
The Selenium RC server is simply a Java jar file (selenium-server-standalone-
Running Selenium Server
Before starting any tests you must start the server. Go to the directory where Selenium RC’s server is located and run the following from a command-line console.
java -jar selenium-server-standalone-<version-number>.jar
This can be simplified by creating a batch or shell executable file (.bat on Windows and .sh on Linux) containing the command above. Then make a shortcut to that executable on your desktop and simply double-click the icon to start the server.
For the server to run you’ll need Java installed and the PATH environment variable correctly configured to run it from the console. You can check that you have Java correctly installed by running the following on a console.
java -version
If you get a version number (which needs to be 1.5 or later), you’re ready to start using Selenium RC.
Using the Java Client Driver
- Download Selenium java client driver zip from the SeleniumHQ downloads page.
- Extract selenium-java-
.jar file - Open your desired Java IDE (Eclipse, NetBeans, IntelliJ, Netweaver, etc.)
- Create a java project.
- Add the selenium-java-
.jar files to your project as references. - Add to your project classpath the file selenium-java-
.jar. - From Selenium-IDE, export a script to a Java file and include it in your Java project, or write your Selenium test in Java using the selenium-java-client API. The API is presented later in this chapter. You can either use JUnit, or TestNg to run your test, or you can write your own simple main() program. These concepts are explained later in this section.
- Run Selenium server from the console.
- Execute your test from the Java IDE or from the command-line.
For details on Java test project configuration, see the Appendix sections Configuring Selenium RC With Eclipse and Configuring Selenium RC With Intellij.
Using the Python Client Driver
- Install Selenium via PIP, instructions linked at SeleniumHQ downloads page
- Either write your Selenium test in Python or export a script from Selenium-IDE to a python file.
- Run Selenium server from the console
- Execute your test from a console or your Python IDE
For details on Python client driver configuration, see the appendix Python Client Driver Configuration.
Using the .NET Client Driver
- Download Selenium RC from the SeleniumHQ downloads page
- Extract the folder
- Download and install NUnit ( Note: You can use NUnit as your test engine. If you’re not familiar yet with NUnit, you can also write a simple main() function to run your tests; however NUnit is very useful as a test engine.)
- Open your desired .Net IDE (Visual Studio, SharpDevelop, MonoDevelop)
- Create a class library (.dll)
- Add references to the following DLLs: nmock.dll, nunit.core.dll, nunit. framework.dll, ThoughtWorks.Selenium.Core.dll, ThoughtWorks.Selenium.IntegrationTests.dll and ThoughtWorks.Selenium.UnitTests.dll
- Write your Selenium test in a .Net language (C#, VB.Net), or export a script from Selenium-IDE to a C# file and copy this code into the class file you just created.
- Write your own simple main() program or you can include NUnit in your project for running your test. These concepts are explained later in this chapter.
- Run Selenium server from console
- Run your test either from the IDE, from the NUnit GUI or from the command line
For specific details on .NET client driver configuration with Visual Studio, see the appendix .NET client driver configuration.
Using the Ruby Client Driver
- If you do not already have RubyGems, install it from RubyForge.
- Run
gem install selenium-client - At the top of your test script, add
require "selenium/client" - Write your test script using any Ruby test harness (eg Test::Unit, Mini::Test or RSpec).
- Run Selenium RC server from the console.
- Execute your test in the same way you would run any other Ruby script.
For details on Ruby client driver configuration, see the Selenium-Client documentation_
From Selenese to a Program
The primary task for using Selenium RC is to convert your Selenese into a programming language. In this section, we provide several different language-specific examples.
Sample Test Script
Let’s start with an example Selenese test script. Imagine recording the following test with Selenium-IDE.
| open | / | |
| type | q | selenium rc |
| clickAndWait | btnG | |
| assertTextPresent | Results * for selenium rc |
Note: This example would work with the Google search page http://www.google.com
Selenese as Programming Code
Here is the test script exported (via Selenium-IDE) to each of the supported programming languages. If you have at least basic knowledge of an object- oriented programming language, you will understand how Selenium runs Selenese commands by reading one of these examples. To see an example in a specific language, select one of these buttons.
CSharp
        using System;
        using System.Text;
        using System.Text.RegularExpressions;
        using System.Threading;
        using NUnit.Framework;
        using Selenium;

        namespace SeleniumTests
        {
            [TestFixture]
            public class NewTest
            {
                private ISelenium selenium;
                private StringBuilder verificationErrors;

                [SetUp]
                public void SetupTest()
                {
                    selenium = new DefaultSelenium("localhost", 4444, "*firefox", "http://www.google.com/");
                    selenium.Start();
                    verificationErrors = new StringBuilder();
                }

                [TearDown]
                public void TeardownTest()
                {
                    try
                    {
                        selenium.Stop();
                    }
                    catch (Exception)
                    {
                        // Ignore errors if unable to close the browser
                    }
                    Assert.AreEqual("", verificationErrors.ToString());
                }

                [Test]
                public void TheNewTest()
                {
                    selenium.Open("/");
                    selenium.Type("q", "selenium rc");
                    selenium.Click("btnG");
                    selenium.WaitForPageToLoad("30000");
                    Assert.AreEqual("selenium rc - Google Search", selenium.GetTitle());
                }
            }
        }
Java
	  /** Add JUnit framework to your classpath if not already there
	   *  for this example to work
	  */
      package com.example.tests;

      import com.thoughtworks.selenium.*;
      import java.util.regex.Pattern;

      public class NewTest extends SeleneseTestCase {
          public void setUp() throws Exception {
              setUp("http://www.google.com/", "*firefox");
          }
            public void testNew() throws Exception {
                selenium.open("/");
                selenium.type("q", "selenium rc");
                selenium.click("btnG");
                selenium.waitForPageToLoad("30000");
                assertTrue(selenium.isTextPresent("Results * for selenium rc"));
          }
      }
Php
      <?php

      require_once 'PHPUnit/Extensions/SeleniumTestCase.php';

      class Example extends PHPUnit_Extensions_SeleniumTestCase
      {
        function setUp()
        {
          $this->setBrowser("*firefox");
          $this->setBrowserUrl("http://www.google.com/");
        }

        function testMyTestCase()
        {
          $this->open("/");
          $this->type("q", "selenium rc");
          $this->click("btnG");
          $this->waitForPageToLoad("30000");
          $this->assertTrue($this->isTextPresent("Results * for selenium rc"));
        }
      }
      ?>
Python
     from selenium import selenium
      import unittest, time, re

      class NewTest(unittest.TestCase):
          def setUp(self):
              self.verificationErrors = []
              self.selenium = selenium("localhost", 4444, "*firefox",
                      "http://www.google.com/")
              self.selenium.start()

          def test_new(self):
              sel = self.selenium
              sel.open("/")
              sel.type("q", "selenium rc")
              sel.click("btnG")
              sel.wait_for_page_to_load("30000")
              self.failUnless(sel.is_text_present("Results * for selenium rc"))

          def tearDown(self):
              self.selenium.stop()
              self.assertEqual([], self.verificationErrors)
Ruby
      require "selenium/client"
      require "test/unit"

      class NewTest < Test::Unit::TestCase
        def setup
          @verification_errors = []
          if $selenium
            @selenium = $selenium
          else
            @selenium =  Selenium::Client::Driver.new("localhost", 4444, "*firefox", "http://www.google.com/", 60);
            @selenium.start
          end
          @selenium.set_context("test_new")
        end

        def teardown
          @selenium.stop unless $selenium
          assert_equal [], @verification_errors
        end

        def test_new
          @selenium.open "/"
          @selenium.type "q", "selenium rc"
          @selenium.click "btnG"
          @selenium.wait_for_page_to_load "30000"
          assert @selenium.is_text_present("Results * for selenium rc")
        end
      end
In the next section we’ll explain how to build a test program using the generated code.
Programming Your Test
Now we’ll illustrate how to program your own tests using examples in each of the supported programming languages. There are essentially two tasks:
- Generate your script into a programming language from Selenium-IDE, optionally modifying the result.
- Write a very simple main program that executes the generated code.
Optionally, you can adopt a test engine platform like JUnit or TestNG for Java, or NUnit for .NET if you are using one of those languages.
Here, we show language-specific examples. The language-specific APIs tend to differ from one to another, so you’ll find a separate explanation for each.
- Java
- C#
- Python
- Ruby
- Perl, PHP
Java
For Java, people use either JUnit or TestNG as the test engine.
Some development environments like Eclipse have direct support for these via
plug-ins. This makes it even easier. Teaching JUnit or TestNG is beyond the scope of
this document however materials may be found online and there are publications
available. If you are already a “java-shop” chances are your developers will
already have some experience with one of these test frameworks.
You will probably want to rename the test class from “NewTest” to something of your own choosing. Also, you will need to change the browser-open parameters in the statement:
selenium = new DefaultSelenium("localhost", 4444, "*iehta", "http://www.google.com/");
The Selenium-IDE generated code will look like this. This example has comments added manually for additional clarity.
   package com.example.tests;
   // We specify the package of our tests

   import com.thoughtworks.selenium.*;
   // This is the driver's import. You'll use this for instantiating a
   // browser and making it do what you need.

   import java.util.regex.Pattern;
   // Selenium-IDE add the Pattern module because it's sometimes used for
   // regex validations. You can remove the module if it's not used in your
   // script.

   public class NewTest extends SeleneseTestCase {
   // We create our Selenium test case

         public void setUp() throws Exception {
           setUp("http://www.google.com/", "*firefox");
                // We instantiate and start the browser
         }

         public void testNew() throws Exception {
              selenium.open("/");
              selenium.type("q", "selenium rc");
              selenium.click("btnG");
              selenium.waitForPageToLoad("30000");
              assertTrue(selenium.isTextPresent("Results * for selenium rc"));
              // These are the real test steps
        }
   }
C#
The .NET Client Driver works with Microsoft.NET. It can be used with any .NET testing framework like NUnit or the Visual Studio 2005 Team System.
Selenium-IDE assumes you will use NUnit as your testing framework. You can see this in the generated code below. It includes the using statement for NUnit along with corresponding NUnit attributes identifying the role for each member function of the test class.
You will probably have to rename the test class from “NewTest” to something of your own choosing. Also, you will need to change the browser-open parameters in the statement:
selenium = new DefaultSelenium("localhost", 4444, "*iehta", "http://www.google.com/");
The generated code will look similar to this.
    using System;
    using System.Text;
    using System.Text.RegularExpressions;
    using System.Threading;
    using NUnit.Framework;
    using Selenium;

    namespace SeleniumTests

    {
        [TestFixture]

        public class NewTest

        {
        private ISelenium selenium;

        private StringBuilder verificationErrors;

        [SetUp]

        public void SetupTest()

        {
            selenium = new DefaultSelenium("localhost", 4444, "*iehta",
            "http://www.google.com/");

            selenium.Start();

            verificationErrors = new StringBuilder();
        }

        [TearDown]

        public void TeardownTest()
        {
            try
            {
            selenium.Stop();
            }

            catch (Exception)
            {
            // Ignore errors if unable to close the browser
            }

            Assert.AreEqual("", verificationErrors.ToString());
        }
        [Test]

        public void TheNewTest()
        {
            // Open Google search engine.
            selenium.Open("http://www.google.com/");

            // Assert Title of page.
            Assert.AreEqual("Google", selenium.GetTitle());

            // Provide search term as "Selenium OpenQA"
            selenium.Type("q", "Selenium OpenQA");

            // Read the keyed search term and assert it.
            Assert.AreEqual("Selenium OpenQA", selenium.GetValue("q"));

            // Click on Search button.
            selenium.Click("btnG");

            // Wait for page to load.
            selenium.WaitForPageToLoad("5000");

            // Assert that "www.openqa.org" is available in search results.
            Assert.IsTrue(selenium.IsTextPresent("www.openqa.org"));

            // Assert that page title is - "Selenium OpenQA - Google Search"
            Assert.AreEqual("Selenium OpenQA - Google Search",
                         selenium.GetTitle());
        }
        }
    }
You can allow NUnit to manage the execution
of your tests. Or alternatively, you can write a simple main() program that
instantiates the test object and runs each of the three methods, SetupTest(),
TheNewTest(), and TeardownTest() in turn.
Python
Pyunit is the test framework to use for Python.
The basic test structure is:
   from selenium import selenium
   # This is the driver's import.  You'll use this class for instantiating a
   # browser and making it do what you need.

   import unittest, time, re
   # This are the basic imports added by Selenium-IDE by default.
   # You can remove the modules if they are not used in your script.

   class NewTest(unittest.TestCase):
   # We create our unittest test case

       def setUp(self):
           self.verificationErrors = []
           # This is an empty array where we will store any verification errors
           # we find in our tests

           self.selenium = selenium("localhost", 4444, "*firefox",
                   "http://www.google.com/")
           self.selenium.start()
           # We instantiate and start the browser

       def test_new(self):
           # This is the test code.  Here you should put the actions you need
           # the browser to do during your test.

           sel = self.selenium
           # We assign the browser to the variable "sel" (just to save us from
           # typing "self.selenium" each time we want to call the browser).

           sel.open("/")
           sel.type("q", "selenium rc")
           sel.click("btnG")
           sel.wait_for_page_to_load("30000")
           self.failUnless(sel.is_text_present("Results * for selenium rc"))
           # These are the real test steps

       def tearDown(self):
           self.selenium.stop()
           # we close the browser (I'd recommend you to comment this line while
           # you are creating and debugging your tests)

           self.assertEqual([], self.verificationErrors)
           # And make the test fail if we found that any verification errors
           # were found
Ruby
Old (pre 2.0) versions of Selenium-IDE generate Ruby code that requires the old Selenium gem. Therefore, it is advisable to update any Ruby scripts generated by the IDE as follows:
On line 1, change
require "selenium"torequire "selenium/client"On line 11, change
Selenium::SeleniumDriver.newtoSelenium::Client::Driver.new
You probably also want to change the class name to something more informative than “Untitled,” and change the test method’s name to something other than “test_untitled.”
Here is a simple example created by modifying the Ruby code generated by Selenium IDE, as described above.
   # load the Selenium-Client gem
   require "selenium/client"

   # Load Test::Unit, Ruby's default test framework.
   # If you prefer RSpec, see the examples in the Selenium-Client
   # documentation.
   require "test/unit"

   class Untitled < Test::Unit::TestCase

     # The setup method is called before each test.
     def setup

       # This array is used to capture errors and display them at the
       # end of the test run.
       @verification_errors = []

       # Create a new instance of the Selenium-Client driver.
       @selenium = Selenium::Client::Driver.new \
         :host => "localhost",
         :port => 4444,
         :browser => "*chrome",
         :url => "http://www.google.com/",
         :timeout_in_second => 60

       # Start the browser session
       @selenium.start

       # Print a message in the browser-side log and status bar
       # (optional).
       @selenium.set_context("test_untitled")

     end

     # The teardown method is called after each test.
     def teardown

       # Stop the browser session.
       @selenium.stop

       # Print the array of error messages, if any.
       assert_equal [], @verification_errors
     end

     # This is the main body of your test.
     def test_untitled

       # Open the root of the site we specified when we created the
       # new driver instance, above.
       @selenium.open "/"

       # Type 'selenium rc' into the field named 'q'
       @selenium.type "q", "selenium rc"

       # Click the button named "btnG"
       @selenium.click "btnG"

       # Wait for the search results page to load.
       # Note that we don't need to set a timeout here, because that
       # was specified when we created the new driver instance, above.
       @selenium.wait_for_page_to_load

       begin

          # Test whether the search results contain the expected text.
	  # Notice that the star (*) is a wildcard that matches any
	  # number of characters.
	  assert @selenium.is_text_present("Results * for selenium rc")

       rescue Test::Unit::AssertionFailedError

          # If the assertion fails, push it onto the array of errors.
	  @verification_errors << $!

       end
     end
   end
Perl, PHP
The members of the documentation team have not used Selenium RC with Perl or PHP. If you are using Selenium RC with either of these two languages please contact the Documentation Team (see the chapter on contributing). We would love to include some examples from you and your experiences, to support Perl and PHP users.
Learning the API
The Selenium RC API uses naming conventions
that, assuming you understand Selenese, much of the interface
will be self-explanatory. Here, however, we explain the most critical and
possibly less obvious aspects.
Starting the Browser
CSharp
      selenium = new DefaultSelenium("localhost", 4444, "*firefox", "http://www.google.com/");
      selenium.Start();
Java
setUp("http://www.google.com/", "*firefox");
Perl
      my $sel = Test::WWW::Selenium->new( host => "localhost",
                                          port => 4444,
                                          browser => "*firefox",
                                          browser_url => "http://www.google.com/" );
Php
      $this->setBrowser("*firefox");
      $this->setBrowserUrl("http://www.google.com/");
Python
      self.selenium = selenium("localhost", 4444, "*firefox",
                               "http://www.google.com/")
      self.selenium.start()
Ruby
      @selenium = Selenium::ClientDriver.new("localhost", 4444, "*firefox", "http://www.google.com/", 10000);
      @selenium.start
Each of these examples opens the browser and represents that browser by assigning a “browser instance” to a program variable. This program variable is then used to call methods from the browser. These methods execute the Selenium commands, i.e. like open or type or the verify commands.
The parameters required when creating the browser instance are:
host Specifies the IP address of the computer where the server is located. Usually, this is the same machine as where the client is running, so in this case localhost is passed. In some clients this is an optional parameter.
port Specifies the TCP/IP socket where the server is listening waiting for the client to establish a connection. This also is optional in some client drivers.
browser The browser in which you want to run the tests. This is a required parameter.
url The base url of the application under test. This is required by all the client libs and is integral information for starting up the browser-proxy-AUT communication.
Note that some of the client libraries require the browser to be started explicitly by calling
its start() method.
Running Commands
Once you have the browser initialized and assigned to a variable (generally named “selenium”) you can make it run Selenese commands by calling the respective methods from the browser variable. For example, to call the type method of the selenium object:
selenium.type("field-id","string to type")
In the background the browser will actually perform a type operation,
essentially identical to a user typing input into the browser, by
using the locator and the string you specified during the method call.
Reporting Results
Selenium RC does not have its own mechanism for reporting results. Rather, it allows you to build your reporting customized to your needs using features of your chosen programming language. That’s great, but what if you simply want something quick that’s already done for you? Often an existing library or test framework can meet your needs faster than developing your own test reporting code.
Test Framework Reporting Tools
Test frameworks are available for many programming languages. These, along with their primary function of providing a flexible test engine for executing your tests, include library code for reporting results. For example, Java has two commonly used test frameworks, JUnit and TestNG. .NET also has its own, NUnit.
We won’t teach the frameworks themselves here; that’s beyond the scope of this user guide. We will simply introduce the framework features that relate to Selenium along with some techniques you can apply. There are good books available on these test frameworks however along with information on the internet.
Test Report Libraries
Also available are third-party libraries specifically created for reporting test results in your chosen programming language. These often support a variety of formats such as HTML or PDF.
What’s The Best Approach?
Most people new to the testing frameworks will begin with the framework’s built-in reporting features. From there most will examine any available libraries as that’s less time consuming than developing your own. As you begin to use Selenium no doubt you will start putting in your own “print statements” for reporting progress. That may gradually lead to you developing your own reporting, possibly in parallel to using a library or test framework. Regardless, after the initial, but short, learning curve you will naturally develop what works best for your own situation.
Test Reporting Examples
To illustrate, we’ll direct you to some specific tools in some of the other languages supported by Selenium. The ones listed here are commonly used and have been used extensively (and therefore recommended) by the authors of this guide.
Test Reports in Java
If Selenium Test cases are developed using JUnit then JUnit Report can be used to generate test reports.
If Selenium Test cases are developed using TestNG then no external task is required to generate test reports. The TestNG framework generates an HTML report which list details of tests.
ReportNG is a HTML reporting plug-in for the TestNG framework. It is intended as a replacement for the default TestNG HTML report. ReportNG provides a simple, colour-coded view of the test results.
Logging the Selenese Commands
- Logging Selenium can be used to generate a report of all the Selenese commands in your test along with the success or failure of each. Logging Selenium extends the Java client driver to add this Selenese logging ability.
Test Reports for Python
- When using Python Client Driver then HTMLTestRunner can be used to generate a Test Report.
Test Reports for Ruby
- If RSpec framework is used for writing Selenium Test Cases in Ruby then its HTML report can be used to generate a test report.
Adding Some Spice to Your Tests
Now we’ll get to the whole reason for using Selenium RC, adding programming logic to your tests. It’s the same as for any program. Program flow is controlled using condition statements and iteration. In addition you can report progress information using I/O. In this section we’ll show some examples of how programming language constructs can be combined with Selenium to solve common testing problems.
You will find as you transition from the simple tests of the existence of
page elements to tests of dynamic functionality involving multiple web-pages and
varying data that you will require programming logic for verifying expected
results. Basically, the Selenium-IDE does not support iteration and
standard condition statements. You can do some conditions by embedding JavaScript
in Selenese parameters, however
iteration is impossible, and most conditions will be much easier in a
programming language. In addition, you may need exception handling for
error recovery. For these reasons and others, we have written this section
to illustrate the use of common programming techniques to
give you greater ‘verification power’ in your automated testing.
The examples in this section are written in C# and Java, although the code is simple and can be easily adapted to the other supported languages. If you have some basic knowledge of an object-oriented programming language you shouldn’t have difficulty understanding this section.
Iteration
Iteration is one of the most common things people need to do in their tests. For example, you may want to to execute a search multiple times. Or, perhaps for verifying your test results you need to process a “result set” returned from a database.
Using the same Google search example we used earlier, let’s check the Selenium search results. This test could use the Selenese:
| open | / | |
| type | q | selenium rc |
| clickAndWait | btnG | |
| assertTextPresent | Results * for selenium rc | |
| type | q | selenium ide |
| clickAndWait | btnG | |
| assertTextPresent | Results * for selenium ide | |
| type | q | selenium grid |
| clickAndWait | btnG | |
| assertTextPresent | Results * for selenium grid |
The code has been repeated to run the same steps 3 times. But multiple copies of the same code is not good program practice because it’s more work to maintain. By using a programming language, we can iterate over the search results for a more flexible and maintainable solution.
In C#
   // Collection of String values.
   String[] arr = {"ide", "rc", "grid"};

   // Execute loop for each String in array 'arr'.
   foreach (String s in arr) {
       sel.open("/");
       sel.type("q", "selenium " +s);
       sel.click("btnG");
       sel.waitForPageToLoad("30000");
       assertTrue("Expected text: " +s+ " is missing on page."
       , sel.isTextPresent("Results * for selenium " + s));
    }
Condition Statements
To illustrate using conditions in tests we’ll start with an example. A common problem encountered while running Selenium tests occurs when an expected element is not available on page. For example, when running the following line:
selenium.type("q", "selenium " +s);
If element ‘q’ is not on the page then an exception is thrown:
com.thoughtworks.selenium.SeleniumException: ERROR: Element q not found
This can cause your test to abort. For some tests that’s what you want. But often that is not desirable as your test script has many other subsequent tests to perform.
A better approach is to first validate whether the element is really present and then take alternatives when it it is not. Let’s look at this using Java.
   // If element is available on page then perform type operation.
   if(selenium.isElementPresent("q")) {
       selenium.type("q", "Selenium rc");
   } else {
       System.out.printf("Element: " +q+ " is not available on page.")
   }
The advantage of this approach is to continue with test execution even if some UI elements are not available on page.
Executing JavaScript from Your Test
JavaScript comes very handy in exercising an application which is not directly supported by Selenium. The getEval method of Selenium API can be used to execute JavaScript from Selenium RC.
Consider an application having check boxes with no static identifiers. In this case one could evaluate JavaScript from Selenium RC to get ids of all check boxes and then exercise them.
   public static String[] getAllCheckboxIds () {
		String script = "var inputId  = new Array();";// Create array in java script.
		script += "var cnt = 0;"; // Counter for check box ids.
		script += "var inputFields  = new Array();"; // Create array in java script.
		script += "inputFields = window.document.getElementsByTagName('input');"; // Collect input elements.
		script += "for(var i=0; i<inputFields.length; i++) {"; // Loop through the collected elements.
		script += "if(inputFields[i].id !=null " +
		"&& inputFields[i].id !='undefined' " +
		"&& inputFields[i].getAttribute('type') == 'checkbox') {"; // If input field is of type check box and input id is not null.
		script += "inputId[cnt]=inputFields[i].id ;" + // Save check box id to inputId array.
		"cnt++;" + // increment the counter.
		"}" + // end of if.
		"}"; // end of for.
		script += "inputId.toString();" ;// Convert array in to string.
		String[] checkboxIds = selenium.getEval(script).split(","); // Split the string.
		return checkboxIds;
    }
To count number of images on a page:
selenium.getEval("window.document.images.length;");
Remember to use window object in case of DOM expressions as by default selenium window is referred to, not the test window.
Server Options
When the server is launched, command line options can be used to change the default server behaviour.
Recall, the server is started by running the following.
$ java -jar selenium-server-standalone-<version-number>.jar
To see the list of options, run the server with the -h option.
$ java -jar selenium-server-standalone-<version-number>.jar -h
You’ll see a list of all the options you can use with the server and a brief description of each. The provided descriptions will not always be enough, so we’ve provided explanations for some of the more important options.
Proxy Configuration
If your AUT is behind an HTTP proxy which requires authentication then you should configure http.proxyHost, http.proxyPort, http.proxyUser and http.proxyPassword using the following command.
$ java -jar selenium-server-standalone-<version-number>.jar -Dhttp.proxyHost=proxy.com -Dhttp.proxyPort=8080 -Dhttp.proxyUser=username -Dhttp.proxyPassword=password
Multi-Window Mode
If you are using Selenium 1.0 you can probably skip this section, since multiwindow mode is the default behavior. However, prior to version 1.0, Selenium by default ran the application under test in a sub frame as shown here.
Some applications didn’t run correctly in a sub frame, and needed to be loaded into the top frame of the window. The multi-window mode option allowed the AUT to run in a separate window rather than in the default frame where it could then have the top frame it required.
For older versions of Selenium you must specify multiwindow mode explicitly with the following option:
-multiwindow
As of Selenium RC 1.0, if you want to run your test within a single frame (i.e. using the standard for earlier Selenium versions) you can state this to the Selenium Server using the option
-singlewindow
Specifying the Firefox Profile
Firefox will not run two instances simultaneously unless you specify a separate profile for each instance. Selenium RC 1.0 and later runs in a separate profile automatically, so if you are using Selenium 1.0, you can probably skip this section. However, if you’re using an older version of Selenium or if you need to use a specific profile for your tests (such as adding an https certificate or having some addons installed), you will need to explicitly specify the profile.
First, to create a separate Firefox profile, follow this procedure. Open the Windows Start menu, select “Run”, then type and enter one of the following:
firefox.exe -profilemanager
firefox.exe -P
Create the new profile using the dialog. Then when you run Selenium Server, tell it to use this new Firefox profile with the server command-line option -firefoxProfileTemplate and specify the path to the profile using its filename and directory path.
-firefoxProfileTemplate "path to the profile"
Warning: Be sure to put your profile in a new folder separate from the default!!! The Firefox profile manager tool will delete all files in a folder if you delete a profile, regardless of whether they are profile files or not.
More information about Firefox profiles can be found in Mozilla’s Knowledge Base
Run Selenese Directly Within the Server Using -htmlSuite
You can run Selenese html files directly within the Selenium Server by passing the html file to the server’s command line. For instance:
   java -jar selenium-server-standalone-<version-number>.jar -htmlSuite "*firefox"
   "http://www.google.com" "c:\absolute\path\to\my\HTMLSuite.html"
   "c:\absolute\path\to\my\results.html"
This will automatically launch your HTML suite, run all the tests and save a nice HTML report with the results.
Note: When using this option, the server will start the tests and wait for a specified number of seconds for the test to complete; if the test doesn’t complete within that amount of time, the command will exit with a non-zero exit code and no results file will be generated.
This command line is very long so be careful when
you type it. Note this requires you to pass in an HTML
Selenese suite, not a single test. Also be aware the -htmlSuite option is incompatible with -interactive
You cannot run both at the same time.
Selenium Server Logging
Server-Side Logs
When launching Selenium server the -log option can be used to record valuable debugging information reported by the Selenium Server to a text file.
java -jar selenium-server-standalone-<version-number>.jar -log selenium.log
This log file is more verbose than the standard console logs (it includes DEBUG level logging messages). The log file also includes the logger name, and the ID number of the thread that logged the message. For example:
   20:44:25 DEBUG [12] org.openqa.selenium.server.SeleniumDriverResourceHandler -
   Browser 465828/:top frame1 posted START NEW
The message format is
TIMESTAMP(HH:mm:ss) LEVEL [THREAD] LOGGER - MESSAGE
This message may be multiline.
Browser-Side Logs
JavaScript on the browser side (Selenium Core) also logs important messages; in many cases, these can be more useful to the end-user than the regular Selenium Server logs. To access browser-side logs, pass the -browserSideLog argument to the Selenium Server.
java -jar selenium-server-standalone-<version-number>.jar -browserSideLog
-browserSideLog must be combined with the -log argument, to log browserSideLogs (as well as all other DEBUG level logging messages) to a file.
Specifying the Path to a Specific Browser
You can specify to Selenium RC a path to a specific browser. This is useful if you have different versions of the same browser and you wish to use a specific one. Also, this is used to allow your tests to run against a browser not directly supported by Selenium RC. When specifying the run mode, use the *custom specifier followed by the full path to the browser’s executable:
*custom <path to browser>
Selenium RC Architecture
Note: This topic tries to explain the technical implementation behind Selenium RC. It’s not fundamental for a Selenium user to know this, but could be useful for understanding some of the problems you might find in the future.
To understand in detail how Selenium RC Server works and why it uses proxy injection
and heightened privilege modes you must first understand the same origin policy_.
The Same Origin Policy
The main restriction that Selenium faces is the Same Origin Policy. This security restriction is applied by every browser in the market and its objective is to ensure that a site’s content will never be accessible by a script from another site. The Same Origin Policy dictates that any code loaded within the browser can only operate within that website’s domain. It cannot perform functions on another website. So for example, if the browser loads JavaScript code when it loads www.mysite.com, it cannot run that loaded code against www.mysite2.com–even if that’s another of your sites. If this were possible, a script placed on any website you open would be able to read information on your bank account if you had the account page opened on other tab. This is called XSS (Cross-site Scripting).
To work within this policy, Selenium-Core (and its JavaScript commands that make all the magic happen) must be placed in the same origin as the Application Under Test (same URL).
Historically, Selenium-Core was limited by this problem since it was implemented in JavaScript. Selenium RC is not, however, restricted by the Same Origin Policy. Its use of the Selenium Server as a proxy avoids this problem. It, essentially, tells the browser that the browser is working on a single “spoofed” website that the Server provides.
Note: You can find additional information about this topic on Wikipedia pages about Same Origin Policy and XSS.
Proxy Injection
The first method Selenium used to avoid the The Same Origin Policy was Proxy Injection. In Proxy Injection Mode, the Selenium Server acts as a client-configured HTTP proxy1, that sits between the browser and the Application Under Test2. It then masks the AUT under a fictional URL (embedding Selenium-Core and the set of tests and delivering them as if they were coming from the same origin).
Here is an architectural diagram.
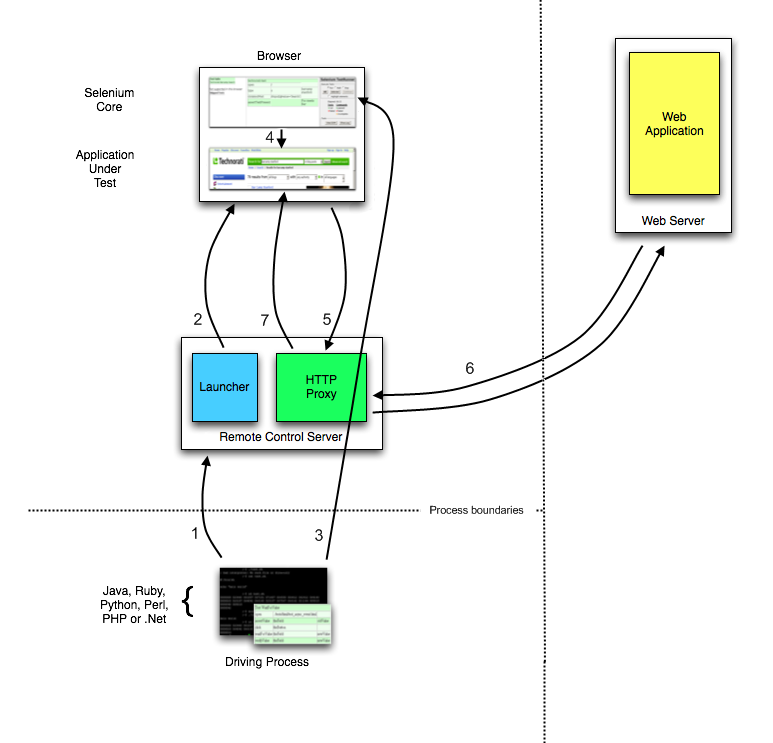
As a test suite starts in your favorite language, the following happens:
- The client/driver establishes a connection with the selenium-RC server.
- Selenium RC server launches a browser (or reuses an old one) with a URL that injects Selenium-Core’s JavaScript into the browser-loaded web page.
- The client-driver passes a Selenese command to the server.
- The Server interprets the command and then triggers the corresponding JavaScript execution to execute that command within the browser. Selenium-Core instructs the browser to act on that first instruction, typically opening a page of the AUT.
- The browser receives the open request and asks for the website’s content from the Selenium RC server (set as the HTTP proxy for the browser to use).
- Selenium RC server communicates with the Web server asking for the page and once it receives it, it sends the page to the browser masking the origin to look like the page comes from the same server as Selenium-Core (this allows Selenium-Core to comply with the Same Origin Policy).
- The browser receives the web page and renders it in the frame/window reserved for it.
Heightened Privileges Browsers
This workflow in this method is very similar to Proxy Injection but the main difference is that the browsers are launched in a special mode called Heightened Privileges, which allows websites to do things that are not commonly permitted (as doing XSS_, or filling file upload inputs and pretty useful stuff for Selenium). By using these browser modes, Selenium Core is able to directly open the AUT and read/interact with its content without having to pass the whole AUT through the Selenium RC server.
Here is the architectural diagram.
As a test suite starts in your favorite language, the following happens:
- The client/driver establishes a connection with the selenium-RC server.
- Selenium RC server launches a browser (or reuses an old one) with a URL that will load Selenium-Core in the web page.
- Selenium-Core gets the first instruction from the client/driver (via another HTTP request made to the Selenium RC Server).
- Selenium-Core acts on that first instruction, typically opening a page of the AUT.
- The browser receives the open request and asks the Web Server for the page. Once the browser receives the web page, renders it in the frame/window reserved for it.
Handling HTTPS and Security Popups
Many applications switch from using HTTP to HTTPS when they need to send encrypted information such as passwords or credit card information. This is common with many of today’s web applications. Selenium RC supports this.
To ensure the HTTPS site is genuine, the browser will need a security certificate. Otherwise, when the browser accesses the AUT using HTTPS, it will assume that application is not ’trusted’. When this occurs the browser displays security popups, and these popups cannot be closed using Selenium RC.
When dealing with HTTPS in a Selenium RC test, you must use a run mode that supports this and handles the security certificate for you. You specify the run mode when your test program initializes Selenium.
In Selenium RC 1.0 beta 2 and later use *firefox or *iexplore for the run mode. In earlier versions, including Selenium RC 1.0 beta 1, use *chrome or *iehta, for the run mode. Using these run modes, you will not need to install any special security certificates; Selenium RC will handle it for you.
In version 1.0 the run modes *firefox or *iexplore are recommended. However, there are additional run modes of *iexploreproxy and *firefoxproxy. These are provided for backwards compatibility only, and should not be used unless required by legacy test programs. Their use will present limitations with security certificate handling and with the running of multiple windows if your application opens additional browser windows.
In earlier versions of Selenium RC, *chrome or *iehta were the run modes that supported HTTPS and the handling of security popups. These were considered ‘experimental modes although they became quite stable and many people used them. If you are using Selenium 1.0 you do not need, and should not use, these older run modes.
Security Certificates Explained
Normally, your browser will trust the application you are testing by installing a security certificate which you already own. You can check this in your browser’s options or Internet properties (if you don’t know your AUT’s security certificate ask your system administrator). When Selenium loads your browser it injects code to intercept messages between the browser and the server. The browser now thinks untrusted software is trying to look like your application. It responds by alerting you with popup messages.
To get around this, Selenium RC, (again when using a run mode that support this) will install its own security certificate, temporarily, to your client machine in a place where the browser can access it. This tricks the browser into thinking it’s accessing a site different from your AUT and effectively suppresses the popups.
Another method used with earlier versions of Selenium was to install the Cybervillians security certificate provided with your Selenium installation. Most users should no longer need to do this however; if you are running Selenium RC in proxy injection mode, you may need to explicitly install this security certificate.
Supporting Additional Browsers and Browser Configurations
The Selenium API supports running against multiple browsers in addition to Internet Explorer and Mozilla Firefox. See the https://selenium.dev website for supported browsers. In addition, when a browser is not directly supported, you may still run your Selenium tests against a browser of your choosing by using the “*custom” run-mode (i.e. in place of *firefox or *iexplore) when your test application starts the browser. With this, you pass in the path to the browsers executable within the API call. This can also be done from the Server in interactive mode.
cmd=getNewBrowserSession&1=*custom c:\Program Files\Mozilla Firefox\MyBrowser.exe&2=http://www.google.com
Running Tests with Different Browser Configurations
Normally Selenium RC automatically configures the browser, but if you launch the browser using the “*custom” run mode, you can force Selenium RC to launch the browser as-is, without using an automatic configuration.
For example, you can launch Firefox with a custom configuration like this:
cmd=getNewBrowserSession&1=*custom c:\Program Files\Mozilla Firefox\firefox.exe&2=http://www.google.com
Note that when launching the browser this way, you must manually configure the browser to use the Selenium Server as a proxy. Normally this just means opening your browser preferences and specifying “localhost:4444” as an HTTP proxy, but instructions for this can differ radically from browser to browser. Consult your browser’s documentation for details.
Be aware that Mozilla browsers can vary in how they start and stop. One may need to set the MOZ_NO_REMOTE environment variable to make Mozilla browsers behave a little more predictably. Unix users should avoid launching the browser using a shell script; it’s generally better to use the binary executable (e.g. firefox-bin) directly.
Troubleshooting Common Problems
When getting started with Selenium RC there’s a few potential problems that are commonly encountered. We present them along with their solutions here.
Unable to Connect to Server
When your test program cannot connect to the Selenium Server, Selenium throws an exception in your test program. It should display this message or a similar one:
    "Unable to connect to remote server (Inner Exception Message:
	No connection could be made because the target machine actively
	refused it )"

	(using .NET and XP Service Pack 2)
If you see a message like this, be sure you started the Selenium Server. If so, then there is a problem with the connectivity between the Selenium Client Library and the Selenium Server.
When starting with Selenium RC, most people begin by running their test program (with a Selenium Client Library) and the Selenium Server on the same machine. To do this use “localhost” as your connection parameter. We recommend beginning this way since it reduces the influence of potential networking problems which you’re getting started. Assuming your operating system has typical networking and TCP/IP settings you should have little difficulty. In truth, many people choose to run the tests this way.
If, however, you do want to run Selenium Server on a remote machine, the connectivity should be fine assuming you have valid TCP/IP connectivity between the two machines.
If you have difficulty connecting, you can use common networking tools like ping, telnet, ifconfig(Unix)/ipconfig (Windows), etc to ensure you have a valid network connection. If unfamilar with these, your system administrator can assist you.
Unable to Load the Browser
Ok, not a friendly error message, sorry, but if the Selenium Server cannot load the browser you will likely see this error.
(500) Internal Server Error
This could be caused by
- Firefox (prior to Selenium 1.0) cannot start because the browser is already open and you did not specify a separate profile. See the section on Firefox profiles under Server Options.
- The run mode you’re using doesn’t match any browser on your machine. Check the parameters you passed to Selenium when you program opens the browser.
- You specified the path to the browser explicitly (using “*custom”–see above) but the path is incorrect. Check to be sure the path is correct. Also check the user group to be sure there are no known issues with your browser and the “*custom” parameters.
Selenium Cannot Find the AUT
If your test program starts the browser successfully, but the browser doesn’t display the website you’re testing, the most likely cause is your test program is not using the correct URL.
This can easily happen. When you use Selenium-IDE to export your script, it inserts a dummy URL. You must manually change the URL to the correct one for your application to be tested.
Firefox Refused Shutdown While Preparing a Profile
This most often occurs when you run your Selenium RC test program against Firefox, but you already have a Firefox browser session running and, you didn’t specify a separate profile when you started the Selenium Server. The error from the test program looks like this:
    Error:  java.lang.RuntimeException: Firefox refused shutdown while
    preparing a profile
Here’s the complete error message from the server:
    16:20:03.919 INFO - Preparing Firefox profile...
    16:20:27.822 WARN - GET /selenium-server/driver/?cmd=getNewBrowserSession&1=*fir
    efox&2=http%3a%2f%2fsage-webapp1.qa.idc.com HTTP/1.1
    java.lang.RuntimeException: Firefox refused shutdown while preparing a profile
            at org.openqa.selenium.server.browserlaunchers.FirefoxCustomProfileLaunc
    her.waitForFullProfileToBeCreated(FirefoxCustomProfileLauncher.java:277)
    ...
    Caused by: org.openqa.selenium.server.browserlaunchers.FirefoxCustomProfileLaunc
    her$FileLockRemainedException: Lock file still present! C:\DOCUME~1\jsvec\LOCALS
    ~1\Temp\customProfileDir203138\parent.lock
To resolve this, see the section on Specifying a Separate Firefox Profile
Versioning Problems
Make sure your version of Selenium supports the version of your browser. For example, Selenium RC 0.92 does not support Firefox 3. At times you may be lucky (I was). But don’t forget to check which browser versions are supported by the version of Selenium you are using. When in doubt, use the latest release version of Selenium with the most widely used version of your browser.
Error message: “(Unsupported major.minor version 49.0)” while starting server
This error says you’re not using a correct version of Java. The Selenium Server requires Java 1.5 or higher.
To check double-check your java version, run this from the command line.
java -version
You should see a message showing the Java version.
   java version "1.5.0_07"
   Java(TM) 2 Runtime Environment, Standard Edition (build 1.5.0_07-b03)
   Java HotSpot(TM) Client VM (build 1.5.0_07-b03, mixed mode)
If you see a lower version number, you may need to update the JRE, or you may simply need to add it to your PATH environment variable.
404 error when running the getNewBrowserSession command
If you’re getting a 404 error while attempting to open a page on “http://www.google.com/selenium-server/", then it must be because the Selenium Server was not correctly configured as a proxy. The “selenium-server” directory doesn’t exist on google.com; it only appears to exist when the proxy is properly configured. Proxy Configuration highly depends on how the browser is launched with firefox, iexplore, opera, or custom.
iexplore: If the browser is launched using *iexplore, you could be having a problem with Internet Explorer’s proxy settings. Selenium Server attempts To configure the global proxy settings in the Internet Options Control Panel. You must make sure that those are correctly configured when Selenium Server launches the browser. Try looking at your Internet Options control panel. Click on the “Connections” tab and click on “LAN Settings”.
- If you need to use a proxy to access the application you want to test,
you’ll need to start Selenium Server with “-Dhttp.proxyHost”;
see the
Proxy Configuration_ for more details. - You may also try configuring your proxy manually and then launching the browser with *custom, or with *iehta browser launcher.
- If you need to use a proxy to access the application you want to test,
you’ll need to start Selenium Server with “-Dhttp.proxyHost”;
see the
custom: When using *custom you must configure the proxy correctly(manually), otherwise you’ll get a 404 error. Double-check that you’ve configured your proxy settings correctly. To check whether you’ve configured the proxy correctly is to attempt to intentionally configure the browser incorrectly. Try configuring the browser to use the wrong proxy server hostname, or the wrong port. If you had successfully configured the browser’s proxy settings incorrectly, then the browser will be unable to connect to the Internet, which is one way to make sure that one is adjusting the relevant settings.
For other browsers (*firefox, *opera) we automatically hard-code the proxy for you, and so there are no known issues with this functionality. If you’re encountering 404 errors and have followed this user guide carefully post your results to user group for some help from the user community.
Permission Denied Error
The most common reason for this error is that your session is attempting to violate the same-origin policy by crossing domain boundaries (e.g., accesses a page from http://domain1 and then accesses a page from http://domain2) or switching protocols (moving from http://domainX to https://domainX).
This error can also occur when JavaScript attempts to find UI objects which are not yet available (before the page has completely loaded), or are no longer available (after the page has started to be unloaded). This is most typically encountered with AJAX pages which are working with sections of a page or subframes that load and/or reload independently of the larger page.
This error can be intermittent. Often it is impossible to reproduce the problem
with a debugger because the trouble stems from race conditions which
are not reproducible when the debugger’s overhead is added to the system.
Permission issues are covered in some detail in the tutorial. Read the section
about the The Same Origin Policy, Proxy Injection carefully.
Handling Browser Popup Windows
There are several kinds of “Popups” that you can get during a Selenium test. You may not be able to close these popups by running Selenium commands if they are initiated by the browser and not your AUT. You may need to know how to manage these. Each type of popup needs to be addressed differently.
HTTP basic authentication dialogs: These dialogs prompt for a username/password to login to the site. To login to a site that requires HTTP basic authentication, use a username and password in the URL, as described in
RFC 1738_, like this: open(“http://myusername:myuserpassword@myexample.com/blah/blah/blah").SSL certificate warnings: Selenium RC automatically attempts to spoof SSL certificates when it is enabled as a proxy; see more on this in the section on HTTPS. If your browser is configured correctly, you should never see SSL certificate warnings, but you may need to configure your browser to trust our dangerous “CyberVillains” SSL certificate authority. Again, refer to the HTTPS section for how to do this.
modal JavaScript alert/confirmation/prompt dialogs: Selenium tries to conceal those dialogs from you (by replacing window.alert, window.confirm and window.prompt) so they won’t stop the execution of your page. If you’re seeing an alert pop-up, it’s probably because it fired during the page load process, which is usually too early for us to protect the page. Selenese contains commands for asserting or verifying alert and confirmation popups. See the sections on these topics in Chapter 4.
On Linux, why isn’t my Firefox browser session closing?
On Unix/Linux you must invoke “firefox-bin” directly, so make sure that executable is on the path. If executing Firefox through a shell script, when it comes time to kill the browser Selenium RC will kill the shell script, leaving the browser running. You can specify the path to firefox-bin directly, like this.
cmd=getNewBrowserSession&1=*firefox /usr/local/firefox/firefox-bin&2=http://www.google.com
Firefox *chrome doesn’t work with custom profile
Check Firefox profile folder -> prefs.js -> user_pref(“browser.startup.page”, 0); Comment this line like this: “//user_pref(“browser.startup.page”, 0);” and try again.
Is it ok to load a custom pop-up as the parent page is loading (i.e., before the parent page’s javascript window.onload() function runs)?
No. Selenium relies on interceptors to determine window names as they are being loaded. These interceptors work best in catching new windows if the windows are loaded AFTER the onload() function. Selenium may not recognize windows loaded before the onload function.
Firefox on Linux
On Unix/Linux, versions of Selenium before 1.0 needed to invoke “firefox-bin” directly, so if you are using a previous version, make sure that the real executable is on the path.
On most Linux distributions, the real firefox-bin is located on:
/usr/lib/firefox-x.x.x/
Where the x.x.x is the version number you currently have. So, to add that path to the user’s path. you will have to add the following to your .bashrc file:
export PATH="$PATH:/usr/lib/firefox-x.x.x/"
If necessary, you can specify the path to firefox-bin directly in your test, like this:
"*firefox /usr/lib/firefox-x.x.x/firefox-bin"
IE and Style Attributes
If you are running your tests on Internet Explorer and you cannot locate
elements using their style attribute.
For example:
//td[@style="background-color:yellow"]
This would work perfectly in Firefox, Opera or Safari but not with IE.
IE interprets the keys in @style as uppercase. So, even if the
source code is in lowercase, you should use:
//td[@style="BACKGROUND-COLOR:yellow"]
This is a problem if your test is intended to work on multiple browsers, but you can easily code your test to detect the situation and try the alternative locator that only works in IE.
Error encountered - “Cannot convert object to primitive value” with shut down of *googlechrome browser
To avoid this error you have to start browser with an option that disables same origin policy checks:
selenium.start("commandLineFlags=--disable-web-security");
Error encountered in IE - “Couldn’t open app window; is the pop-up blocker enabled?”
To avoid this error you have to configure the browser: disable the popup blocker AND uncheck ‘Enable Protected Mode’ option in Tools » Options » Security.
The proxy is a third person in the middle that passes the ball between the two parts. It acts as a “web server” that delivers the AUT to the browser. Being a proxy gives Selenium Server the capability of “lying” about the AUT’s real URL. ↩︎
The browser is launched with a configuration profile that has set localhost:4444 as the HTTP proxy, this is why any HTTP request that the browser does will pass through Selenium server and the response will pass through it and not from the real server. ↩︎
2 - Selenium 2
2.1 - Migrating from RC to WebDriver
How to Migrate to Selenium WebDriver
A common question when adopting Selenium 2 is what’s the correct thing to do when adding new tests to an existing set of tests? Users who are new to the framework can begin by using the new WebDriver APIs for writing their tests. But what of users who already have suites of existing tests? This guide is designed to demonstrate how to migrate your existing tests to the new APIs, allowing all new tests to be written using the new features offered by WebDriver.
The method presented here describes a piecemeal migration to the WebDriver APIs without needing to rework everything in one massive push. This means that you can allow more time for migrating your existing tests, which may make it easier for you to decide where to spend your effort.
This guide is written using Java, because this has the best support for making the migration. As we provide better tools for other languages, this guide shall be expanded to include those languages.
Why Migrate to WebDriver
Moving a suite of tests from one API to another API requires an enormous amount of effort. Why would you and your team consider making this move? Here are some reasons why you should consider migrating your Selenium Tests to use WebDriver.
- Smaller, compact API. WebDriver’s API is more Object Oriented than the original Selenium RC API. This can make it easier to work with.
- Better emulation of user interactions. Where possible, WebDriver makes use of native events in order to interact with a web page. This more closely mimics the way that your users work with your site and apps. In addition, WebDriver offers the advanced user interactions APIs which allow you to model complex interactions with your site.
- Support by browser vendors. Opera, Mozilla and Google are all active participants in WebDriver’s development, and each have engineers working to improve the framework. Often, this means that support for WebDriver is baked into the browser itself: your tests run as fast and as stably as possible.
Before Starting
In order to make the process of migrating as painless as possible, make sure that all your tests run properly with the latest Selenium release. This may sound obvious, but it’s best to have it said!
Getting Started
The first step when starting the migration is to change how you obtain your instance of Selenium. When using Selenium RC, this is done like so:
Selenium selenium = new DefaultSelenium("localhost", 4444, "*firefox", "http://www.yoursite.com");
selenium.start();
This should be replaced like so:
WebDriver driver = new FirefoxDriver();
Selenium selenium = new WebDriverBackedSelenium(driver, "http://www.yoursite.com");
Next Steps
Once your tests execute without errors, the next stage is to migrate the actual test code to use the WebDriver APIs. Depending on how well abstracted your code is, this might be a short process or a long one. In either case, the approach is the same and can be summed up simply: modify code to use the new API when you come to edit it.
If you need to extract the underlying WebDriver implementation from the Selenium instance, you can simply cast it to WrapsDriver:
WebDriver driver = ((WrapsDriver) selenium).getWrappedDriver();
This allows you to continue passing the Selenium instance around as normal, but to unwrap the WebDriver instance as required.
At some point, you’re codebase will mostly be using the newer APIs. At this point, you can flip the relationship, using WebDriver throughout and instantiating a Selenium instance on demand:
Selenium selenium = new WebDriverBackedSelenium(driver, baseUrl);
Common Problems
Fortunately, you’re not the first person to go through this migration, so here are some common problems that others have seen, and how to solve them.
Clicking and Typing is More Complete
A common pattern in a Selenium RC test is to see something like:
selenium.type("name", "exciting tex");
selenium.keyDown("name", "t");
selenium.keyPress("name", "t");
selenium.keyUp("name", "t");
This relies on the fact that “type” simply replaces the content of the identified element without also firing all the events that would normally be fired if a user interacts with the page. The final direct invocations of “key*” cause the JS handlers to fire as expected.
When using the WebDriverBackedSelenium, the result of filling in the form field would be “exciting texttt”: not what you’d expect! The reason for this is that WebDriver more accurately emulates user behavior, and so will have been firing events all along.
This same fact may sometimes cause a page load to fire earlier than it would do in a Selenium 1 test. You can tell that this has happened if a “StaleElementException” is thrown by WebDriver.
WaitForPageToLoad Returns Too Soon
Discovering when a page load is complete is a tricky business. Do we mean “when the load event fires”, “when all AJAX requests are complete”, “when there’s no network traffic”, “when document.readyState has changed” or something else entirely?
WebDriver attempts to simulate the original Selenium behavior, but this doesn’t always work perfectly for various reasons. The most common reason is that it’s hard to tell the difference between a page load not having started yet, and a page load having completed between method calls. This sometimes means that control is returned to your test before the page has finished (or even started!) loading.
The solution to this is to wait on something specific. Commonly, this might be for the element you want to interact with next, or for some Javascript variable to be set to a specific value. An example would be:
Wait<WebDriver> wait = new WebDriverWait(driver, Duration.ofSeconds(30));
WebElement element= wait.until(visibilityOfElementLocated(By.id("some_id")));
Where “visibilityOfElementLocated” is implemented as:
public ExpectedCondition<WebElement> visibilityOfElementLocated(final By locator) {
  return new ExpectedCondition<WebElement>() {
    public WebElement apply(WebDriver driver) {
      WebElement toReturn = driver.findElement(locator);
      if (toReturn.isDisplayed()) {
        return toReturn;
      }
      return null;
    }
  };
}
This may look complex, but it’s almost all boiler-plate code. The only interesting bit is that the “ExpectedCondition” will be evaluated repeatedly until the “apply” method returns something that is neither “null” nor Boolean.FALSE.
Of course, adding all these “wait” calls may clutter up your code. If that’s the case, and your needs are simple, consider using the implicit waits:
driver.manage().timeouts().implicitlyWait(30, TimeUnit.SECONDS);
By doing this, every time an element is located, if the element is not present, the location is retried until either it is present, or until 30 seconds have passed.
Finding By XPath or CSS Selectors Doesn’t Always Work, But It Does In Selenium 1
In Selenium 1, it was common for xpath to use a bundled library rather than the capabilities of the browser itself. WebDriver will always use the native browser methods unless there’s no alternative. That means that complex xpath expressions may break on some browsers.
CSS Selectors in Selenium 1 were implemented using the Sizzle library. This implements a superset of the CSS Selector spec, and it’s not always clear where you’ve crossed the line. If you’re using the WebDriverBackedSelenium and use a Sizzle locator instead of a CSS Selector for finding elements, a warning will be logged to the console. It’s worth taking the time to look for these, particularly if tests are failing because of not being able to find elements.
There is No Browserbot
Selenium RC was based on Selenium Core, and therefore when you executed Javascript, you could access bits of Selenium Core to make things easier. As WebDriver is not based on Selenium Core, this is no longer possible. How can you tell if you’re using Selenium Core? Simple! Just look to see if your “getEval” or similar calls are using “selenium” or “browserbot” in the evaluated Javascript.
You might be using the browserbot to obtain a handle to the current window or document of the test. Fortunately, WebDriver always evaluates JS in the context of the current window, so you can use “window” or “document” directly.
Alternatively, you might be using the browserbot to locate elements. In WebDriver, the idiom for doing this is to first locate the element, and then pass that as an argument to the Javascript. Thus:
String name = selenium.getEval(
    "selenium.browserbot.findElement('id=foo', browserbot.getCurrentWindow()).tagName");
becomes:
WebElement element = driver.findElement(By.id("foo"));
String name = (String) ((JavascriptExecutor) driver).executeScript(
    "return arguments[0].tagName", element);
Notice how the passed in “element” variable appears as the first item in the JS standard “arguments” array.
Executing Javascript Doesn’t Return Anything
WebDriver’s JavascriptExecutor will wrap all JS and evaluate it as an anonymous expression. This means that you need to use the “return” keyword:
String title = selenium.getEval("browserbot.getCurrentWindow().document.title");
becomes:
((JavascriptExecutor) driver).executeScript("return document.title;");
2.2 - Backing Selenium with WebDriver
(Previously located: https://github.com/SeleniumHQ/selenium/wiki/Selenium-Emulation)
Backing Selenium with WebDriver
The Java and .NET versions of WebDriver provide implementations of the existing Selenium API. In Java, it is used like so:
// You may use any WebDriver implementation. Firefox is used here as an example
WebDriver driver = new FirefoxDriver();

// A "base url", used by selenium to resolve relative URLs
String baseUrl = "http://www.google.com";

// Create the Selenium implementation
Selenium selenium = new WebDriverBackedSelenium(driver, baseUrl);

// Perform actions with selenium
selenium.open("http://www.google.com");
selenium.type("name=q", "cheese");
selenium.click("name=btnG");

// And get the underlying WebDriver implementation back. This will refer to the
// same WebDriver instance as the "driver" variable above.
WebDriver driverInstance = ((WebDriverBackedSelenium) selenium).getUnderlyingWebDriver();
Pros
- Allows for WebDriver and Selenium to live side-by-side.
- Provides a simple mechanism for a managed migration from the existing Selenium API to WebDriver’s.
- Does not require the standalone Selenium RC server to be run
Cons
- Does not implement every method
- But we’d love feedback!
- Does also emulate Selenium Core
- So more advanced Selenium usage (that is, using “browserbot” or other built-in Javascript methods from Selenium Core) may need work
- Some methods may be slower due to underlying implementation differences
- Does not support Selenium’s “user extensions” (i.e., user-extensions.js)
Notes
After creating a WebDriverBackedSelenium instance with a given Driver, one does not have to call start() - as the creation of the Driver already started the session. At the end of the test, stop() should be called instead of the Driver’s quit() method.
This is more similar to WebDriver’s behaviour - as creating a Driver instance starts a session, yet it has to be terminated explicitly with a call to quit().
Backing Selenium with RemoteWebDriver
Starting with release 2.19, WebDriverBackedSelenium can be used from any language supported by WebDriver and Selenium.
For example, in Python:
driver = RemoteWebDriver(desired_capabilities = DesiredCapabilities.FIREFOX)
selenium = DefaultSelenium('localhost', '4444', '*webdriver', 'http://www.google.com')
selenium.start(driver = driver)
Provided you keep a reference to the original WebDriver and Selenium objects you created, you can use even the two APIs interchangeably. The magic is the “*webdriver” browser name passed to the Selenium instance, and that you pass the WebDriver instance when calling start().
In languages where DefaultSelenium doesn’t have start(driver), you can connect the WebDriver and Selenium objects together yourself, by supplying the WebDriver session ID to the Selenium object.
For example, in C#:
RemoteWebDriver driver = new RemoteWebDriver(DesiredCapabilities.Firefox());
string sessionId = (string) driver.Capabilities.GetCapability("webdriver.remote.sessionid");
DefaultSelenium selenium = new DefaultSelenium("localhost", 4444, "*webdriver", "http://www.google.com");
selenium.Start("webdriver.remote.sessionid=" + sessionId);
Backing WebDriver with Selenium
WebDriver doesn’t support as many browsers as Selenium does, so in order to provide that support while still using the webdriver API, you can make use of the SeleneseCommandExecutor It is done like this:
Capabilities capabilities = new DesiredCapabilities()
capabilities.setBrowserName("safari");
CommandExecutor executor = new SeleneseCommandExecutor("http:localhost:4444/", "http://www.google.com/", capabilities);
WebDriver driver = new RemoteWebDriver(executor, capabilities);
There are currently some major limitations with this approach, notably that findElements doesn’t work as expected. Also, because we’re using Selenium Core for the heavy lifting of driving the browser, you are limited by the Javascript sandbox.
2.3 - Legacy Firefox Driver
This documentation previously located on the wiki
You can read more about geckodriver.
About
Firefox driver is included in the selenium-server-stanalone.jar available in the downloads. The driver comes in the form of an xpi (firefox extension) which is added to the firefox profile when you start a new instance of FirefoxDriver.
Pros
- Runs in a real browser and supports Javascript
- Faster than the InternetExplorerDriver
Cons
- Slower than the HtmlUnitDriver
Important System Properties
The following system properties (read using System.getProperty() and set using System.setProperty() in Java code or the “-DpropertyName=value” command line flag) are used by the FirefoxDriver:
| Property | What it means |
|---|---|
| webdriver.firefox.bin | The location of the binary used to control firefox. |
| webdriver.firefox.marionette | Boolean value, if set on standalone-server will ignore any “marionette” desired capability requested and force firefox to use GeckoDriver (true) or Legacy Firefox Driver (false) |
| webdriver.firefox.profile | The name of the profile to use when starting firefox. This defaults to webdriver creating an anonymous profile |
| webdriver.firefox.useExisting | Never use in production Use a running instance of firefox if one is present |
| webdriver.firefox.logfile | Log file to dump firefox stdout/stderr to |
Normally the Firefox binary is assumed to be in the default location for your particular operating system:
| OS | Expected Location of Firefox |
|---|---|
| Linux | firefox (found using “which”) |
| Mac | /Applications/Firefox.app/Contents/MacOS/firefox-bin |
| Windows | %PROGRAMFILES%\Mozilla Firefox\firefox.exe |
By default, the Firefox driver creates an anonymous profile
Running with firebug
Download the firebug xpi file from mozilla and start the profile as follows:
   File file = new File("firebug-1.8.1.xpi");
   FirefoxProfile firefoxProfile = new FirefoxProfile();
   firefoxProfile.addExtension(file);
   firefoxProfile.setPreference("extensions.firebug.currentVersion", "1.8.1"); // Avoid startup screen

   WebDriver driver = new FirefoxDriver(firefoxProfile);
FirefoxDriver Internals
(Previously located: https://github.com/SeleniumHQ/selenium/wiki/FirefoxDriver-Internals)
The FirefoxDriver is largely written in the form of a Firefox extension. Language bindings control the driver by connecting over a socket and sending commands (described in the JsonWireProtocol page) in UTF-8. The extension makes use of the XPCOM primitives offered by Firefox in order to do its work. The important thing to notice is that the command names map directly on to methods exposed on the “FirefoxDriver.prototype” in the javascript code.
Working on the FirefoxDriver Code
Firstly, make sure that there’s no old version of the FirefoxDriver installed:
- Start firefox’s profile manager:
firefox -ProfileManager - Delete the existing WebDriver profile if there is one. Delete the files too (it’s an option that’s offered when you delete the profile in the profile manager)
Secondly, take a look at the Mozilla Developer Center, particularly the section to do with setting up an extension development environment. You should now be ready to edit code. It’s best to create a test around the area of code that you’re working on, and to run this using the SingleTestSuite. The FirefoxDriver logs errors to Firefox’s error console (“Tools->Error Console”), so if a test fails, that’s a great place to start looking.
To actually log information to the console, use the “Utils.dumpn()” method in your javascript code. If you find that you’d like to examine an object in detail, use the “Utils.dump()” method, which will report which interfaces an object implements, as well as outputting as much information as it can to the console..
Flow of Control: Starting Firefox
The following steps are performed when instantiating an instance of the FirefoxDriver:
- Grab the “locking port”
2.4 - Selenium grid 2
This documentation previously located on the wiki
You can read our documentation for more information about Grid 4
Introduction
Grid allows you to :
- scale by distributing tests on several machines ( parallel execution )
- manage multiple environments from a central point, making it easy to run the tests against a vast combination of browsers / OS.
- minimize the maintenance time for the grid by allowing you to implement custom hooks to leverage virtual infrastructure for instance.
Quick Start
This example will show you how to start the Selenium 2 Hub, and register both a WebDriver node and a Selenium 1 RC legacy node. We’ll also show you how to call the grid from Java. The hub and nodes are shown here running on the same machine, but of course you can copy the selenium-server-standalone to multiple machines. Note: The selenium-server-standalone package includes the Hub, WebDriver, and legacy RC needed to run the grid. Ant is not required anymore. You can download the selenium-server-standalone-
*.jar from http://selenium-release.storage.googleapis.com/index.html This walk-through assumes you already have Java installed.
Step 1: Start the hub
The Hub is the central point that will receive all the test request and distribute them the the right nodes.
Open a command prompt and navigate to the directory where you copied the selenium-server-standalone file. Type the following command:
java -jar selenium-server-standalone-<version>.jar -role hub
The hub will automatically start-up using port 4444 by default. To change the default port, you can add the optional parameter -port when you run the command. You can view the status of the hub by opening a browser window and navigating to: http://localhost:4444/grid/console
Step 2: Start the nodes
Regardless on whether you want to run a grid with new WebDriver functionality, or a grid with Selenium 1 RC functionality, or both at the same time, you use the same selenium-server-standalone jar file to start the nodes.
java -jar selenium-server-standalone-<version>.jar -role node -hub http://localhost:4444/grid/register
Note: The port defaults to 5555 if not specified whenever the “-role” option is provided and is not hub.
For backwards compatibility “wd” and “rc” roles are still a valid subset of the “node” role. But those roles limit the types of remote connections to their corresponding API, while “node” allows both RC and WebDriver remote connections.
Using grid to run tests
( using java as an example ) Now that the grid is in-place, we need to access the grid from our test cases. For the Selenium 1 RC nodes, you can continue to use the DefaultSelenium object and pass in the hub information:
Selenium selenium = new DefaultSelenium(“localhost”, 4444, “*firefox”, “http://www.google.com”);
For WebDriver nodes, you will need to use the RemoteWebDriver and the DesiredCapabilities object to define which browser, version and platform you wish to use. Create the target browser capabilities you want to run the tests against:
DesiredCapabilities capability = DesiredCapabilities.firefox();
Pass that into the RemoteWebDriver object:
WebDriver driver = new RemoteWebDriver(new URL("http://localhost:4444/wd/hub"), capability);
The hub will then assign the test to a matching node.
A node matches if all the requested capabilities are met. To request specific capabilities on the grid, specify them before passing it into the WebDriver object.
capability.setBrowserName();
capability.setPlatform();
capability.setVersion()
capability.setCapability(,);
Example: A node registered with the setting:
-browser browserName=firefox,version=3.6,platform=LINUX
will be a match for:
capability.setBrowserName(“firefox” );
capability.setPlatform(“LINUX”);
capability.setVersion(“3.6”);
and would also be a match for
capability.setBrowserName(“firefox” );
capability.setVersion(“3.6”);
The capabilities that are not specified will be ignored. If you specify capabilities that do not exist on your grid (for example, your test specifies Firefox version 4.0, but have no Firefox 4 instance) then there will be no match and the test will fail to run.
Configuring the nodes
The node can be configured in 2 different ways; one is by specifying command-line parameters, the other is by specifying a JSON file.
Configuring the nodes by command line
By default, starting the node allows for concurrent use of 11 browsers…: 5 Firefox, 5 Chrome, 1 Internet Explorer. The maximum number of concurrent tests is set to 5 by default. To change this and other browser settings, you can pass in parameters to each -browser switch (each switch represents a node based on your parameters). If you use the -browser parameter, the default browsers will be ignored and only what you specify command line will be used.
-browser browserName=firefox,version=3.6,maxInstances=5,platform=LINUX
This setting starts 5 Firefox 3.6 nodes on a Linux machine.
If your remote machine has multiple versions of Firefox you’d like to use, you can map the location of each binary to a particular version on the same machine:
-browser browserName=firefox,version=3.6,firefox_binary=/home/myhomedir/firefox36/firefox,maxInstances=3,platform=LINUX -browser browserName=firefox,version=4,firefox_binary=/home/myhomedir/firefox4/firefox,maxInstances=4,platform=LINUX
Tip: If you need to provide a space somewhere in your browser parameters, then surround the parameters with quotation marks:
-browser “browserName=firefox,version=3.6,firefox_binary=c:\Program Files\firefox ,maxInstances=3, platform=WINDOWS”
Optional parameters
-port 4444(4444 is default)-host <IP | hostname>specify the hostname or IP. usually not needed and determined automatically. For exotic network configuration, network with VPN, specifying the host might be necessary.-timeout 30(300 is default) The timeout in seconds before the hub automatically releases a node that hasn’t received any requests for more than the specified number of seconds. After this time, the node will be released for another test in the queue. This helps to clear client crashes without manual intervention. To remove the timeout completely, specify -timeout 0 and the hub will never release the node.
Note: This is NOT the WebDriver timeout for all ”wait for WebElement” type of commands.
-maxSession 5(5 is default) The maximum number of browsers that can run in parallel on the node. This is different from the maxInstance of supported browsers (Example: For a node that supports Firefox 3.6, Firefox 4.0 and Internet Explorer 8, maxSession=1 will ensure that you never have more than 1 browser running. With maxSession=2 you can have 2 Firefox tests at the same time, or 1 Internet Explorer and 1 Firefox test).-browser < params >If -browser is not set, a node will start with 5 firefox, 1 chrome, and 1 internet explorer instance (assuming it’s on a windows box). This parameter can be set multiple times on the same line to define multiple types of browsers. Parameters allowed for -browser: browserName={android, chrome, firefox, htmlunit, internet explorer, iphone, opera} version={browser version} firefox_binary={path to executable binary} chrome_binary={path to executable binary} maxInstances={maximum number of browsers of this type} platform={WINDOWS, LINUX, MAC}-registerCycle N= how often in ms the node will try to register itself again. Allow to restart the hub without having to restart the nodes.Really large (>50 node) Hub installations may need to increase the jetty threads by setting -DPOOL_MAX=512 (or larger) on the java command line.
Configuring timeouts (Version 2.21 required)
Timeouts in the grid should normally be handled through webDriver.manage().timeouts(), which will control how the different operations time out.
To preserve run-time integrity of a grid with selenium-servers, there are two other timeout values that can be set.
On the hub, setting the -timeout command line option to “30” seconds will ensure all resources are reclaimed 30 seconds after a client crashes. On the hub you can also set -browserTimeout 60 to make the maximum time a node is willing to hang inside the browser 60 seconds. This will ensure all resources are reclaimed slightly after 60 seconds. All the nodes use these two values from the hub if they are set. Locally set parameters on a single node has precedence, it is generally recommended not to set these timeouts on the node.
The browserTimeout should be:
- Higher than the socket lock timeout (45 seconds)
- Generally higher than values used in webDriver.manage().timeouts(), since this mechanism is a “last line of defense”.
Configuring the nodes by JSON
java -jar selenium-server-standalone.jar -role node -nodeConfig nodeconfig.json
A sample nodeconfig file for server version 3.x.x (>= beta4) can be seen at https://github.com/SeleniumHQ/selenium/blob/selenium-3.141.59/java/server/src/org/openqa/grid/common/defaults/DefaultNodeWebDriver.json
A sample nodeconfig file for server version 2.x.x can be seen at https://github.com/SeleniumHQ/selenium/blob/selenium-2.53.0/java/server/src/org/openqa/grid/common/defaults/DefaultNode.json
Note: the configuration { ... } object in version 2.x.x has been flattened in version 3.x.x (>= beta4)
Configuring the hub by JSON
java -jar selenium-server-standalone.jar -role hub -hubConfig hubconfig.json
A sample hubconfig.json file can be seen at https://github.com/SeleniumHQ/selenium/blob/selenium-3.141.59/java/server/src/org/openqa/grid/common/defaults/DefaultHub.json
Hub diagnostic messages
Upon detecting anomalous usage patterns, the hub can give the following message:
Client requested session XYZ that was terminated due to REASON
| Reason | Cause/fix |
|---|---|
| TIMEOUT | The session timed out because the client did not access it within the timeout. If the client has been somehow suspended, this may happen when it wakes up |
| BROWSER_TIMEOUT | The node timed out the browser because it was hanging for too long (parameter browserTimeout) |
| ORPHAN | A client waiting in queue has given up once it was offered a new session |
| CLIENT_STOPPED_SESSION | The session was stopped using an ordinary call to stop/quit on the client. Why are you using it again?? |
| CLIENT_GONE | The client process (your code) appears to have died or otherwise not responded to our requests, intermittent network issues may also cause |
| FORWARDING_TO_NODE_FAILED | The hub was unable to forward to the node. Out of memory errors/node stability issues or network problems |
| CREATIONFAILED | The node failed to create the browser. This can typically happen when there are environmental/configuration problems on the node. Try using the node directly to track problem. |
| PROXY_REREGISTRATION | The session has been discarded because the node has re-registered on the grid (in mid-test) |
Tips for running with grid
If your tests are running in parallel, make sure that each thread deallocates its webdriver resource independently of any other tests running on other threads. Starting 1 browser per thread at the start of the test-run and deallocating all browsers at the end is not a good idea. (If one test-case decides to consume abnormal amounts of time you may get timeouts on all the other tests because they’re waiting for the slow test. This can be very confusing)
Selenium Grid Platforms
(previously located: https://github.com/SeleniumHQ/selenium/wiki/Grid-Platforms)
This section describes the PLATFORM option used in configuring Selenium Grid Nodes and [DesiredCapabilities] object.
History of Platforms
When requesting a new WebDriver session from the Grid, user can specify the [DesiredCapabilities] of the remote browser. Things such as the browser name, version, and platform are among the list of options that can be specified by the test. Specifying desired.
The following code demonstrates the DesiredCapability of Internet Explorer, version 9, on Windows XP platform:
	[[DesiredCapabilities]] capability = DesiredCapabilities.internetExplorer();
	capability.setVersion("8");
	capability.setPlatform(Platform.XP);
	WebDriver driver = new RemoteWebDriver(new URL("http://localhost:4444/wd/hub"), capability);
The request for a new session with specified DesiredCapability is sent to the Grid Hub, which will look through all of the registered nodes to see if any of them match the specification given by the test. If no node matches the specification, a CapabilityNotPresentOnTheGridException will be returned.
It is a common misconception that the PLATFORM determines the ability to choose the Operating System on which the new session will be created. In this situation, platform and operating system are not the same, thus specifying the platform to “Windows 2003 Server” will not allow you to choose between a Windows XP, Vista, and 2003 server. This misconception can be born from platforms such as Mac OSX and Linux, where the name of the platform matches the name of the Operating System.
In case of Selenium Grid, platform refers to the underlying interactions between the Driver Atoms and the web browser. Mac OSX and Linux based Operating Systems (Centos, Ubuntu, Debian, etc..) have a relatively stable communication with the web browsers such as Firefox and Chrome. Thus the platform names are simple to understand, as seen in the example bellow:
   capability.setPlatform(Platform.MAC);   //Set platform to OSX
   capability.setPlatform(Platform.LINUX); // Set platform to Linux based systems
The prior to release of Vista, Windows based Operating Systems only had one platform, shown here:
capability.setPlatform(Platform.WINDOWS); //Set platform to Windows
However, with the introduction of UAC in Windows Vista, there were major changes done to the underlying interactions between WebDriver and Internet Explorer. To work around the UAC constrains a new platform was added to nodes with Windows based Operating systems:
capability.setPlatform(Platform.VISTA); //Set platform to VISTA
With the release of Windows 8, another major overhaul happened in how the WebDriver communicates with Internet Explorer, thus a new platform was added for Windows 8 based nodes:
capability.setPlatform(Platform.WIN8); //Set platform to Windows 8
Similar story happened with introduction of Windows 8.1, in this example the platform is set to Windows 8.1:
capability.setPlatform(Platform.WIN8_1); //Set platform to Windows 8.1
Operating System Platforms
The following list demonstrates some of the Operating Systems, and what Platform they are part of:
MAC****All OSX Operating Systems LINUX Centos Ubuntu UNIXSolarisBSD XP Windows Server 2003 Windows XP Windows NT VISTAWindows VistaWindows 2008 Server****Windows 7 WIN8 Windows 2012 Server Windows 8 WIN8_1****Windows 8.1
Families
Different platforms are grouped into “Families” of platform. For example, Win8 and XP platforms are a part of the WINDOWS family. Similarly ANDROID and LINUX are part of the UNIX family.
Choosing Platform and Platform Family
When setting a platform on the [DesiredCapabilities] object, we can set an individual platform or family of platforms. For example:
  	capability.setPlatform(Platform.VISTA); //Will return a node with Windows Vista or 2008 Server or Windows 7 Operating System.
  	capability.setPlatform(Platform.XP);   //Will return a node with Windows XP or 2003 Server or Windows 2000 Professional Operating System.
  	capability.setPlatform(Platform.WINDOWS); //Will return a node with ANY Windows Operating System
More Information
For more information on the latest platforms, please view this file:
org.openqa.selenium.Platform.java
2.5 - History of Grid Platforms
This documentation previously located on the wiki
You can read more about Grid 2
Selenium Grid Platforms
This section describes the PLATFORM option used in configuring Selenium Grid Nodes and [DesiredCapabilities] object.
History of Platforms
When requesting a new WebDriver session from the Grid, user can specify the [DesiredCapabilities] of the remote browser. Things such as the browser name, version, and platform are among the list of options that can be specified by the test. Specifying desired.
The following code demonstrates the DesiredCapability of Internet Explorer, version 9, on Windows XP platform:
	[[DesiredCapabilities]] capability = DesiredCapabilities.internetExplorer();
	capability.setVersion("8");
	capability.setPlatform(Platform.XP);
	WebDriver driver = new RemoteWebDriver(new URL("http://localhost:4444/wd/hub"), capability);
The request for a new session with specified DesiredCapability is sent to the Grid Hub, which will look through all of the registered nodes to see if any of them match the specification given by the test. If no node matches the specification, a CapabilityNotPresentOnTheGridException will be returned.
It is a common misconception that the PLATFORM determines the ability to choose the Operating System on which the new session will be created. In this situation, platform and operating system are not the same, thus specifying the platform to “Windows 2003 Server” will not allow you to choose between a Windows XP, Vista, and 2003 server. This misconception can be born from platforms such as Mac OSX and Linux, where the name of the platform matches the name of the Operating System.
In case of Selenium Grid, platform refers to the underlying interactions between the Driver Atoms and the web browser. Mac OSX and Linux based Operating Systems (Centos, Ubuntu, Debian, etc..) have a relatively stable communication with the web browsers such as Firefox and Chrome. Thus the platform names are simple to understand, as seen in the example bellow:
   capability.setPlatform(Platform.MAC);   //Set platform to OSX
   capability.setPlatform(Platform.LINUX); // Set platform to Linux based systems
The prior to release of Vista, Windows based Operating Systems only had one platform, shown here:
capability.setPlatform(Platform.WINDOWS); //Set platform to Windows
However, with the introduction of UAC in Windows Vista, there were major changes done to the underlying interactions between WebDriver and Internet Explorer. To work around the UAC constrains a new platform was added to nodes with Windows based Operating systems:
capability.setPlatform(Platform.VISTA); //Set platform to VISTA
With the release of Windows 8, another major overhaul happened in how the WebDriver communicates with Internet Explorer, thus a new platform was added for Windows 8 based nodes:
capability.setPlatform(Platform.WIN8); //Set platform to Windows 8
Similar story happened with introduction of Windows 8.1, in this example the platform is set to Windows 8.1:
capability.setPlatform(Platform.WIN8_1); //Set platform to Windows 8.1
Operating System Platforms
The following list demonstrates some of the Operating Systems, and what Platform they are part of:
MAC****All OSX Operating Systems LINUX Centos Ubuntu UNIXSolarisBSD XP Windows Server 2003 Windows XP Windows NT VISTAWindows VistaWindows 2008 Server****Windows 7 WIN8 Windows 2012 Server Windows 8 WIN8_1****Windows 8.1
Families
Different platforms are grouped into “Families” of platform. For example, Win8 and XP platforms are a part of the WINDOWS family. Similarly ANDROID and LINUX are part of the UNIX family.
Choosing Platform and Platform Family
When setting a platform on the [DesiredCapabilities] object, we can set an individual platform or family of platforms. For example:
  	capability.setPlatform(Platform.VISTA); //Will return a node with Windows Vista or 2008 Server or Windows 7 Operating System.
  	capability.setPlatform(Platform.XP);   //Will return a node with Windows XP or 2003 Server or Windows 2000 Professional Operating System.
  	capability.setPlatform(Platform.WINDOWS); //Will return a node with ANY Windows Operating System
More Information
For more information on the latest platforms, please view this file:
org.openqa.selenium.Platform.java
2.6 - Remote WebDriver standalone server
This documentation previously located on the wiki
The server will always run on the machine with the browser you want to test. The server can be used either from the command line or through code configuration.
Starting the server from the command line
Once you have downloaded selenium-server-standalone-{VERSION}.jar,
place it on the computer with the browser you want to test. Then, from
the directory with the jar, run the following:
java -jar selenium-server-standalone-{VERSION}.jar
Considerations for running the server
The caller is expected to terminate each session properly, calling
either Selenium#stop() or WebDriver#quit.
The selenium-server keeps in-memory logs for each ongoing session,
which are cleared when Selenium#stop() or WebDriver#quit is called. If
you forget to terminate these sessions, your server may leak memory. If
you keep extremely long-running sessions, you will probably need to
stop/quit every now and then (or increase memory with -Xmx jvm option).
Timeouts (from version 2.21)
The server has two different timeouts, which can be set as follows:
java -jar selenium-server-standalone-{VERSION}.jar -timeout=20 -browserTimeout=60
- browserTimeout
- Controls how long the browser is allowed to hang (value in seconds).
- timeout
- Controls how long the client is allowed to be gone before the session is reclaimed (value in seconds).
The system property selenium.server.session.timeout
is no longer supported as of 2.21.
Please note that the browserTimeout
is intended as a backup timeout mechanism
when the ordinary timeout mechanism fails,
which should be used mostly in grid/server environments
to ensure that crashed/lost processes do not stay around for too long,
polluting the runtime environment.
Configuring the server programmatically
In theory, the process is as simple as mapping the DriverServlet to
a URL, but it is also possible to host the page in a lightweight
container, such as Jetty, configured entirely in code.
- Download the
selenium-server.zipand unpack. - Put the JARs on the CLASSPATH.
- Create a new class called
AppServer. Here, we are using Jetty, so you will need to download that as well:
import org.mortbay.jetty.Connector;
import org.mortbay.jetty.Server;
import org.mortbay.jetty.nio.SelectChannelConnector;
import org.mortbay.jetty.security.SslSocketConnector;
import org.mortbay.jetty.webapp.WebAppContext;

import javax.servlet.Servlet;
import java.io.File;

import org.openqa.selenium.remote.server.DriverServlet;

public class AppServer {
  private Server server = new Server();

  public AppServer() throws Exception {
    WebAppContext context = new WebAppContext();
    context.setContextPath("");
    context.setWar(new File("."));
    server.addHandler(context);

    context.addServlet(DriverServlet.class, "/wd/*");

    SelectChannelConnector connector = new SelectChannelConnector();
    connector.setPort(3001);
    server.addConnector(connector);

    server.start();
  }
}
2.7 - Limitations of scaling up tests in Selenium 2
This documentation previously located on the wiki
Running parallel Selenium2
This page tries to summarize additional constraints that arise when running Selenium2 in parallel.
WebDriver instantiation
While an individual WebDriver instance cannot be shared among threads, it is easy to create multiple WebDriver instances.
Ephemeral sockets
There is a general problem of TCP/IP v4, where the TCP/IP stack uses ephemeral ports when making a connection between two sockets. The typical symptom of this is that connection failures start appearing after a short time of running, often a minute or two. The message will vary somewhat but it always appears after some time, and if you reduce the number of browsers it will eventually work fine.
Wikipedia on Ephemeral ports or a quick google of “ephemeral sockets
Currently (2.13.0) it seems like a firefox running at full blast consumes something in the range of 2000 ephemeral ports per firefox; your mileage will vary here. This means you can run out of ephemeral port on Windows XP with as litttle as 2 browsers, maybe even 1 if you for instance iterate extermly quickly .
Will it be fixed ?
The solution to the ephemeral socket problem is HTTP1.1 keep alive on the connections. Firefox does not support keep-alive as of version 2.13.0.
Things that are fixed
- The java client.
- Selenium server (“rc”).
- Selenium grid hub & nodes
- The ruby bindings (see notes in RubyBindings).
- The IE driver.
- ChromeDriver
The means you can use the java client to scale out to remote boxes running selenium server and never have any problems on the central build server. You may need to solve socket problems on the remote boxes though.
Microsoft Windows
If you are using the old versions of Windows (<=2003, inc XP) you should not be waiting for port usage to get low enough to fit in this space. That may simply never happen, although some combinations probably will. See http://support.microsoft.com/kb/196271 on how to adjust it.
If you for technical reasons cannot adjust the port range on your Windows machine you will not be able to run more than 2-3 firefox browsers.
Avoiding the socket lock
Starting new browsers between each test class/test method is slow, and the socket lock also uses Ephemeral sockets, worsening the problem described above.
If you’re using a suite-less test setup (like many JUnit4 users), you often start/stop the browsers in @BeforeClass/@AfterClass methods. Another option is to start the browsers in @BeforeClass and use something like JUnit/TestNG run listeners to shut down all the browsers at the end of the test run. Maven surefire supports run listeners for both JUnit and TestNG.
(TODO: Strategies to disable the socket lock and manage the ports yourself)
Native events
Due to a shared file in the native events logic, the firefox driver should probably not be using native events when running concurrently. (Watch this issue).
2.8 - Stealing focus from Firefox in Linux
This documentation previously located on the wiki
This page describes an essential component of the native events implementation on Linux - focus maintaining. In order for native events to be processed in Firefox, it must always retain focus. In case the user decides to switch to another window (a thing which could be understood), Firefox must not know it lost focus.
Solution overview
Basic idea
The basic idea is to get between the XLib (X-Windows client library) layer and the application. X-Windows notifies the application of events (user input, windows being destroyed, mouse movements) by asynchronous events. The events that indicate loss of focus FocusOut are discarded. The idea is based on Jordan Sissel’s implementation of a pre-loaded library that over-rides XNextEvent - see http://www.semicomplete.com/blog/geekery/xsendevent-xdotool-and-ld_preload.html.
Extension
This simple implementation works well as long as there’s one browser window. When multiple windows are involved, several challenges arise:
- Even though new windows may be opened, native events must continue to flow to the active window. However, most window managers will give focus to newly-opened windows.
- Window Switching: When wishing to switch to another window, the focus has to be moved. This requires cooperation between WebDriver’s Firefox extension and this component.
- Closing windows: When a window is closed, focus must move to another window. By design, WebDriver does not guarantee anything if the active window is closed - until a new window is being switched to. In this situation, special care must be taken.
Interaction with other components
The basic idea requires no interaction with other components of WebDriver. However, when multiple windows are involved - creating, switching or destroying, this component should be aware of it. New window creation cannot be tracked - as it may happen as a side effect of many operations. Switching and closing can be tracked.
Involved technologies
To understand this solution, one should be familiar with X-Windows and its events. Knowledge of the GDK event processing loop is also useful.
Implementation Details
All of this describes the code in firefox/src/cpp/linux-specific/x_ignore_nofocus.c.
The shared library
Hijacking the events is done by over-riding XNextEvent.
A shared library containing a modified implementation of XNextEvent is loaded using LD_PRELOAD.
The modified function opens /usr/lib/libX11.so.6 and invokes the real function.
Then the event that the real function returns (i.e. the real event) is inspected.
Identifying events
Under the basic idea, FocusOut events will be simply discarded. However, window switching complicates matters.
Data structure
There’s a global data structure that remembers the following information:
- The active window ID (if there is such one at the moment)
- The ID of a new window that’s being created (again, if exists)
- If window switching is in progress.
- If window closing is in progress.
- Was the focus given to another window and should be stolen back to the active one?
- Was a
FocusInevent already received by the active window? - Did we set the currently active window as a result of a close operation?
Firefox starts up
FocusIn event arrives and the active window ID is 0. A new active window is set. Note that during the creation of the main window, another sub-window is created and a FocusOut event is sent to the active window. Fortunately, this FocusOut event indicates that the focus is going to move to a sub-window (identified by NotifyInferior) so it is allowed.
The user has switched to another window
This is indicated by a FocusOut event with a detail field that is neither NotifyAncestor nor NotifyInferior. This event is simply discarded and replaced with a KeymapNotify event, which is promptly discarded by GDK.
A new window is being created
This condition is identified by a ReparentNotify event. When this happens, the new_window field will be set to the ID of the newly created window. Subsequent FocusOut events will be allowed - during the new window creation events will flow as usual (FocusOut event from the active window, FocusIn event to the new window, FocusOut to the new window and FocusIn to a sub-window of the new window). After the sub-window of the new window receives FocusIn, a call to XSetInputFocus will be issued to return the focus to the active window.
A window switch occurs
During a window switch events will flow as normal. A window switch is considered done when the sub-window of a window receives the FocusIn event. A window switch starts by identifying the file /tmp/switch_window_started. In this file, a switch: string following a window ID is written (the ID is just for debugging purpose). This will change the active window ID to 0 and the state to “during switch”. During a switch (or when there’s no active window) no events are discarded.
A window is being closed
Very similar to window switching (also identified by reading the file). However, it is indicated that the window is being closed - in case it was closed, no focus stealing will take place. In addition, the DestroyNotify event is being identified to find out when the active window is being closed (explicitly by the user or implicitly by some other operation that is not an explicit call to close). In this case, the active window ID will be set to 0 as well.
Important Links
- Jordan Sissel’s original XSendEvent hack
- XLib events and the XLib programming manual
- The X programming manual / specification
2.9 - Untrusted SSL Certificates
This documentation previously located on the wiki
Introduction
This page details how WebDriver is able to accept untrusted SSL certificates, allowing users to test trusted sites in a testing environment, where valid certificates usually do not exist. This feature is turned on by default for all supported browsers (Currently Firefox).
Firefox
Outline of solution
Firefox has an interface for overriding invalid certificates, called nsICertOverrideService. Implement this interface as a proxy to the original service - unless untrusted certificates are allowed. In that case, when asked about a certificate (a call to hasMatchingOverride for an invalid certificate) - indicate it’s trusted.
Implementation details
Implementing the idea is mostly straightforward - badCertListener.js is a stand-alone module, that, when loaded, registers a factory for returning an instance of the service. The interesting function is hasMatchingOverride:
WdCertOverrideService.prototype.hasMatchingOverride = function(
    aHostName, aPort, aCert, aOverrideBits, aIsTemporary)
The aOverrideBits and aIsTemporary are output arguments. This is where things get a bit tricky: There are three possible override bits:
  ERROR_UNTRUSTED: 1,
  ERROR_MISMATCH: 2,
  ERROR_TIME: 4
It’s impossible to just set them all, since Firefox expects a perfect match between the offences generated by the certificate and the function’s return value: (security/manager/ssl/src/SSLServerCertVerification.cpp:302):
  if (overrideService)
  {
    PRBool haveOverride;
    PRBool isTemporaryOverride; // we don't care

    nsrv = overrideService->HasMatchingOverride(hostString, port,
                                                ix509,
                                                &overrideBits,
                                                &isTemporaryOverride,
                                                &haveOverride);
    if (NS_SUCCEEDED(nsrv) && haveOverride)
    {
      // remove the errors that are already overriden
      remaining_display_errors -= overrideBits;
    }
  }

  if (!remaining_display_errors) {
    // all errors are covered by override rules, so let's accept the cert
    return SECSuccess;
  }
The exact mapping of violation to error code can be easily seen at security/manager/pki/resources/content/exceptionDialog.js (in Firefox source):
  var flags = 0;
  if(gSSLStatus.isUntrusted)
    flags |= overrideService.ERROR_UNTRUSTED;
  if(gSSLStatus.isDomainMismatch)
    flags |= overrideService.ERROR_MISMATCH;
  if(gSSLStatus.isNotValidAtThisTime)
    flags |= overrideService.ERROR_TIME;
The SSL status can be obtained from "@mozilla.org/security/recentbadcerts;1" usually - However, the certificate (and its status) are added to this service only after the call to hasMatchingOverride, so there is no easy way to find out the certificate’s SSLStatus. Instead, the checks have to be executed manually.
Two checks are carried out:
- Calling
nsIX509Cert.verifyForUsage - Comparing hostname against
nsIX509Cert.commonName. If those are not equal,ERROR_MISMATCHis set.
The second check indicates whether ERROR_MISMATCH should be set.
The first check should indicate whether ERROR_UNTRUSTED and ERROR_TIME should be set. Unfortunately, it does not work reliably when the certificate expired and is from an untrusted issuer. When the certificate has expired, the return code would be CERT_EXPIRED even if it is also untrusted. For this reason, the FirefoxDriver assumes that certificates will be untrusted - it always sets the ERROR_UNTRUSTED bit - the other two will be set only if the conditions for them are met.
This could pose a problem for someone testing a site with a valid certificate that does not match the host name it’s served from (e.g. test environment serving production certificates). An additional feature for FirefoxProfile was added: FirefoxProfile.setAssumeUntrustedCertificateIssuer. Calling this function with false will turn the ERROR_UNTRUSTED bit off and allow a user to work in such situation.
HTMLUnit
Not tested yet.
IE
Not implemented yet.
Chrome
Not implemented yet.
2.10 - WebDriver For Mobile Browsers
This documentation previously located on the wiki
Introduction
We provide mobile drivers for two major mobile platforms: Android and iOS (iPhone & iPad).
They can be run on real devices and in an Android emulator or in the iOS Simulator, as appropriate. They are packaged as an app. The app needs to be installed on the emulator or device. The app embeds a RemoteWebDriver server and a light-weight HTTP server which receive, and respond to, requests from WebDriver Clients i.e. from your automated tests.
The connection between the server on the mobile platform and your tests uses an IP connection. The connection may need to be configured. For Android you can connect establish an IP connection over USB.
In some cases your existing WebDriver tests may run successfully e.g. where a common web site serves mobile and desktop users and where the UI is relatively straight-forward. However in other cases you may end up needing to create specific tests for the mobile site; particularly when the site provides specific capabilities, user interfaces, etc. for mobile browsers.
Even when a common web site serves both desktop and mobile browsers, you may want to consider writing specific tests that incorporate factors such as the screen-size of the mobile devices, and different ways users are likely to interact with your web site or web app.
Getting Started
Additional Mobile Platforms
There are several related opensource projects that include support for other Mobile platforms. These include:
Blackberry WebDriver, for BlackBerry 5.0 and onward.
Headless WebKit WebDriver. Many mobile browsers are WebKit based. Headless WebKit provides a fast light-weight solution.
These projects don’t appear to be active, however they may provide a starting point for future work on these platforms.
2.11 - Frequently Asked Questions for Selenium 2
This documentation previously located on the wiki \
Q: What is WebDriver?
A: WebDriver is a tool for writing automated tests of websites. It aims to mimic the behaviour of a real user, and as such interacts with the HTML of the application.
Q: So, is it like Selenium? Or Sahi?
A: The aim is the same (to allow you to test your webapp), but the implementation is different. Rather than running as a Javascript application within the browser (with the limitations this brings, such as the “same origin” problem), WebDriver controls the browser itself. This means that it can take advantage of any facilities offered by the native platform.
Q: What is Selenium 2.0?
A: WebDriver is part of Selenium. The main contribution that WebDriver makes is its API and the native drivers.
Q: How do I migrate from using the original Selenium APIs to the new WebDriver APIs?
A: The process is described in the Selenium documentation at http://seleniumhq.org/docs/appendix_migrating_from_rc_to_webdriver.html
Q: Which browsers does WebDriver support?
A: The existing drivers are the ChromeDriver, InternetExplorerDriver, FirefoxDriver, OperaDriver and HtmlUnitDriver. For more information about each of these, including their relative strengths and weaknesses, please follow the links to the relevant pages. There is also support for mobile testing via the AndroidDriver, OperaMobileDriver and IPhoneDriver.
Q: What does it mean to be “developer focused”?
A: We believe that within a software application’s development team, the people who are best placed to build the tools that everyone else can use are the developers. Although it should be easy to use WebDriver directly, it should also be easy to use it as a building block for more sophisticated tools. Because of this, WebDriver has a small API that’s easy to explore by hitting the “autocomplete” button in your favourite IDE, and aims to work consistently no matter which browser implementation you use.
Q: How do I execute Javascript directly?
A: We believe that most of the time there is a requirement to execute Javascript there is a failing in the tool being used: it hasn’t emitted the correct events, has not interacted with a page correctly, or has failed to react when an XmlHttpRequest returns. We would rather fix WebDriver to work consistently and correctly than rely on testers working out which Javascript method to call.
We also realise that there will be times when this is a limitation. As a result, for those browsers that support it, you can execute Javascript by casting the WebDriver instance to a JavascriptExecutor (http://selenium.googlecode.com/svn/trunk/docs/api/java/org/openqa/selenium/JavascriptExecutor.html). In Java, this looks like:
WebDriver driver; // Assigned elsewhere
JavascriptExecutor js = (JavascriptExecutor) driver;
js.executeScript("return document.title");
Other language bindings will follow a similar approach. Take a look at the UsingJavascript page for more information.
Q: Why is my Javascript execution always returning null?
A: You need to return from your javascript snippet to return a value, so:
js.executeScript("document.title");
will return null, but:
js.executeScript("return document.title");
will return the title of the document.
Q: My XPath finds elements in one browser, but not in others. Why is this?
A: The short answer is that each supported browser handles XPath slightly differently, and you’re probably running into one of these differences. The long answer is on the XpathInWebDriver page.
Q: The InternetExplorerDriver does not work well on Vista. How do I get it to work as expected?
A: The InternetExplorerDriver requires that all security domains are set to the same value (either trusted or untrusted) If you’re not in a position to modify the security domains, then you can override the check like this:
DesiredCapabilities capabilities = DesiredCapabilities.internetExplorer();
capabilities.setCapability(InternetExplorerDriver.INTRODUCE_FLAKINESS_BY_IGNORING_SECURITY_DOMAINS, true);
WebDriver driver = new InternetExplorerDriver(capabilities);
As can be told by the name of the constant, this may introduce flakiness in your tests. If all sites are in the same protection domain, you should be okay.
Q: What about support for languages other than Java?
A: Python, Ruby, C# and Java are all supported directly by the development team. There are also webdriver implementations for PHP and Perl. Support for a pure JS API is also planned.
Q: How do I handle pop up windows?
A: WebDriver offers the ability to cope with multiple windows. This is done by using the “WebDriver.switchTo().window()” method to switch to a window with a known name. If the name is not known, you can use “WebDriver.getWindowHandles()” to obtain a list of known windows. You may pass the handle to “switchTo().window()”.
Q: Does WebDriver support Javascript alerts and prompts?
A: Yes, using the Alerts API (http://selenium.googlecode.com/svn/trunk/docs/api/java/org/openqa/selenium/Alert.html):
// Get a handle to the open alert, prompt or confirmation
Alert alert = driver.switchTo().alert();
// Get the text of the alert or prompt
alert.getText();
// And acknowledge the alert (equivalent to clicking "OK")
alert.accept();
Q: Does WebDriver support file uploads?
A: Yes.
You can’t interact with the native OS file browser dialog directly, but we do some magic so that if you call WebElement#sendKeys("/path/to/file") on a file upload element, it does the right thing. Make sure you don’t WebElement#click() the file upload element, or the browser will probably hang.
Handy hint: You can’t interact with hidden elements without making them un-hidden. If your element is hidden, it can probably be un-hidden with some code like:
((JavascriptExecutor)driver).executeScript("arguments[0].style.visibility = 'visible'; arguments[0].style.height = '1px'; arguments[0].style.width = '1px'; arguments[0].style.opacity = 1", fileUploadElement);
Q: The “onchange” event doesn’t fire after a call “sendKeys”
A: WebDriver leaves the focus in the element you called “sendKeys” on. The “onchange” event will only fire when focus leaves that element. As such, you need to move the focus, perhaps using a “click” on another element.
Q: Can I run multiple instances of the WebDriver sub-classes?
A: Each instance of an HtmlUnitDriver, ChromeDriver and FirefoxDriver is completely independent of every other instance (in the case of firefox and chrome, each instance has its own anonymous profile it uses). Because of the way that Windows works, there should only ever be a single InternetExplorerDriver instance at one time. If you need to run more than one instance of the InternetExplorerDriver at a time, consider using the Remote!WebDriver and virtual machines.
Q: I need to use a proxy. How do I configure that?
A: Proxy configuration is done via the org.openqa.selenium.Proxy class like so:
Proxy proxy = new Proxy();
proxy.setProxyAutoconfigUrl("http://youdomain/config");

// We use firefox as an example here.
DesiredCapabilities capabilities = DesiredCapabilities.firefox();
capabilities.setCapability(CapabilityType.PROXY, proxy);

// You could use any webdriver implementation here
WebDriver driver = new FirefoxDriver(capabilities);
Q: How do I handle authentication with the HtmlUnitDriver?
A: When creating your instance of the HtmlUnitDriver, override the “modifyWebClient” method, for example:
WebDriver driver = new HtmlUnitDriver() {
  protected WebClient modifyWebClient(WebClient client) {
    // This class ships with HtmlUnit itself
    DefaultCredentialsProvider creds = new DefaultCredentialsProvider();

    // Set some example credentials
    creds.addCredentials("username", "password");

    // And now add the provider to the webClient instance
    client.setCredentialsProvider(creds);

    return client;
  }
};
Q: Is WebDriver thread-safe?
A: WebDriver is not thread-safe. Having said that, if you can serialise access to the underlying driver instance, you can share a reference in more than one thread. This is not advisable. You /can/ on the other hand instantiate one WebDriver instance for each thread.
Q: How do I type into a contentEditable iframe?
A: Assuming that the iframe is named “foo”:
driver.switchTo().frame("foo");
WebElement editable = driver.switchTo().activeElement();
editable.sendKeys("Your text here");
Sometimes this doesn’t work, and this is because the iframe doesn’t have any content. On Firefox you can execute the following before “sendKeys”:
((JavascriptExecutor) driver).executeScript("document.body.innerHTML = '<br>'");
This is needed because the iframe has no content by default: there’s nothing to send keyboard input to. This method call inserts an empty tag, which sets everything up nicely.
Remember to switch out of the frame once you’re done (as all further interactions will be with this specific frame):
driver.switchTo().defaultContent();
Q: WebDriver fails to start Firefox on Linux due to java.net.SocketException
A: If, when running WebDriver on Linux, Firefox fails to start and the error looks like:
Caused by: java.net.SocketException: Invalid argument
        at java.net.PlainSocketImpl.socketBind(Native Method)
        at java.net.PlainSocketImpl.bind(PlainSocketImpl.java:365)
        at java.net.Socket.bind(Socket.java:571)
        at org.openqa.selenium.firefox.internal.SocketLock.isLockFree(SocketLock.java:99)
        at org.openqa.selenium.firefox.internal.SocketLock.lock(SocketLock.java:63)
It may be caused due to IPv6 settings on the machine. Execute:
sudo sysctl net.ipv6.bindv6only=0
To get the socket to bind both to IPv6 and IPv4 addresses of the host with the same calls. More permanent solution is disabling this behaviour by editing /etc/sysctl.d/bindv6only.conf
Q: WebDriver fails to find elements / Does not block on page loads
A: This problem can manifest itself in various ways:
- Using WebDriver.findElement(…) throws ElementNotFoundException, but the element is clearly there - inspecting the DOM (using Firebug, etc) clearly shows it.
- Calling Driver.get returns once the HTML has been loaded - but Javascript code triggered by the onload event was not done, so the page is incomplete and some elements cannot be found.
- Clicking on an element / link triggers an operation that creates new element. However, calling findElement(s) after click returns does not find it. Isn’t click supposed to be blocking?
- How do I know when a page has finished loading?
Explanation: WebDriver has a blocking API, generally. However, under some conditions it is possible for a get call to return before the page has finished loading. The classic example is Javascript starting to run after the page has loaded (triggered by onload). Browsers (e.g. Firefox) will notify WebDriver when the basic HTML content has been loaded, which is when WebDriver returns. It’s difficult (if not impossible) to know when Javascript has finished executing, since JS code may schedule functions to be called in the future, depend on server response, etc. This is also true for clicking - when the platform supports native events (Windows, Linux) clicking is done by sending a mouse click event with the element’s coordinates at the OS level - WebDriver cannot track the exact sequence of operations this click creates. For this reason, the blocking API is imperfect - WebDriver cannot wait for all conditions to be met before the test proceeds because it does not know them. Usually, the important matter is whether the element involved in the next interaction is present and ready.
Solution: Use the Wait class to wait for a specific element to appear. This class simply calls findElement over and over, discarding the NoSuchElementException each time, until the element is found (or a timeout has expired). Since this is the behaviour desired by default for many users, a mechanism for implicitly-waiting for elements to appear has been implemented. This is accessible through the WebDriver.manage().timeouts() call. (This was previously tracked on issue 26).
Q: How can I trigger arbitrary events on the page?
A: WebDriver aims to emulate user interaction - so the API reflects the ways a user can interact with various elements.
Triggering a specific event cannot be achieved directly using the API, but one can use the Javascript execution abilities to call methods on an element.
Q: Why is it not possible to interact with hidden elements?
A: Since a user cannot read text in a hidden element, WebDriver will not allow access to it as well.
However, it is possible to use Javascript execution abilities to call getText directly from the element:
WebElement element = ...;
((JavascriptExecutor) driver).executeScript("return arguments[0].getText();", element);
Q: How do I start Firefox with an extension installed?
A:
FirefoxProfile profile = new FirefoxProfile()
profile.addExtension(....);

WebDriver driver = new FirefoxDriver(profile);
Q: I’d like it if WebDriver did….
A: If there’s something that you’d like WebDriver to do, or you’ve found a bug, then please add an add an issue to the WebDriver project page.
Q: Selenium server sometimes takes a long time to start a new session ?
A: If you’re running on linux, you will need to increase the amount of entropy available for secure random number generation. Most linux distros can install a package called “randomsound” to do this.
On Windows (XP), you may be running into http://bugs.sun.com/view_bug.do?bug_id=6705872, which usually means clearing out a lot of files from your temp directory. temp directory.
Q: What’s the Selenium WebDriver API equivalent to TextPresent ?
A:
driver.findElement(By.tagName("body")).getText()
will get you the text of the page. To verifyTextPresent/assertTextPresent, from that you can use your favourite test framework to assert on the text. To waitForTextPresent, you may want to investigate the WebDriverWait class.
Q: The socket lock seems like a bad design. I can make it better
A: the socket lock that guards the starting of firefox is constructed with the following design constraints:
- It is shared among all the language bindings; ruby, java and any of the other bindings can coexist at the same time on the same machine.
- Certain critical parts of starting firefox must be exclusive-locked on the machine in question.
- The socket lock itself is not the primary bottleneck, starting firefox is.
The SocketLock is an implementation of the Lock interface. This allows for a pluggable strategy for your own implementation of it. To switch to a different implementation, subclass the FirefoxDriver and override the “obtainLock” method.
Q: Why do I get a UnicodeEncodeError when I send_keys in python
A: You likely don’t have a Locale set on your system. Please set a locale LANG=en_US.UTF-8 and LC_CTYPE=“en_US.UTF-8” for example.
2.12 - Selenium 2.0 Team
(Previously located: https://github.com/SeleniumHQ/selenium/wiki/The-Team)
If you’ve ever wondered who to thank (or blame!) for Selenium, then you’ve come to the right place. This page introduces you to the contributors and shows you what they’re working on.
SimonStewart: Original WebDriver developer and leading the Selenium 2 effort. He works mainly with Java and can be seen all over the code base, patching holes and adding features. By day he works as a Software Engineer in Test at Google. By night, he hacks on the crazy fun build grammar.
Julian Harty: Dabbled with WebDriver since 2007 mainly finding ways to make the code real and useful by testing it, and by documenting it. Currently working at eBay to find ways to make software testing more efficient and effective. He’s also involved in various open source initiatives, accessibility software, and writing material. Search for “Julian Harty” in your favorite search engine to track down his public work.
Jari Bakken: Has been working on WebDriver since late 2009, developed and now maintaining all things Ruby. Lead developer of Celerity and watir-webdriver and a committer on the Watir project. Day job is as a test engineer for classified ads website FINN.no, and by night I try to make use of my degree in jazz guitar.
David Burns: Has been working with Selenium 1 for about 4 years and with WebDriver since the beginning of 2010 and now maintaining the .NET and Python bindings. Senior Software Engineer in Test at Mozilla helping lead the Test Automation on Web propjects from within WebQA.
Anthony Long: Has been working with Selenium since 2008, and is currently working to improve the Selenium Python bindings. Anthony is the organizer of Quality Assurance and author of numerous python modules for use in the Quality Assurance field. He has used selenium extensively as a QA Lead at HUGE and most recently and currently, at AdMeld.
Jim Evans: Started working with the WebDriver and Selenium since the end of 2009, working mostly on the .NET bindings. His test automation experience includes 12 years at Microsoft, and has worked for the past 7 years as a Senior QA Engineer at Numara Software. When he’s not hacking code, he enjoys spending time with his family and performing as a singer and songwriter.
3 - Selenium 3
3.1 - Grid 3
You can read our documentation for more information about Grid 4
Selenium Grid is a smart proxy server that allows Selenium tests to route commands to remote web browser instances. Its aim is to provide an easy way to run tests in parallel on multiple machines.
With Selenium Grid, one server acts as the hub that routes JSON formatted test commands to one or more registered Grid nodes. Tests contact the hub to obtain access to remote browser instances. The hub has a list of registered servers that it provides access to, and allows control of these instances.
Selenium Grid allows us to run tests in parallel on multiple machines, and to manage different browser versions and browser configurations centrally (instead of in each individual test).
Selenium Grid is not a silver bullet. It solves a subset of common delegation and distribution problems, but will for example not manage your infrastructure, and might not suit your specific needs.
3.2 - Setting up your own Grid 3
To use Selenium Grid, you need to maintain your own infrastructure for the nodes. As this can be a cumbersome and time intense effort, many organizations use IaaS providers such as Amazon EC2 and Google Compute to provide this infrastructure.
Other options include using providers such as Sauce Labs or Testing Bot who provide a Selenium Grid as a service in the cloud. It is certainly possible to also run nodes on your own hardware. This chapter will go into detail about the option of running your own grid, complete with its own node infrastructure.
Quick start
This example will show you how to start the Selenium 2 Grid Hub, and register both a WebDriver node and a Selenium 1 RC legacy node. We will also show you how to call the grid from Java. The hub and nodes are shown here running on the same machine, but of course you can copy the selenium-server-standalone to multiple machines.
The selenium-server-standalone package includes the hub,
WebDriver, and legacy RC needed to run the Grid,
ant is not required anymore.
You can download the selenium-server-standalone.jar from
https://selenium.dev/downloads/.
Step 1: Start the Hub
The Hub is the central point that will receive test requests and distribute them to the right nodes. The distribution is done on a capabilities basis, meaning a test requiring a set of capabilities will only be distributed to nodes offering that set or subset of capabilities.
Because a test’s desired capabilities are just what the name implies, desired, the hub cannot guarantee that it will locate a node fully matching the requested desired capabilities set.
Open a command prompt
and navigate to the directory where you copied
the selenium-server-standalone.jar file.
You start the hub by passing the -role hub flag
to the standalone server:
java -jar selenium-server-standalone.jar -role hub
The Hub will listen to port 4444 by default. You can view the status of the hub by opening a browser window and navigating to http://localhost:4444/grid/console.
To change the default port,
you can add the optional -port flag
with an integer representing the port to listen to when you run the command.
Also, all of the other options you see in the JSON config file (seen below)
are possible command-line flags.
You certainly can get by with only the simple command shown above, but if you need more advanced configuration, you can also specify a JSON format config file, for convenience, to configure the hub when you start it. You can do it like so:
java -jar selenium-server-standalone.jar -role hub -hubConfig hubConfig.json -debug
Below you will see an example of a hubConfig.json file.
We will go into more detail on how to provide node configuration files in step 2.
{
  "_comment" : "Configuration for Hub - hubConfig.json",
  "host": ip,
  "maxSession": 5,
  "port": 4444,
  "cleanupCycle": 5000,
  "timeout": 300000,
  "newSessionWaitTimeout": -1,
  "servlets": [],
  "prioritizer": null,
  "capabilityMatcher": "org.openqa.grid.internal.utils.DefaultCapabilityMatcher",
  "throwOnCapabilityNotPresent": true,
  "nodePolling": 180000,
  "platform": "WINDOWS"}
Step 2: Start the Nodes
Regardless of whether you want to run a grid with new WebDriver functionality,
or a grid with Selenium 1 RC functionality,
or both at the same time,
you use the same selenium-server-standalone.jar file to start the nodes:
java -jar selenium-server-standalone.jar -role node -hub http://localhost:4444
If a port is not specified through the -port flag,
a free port will be chosen. You can run multiple nodes on one machine
but if you do so, you need to be aware of your systems memory resources
and problems with screenshots if your tests take them.
Configuration of Node with options
As mentioned, for backwards compatibility “wd” and “rc” roles are still a valid subset of the “node” role. But those roles limit the types of remote connections to their corresponding API, while “node” allows both RC and WebDriver remote connections.
Passing JVM properties (using the -D flag
before the -jar argument)
on the command line as well,
and these will be picked up and propagated to the nodes:
-Dwebdriver.chrome.driver=chromedriver.exe
Configuration of Node with JSON
You can also start grid nodes that are configured with a JSON configuration file
java -Dwebdriver.chrome.driver=chromedriver.exe -jar selenium-server-standalone.jar -role node -nodeConfig node1Config.json
And here is an example of a nodeConfig.json file:
{
  "capabilities": [
    {
      "browserName": "firefox",
      "acceptSslCerts": true,
      "javascriptEnabled": true,
      "takesScreenshot": false,
      "firefox_profile": "",
      "browser-version": "27",
      "platform": "WINDOWS",
      "maxInstances": 5,
      "firefox_binary": "",
      "cleanSession": true
    },
    {
      "browserName": "chrome",
      "maxInstances": 5,
      "platform": "WINDOWS",
      "webdriver.chrome.driver": "C:/Program Files (x86)/Google/Chrome/Application/chrome.exe"
    },
    {
      "browserName": "internet explorer",
      "maxInstances": 1,
      "platform": "WINDOWS",
      "webdriver.ie.driver": "C:/Program Files (x86)/Internet Explorer/iexplore.exe"
    }
  ],
  "configuration": {
    "_comment" : "Configuration for Node",
    "cleanUpCycle": 2000,
    "timeout": 30000,
    "proxy": "org.openqa.grid.selenium.proxy.WebDriverRemoteProxy",
    "port": 5555,
    "host": ip,
    "register": true,
    "hubPort": 4444,
    "maxSession": 5
  }
}
A note about the -host flag
For both hub and node, if the -host flag is not specified,
0.0.0.0 will be used by default. This will bind to all the
public (non-loopback) IPv4 interfaces of the machine. If you have a special
network configuration or any component that creates extra network interfaces,
it is advised to set the -host flag with a value that allows the
hub/node to be reachable from a different machine.
Specifying the port
The default TCP/IP port used by the hub is 4444. If you need to change the port please use above mentioned configurations.
Troubleshooting
Using Log file
For advanced troubleshooting you can specify a log file to log system messages. Start Selenium GRID hub or node with -log argument. Please see the below example:
java -jar selenium-server-standalone.jar -role hub -log log.txt
Use your favorite text editor to open log file (log.txt in the example above) to find “ERROR” logs if you get issues.
Using -debug argument
Also you can use -debug argument to print debug logs to console.
Start Selenium Grid Hub or Node with -debug argument. Please see
the below example:
java -jar selenium-server-standalone.jar -role hub -debug
Warning
The Selenium Grid must be protected from external access using appropriate firewall permissions.
Failure to protect your Grid could result in one or more of the following occurring:
- You provide open access to your Grid infrastructure
- You allow third parties to access internal web applications and files
- You allow third parties to run custom binaries
See this blog post on Detectify, which gives a good overview of how a publicly exposed Grid could be misused: Don’t Leave your Grid Wide Open.
Docker Selenium
Docker provides a convenient way to provision and scale Selenium Grid infrastructure in a unit known as a container. Containers are standardised units of software that contain everything required to run the desired application, including all dependencies, in a reliable and repeatable way on different machines.
The Selenium project maintains a set of Docker images which you can download and run to get a working grid up and running quickly. Nodes are available for both Firefox and Chrome. Full details of how to provision a grid can be found within the Docker Selenium repository.
Prerequisite
The only requirement to run a Grid is to have Docker installed and working. Install Docker.
3.3 - Components of Grid 3
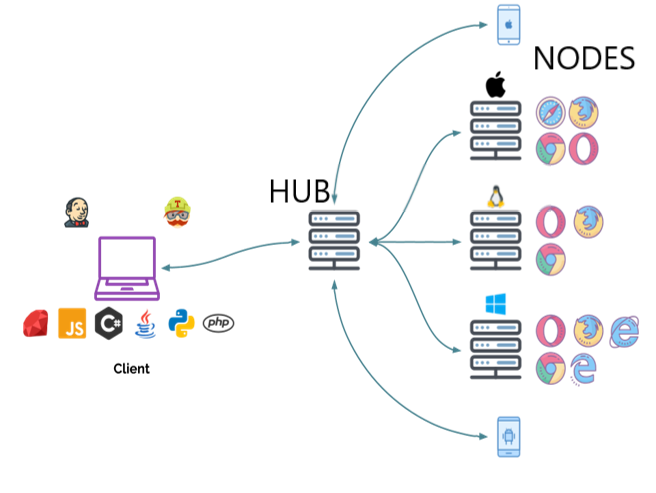
Hub
- Intermediary and manager
- Accepts requests to run tests
- Takes instructions from client and executes them remotely on the nodes
- Manages threads
A Hub is a central point where all your tests are sent. Each Selenium Grid consists of exactly one hub. The hub needs to be reachable from the respective clients (i.e. CI server, Developer machine etc.) The hub will connect one or more nodes that tests will be delegated to.
Nodes
- Where the browsers live
- Registers itself to the hub and communicates its capabilities
- Receives requests from the hub and executes them
Nodes are different Selenium instances that will execute tests on individual computer systems. There can be many nodes in a grid. The machines which are nodes do not need to be the same platform or have the same browser selection as that of the hub or the other nodes. A node on Windows might have the capability of offering Internet Explorer as a browser option, whereas this wouldn’t be possible on Linux or Mac.
4 - Legacy Selenium IDE
Introduction
The Selenium-IDE (Integrated Development Environment) is the tool you use to develop your Selenium test cases. It’s an easy-to-use Firefox plug-in and is generally the most efficient way to develop test cases. It also contains a context menu that allows you to first select a UI element from the browser’s currently displayed page and then select from a list of Selenium commands with parameters pre-defined according to the context of the selected UI element. This is not only a time-saver, but also an excellent way of learning Selenium script syntax.
This chapter is all about the Selenium IDE and how to use it effectively.
Installing the IDE
Using Firefox, first, download the IDE from the SeleniumHQ downloads page
Firefox will protect you from installing addons from unfamiliar locations, so you will need to click ‘Allow’ to proceed with the installation, as shown in the following screenshot.
When downloading from Firefox, you’ll be presented with the following window.
Select Install Now. The Firefox Add-ons window pops up, first showing a progress bar, and when the download is complete, displays the following.
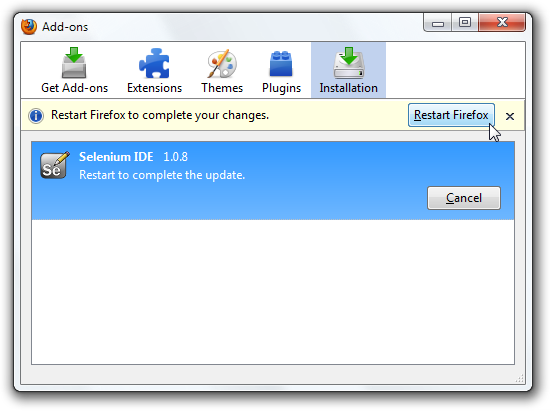
Restart Firefox. After Firefox reboots you will find the Selenium-IDE listed under the Firefox Tools menu.
Opening the IDE
To run the Selenium-IDE, simply select it from the Firefox Tools menu. It opens as follows with an empty script-editing window and a menu for loading, or creating new test cases.
IDE Features
Menu Bar
The File menu has options for Test Case and Test Suite (suite of Test Cases). Using these you can add a new Test Case, open a Test Case, save a Test Case, export Test Case in a language of your choice. You can also open the recent Test Case. All these options are also available for Test Suite.
The Edit menu allows copy, paste, delete, undo, and select all operations for editing the commands in your test case. The Options menu allows the changing of settings. You can set the timeout value for certain commands, add user-defined user extensions to the base set of Selenium commands, and specify the format (language) used when saving your test cases. The Help menu is the standard Firefox Help menu; only one item on this menu–UI-Element Documentation–pertains to Selenium-IDE.
Toolbar
The toolbar contains buttons for controlling the execution of your test cases, including a step feature for debugging your test cases. The right-most button, the one with the red-dot, is the record button.


Speed Control: controls how fast your test case runs.

Run All: Runs the entire test suite when a test suite with multiple test cases is loaded.

Run: Runs the currently selected test. When only a single test is loaded this button and the Run All button have the same effect.


Pause/Resume: Allows stopping and re-starting of a running test case.

Step: Allows you to “step” through a test case by running it one command at a time. Use for debugging test cases.

TestRunner Mode: Allows you to run the test case in a browser loaded with the Selenium-Core TestRunner. The TestRunner is not commonly used now and is likely to be deprecated. This button is for evaluating test cases for backwards compatibility with the TestRunner. Most users will probably not need this button.

Apply Rollup Rules: This advanced feature allows repetitive sequences of Selenium commands to be grouped into a single action. Detailed documentation on rollup rules can be found in the UI-Element Documentation on the Help menu.

Test Case Pane
Your script is displayed in the test case pane. It has two tabs, one for displaying the command and their parameters in a readable “table” format.
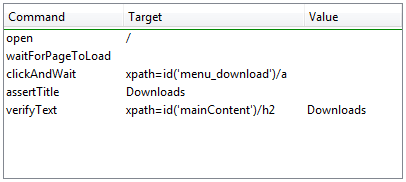
The other tab - Source displays the test case in the native format in which the file will be stored. By default, this is HTML although it can be changed to a programming language such as Java or C#, or a scripting language like Python. See the Options menu for details. The Source view also allows one to edit the test case in its raw form, including copy, cut and paste operations.
The Command, Target, and Value entry fields display the currently selected command along with its parameters. These are entry fields where you can modify the currently selected command. The first parameter specified for a command in the Reference tab of the bottom pane always goes in the Target field. If a second parameter is specified by the Reference tab, it always goes in the Value field.

If you start typing in the Command field, a drop-down list will be populated based on the first characters you type; you can then select your desired command from the drop-down.
Log/Reference/UI-Element/Rollup Pane
The bottom pane is used for four different functions–Log, Reference, UI-Element, and Rollup–depending on which tab is selected.
Log
When you run your test case, error messages and information messages showing the progress are displayed in this pane automatically, even if you do not first select the Log tab. These messages are often useful for test case debugging. Notice the Clear button for clearing the Log. Also notice the Info button is a drop-down allowing selection of different levels of information to log.

Reference
The Reference tab is the default selection whenever you are entering or modifying Selenese commands and parameters in Table mode. In Table mode, the Reference pane will display documentation on the current command. When entering or modifying commands, whether from Table or Source mode, it is critically important to ensure that the parameters specified in the Target and Value fields match those specified in the parameter list in the Reference pane. The number of parameters provided must match the number specified, the order of parameters provided must match the order specified, and the type of parameters provided must match the type specified. If there is a mismatch in any of these three areas, the command will not run correctly.
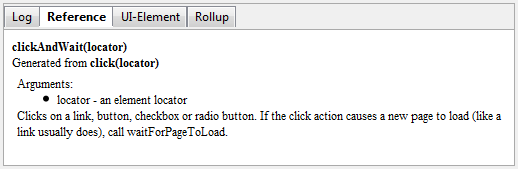
While the Reference tab is invaluable as a quick reference, it is still often necessary to consult the Selenium Reference document.
UI-Element and Rollup
Detailed information on these two panes (which cover advanced features) can be found in the UI-Element Documentation on the Help menu of Selenium-IDE.
Building Test Cases
There are three primary methods for developing test cases. Frequently, a test developer will require all three techniques.
Recording
Many first-time users begin by recording a test case from their interactions with a website. When Selenium-IDE is first opened, the record button is ON by default. If you do not want Selenium-IDE to begin recording automatically you can turn this off by going under Options > Options… and deselecting “Start recording immediately on open.”
During recording, Selenium-IDE will automatically insert commands into your test case based on your actions. Typically, this will include:
- clicking a link - click or clickAndWait commands
- entering values - type command
- selecting options from a drop-down listbox - select command
- clicking checkboxes or radio buttons - click command
Here are some “gotchas” to be aware of:
- The type command may require clicking on some other area of the web page for it to record.
- Following a link usually records a click command. You will often need to change this to clickAndWait to ensure your test case pauses until the new page is completely loaded. Otherwise, your test case will continue running commands before the page has loaded all its UI elements. This will cause unexpected test case failures.
Adding Verifications and Asserts With the Context Menu
Your test cases will also need to check the properties of a web-page. This requires assert and verify commands. We won’t describe the specifics of these commands here; that is in the chapter on Selenium Commands – “Selenese”. Here we’ll simply describe how to add them to your test case.
With Selenium-IDE recording, go to the browser displaying your test application and right click anywhere on the page. You will see a context menu showing verify and/or assert commands.
The first time you use Selenium, there may only be one Selenium command listed. As you use the IDE however, you will find additional commands will quickly be added to this menu. Selenium-IDE will attempt to predict what command, along with the parameters, you will need for a selected UI element on the current web-page.
Let’s see how this works. Open a web-page of your choosing and select a block of text on the page. A paragraph or a heading will work fine. Now, right-click the selected text. The context menu should give you a verifyTextPresent command and the suggested parameter should be the text itself.
Also, notice the Show All Available Commands menu option. This shows many, many more commands, again, along with suggested parameters, for testing your currently selected UI element.
Try a few more UI elements. Try right-clicking an image, or a user control like a button or a checkbox. You may need to use Show All Available Commands to see options other than verifyTextPresent. Once you select these other options, the more commonly used ones will show up on the primary context menu. For example, selecting verifyElementPresent for an image should later cause that command to be available on the primary context menu the next time you select an image and right-click.
Again, these commands will be explained in detail in the chapter on Selenium commands. For now though, feel free to use the IDE to record and select commands into a test case and then run it. You can learn a lot about the Selenium commands simply by experimenting with the IDE.
Editing
Insert Command
Table View
Select the point in your test case where you want to insert the command. To do this, in the Test Case Pane, left-click on the line where you want to insert a new command. Right-click and select Insert Command; the IDE will add a blank line just ahead of the line you selected. Now use the command editing text fields to enter your new command and its parameters.
Source View
Select the point in your test case where you want to insert the command. To do this, in the Test Case Pane, left-click between the commands where you want to insert a new command, and enter the HTML tags needed to create a 3-column row containing the Command, first parameter (if one is required by the Command), and second parameter (again, if one is required to locate an element) and third parameter(again, if one is required to have a value). Example:
<tr>
    <td>Command</td>
    <td>target (locator)</td>
    <td>Value</td>
</tr>
Insert Comment
Comments may be added to make your test case more readable. These comments are ignored when the test case is run.
Comments may also be used to add vertical white space (one or more blank lines) in your tests; just create empty comments. An empty command will cause an error during execution; an empty comment won’t.
Table View
Select the line in your test case where you want to insert the comment. Right-click and select Insert Comment. Now use the Command field to enter the comment. Your comment will appear in purple text.
Source View
Select the point in your test case where you want to insert the comment. Add an
HTML-style comment, i.e., <!-- your comment here -->.
Edit a Command or Comment
Table View
Simply select the line to be changed and edit it using the Command, Target, and Value fields.
Source View
Since Source view provides the equivalent of a WYSIWYG (What You See is What You Get) editor, simply modify which line you wish–command, parameter, or comment.
Opening and Saving a Test Case
Like most programs, there are Save and Open commands under the File menu. However, Selenium distinguishes between test cases and test suites. To save your Selenium-IDE tests for later use you can either save the individual test cases, or save the test suite. If the test cases of your test suite have not been saved, you’ll be prompted to save them before saving the test suite.
When you open an existing test case or suite, Selenium-IDE displays its Selenium commands in the Test Case Pane.
Running Test Cases
The IDE allows many options for running your test case. You can run a test case all at once, stop and start it, run it one line at a time, run a single command you are currently developing, and you can do a batch run of an entire test suite. Execution of test cases is very flexible in the IDE.
Run a Test Case
Click the Run button to run the currently displayed test case.
Run a Test Suite
Click the Run All button to run all the test cases in the currently loaded test suite.
Stop and Start
The Pause button can be used to stop the test case while it is running. The icon of this button then changes to indicate the Resume button. To continue click Resume.
Stop in the Middle
You can set a breakpoint in the test case to cause it to stop on a particular command. This is useful for debugging your test case. To set a breakpoint, select a command, right-click, and from the context menu select Toggle Breakpoint.
Start from the Middle
You can tell the IDE to begin running from a specific command in the middle of the test case. This also is used for debugging. To set a startpoint, select a command, right-click, and from the context menu select Set/Clear Start Point.
Run Any Single Command
Double-click any single command to run it by itself. This is useful when writing a single command. It lets you immediately test a command you are constructing, when you are not sure if it is correct. You can double-click it to see if it runs correctly. This is also available from the context menu.
Using Base URL to Run Test Cases in Different Domains
The Base URL field at the top of the Selenium-IDE window is very useful for allowing test cases to be run across different domains. Suppose that a site named http://news.portal.com had an in-house beta site named http://beta.news.portal.com. Any test cases for these sites that begin with an open statement should specify a relative URL as the argument to open rather than an absolute URL (one starting with a protocol such as http: or https:). Selenium-IDE will then create an absolute URL by appending the open command’s argument onto the end of the value of Base URL. For example, the test case below would be run against http://news.portal.com/about.html:
This same test case with a modified Base URL setting would be run against http://beta.news.portal.com/about.html:
Selenium Commands – “Selenese”
Selenium commands, often called selenese, are the set of commands that run your tests. A sequence of these commands is a test script. Here we explain those commands in detail, and we present the many choices you have in testing your web application when using Selenium.
Selenium provides a rich set of commands for fully testing your web-app in virtually any way you can imagine. The command set is often called selenese. These commands essentially create a testing language.
In selenese, one can test the existence of UI elements based on their HTML tags, test for specific content, test for broken links, input fields, selection list options, submitting forms, and table data among other things. In addition Selenium commands support testing of window size, mouse position, alerts, Ajax functionality, pop up windows, event handling, and many other web-application features. The Command Reference lists all the available commands.
A command tells Selenium what to do. Selenium commands come in three “flavors”: Actions, Accessors, and Assertions.
Actions are commands that generally manipulate the state of the application. They do things like “click this link” and “select that option”. If an Action fails, or has an error, the execution of the current test is stopped.
Many Actions can be called with the “AndWait” suffix, e.g. “clickAndWait”. This suffix tells Selenium that the action will cause the browser to make a call to the server, and that Selenium should wait for a new page to load.
Accessors examine the state of the application and store the results in variables, e.g. “storeTitle”. They are also used to automatically generate Assertions.
Assertions are like Accessors, but they verify that the state of the application conforms to what is expected. Examples include “make sure the page title is X” and “verify that this checkbox is checked”.
All Selenium Assertions can be used in 3 modes: “assert”, “verify”, and ” waitFor”. For example, you can “assertText”, “verifyText” and “waitForText”. When an “assert” fails, the test is aborted. When a “verify” fails, the test will continue execution, logging the failure. This allows a single “assert” to ensure that the application is on the correct page, followed by a bunch of “verify” assertions to test form field values, labels, etc.
“waitFor” commands wait for some condition to become true (which can be useful for testing Ajax applications). They will succeed immediately if the condition is already true. However, they will fail and halt the test if the condition does not become true within the current timeout setting (see the setTimeout action below).
Script Syntax
Selenium commands are simple, they consist of the command and two parameters. For example:
| verifyText | //div//a[2] | Login |
The parameters are not always required; it depends on the command. In some cases both are required, in others one parameter is required, and in still others the command may take no parameters at all. Here are a couple more examples:
| goBackAndWait | ||
| verifyTextPresent | Welcome to My Home Page | |
| type | id=phone | (555) 666-7066 |
| type | id=address1 | ${myVariableAddress} |
The command reference describes the parameter requirements for each command.
Parameters vary, however they are typically:
- a locator for identifying a UI element within a page.
- a text pattern for verifying or asserting expected page content
- a text pattern or a Selenium variable for entering text in an input field or for selecting an option from an option list.
Locators, text patterns, Selenium variables, and the commands themselves are described in considerable detail in the section on Selenium Commands.
Selenium scripts that will be run from Selenium-IDE will be stored in an HTML text file format. This consists of an HTML table with three columns. The first column identifies the Selenium command, the second is a target, and the final column contains a value. The second and third columns may not require values depending on the chosen Selenium command, but they should be present. Each table row represents a new Selenium command. Here is an example of a test that opens a page, asserts the page title and then verifies some content on the page:
<table>
    <tr><td>open</td><td>/download/</td><td></td></tr>
    <tr><td>assertTitle</td><td></td><td>Downloads</td></tr>
    <tr><td>verifyText</td><td>//h2</td><td>Downloads</td></tr>
</table>
Rendered as a table in a browser this would look like the following:
| open | /download/ | |
| assertTitle | Downloads | |
| verifyText | //h2 | Downloads |
The Selenese HTML syntax can be used to write and run tests without requiring knowledge of a programming language. With a basic knowledge of selenese and Selenium-IDE you can quickly produce and run testcases.
Test Suites
A test suite is a collection of tests. Often one will run all the tests in a test suite as one continuous batch-job.
When using Selenium-IDE, test suites also can be defined using a simple HTML file. The syntax again is simple. An HTML table defines a list of tests where each row defines the filesystem path to each test. An example tells it all.
<html>
<head>
<title>Test Suite Function Tests - Priority 1</title>
</head>
<body>
<table>
  <tr><td><b>Suite Of Tests</b></td></tr>
  <tr><td><a href="./Login.html">Login</a></td></tr>
  <tr><td><a href="./SearchValues.html">Test Searching for Values</a></td></tr>
  <tr><td><a href="./SaveValues.html">Test Save</a></td></tr>
</table>
</body>
</html>
A file similar to this would allow running the tests all at once, one after another, from the Selenium-IDE.
Test suites can also be maintained when using Selenium-RC. This is done via programming and can be done a number of ways. Commonly Junit is used to maintain a test suite if one is using Selenium-RC with Java. Additionally, if C# is the chosen language, Nunit could be employed. If using an interpreted language like Python with Selenium-RC then some simple programming would be involved in setting up a test suite. Since the whole reason for using Selenium-RC is to make use of programming logic for your testing this usually isn’t a problem.
Commonly Used Selenium Commands
To conclude our introduction of Selenium, we’ll show you a few typical Selenium commands. These are probably the most commonly used commands for building tests.
open
opens a page using a URL.
click/clickAndWait
performs a click operation, and optionally waits for a new page to load.
verifyTitle/assertTitle
verifies an expected page title.
verifyTextPresent
verifies expected text is somewhere on the page.
verifyElementPresent
verifies an expected UI element, as defined by its HTML tag, is present on the page.
verifyText
verifies expected text and its corresponding HTML tag are present on the page.
verifyTable
verifies a table’s expected contents.
waitForPageToLoad
pauses execution until an expected new page loads. Called automatically when clickAndWait is used.
waitForElementPresent
pauses execution until an expected UI element, as defined by its HTML tag, is present on the page.
Verifying Page Elements
Verifying UI elements on a web page is probably the most common feature of your automated tests. Selenese allows multiple ways of checking for UI elements. It is important that you understand these different methods because these methods define what you are actually testing.
For example, will you test that…
- an element is present somewhere on the page?
- specific text is somewhere on the page?
- specific text is at a specific location on the page?
For example, if you are testing a text heading, the text and its position at the top of the page are probably relevant for your test. If, however, you are testing for the existence of an image on the home page, and the web designers frequently change the specific image file along with its position on the page, then you only want to test that an image (as opposed to the specific image file) exists somewhere on the page.
Assertion or Verification?
Choosing between “assert” and “verify” comes down to convenience and management of failures. There’s very little point checking that the first paragraph on the page is the correct one if your test has already failed when checking that the browser is displaying the expected page. If you’re not on the correct page, you’ll probably want to abort your test case so that you can investigate the cause and fix the issue(s) promptly. On the other hand, you may want to check many attributes of a page without aborting the test case on the first failure as this will allow you to review all failures on the page and take the appropriate action. Effectively an “assert” will fail the test and abort the current test case, whereas a “verify” will fail the test and continue to run the test case.
The best use of this feature is to logically group your test commands, and start each group with an “assert” followed by one or more “verify” test commands. An example follows:
| Command | Target | Value |
|---|---|---|
| open | /download/ | |
| assertTitle | Downloads | |
| verifyText | //h2 | Downloads |
| assertTable | 1.2.1 | Selenium IDE |
| verifyTable | 1.2.2 | June 3, 2008 |
| verifyTable | 1.2.3 | 1.0 beta 2 |
The above example first opens a page and then “asserts” that the correct page is loaded by comparing the title with the expected value. Only if this passes will the following command run and “verify” that the text is present in the expected location. The test case then “asserts” the first column in the second row of the first table contains the expected value, and only if this passed will the remaining cells in that row be “verified”.
verifyTextPresent
The command verifyTextPresent is used to verify specific text exists somewhere
on the page. It takes a single argument–the text pattern to be verified. For
example:
| Command | Target | Value |
|---|---|---|
| verifyTextPresent | Marketing Analysis |
This would cause Selenium to search for, and verify, that the text string “Marketing Analysis” appears somewhere on the page currently being tested. Use verifyTextPresent when you are interested in only the text itself being present on the page. Do not use this when you also need to test where the text occurs on the page.
verifyElementPresent
Use this command when you must test for the presence of a specific UI element, rather than its content. This verification does not check the text, only the HTML tag. One common use is to check for the presence of an image.
| Command | Target | Value |
|---|---|---|
| verifyElementPresent | //div/p/img |
This command verifies that an image, specified by the existence of an
HTML tag, is present on the page, and that it follows a
tag. The first (and only) parameter is a locator for telling the Selenese command how to find the element. Locators are explained in the next section.
verifyElementPresent can be used to check the existence of any HTML tag within
the page. You can check the existence of links, paragraphs, divisions
| Command | Target | Value |
|---|---|---|
| verifyElementPresent | //div/p | |
| verifyElementPresent | //div/a | |
| verifyElementPresent | id=Login | |
| verifyElementPresent | link=Go to Marketing Research | |
| verifyElementPresent | //a[2] | |
| verifyElementPresent | //head/title |
These examples illustrate the variety of ways a UI element may be tested. Again, locators are explained in the next section.
verifyText
Use verifyText when both the text and its UI element must be tested. verifyText
must use a locator. If you choose an XPath or DOM locator, you can verify that
specific text appears at a specific location on the page relative to other UI
components on the page.
| Command | Target | Value |
|---|---|---|
| verifyText | //table/tr/td/div/p | This is my text and it occurs right after the div inside the table. |
Locating Elements
For many Selenium commands, a target is required. This target identifies an
element in the content of the web application, and consists of the location
strategy followed by the location in the format locatorType=location. The
locator type can be omitted in many cases. The various locator types are
explained below with examples for each.
Locating by Identifier
This is probably the most common method of locating elements and is the catch-all default when no recognized locator type is used. With this strategy, the first element with the id attribute value matching the location will be used. If no element has a matching id attribute, then the first element with a name attribute matching the location will be used.
For instance, your page source could have id and name attributes as follows:
  <html>
   <body>
    <form id="loginForm">
     <input name="username" type="text" />
     <input name="password" type="password" />
     <input name="continue" type="submit" value="Login" />
    </form>
   </body>
  <html>
The following locator strategies would return the elements from the HTML snippet above indicated by line number:
identifier=loginForm(3)identifier=password(5)identifier=continue(6)continue(6)
Since the identifier type of locator is the default, the identifier=
in the first three examples above is not necessary.
Locating by Id
This type of locator is more limited than the identifier locator type, but also more explicit. Use this when you know an element’s id attribute.
   <html>
    <body>
     <form id="loginForm">
      <input name="username" type="text" />
      <input name="password" type="password" />
      <input name="continue" type="submit" value="Login" />
      <input name="continue" type="button" value="Clear" />
     </form>
    </body>
   <html>
id=loginForm(3)
Locating by Name
The name locator type will locate the first element with a matching name attribute. If multiple elements have the same value for a name attribute, then you can use filters to further refine your location strategy. The default filter type is value (matching the value attribute).
   <html>
    <body>
     <form id="loginForm">
      <input name="username" type="text" />
      <input name="password" type="password" />
      <input name="continue" type="submit" value="Login" />
      <input name="continue" type="button" value="Clear" />
     </form>
   </body>
   <html>
name=username(4)name=continue value=Clear(7)name=continue Clear(7)name=continue type=button(7)
Note: Unlike some types of XPath and DOM locators, the three types of locators above allow Selenium to test a UI element independent of its location on the page. So if the page structure and organization is altered, the test will still pass. You may or may not want to also test whether the page structure changes. In the case where web designers frequently alter the page, but its functionality must be regression tested, testing via id and name attributes, or really via any HTML property, becomes very important.
Locating by XPath
XPath is the language used for locating nodes in an XML document. As HTML can be an implementation of XML (XHTML), Selenium users can leverage this powerful language to target elements in their web applications. XPath extends beyond (as well as supporting) the simple methods of locating by id or name attributes, and opens up all sorts of new possibilities such as locating the third checkbox on the page.
One of the main reasons for using XPath is when you don’t have a suitable id or name attribute for the element you wish to locate. You can use XPath to either locate the element in absolute terms (not advised), or relative to an element that does have an id or name attribute. XPath locators can also be used to specify elements via attributes other than id and name.
Absolute XPaths contain the location of all elements from the root (html) and as a result are likely to fail with only the slightest adjustment to the application. By finding a nearby element with an id or name attribute (ideally a parent element) you can locate your target element based on the relationship. This is much less likely to change and can make your tests more robust.
Since only xpath locators start with “//”, it is not necessary to include
the xpath= label when specifying an XPath locator.
   <html>
    <body>
     <form id="loginForm">
      <input name="username" type="text" />
      <input name="password" type="password" />
      <input name="continue" type="submit" value="Login" />
      <input name="continue" type="button" value="Clear" />
     </form>
   </body>
   <html>
xpath=/html/body/form[1](3) - Absolute path (would break if the HTML was changed only slightly)//form[1](3) - First form element in the HTMLxpath=//form[@id='loginForm'](3) - The form element with attribute named ‘id’ and the value ’loginForm’xpath=//form[input/@name='username'](3) - First form element with an input child element with attribute named ’name’ and the value ‘username’//input[@name='username'](4) - First input element with attribute named ’name’ and the value ‘username’//form[@id='loginForm']/input[1](4) - First input child element of the form element with attribute named ‘id’ and the value ’loginForm’//input[@name='continue'][@type='button'](7) - Input with attribute named ’name’ and the value ‘continue’ and attribute named ’type’ and the value ‘button’//form[@id='loginForm']/input[4](7) - Fourth input child element of the form element with attribute named ‘id’ and value ’loginForm’
These examples cover some basics, but in order to learn more, the following references are recommended:
There are also a couple of very useful Firefox Add-ons that can assist in discovering the XPath of an element:
- XPath Checker XPath and can be used to test XPath results.
- [Firebug](https://addons.mozilla.org/en-US/firefox/addon/1843 - XPath suggestions are just one of the many powerful features of this very useful add-on.
Locating Hyperlinks by Link Text
This is a simple method of locating a hyperlink in your web page by using the text of the link. If two links with the same text are present, then the first match will be used.
  <html>
   <body>
    <p>Are you sure you want to do this?</p>
    <a href="continue.html">Continue</a>
    <a href="cancel.html">Cancel</a>
  </body>
  <html>
link=Continue(4)link=Cancel(5)
Locating by DOM
The Document Object Model represents an HTML document and can be accessed using JavaScript. This location strategy takes JavaScript that evaluates to an element on the page, which can be simply the element’s location using the hierarchical dotted notation.
Since only dom locators start with “document”, it is not necessary to include
the dom= label when specifying a DOM locator.
   <html>
    <body>
     <form id="loginForm">
      <input name="username" type="text" />
      <input name="password" type="password" />
      <input name="continue" type="submit" value="Login" />
      <input name="continue" type="button" value="Clear" />
     </form>
   </body>
   <html>
dom=document.getElementById('loginForm')(3)dom=document.forms['loginForm'](3)dom=document.forms[0](3)document.forms[0].username(4)document.forms[0].elements['username'](4)document.forms[0].elements[0](4)document.forms[0].elements[3](7)
You can use Selenium itself as well as other sites and extensions to explore the DOM of your web application. A good reference exists on W3Schools.
Locating by CSS
CSS (Cascading Style Sheets) is a language for describing the rendering of HTML and XML documents. CSS uses Selectors for binding style properties to elements in the document. These Selectors can be used by Selenium as another locating strategy.
   <html>
    <body>
     <form id="loginForm">
      <input class="required" name="username" type="text" />
      <input class="required passfield" name="password" type="password" />
      <input name="continue" type="submit" value="Login" />
      <input name="continue" type="button" value="Clear" />
     </form>
   </body>
   <html>
css=form#loginForm(3)css=input[name="username"](4)css=input.required[type="text"](4)css=input.passfield(5)css=#loginForm input[type="button"](7)css=#loginForm input:nth-child(2)(5)
For more information about CSS Selectors, the best place to go is the W3C publication. You’ll find additional references there.
Implicit Locators
You can choose to omit the locator type in the following situations:
Locators without an explicitly defined locator strategy will default to using the identifier locator strategy. See
Locating by Identifier_.Locators starting with “//” will use the XPath locator strategy. See
Locating by XPath_.Locators starting with “document” will use the DOM locator strategy. See
Locating by DOM_
Matching Text Patterns
Like locators, patterns are a type of parameter frequently required by Selenese commands. Examples of commands which require patterns are verifyTextPresent, verifyTitle, verifyAlert, assertConfirmation, verifyText, and verifyPrompt. And as has been mentioned above, link locators can utilize a pattern. Patterns allow you to describe, via the use of special characters, what text is expected rather than having to specify that text exactly.
There are three types of patterns: globbing, regular expressions, and exact.
Globbing Patterns
Most people are familiar with globbing as it is utilized in
filename expansion at a DOS or Unix/Linux command line such as ls *.c.
In this case, globbing is used to display all the files ending with a .c
extension that exist in the current directory. Globbing is fairly limited.
Only two special characters are supported in the Selenium implementation:
* which translates to “match anything,” i.e., nothing, a single character, or many characters.
[ ] (character class) which translates to “match any single character
found inside the square brackets.” A dash (hyphen) can be used as a shorthand
to specify a range of characters (which are contiguous in the ASCII character
set). A few examples will make the functionality of a character class clear:
[aeiou] matches any lowercase vowel
[0-9] matches any digit
[a-zA-Z0-9] matches any alphanumeric character
In most other contexts, globbing includes a third special character, the ?. However, Selenium globbing patterns only support the asterisk and character class.
To specify a globbing pattern parameter for a Selenese command, you can prefix the pattern with a glob: label. However, because globbing patterns are the default, you can also omit the label and specify just the pattern itself.
Below is an example of two commands that use globbing patterns. The actual link text on the page being tested was “Film/Television Department”; by using a pattern rather than the exact text, the click command will work even if the link text is changed to “Film & Television Department” or “Film and Television Department”. The glob pattern’s asterisk will match “anything or nothing” between the word “Film” and the word “Television”.
| Command | Target | Value |
|---|---|---|
| click | link=glob:Film*Television Department | |
| verifyTitle | glob:*Film*Television* |
The actual title of the page reached by clicking on the link was “De Anza Film And
Television Department - Menu”. By using a pattern rather than the exact
text, the verifyTitle will pass as long as the two words “Film” and “Television” appear
(in that order) anywhere in the page’s title. For example, if
the page’s owner should shorten
the title to just “Film & Television Department,” the test would still pass.
Using a pattern for both a link and a simple test that the link worked (such as
the verifyTitle above does) can greatly reduce the maintenance for such
test cases.
Regular Expression Patterns
Regular expression patterns are the most powerful of the three types
of patterns that Selenese supports. Regular expressions
are also supported by most high-level programming languages, many text
editors, and a host of tools, including the Linux/Unix command-line
utilities grep, sed, and awk. In Selenese, regular
expression patterns allow a user to perform many tasks that would
be very difficult otherwise. For example, suppose your test needed
to ensure that a particular table cell contained nothing but a number.
regexp: [0-9]+ is a simple pattern that will match a decimal number of any length.
Whereas Selenese globbing patterns support only the * and [ ] (character class) features, Selenese regular expression patterns offer the same wide array of special characters that exist in JavaScript. Below are a subset of those special characters:
| PATTERN | MATCH |
|---|---|
| . | any single character |
| [ ] | character class: any single character that appears inside the brackets |
| * | quantifier: 0 or more of the preceding character (or group) |
| + | quantifier: 1 or more of the preceding character (or group) |
| ? | quantifier: 0 or 1 of the preceding character (or group) |
| {1,5} | quantifier: 1 through 5 of the preceding character (or group) |
| | | alternation: the character/group on the left or the character/group on the right |
| ( ) | grouping: often used with alternation and/or quantifier |
Regular expression patterns in Selenese need to be prefixed with
either regexp: or regexpi:. The former is case-sensitive; the
latter is case-insensitive.
A few examples will help clarify how regular expression patterns can be used with Selenese commands. The first one uses what is probably the most commonly used regular expression pattern–.* (“dot star”). This two-character sequence can be translated as “0 or more occurrences of any character” or more simply, “anything or nothing.” It is the equivalent of the one-character globbing pattern * (a single asterisk).
| Command | Target | Value |
|---|---|---|
| click | link=glob:Film*Television Department | |
| verifyTitle | regexp:.*Film.*Television.* |
The example above is functionally equivalent to the earlier example that used globbing patterns for this same test. The only differences are the prefix (regexp: instead of glob:) and the “anything or nothing” pattern (.* instead of just *).
The more complex example below tests that the Yahoo! Weather page for Anchorage, Alaska contains info on the sunrise time:
| Command | Target | Value |
|---|---|---|
| open | http://weather.yahoo.com/forecast/USAK0012.html | |
| verifyTextPresent | regexp:Sunrise: *[0-9]{1,2}:[0-9]{2} [ap]m |
Let’s examine the regular expression above one part at a time:
Sunrise: * | The string Sunrise: followed by 0 or more spaces |
[0-9]{1,2} | 1 or 2 digits (for the hour of the day) |
: | The character : (no special characters involved) |
[0-9]{2} | 2 digits (for the minutes) followed by a space |
[ap]m | “a” or “p” followed by “m” (am or pm) |
Exact Patterns
The exact type of Selenium pattern is of marginal usefulness.
It uses no special characters at all. So, if you needed to look for
an actual asterisk character (which is special for both globbing and
regular expression patterns), the exact pattern would be one way
to do that. For example, if you wanted to select an item labeled
“Real *” from a dropdown, the following code might work or it might not.
The asterisk in the glob:Real * pattern will match anything or nothing.
So, if there was an earlier select option labeled “Real Numbers,” it would
be the option selected rather than the “Real *” option.
| Command | Target | Value |
|---|---|---|
| select | //select | glob:Real * |
In order to ensure that the “Real *” item would be selected, the exact:
prefix could be used to create an exact pattern as shown below:
| Command | Target | Value |
|---|---|---|
| select | //select | exact:Real * |
But the same effect could be achieved via escaping the asterisk in a regular expression pattern:
| Command | Target | Value |
|---|---|---|
| select | //select | regexp:Real \* |
It’s rather unlikely that most testers will ever need to look for an asterisk or a set of square brackets with characters inside them (the character class for globbing patterns). Thus, globbing patterns and regular expression patterns are sufficient for the vast majority of us.
The “AndWait” Commands
The difference between a command and its AndWait alternative is that the regular command (e.g. click) will do the action and continue with the following command as fast as it can, while the AndWait alternative (e.g. clickAndWait) tells Selenium to wait for the page to load after the action has been done.
The AndWait alternative is always used when the action causes the browser to navigate to another page or reload the present one.
Be aware, if you use an AndWait command for an action that does not trigger a navigation/refresh, your test will fail. This happens because Selenium will reach the AndWait’s timeout without seeing any navigation or refresh being made, causing Selenium to raise a timeout exception.
The waitFor Commands in AJAX applications
In AJAX driven web applications, data is retrieved from server without refreshing the page. Using andWait commands will not work as the page is not actually refreshed. Pausing the test execution for a certain period of time is also not a good approach as web element might appear later or earlier than the stipulated period depending on the system’s responsiveness, load or other uncontrolled factors of the moment, leading to test failures. The best approach would be to wait for the needed element in a dynamic period and then continue the execution as soon as the element is found.
This is done using waitFor commands, as waitForElementPresent or waitForVisible, which wait dynamically, checking for the desired condition every second and continuing to the next command in the script as soon as the condition is met.
Sequence of Evaluation and Flow Control
When a script runs, it simply runs in sequence, one command after another.
Selenese, by itself, does not support condition statements (if-else, etc.) or iteration (for, while, etc.). Many useful tests can be conducted without flow control. However, for a functional test of dynamic content, possibly involving multiple pages, programming logic is often needed.
When flow control is needed, there are three options:
a) Run the script using Selenium-RC and a client library such as Java or
PHP to utilize the programming language’s flow control features.
b) Run a small JavaScript snippet from within the script using the storeEval command.
c) Install the goto_sel_ide.js extension.
Most testers will export the test script into a programming language file that uses the Selenium-RC API (see the Selenium-IDE chapter). However, some organizations prefer to run their scripts from Selenium-IDE whenever possible (for instance, when they have many junior-level people running tests for them, or when programming skills are lacking). If this is your case, consider a JavaScript snippet or the goto_sel_ide.js extension.
Store Commands and Selenium Variables
You can use Selenium variables to store constants at the beginning of a script. Also, when combined with a data-driven test design (discussed in a later section), Selenium variables can be used to store values passed to your test program from the command-line, from another program, or from a file.
The plain store command is the most basic of the many store commands and can be used to simply store a constant value in a Selenium variable. It takes two parameters, the text value to be stored and a Selenium variable. Use the standard variable naming conventions of only alphanumeric characters when choosing a name for your variable.
| Command | Target | Value |
|---|---|---|
| store | paul@mysite.org |
Later in your script, you’ll want to use the stored value of your variable. To access the value of a variable, enclose the variable in curly brackets ({}) and precede it with a dollar sign like this.
| Command | Target | Value |
|---|---|---|
| verifyText | //div/p | \${userName} |
A common use of variables is for storing input for an input field.
| Command | Target | Value |
|---|---|---|
| type | id=login | \${userName} |
Selenium variables can be used in either the first or second parameter and are interpreted by Selenium prior to any other operations performed by the command. A Selenium variable may also be used within a locator expression.
An equivalent store command exists for each verify and assert command. Here are a couple more commonly used store commands.
storeElementPresent
This corresponds to verifyElementPresent. It simply stores a boolean value–“true” or “false”–depending on whether the UI element is found.
storeText
StoreText corresponds to verifyText. It uses a locator to identify specific page text. The text, if found, is stored in the variable. StoreText can be used to extract text from the page being tested.
storeEval
This command takes a script as its first parameter. Embedding JavaScript within Selenese is covered in the next section. StoreEval allows the test to store the result of running the script in a variable.
JavaScript and Selenese Parameters
JavaScript can be used with two types of Selenese parameters: script and non-script (usually expressions). In most cases, you’ll want to access and/or manipulate a test case variable inside the JavaScript snippet used as a Selenese parameter. All variables created in your test case are stored in a JavaScript associative array. An associative array has string indexes rather than sequential numeric indexes. The associative array containing your test case’s variables is named storedVars. Whenever you wish to access or manipulate a variable within a JavaScript snippet, you must refer to it as storedVars[‘yourVariableName’].
JavaScript Usage with Script Parameters
Several Selenese commands specify a script parameter including assertEval, verifyEval, storeEval, and waitForEval. These parameters require no special syntax. A Selenium-IDE user would simply place a snippet of JavaScript code into the appropriate field, normally the Target field (because a script parameter is normally the first or only parameter).
The example below illustrates how a JavaScript snippet can be used to perform a simple numerical calculation:
| Command | Target | Value |
|---|---|---|
| store | 10 | hits |
| storeXpathCount | //blockquote | blockquotes |
| storeEval | storedVars[‘hits’].storedVars[‘blockquotes’] | paragraphs |
This next example illustrates how a JavaScript snippet can include calls to
methods, in this case the JavaScript String object’s toUpperCase method
and toLowerCase method.
| Command | Target | Value |
|---|---|---|
| store | Edith Wharton | name |
| storeEval | storedVars[’name’].toUpperCase() | uc |
| storeEval | storedVars[’name’].toUpperCase() | lc |
JavaScript Usage with Non-Script Parameters
JavaScript can also be used to help generate values for parameters, even
when the parameter is not specified to be of type script.
However, in this case, special syntax is required–the entire parameter
value must be prefixed by javascript{ with a trailing }, which encloses the JavaScript
snippet, as in javascript{*yourCodeHere*}.
Below is an example in which the type command’s second parameter
value is generated via JavaScript code using this special syntax:
| Command | Target | Value |
|---|---|---|
| store | league of nations | searchString |
| type | q | javascript{storedVars[‘searchString’].toUpperCase()} |
echo - The Selenese Print Command
Selenese has a simple command that allows you to print text to your test’s output. This is useful for providing informational progress notes in your test which display on the console as your test is running. These notes also can be used to provide context within your test result reports, which can be useful for finding where a defect exists on a page in the event your test finds a problem. Finally, echo statements can be used to print the contents of Selenium variables.
| Command | Target | Value |
|---|---|---|
| echo | Testing page footer now. | |
| echo | Username is \${userName} |
Alerts, Popups, and Multiple Windows
Suppose that you are testing a page that looks like this.
  <!DOCTYPE HTML>
  <html>
  <head>
    <script type="text/javascript">
      function output(resultText){
        document.getElementById('output').childNodes[0].nodeValue=resultText;
      }

      function show_confirm(){
        var confirmation=confirm("Chose an option.");
        if (confirmation==true){
          output("Confirmed.");
        }
        else{
          output("Rejected!");
        }
      }

      function show_alert(){
        alert("I'm blocking!");
        output("Alert is gone.");
      }
      function show_prompt(){
        var response = prompt("What's the best web QA tool?","Selenium");
        output(response);
      }
      function open_window(windowName){
        window.open("newWindow.html",windowName);
      }
      </script>
  </head>
  <body>

    <input type="button" id="btnConfirm" onclick="show_confirm()" value="Show confirm box" />
    <input type="button" id="btnAlert" onclick="show_alert()" value="Show alert" />
    <input type="button" id="btnPrompt" onclick="show_prompt()" value="Show prompt" />
    <a href="newWindow.html" id="lnkNewWindow" target="_blank">New Window Link</a>
    <input type="button" id="btnNewNamelessWindow" onclick="open_window()" value="Open Nameless Window" />
    <input type="button" id="btnNewNamedWindow" onclick="open_window('Mike')" value="Open Named Window" />

    <br />
    <span id="output">
    </span>
  </body>
  </html>
The user must respond to alert/confirm boxes, as well as moving focus to newly opened popup windows. Fortunately, Selenium can cover JavaScript pop-ups.
But before we begin covering alerts/confirms/prompts in individual detail, it is helpful to understand the commonality between them. Alerts, confirmation boxes and prompts all have variations of the following
| Command | Description |
|---|---|
| assertFoo(pattern) | throws error if pattern doesn’t match the text of the pop-up |
| assertFooPresent | throws error if pop-up is not available |
| assertFooNotPresent | throws error if any pop-up is present |
| storeFoo(variable) | stores the text of the pop-up in a variable |
| storeFooPresent(variable) | stores the text of the pop-up in a variable and returns true or false |
When running under Selenium, JavaScript pop-ups will not appear. This is because
the function calls are actually being overridden at runtime by Selenium’s own
JavaScript. However, just because you cannot see the pop-up doesn’t mean you don’t
have to deal with it. To handle a pop-up, you must call its assertFoo(pattern)
function. If you fail to assert the presence of a pop-up your next command will be
blocked and you will get an error similar to the following [error] Error: There was an unexpected Confirmation! [Chose an option.]
Alerts
Let’s start with alerts because they are the simplest pop-up to handle. To begin, open the HTML sample above in a browser and click on the “Show alert” button. You’ll notice that after you close the alert the text “Alert is gone.” is displayed on the page. Now run through the same steps with Selenium IDE recording, and verify the text is added after you close the alert. Your test will look something like this:
| Command | Target | Value |
|---|---|---|
| open | / | |
| click | btnAlert | |
| assertAlert | I’m blocking! | |
| verifyTextPresent | Alert is gone. |
You may be thinking “That’s odd, I never tried to assert that alert.” But this is
Selenium-IDE handling and closing the alert for you. If you remove that step and replay
the test you will get the following error [error] Error: There was an unexpected Alert! [I'm blocking!]. You must include an assertion of the alert to acknowledge
its presence.
If you just want to assert that an alert is present but either don’t know or don’t care
what text it contains, you can use assertAlertPresent. This will return true or false,
with false halting the test.
Confirmations
Confirmations behave in much the same way as alerts, with assertConfirmation and
assertConfirmationPresent offering the same characteristics as their alert counterparts.
However, by default Selenium will select OK when a confirmation pops up. Try recording
clicking on the “Show confirm box” button in the sample page, but click on the “Cancel” button
in the popup, then assert the output text. Your test may look something like this:
| Command | Target | Value |
|---|---|---|
| open | / | |
| click | btnConfirm | |
| chooseCancelOnNextConfirmation | ||
| assertConfirmation | Choose an option. | |
| verifyTextPresent | Rejected |
The chooseCancelOnNextConfirmation function tells Selenium that all following
confirmation should return false. It can be reset by calling chooseOkOnNextConfirmation.
You may notice that you cannot replay this test, because Selenium complains that there is an unhandled confirmation. This is because the order of events Selenium-IDE records causes the click and chooseCancelOnNextConfirmation to be put in the wrong order (it makes sense if you think about it, Selenium can’t know that you’re cancelling before you open a confirmation) Simply switch these two commands and your test will run fine.
Prompts
Prompts behave in much the same way as alerts, with assertPrompt and assertPromptPresent
offering the same characteristics as their alert counterparts. By default, Selenium will wait for
you to input data when the prompt pops up. Try recording clicking on the “Show prompt” button in
the sample page and enter “Selenium” into the prompt. Your test may look something like this:
| Command | Target | Value |
|---|---|---|
| open | / | |
| answerOnNextPrompt | Selenium! | |
| click | id=btnPrompt | |
| assertPrompt | What’s the best web QA tool? | |
| verifyTextPresent | Selenium! |
If you choose cancel on the prompt, you may notice that answerOnNextPrompt will simply show a target of blank. Selenium treats cancel and a blank entry on the prompt basically as the same thing.
Debugging
Debugging means finding and fixing errors in your test case. This is a normal part of test case development.
We won’t teach debugging here as most new users to Selenium will already have some basic experience with debugging. If this is new to you, we recommend you ask one of the developers in your organization.
Breakpoints and Startpoints
The Sel-IDE supports the setting of breakpoints and the ability to start and stop the running of a test case, from any point within the test case. That is, one can run up to a specific command in the middle of the test case and inspect how the test case behaves at that point. To do this, set a breakpoint on the command just before the one to be examined.
To set a breakpoint, select a command, right-click, and from the context menu select Toggle Breakpoint. Then click the Run button to run your test case from the beginning up to the breakpoint.
It is also sometimes useful to run a test case from somewhere in the middle to
the end of the test case or up to a breakpoint that follows the starting point.
For example, suppose your test case first logs into the website and then
performs a series of tests and you are trying to debug one of those tests.
However, you only need to login once, but you need to keep rerunning your
tests as you are developing them. You can login once, then run your test case
from a startpoint placed after the login portion of your test case. That will
prevent you from having to manually logout each time you rerun your test case.
To set a startpoint, select a command, right-click, and from the context menu select Set/Clear Start Point. Then click the Run button to execute the test case beginning at that startpoint.
Stepping Through a Testcase
To execute a test case one command at a time (“step through” it), follow these steps:
Start the test case running with the Run button from the toolbar.
Immediately pause the executing test case with the Pause button.
Repeatedly select the Step button.
Find Button
The Find button is used to see which UI element on the currently displayed
webpage (in the browser) is used in the currently selected Selenium command.
This is useful when building a locator for a command’s first parameter (see the
section on :ref:locators <locators-section> in the Selenium Commands chapter).
It can be used with any command that identifies a UI element on a webpage,
i.e. click, clickAndWait, type, and certain assert and verify commands,
among others.
From Table view, select any command that has a locator parameter.
Click the Find button.
Now look on the webpage: There should be a bright green rectangle
enclosing the element specified by the locator parameter.
Page Source for Debugging
Often, when debugging a test case, you simply must look at the page source (the
HTML for the webpage you’re trying to test) to determine a problem. Firefox
makes this easy. Simply right-click the webpage and select ‘View->Page Source.
The HTML opens in a separate window. Use its Search feature (Edit=>Find)
to search for a keyword to find the HTML for the UI element you’re trying
to test.
Alternatively, select just that portion of the webpage for which you want to see the source. Then right-click the webpage and select View Selection Source. In this case, the separate HTML window will contain just a small amount of source, with highlighting on the portion representing your selection.
Locator Assistance
Whenever Selenium-IDE records a locator-type argument, it stores additional information which allows the user to view other possible locator-type arguments that could be used instead. This feature can be very useful for learning more about locators, and is often needed to help one build a different type of locator than the type that was recorded.
This locator assistance is presented on the Selenium-IDE window as a drop-down
list accessible at the right end of the Target field
(only when the Target field contains a recorded locator-type argument).
Below is a snapshot showing the
contents of this drop-down for one command. Note that the first column of
the drop-down provides alternative locators, whereas the second column
indicates the type of each alternative.
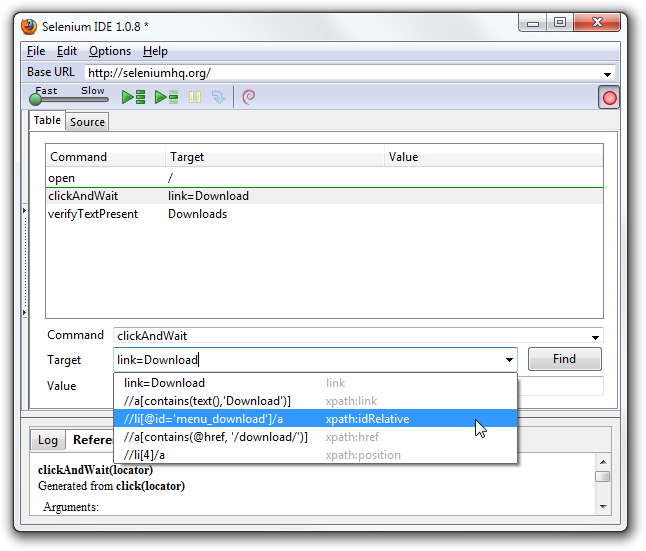
Writing a Test Suite
A test suite is a collection of test cases which is displayed in the leftmost
pane in the IDE.
The test suite pane can be manually opened or closed via selecting a small dot
halfway down the right edge of the pane (which is the left edge of the
entire Selenium-IDE window if the pane is closed).
The test suite pane will be automatically opened when an existing test suite is opened or when the user selects the New Test Case item from the File menu. In the latter case, the new test case will appear immediately below the previous test case.
Selenium-IDE also supports loading pre-existing test cases by using the File -> Add Test Case menu option. This allows you to add existing test cases to a new test suite.
A test suite file is an HTML file containing a one-column table. Each cell of each row in the
section contains a link to a test case. The example below is of a test suite containing four test cases:<html>
<head>
<meta http-equiv="Content-Type" content="text/html; charset=UTF-8">
<title>Sample Selenium Test Suite</title>
</head>
<body>
<table cellpadding="1" cellspacing="1" border="1">
<thead>
<tr><td>Test Cases for De Anza A-Z Directory Links</td></tr>
</thead>
<tbody>
<tr><td><a href="./a.html">A Links</a></td></tr>
<tr><td><a href="./b.html">B Links</a></td></tr>
<tr><td><a href="./c.html">C Links</a></td></tr>
<tr><td><a href="./d.html">D Links</a></td></tr>
</tbody>
</table>
</body>
</html>
Note: Test case files should not have to be co-located with the test suite file that invokes them. And on Mac OS and Linux systems, that is indeed the case. However, at the time of this writing, a bug prevents Windows users from being able to place the test cases elsewhere than with the test suite that invokes them.
User Extensions
User extensions are JavaScript files that allow one to create his or her own customizations and features to add additional functionality. Often this is in the form of customized commands although this extensibility is not limited to additional commands.
There are a number of useful extensions_ created by users.
IMPORTANT: THIS SECTION IS OUT OF DATE–WE WILL BE REVISING THIS SOON.
.. _goto_sel_ide.js extension:
Perhaps the most popular of all Selenium-IDE extensions is one which provides flow control in the form of while loops and primitive conditionals. This extension is the goto_sel_ide.js_. For an example of how to use the functionality provided by this extension, look at the page_ created by its author.
To install this extension, put the pathname to its location on your computer in the Selenium Core extensions field of Selenium-IDE’s Options=>Options=>General tab.
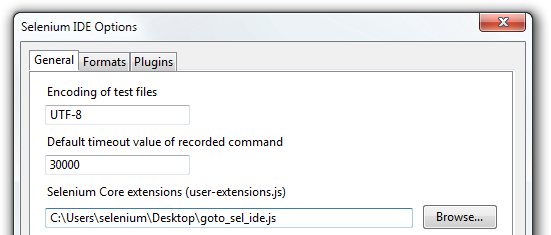
After selecting the OK button, you must close and reopen Selenium-IDE in order for the extensions file to be read. Any change you make to an extension will also require you to close and reopen Selenium-IDE.
Information on writing your own extensions can be found near the bottom of the Selenium Reference_ document.
Sometimes it can prove very useful to debug step by step Selenium IDE and your User Extension. The only debugger that appears able to debug XUL/Chrome based extensions is Venkman which is supported in Firefox until version 32 included. The step by step debug has been verified to work with Firefox 32 and Selenium IDE 2.9.0.
Format
Format, under the Options menu, allows you to select a language for saving and displaying the test case. The default is HTML.
If you will be using Selenium-RC to run your test cases, this feature is used to translate your test case into a programming language. Select the language, e.g. Java, PHP, you will be using with Selenium-RC for developing your test programs. Then simply save the test case using File=>Export Test Case As. Your test case will be translated into a series of functions in the language you choose. Essentially, program code supporting your test is generated for you by Selenium-IDE.
Also, note that if the generated code does not suit your needs, you can alter
it by editing a configuration file which defines the generation process.
Each supported language has configuration settings which are editable. This
is under the Options=>Options=>Formats tab.
Executing Selenium-IDE Tests on Different Browsers
While Selenium-IDE can only run tests against Firefox, tests
developed with Selenium-IDE can be run against other browsers, using a
simple command-line interface that invokes the Selenium-RC server. This topic
is covered in the :ref:Run Selenese tests <html-suite> section on Selenium-RC
chapter. The -htmlSuite command-line option is the particular feature of interest.
Troubleshooting
Below is a list of image/explanation pairs which describe frequent sources of problems with Selenium-IDE:
Table view is not available with this format.
This message can be occasionally displayed in the Table tab when Selenium IDE is launched. The workaround is to close and reopen Selenium IDE. See issue 1008. for more information. If you are able to reproduce this reliably then please provide details so that we can work on a fix.
error loading test case: no command found
You’ve used File=>Open to try to open a test suite file. Use File=>Open Test Suite instead.
An enhancement request has been raised to improve this error message. See issue 1010.
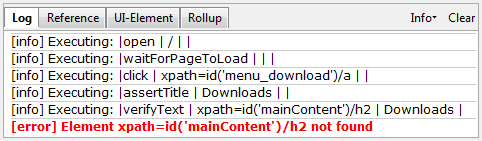
This type of error may indicate a timing problem, i.e., the element specified by a locator in your command wasn’t fully loaded when the command was executed. Try putting a pause 5000 before the command to determine whether the problem is indeed related to timing. If so, investigate using an appropriate waitFor* or *AndWait command before the failing command.
Whenever your attempt to use variable substitution fails as is the case for the open command above, it indicates that you haven’t actually created the variable whose value you’re trying to access. This is sometimes due to putting the variable in the Value field when it should be in the Target field or vice versa. In the example above, the two parameters for the store command have been erroneously placed in the reverse order of what is required. For any Selenese command, the first required parameter must go in the Target field, and the second required parameter (if one exists) must go in the Value field.
error loading test case: [Exception… “Component returned failure code: 0x80520012 (NS_ERROR_FILE_NOT_FOUND) [nsIFileInputStream.init]” nresult: “0x80520012 (NS_ERROR_FILE_NOT_FOUND)” location: “JS frame :: chrome://selenium-ide/content/file-utils.js :: anonymous :: line 48” data: no]
One of the test cases in your test suite cannot be found. Make sure that the test case is indeed located where the test suite indicates it is located. Also, make sure that your actual test case files have the .html extension both in their filenames, and in the test suite file where they are referenced.
An enhancement request has been raised to improve this error message. See issue 1011.
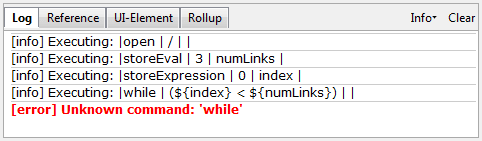
Your extension file’s contents have not been read by Selenium-IDE. Be sure you have specified the proper pathname to the extensions file via Options=>Options=>General in the Selenium Core extensions field. Also, Selenium-IDE must be restarted after any change to either an extensions file or to the contents of the Selenium Core extensions field.
4.1 - HTML runner
Selenium HTML-runner allows you to run Test Suites from a command line. Test Suites are HTML exports from Selenium IDE or compatible tools.
Common information
- Combination of releases of geckodriver / firefox / selenium-html-runner matters. There might be a software compatibility matrix somewhere.
- selenium-html-runner runs only Test Suite (not Test Case - for example an export from Monitis Transaction Monitor). Be sure you comply with this.
- For Linux users with no DISPLAY - you need to start html-runner with Virtual display (search for xvfb)
Example Linux environment
Install / download following software packages:
[user@localhost ~]$ cat /etc/redhat-release
CentOS Linux release 7.4.1708 (Core)

[user@localhost ~]$ rpm -qa | egrep -i "xvfb|java-1.8|firefox"
xorg-x11-server-Xvfb-1.19.3-11.el7.x86_64
firefox-52.4.0-1.el7.centos.x86_64
java-1.8.0-openjdk-1.8.0.151-1.b12.el7_4.x86_64
java-1.8.0-openjdk-headless-1.8.0.151-1.b12.el7_4.x86_64
Test Suite example:
[user@localhost ~]$ cat testsuite.html
<?xml version="1.0" encoding="UTF-8"?>
<!DOCTYPE html PUBLIC "-//W3C//DTD XHTML 1.0 Strict//EN" "http://www.w3.org/TR/xhtml1/DTD/xhtml1-strict.dtd">
<html xmlns="http://www.w3.org/1999/xhtml" xml:lang="en" lang="en">
<head>
  <meta content="text/html; charset=UTF-8" http-equiv="content-type" />
  <title>Test Suite</title>
</head>
<body>
<table id="suiteTable" cellpadding="1" cellspacing="1" border="1" class="selenium"><tbody>
<tr><td><b>Test Suite</b></td></tr>
<tr><td><a href="YOUR-TEST-SCENARIO.html">YOUR-TEST-SCENARIO</a></td></tr>
</tbody></table>
</body>
</html>
How to run selenium-html-runner headless
Now, the most important part, an example of how to run the selenium-html-runner! Your experience might vary depending on software combinations - geckodriver/FF/html-runner releases.
xvfb-run java -Dwebdriver.gecko.driver=/home/mmasek/geckodriver.0.18.0 -jar selenium-html-runner-3.7.1.jar -htmlSuite "firefox" "https://YOUR-BASE-URL" "$(pwd)/testsuite.html" "results.html" ; grep result: -A1 results.html/firefox.results.html
[user@localhost ~]$ xvfb-run java -Dwebdriver.gecko.driver=/home/mmasek/geckodriver.0.18.0 -jar selenium-html-runner-3.7.1.jar -htmlSuite "*firefox" "https://YOUR-BASE-URL" "$(pwd)/testsuite.html" "results.html" ; grep result: -A1 results.html/firefox.results.html
Multi-window mode is longer used as an option and will be ignored.
1510061109691   geckodriver     INFO    geckodriver 0.18.0
1510061109708   geckodriver     INFO    Listening on 127.0.0.1:2885
1510061110162   geckodriver::marionette INFO    Starting browser /usr/bin/firefox with args ["-marionette"]
1510061111084   Marionette      INFO    Listening on port 43229
1510061111187   Marionette      WARN    TLS certificate errors will be ignored for this session
Nov 07, 2017 1:25:12 PM org.openqa.selenium.remote.ProtocolHandshake createSession
INFO: Detected dialect: W3C
2017-11-07 13:25:12.714:INFO::main: Logging initialized @3915ms to org.seleniumhq.jetty9.util.log.StdErrLog
2017-11-07 13:25:12.804:INFO:osjs.Server:main: jetty-9.4.z-SNAPSHOT
2017-11-07 13:25:12.822:INFO:osjsh.ContextHandler:main: Started o.s.j.s.h.ContextHandler@87a85e1{/tests,null,AVAILABLE}
2017-11-07 13:25:12.843:INFO:osjs.AbstractConnector:main: Started ServerConnector@52102734{HTTP/1.1,[http/1.1]}{0.0.0.0:31892}
2017-11-07 13:25:12.843:INFO:osjs.Server:main: Started @4045ms
Nov 07, 2017 1:25:13 PM org.openqa.selenium.server.htmlrunner.CoreTestCase run
INFO: |open | /auth_mellon.php |  |
Nov 07, 2017 1:25:14 PM org.openqa.selenium.server.htmlrunner.CoreTestCase run
INFO: |waitForPageToLoad | 3000 |  |
.
.
.etc

<td>result:</td>
<td>PASS</td>
4.2 - Legacy Selenium IDE Release Notes
This documentation previously located on the wiki
2.9.1 - to be released
- Fix - Fixes https://github.com/SeleniumHQ/selenium/issues/396
- Fix - Changed Google code links to GitHub.
- Enh - Merged official language plugins into the main xpi eliminating the need for multi-xpi with the main xpi and multiple language plugin xpis.
- Fix - Fixes https://github.com/SeleniumHQ/selenium/issues/570
2.9.0
- Enh - Schedule tests for automatic playback at a certain time or periodic intervals. (http://blog.reallysimplethoughts.com/2015/03/09/selenium-ide-scheduler-has-arrived-part-1/)
- Enh - Allow submission of diagnostic information via a gist.
- Enh - Improved health logging, including alerts normally hidden.
2.8.0
- New - Added visual assist option to help users requiring stronger constrast in colors, turned off by default. Turn it on from the Options dialog. - Issue 7696 (on Google Code)
- New - Health Service to catch unhandled exceptions, statistics, metrics and diagnostics
- Enh - Added Search Issues menu item in Help menu to make it easier to search all issues so that we do not get so many duplicate reports of the same issue
- Fix - Fixed broken autocomplete - issue 7928 (on Google Code)
- Fix - Fixed cancelling of select button when page is reloaded - issue 7793 (on Google Code)
- Fix - Adding select button to the sidebar and reduced button size - issue 7815 (on Google Code)
2.7.0
- Fix - Fixed switching between tabs in the bottom info panel in FF32 - issue 7824 (on Google Code)
- Fix - Fixes for https://bugzilla.mozilla.org/show_bug.cgi?id=1016305
- Enh - Let comments (and commands) span the full width of the commands table
- Enh - Show the result of the test case in the log after it has been played
- Enh - Group items in the Action menu by function
- Enh - Collect more statistics about test case and suite including running time for reporting purposes
- Enh - Improved listboxes supporting drag and drop reordering
- Enh - Provide common utility function for plugin authors to deal with files
- Enh - Allow pressing tab in the command text box to accept the current autocomplete and move to the target text box
- Enh - Select an autocomplete match when typing in the command text box to speed up manual entry of commands
- Enh - Make promises implementation available via deferred.js for plugin developers
- Enh - Make simple http functions available for plugin developers
- Enh - Easier to use confirmations for internal use and for plugins
- Fix - Disable autocomplete when editing comments
- Fix - Fixed error TypeError: command.isRollup is not a function
- Fix - Fixed TypeError: debugContext.currentCommand is undefined
- Fix - Fixed TypeError: this.treebox is undefined treeView.js
- Fix - Various errors when selecting a comment (usually hidden from the user)
- Fix - Incorrect doctype in overlay
- Fix - Adding Selenium IDE item under Settings->Developer menu - issue 7268 (on Google Code)
- Fix - Ignore Firefox developer tools while recording
2.6.0
- Fix - Fixed broken autocompletion in FF31+ - issue 7645 (on Google Code)
- Fix - Fixed options validation on options reset - issue 1050 (on Google Code)
- Fix - Fixed C# code formatting for select elements
2.5.0
- Enh - Select an element for a command by clicking on the element in the browser window (http://blog.reallysimplethoughts.com/2014/01/05/manually-adding-and-updating-element-locators-the-easy-way/)
- Enh - Start playing a test suite from any test case (Using right click menu) - issue 1987 (on Google Code)
- Enh - Add a new test case using a keyboard shortcut (ctrl-N or cmd+N)
- Fix - Fixed delete test case through right click menu was sometimes disabled - issue 5003 (on Google Code)
- Fix - Fixed Selenium IDE icon is sometimes not visible - issue 5712 (on Google Code)
- Fix - Fixed selectWindow using a variable - issue 3270 (on Google Code)
- Some minor changes
2.4.0
- Enh - Base URL history, recent test cases and recent test suites can be cleared - issue 6135 (on Google Code)
- Enh - Special key now have shorter names (http://blog.reallysimplethoughts.com/2013/09/25/using-special-keys-in-selenium-ide-part-2/)
- Enh - Support for user extensions in Webdriver playback - issue 5675 (on Google Code)
- Fix - The recording of entering text in fields uses type instead of sendKeys.
- Enh - When developer tools are active, the last open test case or suite is automatically opened
- Fix - Fixed is
*commands in Webdriver playback in Selenium IDE - issue 6118 (on Google Code) - Enh - Adding ability to show commands as deprecated in Selenium IDE and smartness to show the correct alternative command
- Enh - Deprecating Selenium IDE commands
*TextPresent, typeKeys, keyUp, keyDown and keyPress - Enh - Import json library in exported Ruby Webdriver tests
- Enh - Adding support for waitFor
*and waitForNot*commands in Webdriver playback - issue 5913 (on Google Code)
2.3.0
- New - Added support for HTML5 input fields recording - issue 3765 (on Google Code)
- New - Recording for sendKeys command
- Enh - Removal of deprecated
*TextPresent commands from right click menu - Fix - Dead object error in recording IDE tests - issue 4761 (on Google Code)
- Fix - Fixed could not continue in recording - issue 5820 (on Google Code)
- Enh - UTF-8 encoded user-extensions.js support - issue 1646 (on Google Code)
- New special keys support for sendKeys in Selenium IDE and webdriver playback - issue #6052 (on Google Code)
- New - Special keys support to sendKeys in all official formatters - issue 6053 (on Google Code) (http://blog.reallysimplethoughts.com/2013/09/25/using-special-keys-in-selenium-ide-part-1/)
- Enh - Plugin api enhancement for specifying formatter type + documentaton comments
- Fix - Invalid XPath error in Firefox 23 - issue 6055 (on Google Code)
- New - Added support for Firefox 23
2.2.0
- Fix - keyUp, keyDown, keyPress, typeKeys fixed on Firefox 22 - issue 5883 (on Google Code), issue 5884 (on Google Code)
2.1.0
- Enh - Plugin system changed (http://blog.reallysimplethoughts.com/2013/07/07/changes-to-selenium-ide-plugin-system/)
- New - Added support for Firefox 22 + 23 beta
- Fix - Click fixed for Firefox 22 - issue 5841 (on Google Code)
2.0.0
- New - WebDriver playback support (http://blog.reallysimplethoughts.com/2013/02/18/webdriver-playback-in-selenium-ide-is-here/)
- New - Added support for Firefox 19 & 20
- New - Selenium IDE icon on toolbar is added on first install
1.10.0
- New - Added support for Firefox 16 & 17
- New - Implemented formatting for alert handling commands
- Bug - Fixed options for Java 4 WebDriver formatter
- Bug - Processing locators before use in getCssCount and getXpathCount. Fixes issue 4784 (on Google Code)
1.9.1
- New - Added support for Firefox 15
- New - Added support for assertTextPresent, verifyTextPresent, waitForTextPresent, assertTextNotPresent, verifyTextNotPresent, waitForTextNotPresent commands to WebDriver formatters. (http://blog.reallysimplethoughts.com/2012/08/26/selenium-ide-webdriver-formatters-updated-to-support-textpresent-commands/)
- New - Added the target and value parameters in comments when the WebDriver formatters do not support the command
1.9.0
- New - Added Selenese command sendKeys (http://blog.reallysimplethoughts.com/2012/07/19/new-selenese-command-sendkeys/)
- New - Better naming of formatters
- New - Added support for Firefox 14
1.8.1
- New - Added support for Firefox 13
1.8.0
- New - Added support for Firefox 12
1.7.2
- Bug - Fixed regression with typing into file input fields - issue 3549 (on Google Code)
1.7.1
- Bug - Fixed regression with stored variables - issue 3520 (on Google Code)
1.7.0
- New - Added additional useful menu items to the help menu
- New - Added support for Firefox 11
- Bug - Stored variables can safely contain consecutive dollar signs - issue 834 (on Google Code)
- Bug - Don’t trim whitespace when decoding HTML testcases - issue 755 (on Google Code)
- New - Formatter menu items are now context sensitive - issue 3327 (on Google Code) and issue 3385 (on Google Code)
- Bug - Fixed Ruby WebDriver test suite export - issue 3243 (on Google Code)
- Bug - File extensions being added to all file pickers - issue 3336 (on Google Code)
- Bug - Record interactions with elements with an id of ‘id’ - issue 3273 (on Google Code)
1.6.0
- New - Added support for Firefox 10
- New - Added keyboard shortcuts to launch Selenium IDE - issue 3028 (on Google Code)
- Bug - Added break command to autocomplete list - issue 3046 (on Google Code)
- Bug - Incorrect tooltip displayed in sidebar - issue 3098 (on Google Code)
- Bug - Improved XPath locator recording when there are multiple matches - issue 3056 (on Google Code)
- Bug - Locators can now be reordered on Mac - issue 3267 (on Google Code)
1.5.0
- New - Added support for Firefox 9
- Bug - Changes to user extensions weren’t being updated in Firefox 8 - issue 2801 (on Google Code)
- Bug - Security error was thrown when trying to type into file (upload) input fields in Firefox 8 - issue 2826 (on Google Code)
- Bug - Improved French locale - issue 1912 (on Google Code)
- Bug - break command was failing - issue 725 (on Google Code)
- Bug - source view is now fixed width (monospace) - issue 522 (on Google Code)
- New - Implemented ‘select’ formatting for WebDriver bindings (Java, C#, Python, Ruby)
- Bug - Fixed compile-time and run-time errors in the code formatted for WebDriverBackedSelenium
- Bug - Fixed ‘baseUrl’ and ‘get’ formatting errors in various formatters to handle relative and absolute URLs
1.4.1
- Bug - Apparently I shipped without switching all the version numbers correctly. (Adam)
1.4.0
- New - Firefox 8 support (again, just a version max version bump)
1.3.0
Was going to be just a quick release to get
- New - Firefox 7 support (again, just a version max version bump)
in, but then I got busy and didn’t push it when I had planned and so now
- New - Order of locators can be controlled through a panel in options.
has leaked in. Most people will want to just leave this the way it is by default. This is brand-spanking-new and allows you to do visually what you could before using a somewhat arcane bit of JS in an extension.
1.2.0
Just a quick release primarily for
- New - Firefox 6 support (which really was just changing the max version number)
But we also snuck in
- Bug - Recorded CSS locator was not W3C clean wrt attributes
- Bug - Deleting of cookies works properly if the cookie name is escaped (such as will ASP sites)
- Bug - If the cookie value has an = in it, the whole cookie is now returned instead of just up to the =
You will also notice that the bundle now only has formatters for the officially supported languages of the project (Java, C#, Python, Ruby). If anyone from the Perl, Groovy or PHP camps wants to take on ownership of those formats we’ll happily help you out.
1.1.0
Hey! Look at that! A slightly more significant version bump! Any why is that? Well…
- New - WebDriver exports for Ruby, Python, C# and Java
Which are the four supported languages of the Selenium project. This also means that Se-IDE is officially deprecating inclusion of the Groovy, Perl and PHP format plugins in the main release bundle. It would be outstanding if the community around those languages picks up their development and maintenance. Read more about the WebDriver exporters on Samit’s blog.
Of course, format switching is still in Experimental purgatory for at least this release. Losing people’s scripts because of bugs is not acceptable and we’re working on it. To ‘goal’ is to have them back for the next release.
Also included in this release are
- New - setIndent(n) is now available to formats for greater control over formatting of export formats
- Bug - There was a performance regression in deep in some shared code that has been addressed.
- New - Rather than recording ‘foo’ for an element which and an id of ‘foo’ it is captured as ‘id=foo’ to be very specific as to which element would be interacted with
- New - Same with ’name’
- New - Popups (alerts, confirms, prompts) and new windows work again
1.0.12
This is a minor release with nothing too huge included. But because the last one didn’t get pushed to the world, it is important to make a note of a big change introduced in 1.0.11.
We have marked the changing of formats as Experimental due to a couple lose-all-your-data bugs. As a result it is disabled in the toolbar by default. To enable it, click the checkbox in the Options menu. And because we really don’t want you to lose your data, when you switch formats you will get a big warning box. This too can be disabled in the Options menu. But if you do both of these things and your script gets sent to the abyss, you have been warned. :)
Changes in this release include the following:
- New - Firefox 5 support
- New - When upgrading Se-IDE, the release notes (these) are shown on first start
- Bug - some Java format changes
- Bug - some PHP format changes
- Bug - the ‘Find’ button works again
- Bug - generated CSS is standards compliant
- New - dropped support for FF 3.5 or older
1.0.11
It has been half a year since our last release of 1.0.10 and we have put a lot of effort to bring you this release. The summary of the contributions to this release is as follows:-
| 73% (22) | Samit Badle |
|---|---|
| 16%( 5) | Adam Goucher |
| 6% (2) | Dave Hunt |
| 3% (1) | Santiago Suarez Ordoñez |
| 3% (1) | Simon Stewart |
Here is the list of changes excluding some minor fixes and code refactoring.
Main Features:
- Firefox 4 support (Issue 1470 (on Google Code), Simon Stewart and Samit Badle)
- New CSS locator builder! Selenium IDE will now create locators using CSS when recording (Santiago Suarez Ordoñez)
- Added more power to the plugin developers through the new Util command builders support (Issue 442 (on Google Code), Samit Badle)
- New command getCssCount (Adam Goucher)
Usability Improvements:
- Selenium IDE is now available from the Web developer menu in Firefox 4 (Issue 1467 (on Google Code), Samit Badle)
- Camel Case search in command text box has been improved allowing you to type vTP for verifyTextPresent command (Samit Badle with Dave Hunt)
- Most actions in Selenium IDE are now accessible through the new Actions menu (Issue 1266 (on Google Code), Samit Badle and Dave Hunt)
- Removed help menu items related to Firefox from Selenium IDE help menu (Issue 1704 (on Google Code), Samit Badle)
- Less prompting when saving test suite (Issue 967 (on Google Code), Samit Badle)
- A method to Reset IDE Window is now available through the Options menu for people having trouble when switching from multiple monitors (Issue 1249 (on Google Code), Samit Badle)
- Show the name of the test case in save dialog (Issue 984 (on Google Code), Samit Badle)
- The preferences for the current format will be automatically shown in options dialog (Samit Badle)
- The plugins pane in the Options dialog now has a splitter (Samit Badle)
- Default Timeout Value field in the Options dialog now mentions a unit (Issue 896 (on Google Code), Adam Goucher)
- Introduced experimental features option to hide some unstable features (Samit Badle)
Bug Fixes:
- Format changing is now marked as experimental due to possible issues, you can turn it on from the options dialog (Samit Badle)
- Fixed the header issue on saving test case in another format (Issue 1164 (on Google Code), Samit Badle)
- Improved alert on changing the format (Issue 1244 (on Google Code), Samit Badle)
- Find button is back on Macs and uses a new way to highlight (Issue 1052 (on Google Code), Samit Badle)
- Recording is possible in the middle of a script again (Issue 968 (on Google Code), Samit Badle)
- Fixed the annoying skip over one command when recording in the middle of the script (Issue 745 (on Google Code), Samit Badle)
- While recording, “clickAndWait” command becomes “click” is now fixed (Issue 419 (on Google Code), Samit Badle)
- Selenium IDE bottom pane folding now works correctly (Issue 614 (on Google Code), Samit Badle)
- Changed the ID of Selenium IDE menu from generic name to avoid clashes with other addons. (Issue 969 (on Google Code), Samit Badle)
Improvements/Fixes Related to Formatters:
- Fixed support for stored variables in PHP formatter (Issue 970 (on Google Code), Samit Badle)
- Allow formatters to customise how set
*is handled (Adam Goucher) - Some bug fixes in PHP formatter (Issue 1281 (on Google Code), Adam Goucher)
- Number type fix (Jeremy Herault)
- New Java formatter: Webdriver backed Junit 4 formatter
- New PHP formatter: Testing selenium formatter (Adam Goucher)
Known Issues:
- Issue 1728 (on Google Code) - Firefox 4 eliminated support for the highlight. So the Find button has stopped working under Firefox 4 on Windows.
- Issue 1729 (on Google Code) - The Plugin pane in the Options dialog is not shownig any text in Firefox 4 on Windows 7.
- Issues have been reported in Selenium IDE on Ubuntu 11, which are not related to Selenium IDE. See comments on issue 1642 (on Google Code).
1.0.10
Another packaging problem broke the various things that used getText(). Which of course is one of the most commonly used bits of the API.
- BUG - properly including se-core atoms
As a result, we’ve started to rebuild the test suite for things. It’s going to take awhile to get the coverage we’re hoping for, but it’ll be worth it if we can go at least 2 days after a release before becoming embarrassed.
Upgrade Notes:
- Due to the atoms being included properly, some of the behaviour around accessing boolean attributes has changed. See http://seleniumhq.wordpress.com/2010/12/09/atoms-have-come-to-selenium-ide/ for details.
1.0.9
What started out as a pretty major change in terms of packaging ended up including two significant bug fixes as well. Hopefully we avoid that sort of thing with the release. Not that I don’t expect it. :)
- BUG - Sizzle CSS library not included
- BUG - Recording works with FF 4.0b7
What 1.0.9 was supposed to only have was…
- NEW - Formatters are all plugins. This effectively separates the development of an individual format from the development of the editor. Now, this means that when you install things for the first time you get a tonne of addons. That is ok. Don’t panic. Oh, and it also means if you don’t want them you have the option to. Not only does this mean fixes to formats get distributed sooner (PHP, I’m looking at you) but 3rd parties will be able to make better packaging choices by having the editor plus their formatters.
Other stuff
- BUG - the JUnit 4 formatter doesn’t try to use a string as the port number
- BUG - the window when creating new formats properly closes now
- BUG - removed the ‘find’ button if on OSX since it doesn’t do anything on this platform (its a FF bug)
- BUG - some hard coded strings have been internationalized
- NEW - autocomplete has been enhanced somewhat - see http://code.google.com/p/selenium/issues/detail?id=992
- BUG - when switching build systems, the icons for menus and such got left out of the package
- BUG - commands are trimmed of whitespace before executing which was sometimes a source of great confusion
- BUG - now preserves whitespace when displaying diffs in the log
1.0.8
This release is primarily to get FF4 support out into the wild since it is getting to the advanced beta phase, but there is also a fair bit of other bug fixes in there as well. About 75% of the fixes in the release are directly the work of Samit Badle and the vast remainder by Jérémy Hérault.
- BUG - There was an annoying bug where ‘clickAndWait’ would be saved as click, but has been fixed. see http://code.google.com/p/selenium/issues/detail?id=419
- NEW -This could arguably be considered a bug fix, but if you changed format from HTML to something else then made an edit and switched back again to HTML your script contents would be lost. At its heart, the HTML -> something conversion is one way and so there is now a warning about possibly losing your code. The warning only happens the first time though so you can still shoot yourself in the foot; its just harder
- BUG - element locator works for table rows. see http://code.google.com/p/selenium/issues/detail?id=485
- BUG - the default timeout setting of se-ide is now actually used. see http://code.google.com/p/selenium/issues/detail?id=552
- NEW - the ‘run in the selenium testrunner’ option has been removed. The supported methods in se-ide are the play single, play suite and if you need more there is always se-rc with a language binding or -htmlSuite
- BUG - the base url wouldn’t change on occasion, much to the frustration of many
- NEW - a JUnit 4 formatter was added
- BUG - the RSpec formatter had some additional tweaks
- BUG - test suite html can now have tests from different folders
- BUG - test suite saving triggers got a bit of attention so add/delete/modify is a little more robust
- NEW - if you resize your se-ide and/or move it around your screen, the size and position are saved between sessions
- BUG - the logic around when to prompt for saving wasn’t really that nice, but its been fixed
- NEW - uses ‘browser atoms’ like the rest of Selenium
- NEW - CSS locator execution is handled through Sizzle
- NEW - can now add multiple test cases to a suite at once
- NEW - addition to the se-ide plugin api to add se-ide extensions to manipulate how recording is done - http://reallysimplethings.wordpress.com/2010/10/11/the-selenium-ide-1-x-plugin-api-part-12-adding-locator-builders/
- NEW - the case of the missing log messages is now solved
- NEW - Firefox 4 support
1.0.7
Only a couple of things of note in this release to end-users which is somewhat silly since it is a month overdue, but that was due to some build changes that took a bit of work to get the kinks worked out. Should be ok now though.
- NEW - you can now drag-and-drop command around instead of the cut-insert-paste dance that you used to have to do (Jérémy Hérault)
- NEW - same thing with tests in the test suite panel (Jérémy Hérault)
- NEW - an new optional parameter when registering you se-ide plugin to allow for command exporting. see http://adam.goucher.ca/?p=1456 for details (Adam Goucher)
- NEW - Swedish locale sv-SE now has translations (Olle Jonsson)
- BUG - Some people were reporting an annoying popup when starting se-ide without any plugins installed (Adam oucher)
1.0.6
The big thing in this release is that the scary log message that was showing up on ‘open’ is fixed. The other big things are:
- BUG - The scary log message that was happening when you used ‘open’ has had its underlying cause fixed (Adam Goucher, Jérémy Hérault)
- BUG - fixed a build issue with FF 3.6 and type-ahead for commands (Jérémy Hérault)
- BUG - fixed some PHP export issues - see http://jira.openqa.org/browse/SIDE-346 and http://jira.openqa.org/browse/SIDE-183 (Adam Goucher)
- BUG - there was a packaging issue around user-extensions (Adam Goucher)
- BUG - ide won’t put ’name=’ as the Target when recording a selectWindow (David Burns)
- BUG - to avoid confusion, when viewing formatter source, if it is read-only the button says ‘ok’ and if it is editable then it is ‘save’ (Jérémy Hérault)
- NEW - you can now set a preference on whether you want record to be on or off when you start ide (Adam Goucher)
- NEW - se-ide plugin information is read from the plugin’s install.rdf (most people won’t care about this, but its pretty cool from a geek perspective)
1.0.5
One thing that does not really fit the BUG or NEW label is that the code for Se-IDE is now in the main repo rather than tucked away in a somewhat hidden location.
- BUG - user formats were not appearing in the list (Adam Goucher)
- BUG - constrained how iframes were loaded; which is why AMO was unhappy (Adam Goucher)
- BUG - a whole bunch of tweaks to the existing formats (Dave Hunt)
- BUG - a bunch of French translation fixes / additions (Jérémy Hérault)
- BUG - the reload user extensions button only shows up if you have the developer tool checkbox checked (Jérémy Hérault)
- BUG - labelling access keys on test runner (Olle Jonsson)
- BUG - cleaned up a bunch of references from OpenQA to SeleniumHQ (Olle Jonsson)
- BUG - had an = instead of == (Olle Jonsson)
- BUG - adding a bunch of ;’s to make jslint shut up (Olle Jonsson)
- BUG - getting rid of the ‘setting something that only has a getter’ message in Firefox 3.6 (Dan Fabulich)
- NEW - self hosting of updates to avoid delays at AMO (Adam Goucher)
- NEW - the version of se-ide is now in the title bar (Adam Goucher)
- NEW - added some Se-IDE specific icons here and there (Adam Goucher, Dave Hunt)
- NEW - preferences can now be Bool’s as well (Adam Goucher)
- NEW - added addPlugin(id) to the plugin API (Adam Goucher)
- NEW - added a new panel to the Options screen around plugins. It doesn’t do much now other than list the plugins that registered themselves through addPlugin, but should do more for 1.0.6 (Adam Goucher)
1.0.4
Selenium IDE 1.0.4 marks a resurgence in the project with releases planned for the middle of each month. Here are the changes that have happened between versions 1.0.2 and 1.0.4 of Selenium IDE. (Don’t ask what happened to version 1.0.3)
- BUG - Supported Firefox version increased to include the 3.6 series (Santiago Suarez Ordoñez)
- BUG - Removed the Ruby formatter that was flagged as ‘deprecated’ (Adam Goucher)
- NEW - Ruby formatter updated to use the selenium-client gem ( http://selenium-client.rubyforge.org/ ) (Adam Goucher)
- NEW - Ability to add custom user-extensions to extend the Selenium API through plugins to Selenium IDE (Adam Goucher)
- NEW - Ability to add custom formatters to extend which languages are available to users through plugins to Selenium IDE (Adam Goucher)
- NEW - Can now load changes to user extensions without having to restart Selenium IDE (Jérémy Hérault)
- NEW - RSpec formatter
Acknowledgements
Version 1.0.4 would not have happened without the following assistance
- Sauce Labs’ sponsoring of Adam Goucher to work on it
- Jérémy Hérault and the SERLI team for their Helium plugin (which was the proof an API could / should be developed for Se-IDE)
- Dave Hunt for his feedback on pre-release versions
For issues with this release or features you would like to see in future releases, please log them in the Google Code Issue tracker (https://github.com/SeleniumHQ/selenium/issues) using the ide label so they don’t get lost.
-adam
5 - JSON Wire Protocol Specification
This documentation previously located on the wiki
All implementations of WebDriver that communicate with the browser, or a RemoteWebDriver server shall use a common wire protocol. This wire protocol defines a RESTful web service using JSON over HTTP.
The protocol will assume that the WebDriver API has been “flattened”, but there is an expectation that client implementations will take a more Object-Oriented approach, as demonstrated in the existing Java API. The wire protocol is implemented in request/response pairs of “commands” and “responses”.
Terms and Concepts
Client
The machine on which the WebDriver API is being used.
Session
The machine running the RemoteWebDriver. This term may also refer to a specific browser that implements the wire protocol directly, such as the FirefoxDriver or IPhoneDriver.
The server should maintain one browser per session. Commands sent to a session will be directed to the corresponding browser.
WebElement
An object in the WebDriver API that represents a DOM element on the page.
WebElement JSON Object
The JSON representation of a WebElement for transmission over the wire. This object will have the following properties:
| Key | Type | Description |
|---|---|---|
| ELEMENT | string | The opaque ID assigned to the element by the server. This ID should be used in all subsequent commands issued against the element. |
Capabilities JSON Object
Not all server implementations will support every WebDriver feature. Therefore, the client and server should use JSON objects with the properties listed below when describing which features a session supports.
| Key | Type | Description |
|---|---|---|
| browserName | string | The name of the browser being used; should be one of {android, chrome, firefox, htmlunit, internet explorer, iPhone, iPad, opera, safari}. |
| version | string | The browser version, or the empty string if unknown. |
| platform | string | A key specifying which platform the browser is running on. This value should be one of {WINDOWS|XP|VISTA|MAC|LINUX|UNIX}. When requesting a new session, the client may specify ANY to indicate any available platform may be used. |
| javascriptEnabled | boolean | Whether the session supports executing user supplied JavaScript in the context of the current page. |
| takesScreenshot | boolean | Whether the session supports taking screenshots of the current page. |
| handlesAlerts | boolean | Whether the session can interact with modal popups, such as window.alert and window.confirm. |
| databaseEnabled | boolean | Whether the session can interact database storage. |
| locationContextEnabled | boolean | Whether the session can set and query the browser's location context. |
| applicationCacheEnabled | boolean | Whether the session can interact with the application cache. |
| browserConnectionEnabled | boolean | Whether the session can query for the browser's connectivity and disable it if desired. |
| cssSelectorsEnabled | boolean | Whether the session supports CSS selectors when searching for elements. |
| webStorageEnabled | boolean | Whether the session supports interactions with storage objects. |
| rotatable | boolean | Whether the session can rotate the current page's current layout between portrait and landscape orientations (only applies to mobile platforms). |
| acceptSslCerts | boolean | Whether the session should accept all SSL certs by default. |
| nativeEvents | boolean | Whether the session is capable of generating native events when simulating user input. |
| proxy | proxy object | Details of any proxy to use. If no proxy is specified, whatever the system's current or default state is used. The format is specified under Proxy JSON Object. |
| unexpectedAlertBehaviour | string | What the browser should do with an unhandled alert before throwing out the UnhandledAlertException. Possible values are "accept", "dismiss" and "ignore" |
| elementScrollBehavior | integer | Allows the user to specify whether elements are scrolled into the viewport for interaction to align with the top (0) or bottom (1) of the viewport. The default value is to align with the top of the viewport. Supported in IE and Firefox (since 2.36) |
Desired Capabilities
A Capabilities JSON Object sent by the client describing the capabilities a new session created by the server should possess. Any omitted keys implicitly indicate the corresponding capability is irrelevant. More at DesiredCapabilities.
Actual Capabilities
A Capabilities JSON Object returned by the server describing what features a session actually supports.
Any omitted keys implicitly indicate the corresponding capability is not supported.
Cookie JSON Object
A JSON object describing a Cookie.
| Key | Type | Description |
|---|---|---|
| name | string | The name of the cookie. |
| value | string | The cookie value. |
| path | string | (Optional) The cookie path.1 |
| domain | string | (Optional) The domain the cookie is visible to.1 |
| secure | boolean | (Optional) Whether the cookie is a secure cookie.1 |
| httpOnly | boolean | (Optional) Whether the cookie is an httpOnly cookie.1 |
| expiry | number | (Optional) When the cookie expires, specified in seconds since midnight, January 1, 1970 UTC.1 |
1 When returning Cookie objects, the server should only omit an optional field if it is incapable of providing the information.
Log Entry JSON Object
A JSON object describing a log entry.
| Key | Type | Description |
|---|---|---|
| timestamp | number | The timestamp of the entry. |
| level | string | The log level of the entry, for example, "INFO" (see log levels). |
| message | string | The log message. |
Log Levels
Log levels in order, with finest level on top and coarsest level at the bottom.
| Level | Description |
|---|---|
| ALL | All log messages. Used for fetching of logs and configuration of logging. |
| DEBUG | Messages for debugging. |
| INFO | Messages with user information. |
| WARNING | Messages corresponding to non-critical problems. |
| SEVERE | Messages corresponding to critical errors. |
| OFF | No log messages. Used for configuration of logging. |
Log Type
The table below lists common log types. Other log types, for instance, for performance logging may also be available.
| Log Type | Description |
|---|---|
| client | Logs from the client. |
| driver | Logs from the webdriver. |
| browser | Logs from the browser. |
| server | Logs from the server. |
Proxy JSON Object
A JSON object describing a Proxy configuration.
| Key | Type | Description |
|---|---|---|
| proxyType | string | (Required) The type of proxy being used. Possible values are: direct - A direct connection - no proxy in use, manual - Manual proxy settings configured, e.g. setting a proxy for HTTP, a proxy for FTP, etc, pac - Proxy autoconfiguration from a URL, autodetect - Proxy autodetection, probably with WPAD, system - Use system settings |
| proxyAutoconfigUrl | string | (Required if proxyType == pac, Ignored otherwise) Specifies the URL to be used for proxy autoconfiguration. Expected format example: http://hostname.com:1234/pacfile |
| ftpProxy, httpProxy, sslProxy, socksProxy | string | (Optional, Ignored if proxyType != manual) Specifies the proxies to be used for FTP, HTTP, HTTPS and SOCKS requests respectively. Behaviour is undefined if a request is made, where the proxy for the particular protocol is undefined, if proxyType is manual. Expected format example: hostname.com:1234 |
| socksUsername | string | (Optional, Ignored if proxyType != manual and socksProxy is not set) Specifies SOCKS proxy username. |
| socksPassword | string | (Optional, Ignored if proxyType != manual and socksProxy is not set) Specifies SOCKS proxy password. |
| noProxy | string | (Optional, Ignored if proxyType != manual) Specifies proxy bypass addresses. Format is driver specific. |
Messages
Commands
WebDriver command messages should conform to the HTTP/1.1 request specification. Although the server may be extended to respond to other content-types, the wire protocol dictates that all commands accept a content-type of application/json;charset=UTF-8. Likewise, the message bodies for POST and PUT request must use an application/json;charset=UTF-8 content-type.
Each command in the WebDriver service will be mapped to an HTTP method at a specific path. Path segments prefixed with a colon (:) indicate that segment is a variable used to further identify the underlying resource. For example, consider an arbitrary resource mapped as:
GET /favorite/color/:name
Given this mapping, the server should respond to GET requests sent to “/favorite/color/Jack” and “/favorite/color/Jill”, with the variable :name set to “Jack” and “Jill”, respectively.
Responses
Command responses shall be sent as HTTP/1.1 response messages. If the remote server must return a 4xx response, the response body shall have a Content-Type of text/plain and the message body shall be a descriptive message of the bad request. For all other cases, if a response includes a message body, it must have a Content-Type of application/json;charset=UTF-8 and will be a JSON object with the following properties:
| Key | Type | Description |
|---|---|---|
| sessionId | string | null |
| status | number | A status code summarizing the result of the command. A non-zero value indicates that the command failed. |
| value | * | The response JSON value. |
Response Status Codes
The wire protocol will inherit its status codes from those used by the InternetExplorerDriver:
| Code | Summary | Detail |
|---|---|---|
| 0 | Success | The command executed successfully. |
| 6 | NoSuchDriver | A session is either terminated or not started |
| 7 | NoSuchElement | An element could not be located on the page using the given search parameters. |
| 8 | NoSuchFrame | A request to switch to a frame could not be satisfied because the frame could not be found. |
| 9 | UnknownCommand | The requested resource could not be found, or a request was received using an HTTP method that is not supported by the mapped resource. |
| 10 | StaleElementReference | An element command failed because the referenced element is no longer attached to the DOM. |
| 11 | ElementNotVisible | An element command could not be completed because the element is not visible on the page. |
| 12 | InvalidElementState | An element command could not be completed because the element is in an invalid state (e.g. attempting to click a disabled element). |
| 13 | UnknownError | An unknown server-side error occurred while processing the command. |
| 15 | ElementIsNotSelectable | An attempt was made to select an element that cannot be selected. |
| 17 | JavaScriptError | An error occurred while executing user supplied JavaScript. |
| 19 | XPathLookupError | An error occurred while searching for an element by XPath. |
| 21 | Timeout | An operation did not complete before its timeout expired. |
| 23 | NoSuchWindow | A request to switch to a different window could not be satisfied because the window could not be found. |
| 24 | InvalidCookieDomain | An illegal attempt was made to set a cookie under a different domain than the current page. |
| 25 | UnableToSetCookie | A request to set a cookie’s value could not be satisfied. |
| 26 | UnexpectedAlertOpen | A modal dialog was open, blocking this operation |
| 27 | NoAlertOpenError | An attempt was made to operate on a modal dialog when one was not open. |
| 28 | ScriptTimeout | A script did not complete before its timeout expired. |
| 29 | InvalidElementCoordinates | The coordinates provided to an interactions operation are invalid. |
| 30 | IMENotAvailable | IME was not available. |
| 31 | IMEEngineActivationFailed | An IME engine could not be started. |
| 32 | InvalidSelector | Argument was an invalid selector (e.g. XPath/CSS). |
| 33 | SessionNotCreatedException | A new session could not be created. |
| 34 | MoveTargetOutOfBounds | Target provided for a move action is out of bounds. |
The client should interpret a 404 Not Found response from the server as an “Unknown command” response. All other 4xx and 5xx responses from the server that do not define a status field should be interpreted as “Unknown error” responses.
Error Handling
There are two levels of error handling specified by the wire protocol: invalid requests and failed commands.
Invalid Requests
All invalid requests should result in the server returning a 4xx HTTP response. The response Content-Type should be set to text/plain and the message body should be a descriptive error message. The categories of invalid requests are as follows:
- Unknown Commands
- If the server receives a command request whose path is not mapped to a resource in the REST service, it should respond with a
404 Not Foundmessage. - Unimplemented Commands
- Every server implementing the WebDriver wire protocol must respond to every defined command. If an individual command has not been implemented on the server, the server should respond with a
501 Not Implementederror message. Note this is the only error in the Invalid Request category that does not return a4xxstatus code. - Variable Resource Not Found
- If a request path maps to a variable resource, but that resource does not exist, then the server should respond with a
404 Not Found. For example, if IDmy-sessionis not a valid session ID on the server, and a command is sent toGET /session/my-session HTTP/1.1, then the server should gracefully return a404. - Invalid Command Method
- If a request path maps to a valid resource, but that resource does not respond to the request method, the server should respond with a
405 Method Not Allowed. The response must include an Allows header with a list of the allowed methods for the requested resource. - Missing Command Parameters
- If a POST/PUT command maps to a resource that expects a set of JSON parameters, and the response body does not include one of those parameters, the server should respond with a
400 Bad Request. The response body should list the missing parameters.
Failed Commands
If a request maps to a valid command and contains all of the expected parameters in the request body, yet fails to execute successfully, then the server should send a 500 Internal Server Error. This response should have a Content-Type of application/json;charset=UTF-8 and the response body should be a well formed JSON response object.
The response status should be one of the defined status codes and the response value should be another JSON object with detailed information for the failing command:
| Key | Type | Description |
|---|---|---|
| message | string | A descriptive message for the command failure. |
| screen | string | (Optional) If included, a screenshot of the current page as a base64 encoded string. |
| class | string | (Optional) If included, specifies the fully qualified class name for the exception that was thrown when the command failed. |
| stackTrace | array | (Optional) If included, specifies an array of JSON objects describing the stack trace for the exception that was thrown when the command failed. The zeroeth element of the array represents the top of the stack. |
Each JSON object in the stackTrace array must contain the following properties:
| Key | Type | Description |
|---|---|---|
| fileName | string | The name of the source file containing the line represented by this frame. |
| className | string | The fully qualified class name for the class active in this frame. If the class name cannot be determined, or is not applicable for the language the server is implemented in, then this property should be set to the empty string. |
| methodName | string | The name of the method active in this frame, or the empty string if unknown/not applicable. |
| lineNumber | number | The line number in the original source file for the frame, or 0 if unknown. |
Resource Mapping
Resources in the WebDriver REST service are mapped to individual URL patterns. Each resource may respond to one or more HTTP request methods. If a resource responds to a GET request, then it should also respond to HEAD requests. All resources should respond to OPTIONS requests with an Allow header field, whose value is a list of all methods that resource responds to.
If a resource is mapped to a URL containing a variable path segment name, that path segment should be used to further route the request. Variable path segments are indicated in the resource mapping by a colon-prefix. For example, consider the following:
/favorite/color/:person
A resource mapped to this URL should parse the value of the :person path segment to further determine how to respond to the request. If this resource received a request for /favorite/color/Jack, then it should return Jack’s favorite color. Likewise, the server should return Jill’s favorite color for any requests to /favorite/color/Jill.
Two resources may only be mapped to the same URL pattern if one of those resources’ patterns contains variable path segments, and the other does not. In these cases, the server should always route requests to the resource whose path is the best match for the request. Consider the following two resource paths:
/session/:sessionId/element/active/session/:sessionId/element/:id
Given these mappings, the server should always route requests whose final path segment is active to the first resource. All other requests should be routed to second.
Command Reference
Command Summary
| HTTP Method | Path | Summary |
|---|---|---|
| GET | /status | Query the server’s current status. |
| POST | /session | Create a new session. |
| GET | /sessions | Returns a list of the currently active sessions. |
| GET | /session/:sessionId | Retrieve the capabilities of the specified session. |
| DELETE | /session/:sessionId | Delete the session. |
| POST | /session/:sessionId/timeouts | Configure the amount of time that a particular type of operation can execute for before they are aborted and a |
| POST | /session/:sessionId/timeouts/async_script | Set the amount of time, in milliseconds, that asynchronous scripts executed by /session/:sessionId/execute_async are permitted to run before they are aborted and a |
| POST | /session/:sessionId/timeouts/implicit_wait | Set the amount of time the driver should wait when searching for elements. |
| GET | /session/:sessionId/window_handle | Retrieve the current window handle. |
| GET | /session/:sessionId/window_handles | Retrieve the list of all window handles available to the session. |
| GET | /session/:sessionId/url | Retrieve the URL of the current page. |
| POST | /session/:sessionId/url | Navigate to a new URL. |
| POST | /session/:sessionId/forward | Navigate forwards in the browser history, if possible. |
| POST | /session/:sessionId/back | Navigate backwards in the browser history, if possible. |
| POST | /session/:sessionId/refresh | Refresh the current page. |
| POST | /session/:sessionId/execute | Inject a snippet of JavaScript into the page for execution in the context of the currently selected frame. |
| POST | /session/:sessionId/execute_async | Inject a snippet of JavaScript into the page for execution in the context of the currently selected frame. |
| GET | /session/:sessionId/screenshot | Take a screenshot of the current page. |
| GET | /session/:sessionId/ime/available_engines | List all available engines on the machine. |
| GET | /session/:sessionId/ime/active_engine | Get the name of the active IME engine. |
| GET | /session/:sessionId/ime/activated | Indicates whether IME input is active at the moment (not if it’s available. |
| POST | /session/:sessionId/ime/deactivate | De-activates the currently-active IME engine. |
| POST | /session/:sessionId/ime/activate | Make an engines that is available (appears on the listreturned by getAvailableEngines) active. |
| POST | /session/:sessionId/frame | Change focus to another frame on the page. |
| POST | /session/:sessionId/frame/parent | Change focus to the parent context. |
| POST | /session/:sessionId/window | Change focus to another window. |
| DELETE | /session/:sessionId/window | Close the current window. |
| POST | /session/:sessionId/window/:windowHandle/size | Change the size of the specified window. |
| GET | /session/:sessionId/window/:windowHandle/size | Get the size of the specified window. |
| POST | /session/:sessionId/window/:windowHandle/position | Change the position of the specified window. |
| GET | /session/:sessionId/window/:windowHandle/position | Get the position of the specified window. |
| POST | /session/:sessionId/window/:windowHandle/maximize | Maximize the specified window if not already maximized. |
| GET | /session/:sessionId/cookie | Retrieve all cookies visible to the current page. |
| POST | /session/:sessionId/cookie | Set a cookie. |
| DELETE | /session/:sessionId/cookie | Delete all cookies visible to the current page. |
| DELETE | /session/:sessionId/cookie/:name | Delete the cookie with the given name. |
| GET | /session/:sessionId/source | Get the current page source. |
| GET | /session/:sessionId/title | Get the current page title. |
| POST | /session/:sessionId/element | Search for an element on the page, starting from the document root. |
| POST | /session/:sessionId/elements | Search for multiple elements on the page, starting from the document root. |
| POST | /session/:sessionId/element/active | Get the element on the page that currently has focus. |
| GET | /session/:sessionId/element/:id | Describe the identified element. |
| POST | /session/:sessionId/element/:id/element | Search for an element on the page, starting from the identified element. |
| POST | /session/:sessionId/element/:id/elements | Search for multiple elements on the page, starting from the identified element. |
| POST | /session/:sessionId/element/:id/click | Click on an element. |
| POST | /session/:sessionId/element/:id/submit | Submit a FORM element. |
| GET | /session/:sessionId/element/:id/text | Returns the visible text for the element. |
| POST | /session/:sessionId/element/:id/value | Send a sequence of key strokes to an element. |
| POST | /session/:sessionId/keys | Send a sequence of key strokes to the active element. |
| GET | /session/:sessionId/element/:id/name | Query for an element’s tag name. |
| POST | /session/:sessionId/element/:id/clear | Clear a TEXTAREA or text INPUT element’s value. |
| GET | /session/:sessionId/element/:id/selected | Determine if an OPTION element, or an INPUT element of type checkbox or radiobutton is currently selected. |
| GET | /session/:sessionId/element/:id/enabled | Determine if an element is currently enabled. |
| GET | /session/:sessionId/element/:id/attribute/:name | Get the value of an element’s attribute. |
| GET | /session/:sessionId/element/:id/equals/:other | Test if two element IDs refer to the same DOM element. |
| GET | /session/:sessionId/element/:id/displayed | Determine if an element is currently displayed. |
| GET | /session/:sessionId/element/:id/location | Determine an element’s location on the page. |
| GET | /session/:sessionId/element/:id/location_in_view | Determine an element’s location on the screen once it has been scrolled into view. |
| GET | /session/:sessionId/element/:id/size | Determine an element’s size in pixels. |
| GET | /session/:sessionId/element/:id/css/:propertyName | Query the value of an element’s computed CSS property. |
| GET | /session/:sessionId/orientation | Get the current browser orientation. |
| POST | /session/:sessionId/orientation | Set the browser orientation. |
| GET | /session/:sessionId/alert_text | Gets the text of the currently displayed JavaScript alert(), confirm(), or prompt() dialog. |
| POST | /session/:sessionId/alert_text | Sends keystrokes to a JavaScript prompt() dialog. |
| POST | /session/:sessionId/accept_alert | Accepts the currently displayed alert dialog. |
| POST | /session/:sessionId/dismiss_alert | Dismisses the currently displayed alert dialog. |
| POST | /session/:sessionId/moveto | Move the mouse by an offset of the specificed element. |
| POST | /session/:sessionId/click | Click any mouse button (at the coordinates set by the last moveto command). |
| POST | /session/:sessionId/buttondown | Click and hold the left mouse button (at the coordinates set by the last moveto command). |
| POST | /session/:sessionId/buttonup | Releases the mouse button previously held (where the mouse is currently at). |
| POST | /session/:sessionId/doubleclick | Double-clicks at the current mouse coordinates (set by moveto). |
| POST | /session/:sessionId/touch/click | Single tap on the touch enabled device. |
| POST | /session/:sessionId/touch/down | Finger down on the screen. |
| POST | /session/:sessionId/touch/up | Finger up on the screen. |
| POST | session/:sessionId/touch/move | Finger move on the screen. |
| POST | session/:sessionId/touch/scroll | Scroll on the touch screen using finger based motion events. |
| POST | session/:sessionId/touch/scroll | Scroll on the touch screen using finger based motion events. |
| POST | session/:sessionId/touch/doubleclick | Double tap on the touch screen using finger motion events. |
| POST | session/:sessionId/touch/longclick | Long press on the touch screen using finger motion events. |
| POST | session/:sessionId/touch/flick | Flick on the touch screen using finger motion events. |
| POST | session/:sessionId/touch/flick | Flick on the touch screen using finger motion events. |
| GET | /session/:sessionId/location | Get the current geo location. |
| POST | /session/:sessionId/location | Set the current geo location. |
| GET | /session/:sessionId/local_storage | Get all keys of the storage. |
| POST | /session/:sessionId/local_storage | Set the storage item for the given key. |
| DELETE | /session/:sessionId/local_storage | Clear the storage. |
| GET | /session/:sessionId/local_storage/key/:key | Get the storage item for the given key. |
| DELETE | /session/:sessionId/local_storage/key/:key | Remove the storage item for the given key. |
| GET | /session/:sessionId/local_storage/size | Get the number of items in the storage. |
| GET | /session/:sessionId/session_storage | Get all keys of the storage. |
| POST | /session/:sessionId/session_storage | Set the storage item for the given key. |
| DELETE | /session/:sessionId/session_storage | Clear the storage. |
| GET | /session/:sessionId/session_storage/key/:key | Get the storage item for the given key. |
| DELETE | /session/:sessionId/session_storage/key/:key | Remove the storage item for the given key. |
| GET | /session/:sessionId/session_storage/size | Get the number of items in the storage. |
| POST | /session/:sessionId/log | Get the log for a given log type. |
| GET | /session/:sessionId/log/types | Get available log types. |
| GET | /session/:sessionId/application_cache/status | Get the status of the html5 application cache. |
Command Detail
/status
GET /status
- Query the server's current status. The server should respond with a general "HTTP 200 OK" response if it is alive and accepting commands. The response body should be a JSON object describing the state of the server. All server implementations should return two basic objects describing the server's current platform and when the server was built. All fields are optional; if omitted, the client should assume the value is uknown. Furthermore, server implementations may include additional fields not listed here.
Key Type Description build object build.version string A generic release label (i.e. "2.0rc3") build.revision string The revision of the local source control client from which the server was built build.time string A timestamp from when the server was built. os object os.arch string The current system architecture. os.name string The name of the operating system the server is currently running on: "windows", "linux", etc. os.version string The operating system version. - Returns:
{object}An object describing the general status of the server.
- Query the server's current status. The server should respond with a general "HTTP 200 OK" response if it is alive and accepting commands. The response body should be a JSON object describing the state of the server. All server implementations should return two basic objects describing the server's current platform and when the server was built. All fields are optional; if omitted, the client should assume the value is uknown. Furthermore, server implementations may include additional fields not listed here.
/session
POST /session
- Create a new session. The server should attempt to create a session that most closely matches the desired and required capabilities. Required capabilities have higher priority than desired capabilities and must be set for the session to be created.
- JSON Parameters:
desiredCapabilities-{object}An object describing the session's desired capabilities.requiredCapabilities-{object}An object describing the session's required capabilities (Optional).
- Returns:
{object}An object describing the session's capabilities.
- Potential Errors:
SessionNotCreatedException- If a required capability could not be set.
/sessions
GET /sessions
- Returns a list of the currently active sessions. Each session will be returned as a list of JSON objects with the following keys:
Key Type Description id string The session ID. capabilities object An object describing the session's capabilities. - Returns:
{Array.<Object>}A list of the currently active sessions.
- Returns a list of the currently active sessions. Each session will be returned as a list of JSON objects with the following keys:
/session/:sessionId
GET /session/:sessionId
- Retrieve the capabilities of the specified session.
- URL Parameters:
:sessionId- ID of the session to route the command to.
- Returns:
{object}An object describing the session's capabilities.
DELETE /session/:sessionId
- Delete the session.
- URL Parameters:
:sessionId- ID of the session to route the command to.
/session/:sessionId/timeouts
POST /session/:sessionId/timeouts
- Configure the amount of time that a particular type of operation can execute for before they are aborted and a |Timeout| error is returned to the client.
- URL Parameters:
:sessionId- ID of the session to route the command to.
- JSON Parameters:
type-{string}The type of operation to set the timeout for. Valid values are: "script" for script timeouts, "implicit" for modifying the implicit wait timeout and "page load" for setting a page load timeout.ms-{number}The amount of time, in milliseconds, that time-limited commands are permitted to run.
/session/:sessionId/timeouts/async_script
POST /session/:sessionId/timeouts/async_script
- Set the amount of time, in milliseconds, that asynchronous scripts executed by
/session/:sessionId/execute_asyncare permitted to run before they are aborted and a |Timeout| error is returned to the client. - URL Parameters:
:sessionId- ID of the session to route the command to.
- JSON Parameters:
ms-{number}The amount of time, in milliseconds, that time-limited commands are permitted to run.
- Set the amount of time, in milliseconds, that asynchronous scripts executed by
/session/:sessionId/timeouts/implicit_wait
POST /session/:sessionId/timeouts/implicit_wait
- Set the amount of time the driver should wait when searching for elements. When
searching for a single element, the driver should poll the page until an element is found or
the timeout expires, whichever occurs first. When searching for multiple elements, the driver
should poll the page until at least one element is found or the timeout expires, at which point
it should return an empty list.
If this command is never sent, the driver should default to an implicit wait of 0ms. - URL Parameters:
:sessionId- ID of the session to route the command to.
- JSON Parameters:
ms-{number}The amount of time to wait, in milliseconds. This value has a lower bound of 0.
- Set the amount of time the driver should wait when searching for elements. When
/session/:sessionId/window_handle
GET /session/:sessionId/window_handle
- Retrieve the current window handle.
- URL Parameters:
:sessionId- ID of the session to route the command to.
- Returns:
{string}The current window handle.
- Potential Errors:
NoSuchWindow- If the currently selected window has been closed.
/session/:sessionId/window_handles
GET /session/:sessionId/window_handles
- Retrieve the list of all window handles available to the session.
- URL Parameters:
:sessionId- ID of the session to route the command to.
- Returns:
{Array.<string>}A list of window handles.
/session/:sessionId/url
GET /session/:sessionId/url
- Retrieve the URL of the current page.
- URL Parameters:
:sessionId- ID of the session to route the command to.
- Returns:
{string}The current URL.
- Potential Errors:
NoSuchWindow- If the currently selected window has been closed.
POST /session/:sessionId/url
- Navigate to a new URL.
- URL Parameters:
:sessionId- ID of the session to route the command to.
- JSON Parameters:
url-{string}The URL to navigate to.
- Potential Errors:
NoSuchWindow- If the currently selected window has been closed.
/session/:sessionId/forward
POST /session/:sessionId/forward
- Navigate forwards in the browser history, if possible.
- URL Parameters:
:sessionId- ID of the session to route the command to.
- Potential Errors:
NoSuchWindow- If the currently selected window has been closed.
/session/:sessionId/back
POST /session/:sessionId/back
- Navigate backwards in the browser history, if possible.
- URL Parameters:
:sessionId- ID of the session to route the command to.
- Potential Errors:
NoSuchWindow- If the currently selected window has been closed.
/session/:sessionId/refresh
POST /session/:sessionId/refresh
- Refresh the current page.
- URL Parameters:
:sessionId- ID of the session to route the command to.
- Potential Errors:
NoSuchWindow- If the currently selected window has been closed.
/session/:sessionId/execute
POST /session/:sessionId/execute
- Inject a snippet of JavaScript into the page for execution in the context of the currently selected frame. The executed script is assumed to be synchronous and the result of evaluating the script is returned to the client.
Thescriptargument defines the script to execute in the form of a function body. The value returned by that function will be returned to the client. The function will be invoked with the providedargsarray and the values may be accessed via theargumentsobject in the order specified.
Arguments may be any JSON-primitive, array, or JSON object. JSON objects that define a WebElement reference will be converted to the corresponding DOM element. Likewise, any WebElements in the script result will be returned to the client as WebElement JSON objects. - URL Parameters:
:sessionId- ID of the session to route the command to.
- JSON Parameters:
script-{string}The script to execute.args-{Array.<*>}The script arguments.
- Returns:
{*}The script result.
- Potential Errors:
NoSuchWindow- If the currently selected window has been closed.StaleElementReference- If one of the script arguments is a WebElement that is not attached to the page's DOM.JavaScriptError- If the script throws an Error.
- Inject a snippet of JavaScript into the page for execution in the context of the currently selected frame. The executed script is assumed to be synchronous and the result of evaluating the script is returned to the client.
/session/:sessionId/execute_async
POST /session/:sessionId/execute_async
- Inject a snippet of JavaScript into the page for execution in the context of the currently selected frame. The executed script is assumed to be asynchronous and must signal that is done by invoking the provided callback, which is always provided as the final argument to the function. The value to this callback will be returned to the client.
Asynchronous script commands may not span page loads. If anunloadevent is fired while waiting for a script result, an error should be returned to the client.
Thescriptargument defines the script to execute in teh form of a function body. The function will be invoked with the providedargsarray and the values may be accessed via theargumentsobject in the order specified. The final argument will always be a callback function that must be invoked to signal that the script has finished.
Arguments may be any JSON-primitive, array, or JSON object. JSON objects that define a WebElement reference will be converted to the corresponding DOM element. Likewise, any WebElements in the script result will be returned to the client as WebElement JSON objects. - URL Parameters:
:sessionId- ID of the session to route the command to.
- JSON Parameters:
script-{string}The script to execute.args-{Array.<*>}The script arguments.
- Returns:
{*}The script result.
- Potential Errors:
NoSuchWindow- If the currently selected window has been closed.StaleElementReference- If one of the script arguments is a WebElement that is not attached to the page's DOM.Timeout- If the script callback is not invoked before the timout expires. Timeouts are controlled by the/session/:sessionId/timeout/async_scriptcommand.JavaScriptError- If the script throws an Error or if anunloadevent is fired while waiting for the script to finish.
- Inject a snippet of JavaScript into the page for execution in the context of the currently selected frame. The executed script is assumed to be asynchronous and must signal that is done by invoking the provided callback, which is always provided as the final argument to the function. The value to this callback will be returned to the client.
/session/:sessionId/screenshot
GET /session/:sessionId/screenshot
- Take a screenshot of the current page.
- URL Parameters:
:sessionId- ID of the session to route the command to.
- Returns:
{string}The screenshot as a base64 encoded PNG.
- Potential Errors:
NoSuchWindow- If the currently selected window has been closed.
/session/:sessionId/ime/available_engines
GET /session/:sessionId/ime/available_engines
- List all available engines on the machine. To use an engine, it has to be present in this list.
- URL Parameters:
:sessionId- ID of the session to route the command to.
- Returns:
{Array.<string>}A list of available engines
- Potential Errors:
ImeNotAvailableException- If the host does not support IME
/session/:sessionId/ime/active_engine
GET /session/:sessionId/ime/active_engine
- Get the name of the active IME engine. The name string is platform specific.
- URL Parameters:
:sessionId- ID of the session to route the command to.
- Returns:
{string}The name of the active IME engine.
- Potential Errors:
ImeNotAvailableException- If the host does not support IME
/session/:sessionId/ime/activated
GET /session/:sessionId/ime/activated
- Indicates whether IME input is active at the moment (not if it's available.
- URL Parameters:
:sessionId- ID of the session to route the command to.
- Returns:
{boolean}true if IME input is available and currently active, false otherwise
- Potential Errors:
ImeNotAvailableException- If the host does not support IME
/session/:sessionId/ime/deactivate
POST /session/:sessionId/ime/deactivate
- De-activates the currently-active IME engine.
- URL Parameters:
:sessionId- ID of the session to route the command to.
- Potential Errors:
ImeNotAvailableException- If the host does not support IME
/session/:sessionId/ime/activate
POST /session/:sessionId/ime/activate
- Make an engines that is available (appears on the list
returned by getAvailableEngines) active. After this call, the engine will
be added to the list of engines loaded in the IME daemon and the input sent
using sendKeys will be converted by the active engine.
Note that this is a platform-independent method of activating IME
(the platform-specific way being using keyboard shortcuts - URL Parameters:
:sessionId- ID of the session to route the command to.
- JSON Parameters:
engine-{string}Name of the engine to activate.
- Potential Errors:
ImeActivationFailedException- If the engine is not available or if the activation fails for other reasons.ImeNotAvailableException- If the host does not support IME
- Make an engines that is available (appears on the list
/session/:sessionId/frame
POST /session/:sessionId/frame
- Change focus to another frame on the page. If the frame
idisnull, the server
should switch to the page's default content. - URL Parameters:
:sessionId- ID of the session to route the command to.
- JSON Parameters:
id-{string|number|null|WebElement JSON Object}Identifier for the frame to change focus to.
- Potential Errors:
NoSuchWindow- If the currently selected window has been closed.NoSuchFrame- If the frame specified byidcannot be found.
- Change focus to another frame on the page. If the frame
/session/:sessionId/frame/parent
POST /session/:sessionId/frame/parent
- Change focus to the parent context. If the current context is the top level browsing context, the context remains unchanged.
- URL Parameters:
:sessionId- ID of the session to route the command to.
/session/:sessionId/window
POST /session/:sessionId/window
- Change focus to another window. The window to change focus to may be specified by its
server assigned window handle, or by the value of itsnameattribute. - URL Parameters:
:sessionId- ID of the session to route the command to.
- JSON Parameters:
name-{string}The window to change focus to.
- Potential Errors:
NoSuchWindow- If the window specified bynamecannot be found.
- Change focus to another window. The window to change focus to may be specified by its
DELETE /session/:sessionId/window
- Close the current window.
- URL Parameters:
:sessionId- ID of the session to route the command to.
- Potential Errors:
NoSuchWindow- If the currently selected window is already closed
/session/:sessionId/window/:windowHandle/size
POST /session/:sessionId/window/:windowHandle/size
- Change the size of the specified window. If the :windowHandle URL parameter is "current", the currently active window will be resized.
- URL Parameters:
:sessionId- ID of the session to route the command to.
- JSON Parameters:
width-{number}The new window width.height-{number}The new window height.
GET /session/:sessionId/window/:windowHandle/size
- Get the size of the specified window. If the :windowHandle URL parameter is "current", the size of the currently active window will be returned.
- URL Parameters:
:sessionId- ID of the session to route the command to.
- Returns:
{width: number, height: number}The size of the window.
- Potential Errors:
NoSuchWindow- If the specified window cannot be found.
/session/:sessionId/window/:windowHandle/position
POST /session/:sessionId/window/:windowHandle/position
- Change the position of the specified window. If the :windowHandle URL parameter is "current", the currently active window will be moved.
- URL Parameters:
:sessionId- ID of the session to route the command to.
- JSON Parameters:
x-{number}The X coordinate to position the window at, relative to the upper left corner of the screen.y-{number}The Y coordinate to position the window at, relative to the upper left corner of the screen.
- Potential Errors:
NoSuchWindow- If the specified window cannot be found.
GET /session/:sessionId/window/:windowHandle/position
- Get the position of the specified window. If the :windowHandle URL parameter is "current", the position of the currently active window will be returned.
- URL Parameters:
:sessionId- ID of the session to route the command to.
- Returns:
{x: number, y: number}The X and Y coordinates for the window, relative to the upper left corner of the screen.
- Potential Errors:
NoSuchWindow- If the specified window cannot be found.
/session/:sessionId/window/:windowHandle/maximize
POST /session/:sessionId/window/:windowHandle/maximize
- Maximize the specified window if not already maximized. If the :windowHandle URL parameter is "current", the currently active window will be maximized.
- URL Parameters:
:sessionId- ID of the session to route the command to.
- Potential Errors:
NoSuchWindow- If the specified window cannot be found.
/session/:sessionId/cookie
GET /session/:sessionId/cookie
- Retrieve all cookies visible to the current page.
- URL Parameters:
:sessionId- ID of the session to route the command to.
- Returns:
{Array.<object>}A list of cookies.
- Potential Errors:
NoSuchWindow- If the currently selected window has been closed.
POST /session/:sessionId/cookie
- Set a cookie. If the cookie path is not specified, it should be set to
"/". Likewise, if the domain is omitted, it should default to the current page's domain. - URL Parameters:
:sessionId- ID of the session to route the command to.
- JSON Parameters:
cookie-{object}A JSON object defining the cookie to add.
- Set a cookie. If the cookie path is not specified, it should be set to
DELETE /session/:sessionId/cookie
- Delete all cookies visible to the current page.
- URL Parameters:
:sessionId- ID of the session to route the command to.
- Potential Errors:
InvalidCookieDomain- If the cookie'sdomainis not visible from the current page.NoSuchWindow- If the currently selected window has been closed.UnableToSetCookie- If attempting to set a cookie on a page that does not support cookies (e.g. pages with mime-typetext/plain).
/session/:sessionId/cookie/:name
DELETE /session/:sessionId/cookie/:name
- Delete the cookie with the given name. This command should be a no-op if there is no
such cookie visible to the current page. - URL Parameters:
:sessionId- ID of the session to route the command to.:name- The name of the cookie to delete.
- Potential Errors:
NoSuchWindow- If the currently selected window has been closed.
- Delete the cookie with the given name. This command should be a no-op if there is no
/session/:sessionId/source
GET /session/:sessionId/source
- Get the current page source.
- URL Parameters:
:sessionId- ID of the session to route the command to.
- Returns:
{string}The current page source.
- Potential Errors:
NoSuchWindow- If the currently selected window has been closed.
/session/:sessionId/title
GET /session/:sessionId/title
- Get the current page title.
- URL Parameters:
:sessionId- ID of the session to route the command to.
- Returns:
{string}The current page title.
- Potential Errors:
NoSuchWindow- If the currently selected window has been closed.
/session/:sessionId/element
POST /session/:sessionId/element
- Search for an element on the page, starting from the document root. The located element will be returned as a WebElement JSON object. The table below lists the locator strategies that each server should support. Each locator must return the first matching element located in the DOM.
Strategy Description class name Returns an element whose class name contains the search value; compound class names are not permitted. css selector Returns an element matching a CSS selector. id Returns an element whose ID attribute matches the search value. name Returns an element whose NAME attribute matches the search value. link text Returns an anchor element whose visible text matches the search value. partial link text Returns an anchor element whose visible text partially matches the search value. tag name Returns an element whose tag name matches the search value. xpath Returns an element matching an XPath expression. - URL Parameters:
:sessionId- ID of the session to route the command to.
- JSON Parameters:
using-{string}The locator strategy to use.value-{string}The The search target.
- Returns:
{ELEMENT:string}A WebElement JSON object for the located element.
- Potential Errors:
NoSuchWindow- If the currently selected window has been closed.NoSuchElement- If the element cannot be found.XPathLookupError- If using XPath and the input expression is invalid.
- Search for an element on the page, starting from the document root. The located element will be returned as a WebElement JSON object. The table below lists the locator strategies that each server should support. Each locator must return the first matching element located in the DOM.
/session/:sessionId/elements
POST /session/:sessionId/elements
- Search for multiple elements on the page, starting from the document root. The located elements will be returned as a WebElement JSON objects. The table below lists the locator strategies that each server should support. Elements should be returned in the order located in the DOM.
Strategy Description class name Returns all elements whose class name contains the search value; compound class names are not permitted. css selector Returns all elements matching a CSS selector. id Returns all elements whose ID attribute matches the search value. name Returns all elements whose NAME attribute matches the search value. link text Returns all anchor elements whose visible text matches the search value. partial link text Returns all anchor elements whose visible text partially matches the search value. tag name Returns all elements whose tag name matches the search value. xpath Returns all elements matching an XPath expression. - URL Parameters:
:sessionId- ID of the session to route the command to.
- JSON Parameters:
using-{string}The locator strategy to use.value-{string}The The search target.
- Returns:
{Array.<{ELEMENT:string}>}A list of WebElement JSON objects for the located elements.
- Potential Errors:
NoSuchWindow- If the currently selected window has been closed.XPathLookupError- If using XPath and the input expression is invalid.
- Search for multiple elements on the page, starting from the document root. The located elements will be returned as a WebElement JSON objects. The table below lists the locator strategies that each server should support. Elements should be returned in the order located in the DOM.
/session/:sessionId/element/active
POST /session/:sessionId/element/active
- Get the element on the page that currently has focus. The element will be returned as a WebElement JSON object.
- URL Parameters:
:sessionId- ID of the session to route the command to.
- Returns:
{ELEMENT:string}A WebElement JSON object for the active element.
- Potential Errors:
NoSuchWindow- If the currently selected window has been closed.
/session/:sessionId/element/:id
GET /session/:sessionId/element/:id
- Describe the identified element.
Note: This command is reserved for future use; its return type is currently undefined. - URL Parameters:
:sessionId- ID of the session to route the command to.:id- ID of the element to route the command to.
- Potential Errors:
NoSuchWindow- If the currently selected window has been closed.StaleElementReference- If the element referenced by:idis no longer attached to the page's DOM.
- Describe the identified element.
/session/:sessionId/element/:id/element
POST /session/:sessionId/element/:id/element
- Search for an element on the page, starting from the identified element. The located element will be returned as a WebElement JSON object. The table below lists the locator strategies that each server should support. Each locator must return the first matching element located in the DOM.
Strategy Description class name Returns an element whose class name contains the search value; compound class names are not permitted. css selector Returns an element matching a CSS selector. id Returns an element whose ID attribute matches the search value. name Returns an element whose NAME attribute matches the search value. link text Returns an anchor element whose visible text matches the search value. partial link text Returns an anchor element whose visible text partially matches the search value. tag name Returns an element whose tag name matches the search value. xpath Returns an element matching an XPath expression. The provided XPath expression must be applied to the server "as is"; if the expression is not relative to the element root, the server should not modify it. Consequently, an XPath query may return elements not contained in the root element's subtree. - URL Parameters:
:sessionId- ID of the session to route the command to.:id- ID of the element to route the command to.
- JSON Parameters:
using-{string}The locator strategy to use.value-{string}The The search target.
- Returns:
{ELEMENT:string}A WebElement JSON object for the located element.
- Potential Errors:
NoSuchWindow- If the currently selected window has been closed.StaleElementReference- If the element referenced by:idis no longer attached to the page's DOM.NoSuchElement- If the element cannot be found.XPathLookupError- If using XPath and the input expression is invalid.
- Search for an element on the page, starting from the identified element. The located element will be returned as a WebElement JSON object. The table below lists the locator strategies that each server should support. Each locator must return the first matching element located in the DOM.
/session/:sessionId/element/:id/elements
POST /session/:sessionId/element/:id/elements
- Search for multiple elements on the page, starting from the identified element. The located elements will be returned as a WebElement JSON objects. The table below lists the locator strategies that each server should support. Elements should be returned in the order located in the DOM.
Strategy Description class name Returns all elements whose class name contains the search value; compound class names are not permitted. css selector Returns all elements matching a CSS selector. id Returns all elements whose ID attribute matches the search value. name Returns all elements whose NAME attribute matches the search value. link text Returns all anchor elements whose visible text matches the search value. partial link text Returns all anchor elements whose visible text partially matches the search value. tag name Returns all elements whose tag name matches the search value. xpath Returns all elements matching an XPath expression. The provided XPath expression must be applied to the server "as is"; if the expression is not relative to the element root, the server should not modify it. Consequently, an XPath query may return elements not contained in the root element's subtree. - URL Parameters:
:sessionId- ID of the session to route the command to.:id- ID of the element to route the command to.
- JSON Parameters:
using-{string}The locator strategy to use.value-{string}The The search target.
- Returns:
{Array.<{ELEMENT:string}>}A list of WebElement JSON objects for the located elements.
- Potential Errors:
NoSuchWindow- If the currently selected window has been closed.StaleElementReference- If the element referenced by:idis no longer attached to the page's DOM.XPathLookupError- If using XPath and the input expression is invalid.
- Search for multiple elements on the page, starting from the identified element. The located elements will be returned as a WebElement JSON objects. The table below lists the locator strategies that each server should support. Elements should be returned in the order located in the DOM.
/session/:sessionId/element/:id/click
POST /session/:sessionId/element/:id/click
- Click on an element.
- URL Parameters:
:sessionId- ID of the session to route the command to.:id- ID of the element to route the command to.
- Potential Errors:
NoSuchWindow- If the currently selected window has been closed.StaleElementReference- If the element referenced by:idis no longer attached to the page's DOM.ElementNotVisible- If the referenced element is not visible on the page (either is hidden by CSS, has 0-width, or has 0-height)
/session/:sessionId/element/:id/submit
POST /session/:sessionId/element/:id/submit
- Submit a
FORMelement. The submit command may also be applied to any element that is a descendant of aFORMelement. - URL Parameters:
:sessionId- ID of the session to route the command to.:id- ID of the element to route the command to.
- Potential Errors:
NoSuchWindow- If the currently selected window has been closed.StaleElementReference- If the element referenced by:idis no longer attached to the page's DOM.
- Submit a
/session/:sessionId/element/:id/text
GET /session/:sessionId/element/:id/text
- Returns the visible text for the element.
- URL Parameters:
:sessionId- ID of the session to route the command to.:id- ID of the element to route the command to.
- Potential Errors:
NoSuchWindow- If the currently selected window has been closed.StaleElementReference- If the element referenced by:idis no longer attached to the page's DOM.
/session/:sessionId/element/:id/value
POST /session/:sessionId/element/:id/value
- Send a sequence of key strokes to an element.
Any UTF-8 character may be specified, however, if the server does not support native key events, it should simulate key strokes for a standard US keyboard layout. The Unicode Private Use Area code points, 0xE000-0xF8FF, are used to represent pressable, non-text keys (see table below).Key Code NULL U+E000 Cancel U+E001 Help U+E002 Back space U+E003 Tab U+E004 Clear U+E005 Return1 U+E006 Enter1 U+E007 Shift U+E008 Control U+E009 Alt U+E00A Pause U+E00B Escape U+E00C Key Code Space U+E00D Pageup U+E00E Pagedown U+E00F End U+E010 Home U+E011 Left arrow U+E012 Up arrow U+E013 Right arrow U+E014 Down arrow U+E015 Insert U+E016 Delete U+E017 Semicolon U+E018 Equals U+E019 Key Code Numpad 0 U+E01A Numpad 1 U+E01B Numpad 2 U+E01C Numpad 3 U+E01D Numpad 4 U+E01E Numpad 5 U+E01F Numpad 6 U+E020 Numpad 7 U+E021 Numpad 8 U+E022 Numpad 9 U+E023 Key Code Multiply U+E024 Add U+E025 Separator U+E026 Subtract U+E027 Decimal U+E028 Divide U+E029 Key Code F1 U+E031 F2 U+E032 F3 U+E033 F4 U+E034 F5 U+E035 F6 U+E036 F7 U+E037 F8 U+E038 F9 U+E039 F10 U+E03A F11 U+E03B F12 U+E03C Command/Meta U+E03D 1 The return key is not the same as the enter key. The server must process the key sequence as follows:
- Each key that appears on the keyboard without requiring modifiers are sent as a keydown followed by a key up.
- If the server does not support native events and must simulate key strokes with JavaScript, it must generate keydown, keypress, and keyup events, in that order. The keypress event should only be fired when the corresponding key is for a printable character.
- If a key requires a modifier key (e.g. "!" on a standard US keyboard), the sequence is: modifier down, key down, key up, modifier up, where key is the ideal unmodified key value (using the previous example, a "1").
- Modifier keys (Ctrl, Shift, Alt, and Command/Meta) are assumed to be "sticky"; each modifier should be held down (e.g. only a keydown event) until either the modifier is encountered again in the sequence, or the
NULL(U+E000) key is encountered. - Each key sequence is terminated with an implicit
NULLkey. Subsequently, all depressed modifier keys must be released (with corresponding keyup events) at the end of the sequence.
- Each key that appears on the keyboard without requiring modifiers are sent as a keydown followed by a key up.
- URL Parameters:
:sessionId- ID of the session to route the command to.:id- ID of the element to route the command to.
- JSON Parameters:
value-{Array.<string>}The sequence of keys to type. An array must be provided. The server should flatten the array items to a single string to be typed.
- Potential Errors:
NoSuchWindow- If the currently selected window has been closed.StaleElementReference- If the element referenced by:idis no longer attached to the page's DOM.ElementNotVisible- If the referenced element is not visible on the page (either is hidden by CSS, has 0-width, or has 0-height)
- Send a sequence of key strokes to an element.
/session/:sessionId/keys
POST /session/:sessionId/keys
- Send a sequence of key strokes to the active element. This command is similar to the send keys command in every aspect except the implicit termination: The modifiers are not released at the end of the call. Rather, the state of the modifier keys is kept between calls, so mouse interactions can be performed while modifier keys are depressed.
- URL Parameters:
:sessionId- ID of the session to route the command to.
- JSON Parameters:
value-{Array.<string>}The keys sequence to be sent. The sequence is defined in thesend keys command.
- Potential Errors:
NoSuchWindow- If the currently selected window has been closed.
/session/:sessionId/element/:id/name
GET /session/:sessionId/element/:id/name
- Query for an element's tag name.
- URL Parameters:
:sessionId- ID of the session to route the command to.:id- ID of the element to route the command to.
- Returns:
{string}The element's tag name, as a lowercase string.
- Potential Errors:
NoSuchWindow- If the currently selected window has been closed.StaleElementReference- If the element referenced by:idis no longer attached to the page's DOM.
/session/:sessionId/element/:id/clear
POST /session/:sessionId/element/:id/clear
- Clear a
TEXTAREAortext INPUTelement's value. - URL Parameters:
:sessionId- ID of the session to route the command to.:id- ID of the element to route the command to.
- Potential Errors:
NoSuchWindow- If the currently selected window has been closed.StaleElementReference- If the element referenced by:idis no longer attached to the page's DOM.ElementNotVisible- If the referenced element is not visible on the page (either is hidden by CSS, has 0-width, or has 0-height)InvalidElementState- If the referenced element is disabled.
- Clear a
/session/:sessionId/element/:id/selected
GET /session/:sessionId/element/:id/selected
- Determine if an
OPTIONelement, or anINPUTelement of typecheckboxorradiobuttonis currently selected. - URL Parameters:
:sessionId- ID of the session to route the command to.:id- ID of the element to route the command to.
- Returns:
{boolean}Whether the element is selected.
- Potential Errors:
NoSuchWindow- If the currently selected window has been closed.StaleElementReference- If the element referenced by:idis no longer attached to the page's DOM.
- Determine if an
/session/:sessionId/element/:id/enabled
GET /session/:sessionId/element/:id/enabled
- Determine if an element is currently enabled.
- URL Parameters:
:sessionId- ID of the session to route the command to.:id- ID of the element to route the command to.
- Returns:
{boolean}Whether the element is enabled.
- Potential Errors:
NoSuchWindow- If the currently selected window has been closed.StaleElementReference- If the element referenced by:idis no longer attached to the page's DOM.
/session/:sessionId/element/:id/attribute/:name
GET /session/:sessionId/element/:id/attribute/:name
- Get the value of an element's attribute.
- URL Parameters:
:sessionId- ID of the session to route the command to.:id- ID of the element to route the command to.
- Returns:
{string|null}The value of the attribute, or null if it is not set on the element.
- Potential Errors:
NoSuchWindow- If the currently selected window has been closed.StaleElementReference- If the element referenced by:idis no longer attached to the page's DOM.
/session/:sessionId/element/:id/equals/:other
GET /session/:sessionId/element/:id/equals/:other
- Test if two element IDs refer to the same DOM element.
- URL Parameters:
:sessionId- ID of the session to route the command to.:id- ID of the element to route the command to.:other- ID of the element to compare against.
- Returns:
{boolean}Whether the two IDs refer to the same element.
- Potential Errors:
NoSuchWindow- If the currently selected window has been closed.StaleElementReference- If either the element refered to by:idor:otheris no longer attached to the page's DOM.
/session/:sessionId/element/:id/displayed
GET /session/:sessionId/element/:id/displayed
- Determine if an element is currently displayed.
- URL Parameters:
:sessionId- ID of the session to route the command to.:id- ID of the element to route the command to.
- Returns:
{boolean}Whether the element is displayed.
- Potential Errors:
NoSuchWindow- If the currently selected window has been closed.StaleElementReference- If the element referenced by:idis no longer attached to the page's DOM.
/session/:sessionId/element/:id/location
GET /session/:sessionId/element/:id/location
- Determine an element's location on the page. The point
(0, 0)refers to the upper-left corner of the page. The element's coordinates are returned as a JSON object withxandyproperties. - URL Parameters:
:sessionId- ID of the session to route the command to.:id- ID of the element to route the command to.
- Returns:
{x:number, y:number}The X and Y coordinates for the element on the page.
- Potential Errors:
NoSuchWindow- If the currently selected window has been closed.StaleElementReference- If the element referenced by:idis no longer attached to the page's DOM.
- Determine an element's location on the page. The point
/session/:sessionId/element/:id/location_in_view
GET /session/:sessionId/element/:id/location_in_view
- Determine an element's location on the screen once it has been scrolled into view.
Note: This is considered an internal command and should only be used to determine an element's
location for correctly generating native events. - URL Parameters:
:sessionId- ID of the session to route the command to.:id- ID of the element to route the command to.
- Returns:
{x:number, y:number}The X and Y coordinates for the element.
- Potential Errors:
NoSuchWindow- If the currently selected window has been closed.StaleElementReference- If the element referenced by:idis no longer attached to the page's DOM.
- Determine an element's location on the screen once it has been scrolled into view.
/session/:sessionId/element/:id/size
GET /session/:sessionId/element/:id/size
- Determine an element's size in pixels. The size will be returned as a JSON object with
widthandheightproperties. - URL Parameters:
:sessionId- ID of the session to route the command to.:id- ID of the element to route the command to.
- Returns:
{width:number, height:number}The width and height of the element, in pixels.
- Potential Errors:
NoSuchWindow- If the currently selected window has been closed.StaleElementReference- If the element referenced by:idis no longer attached to the page's DOM.
- Determine an element's size in pixels. The size will be returned as a JSON object with
/session/:sessionId/element/:id/css/:propertyName
GET /session/:sessionId/element/:id/css/:propertyName
- Query the value of an element's computed CSS property. The CSS property to query should be specified using the CSS property name, not the JavaScript property name (e.g.
background-colorinstead ofbackgroundColor). - URL Parameters:
:sessionId- ID of the session to route the command to.:id- ID of the element to route the command to.
- Returns:
{string}The value of the specified CSS property.
- Potential Errors:
NoSuchWindow- If the currently selected window has been closed.StaleElementReference- If the element referenced by:idis no longer attached to the page's DOM.
- Query the value of an element's computed CSS property. The CSS property to query should be specified using the CSS property name, not the JavaScript property name (e.g.
/session/:sessionId/orientation
GET /session/:sessionId/orientation
- Get the current browser orientation. The server should return a valid orientation value as defined in ScreenOrientation:
{LANDSCAPE|PORTRAIT}. - URL Parameters:
:sessionId- ID of the session to route the command to.
- Returns:
{string}The current browser orientation corresponding to a value defined in ScreenOrientation:{LANDSCAPE|PORTRAIT}.
- Potential Errors:
NoSuchWindow- If the currently selected window has been closed.
- Get the current browser orientation. The server should return a valid orientation value as defined in ScreenOrientation:
POST /session/:sessionId/orientation
- Set the browser orientation. The orientation should be specified as defined in ScreenOrientation:
{LANDSCAPE|PORTRAIT}. - URL Parameters:
:sessionId- ID of the session to route the command to.
- JSON Parameters:
orientation-{string}The new browser orientation as defined in ScreenOrientation:{LANDSCAPE|PORTRAIT}.
- Potential Errors:
NoSuchWindow- If the currently selected window has been closed.
- Set the browser orientation. The orientation should be specified as defined in ScreenOrientation:
/session/:sessionId/alert_text
GET /session/:sessionId/alert_text
- Gets the text of the currently displayed JavaScript
alert(),confirm(), orprompt()dialog. - URL Parameters:
:sessionId- ID of the session to route the command to.
- Returns:
{string}The text of the currently displayed alert.
- Potential Errors:
NoAlertPresent- If there is no alert displayed.
- Gets the text of the currently displayed JavaScript
POST /session/:sessionId/alert_text
- Sends keystrokes to a JavaScript
prompt()dialog. - URL Parameters:
:sessionId- ID of the session to route the command to.
- JSON Parameters:
text-{string}Keystrokes to send to theprompt()dialog.
- Potential Errors:
NoAlertPresent- If there is no alert displayed.
- Sends keystrokes to a JavaScript
/session/:sessionId/accept_alert
POST /session/:sessionId/accept_alert
- Accepts the currently displayed alert dialog. Usually, this is equivalent to clicking on the 'OK' button in the dialog.
- URL Parameters:
:sessionId- ID of the session to route the command to.
- Potential Errors:
NoAlertPresent- If there is no alert displayed.
/session/:sessionId/dismiss_alert
POST /session/:sessionId/dismiss_alert
- Dismisses the currently displayed alert dialog. For
confirm()andprompt()dialogs, this is equivalent to clicking the 'Cancel' button. Foralert()dialogs, this is equivalent to clicking the 'OK' button. - URL Parameters:
:sessionId- ID of the session to route the command to.
- Potential Errors:
NoAlertPresent- If there is no alert displayed.
- Dismisses the currently displayed alert dialog. For
/session/:sessionId/moveto
POST /session/:sessionId/moveto
- Move the mouse by an offset of the specificed element. If no element is specified, the move is relative to the current mouse cursor. If an element is provided but no offset, the mouse will be moved to the center of the element. If the element is not visible, it will be scrolled into view.
- URL Parameters:
:sessionId- ID of the session to route the command to.
- JSON Parameters:
element-{string}Opaque ID assigned to the element to move to, as described in the WebElement JSON Object. If not specified or is null, the offset is relative to current position of the mouse.xoffset-{number}X offset to move to, relative to the top-left corner of the element. If not specified, the mouse will move to the middle of the element.yoffset-{number}Y offset to move to, relative to the top-left corner of the element. If not specified, the mouse will move to the middle of the element.
/session/:sessionId/click
POST /session/:sessionId/click
- Click any mouse button (at the coordinates set by the last moveto command). Note that calling this command after calling buttondown and before calling button up (or any out-of-order interactions sequence) will yield undefined behaviour).
- URL Parameters:
:sessionId- ID of the session to route the command to.
- JSON Parameters:
button-{number}Which button, enum:{LEFT = 0, MIDDLE = 1 , RIGHT = 2}. Defaults to the left mouse button if not specified.
/session/:sessionId/buttondown
POST /session/:sessionId/buttondown
- Click and hold the left mouse button (at the coordinates set by the last moveto command). Note that the next mouse-related command that should follow is buttonup . Any other mouse command (such as click or another call to buttondown) will yield undefined behaviour.
- URL Parameters:
:sessionId- ID of the session to route the command to.
- JSON Parameters:
button-{number}Which button, enum:{LEFT = 0, MIDDLE = 1 , RIGHT = 2}. Defaults to the left mouse button if not specified.
/session/:sessionId/buttonup
POST /session/:sessionId/buttonup
- Releases the mouse button previously held (where the mouse is currently at). Must be called once for every buttondown command issued. See the note in click and buttondown about implications of out-of-order commands.
- URL Parameters:
:sessionId- ID of the session to route the command to.
- JSON Parameters:
button-{number}Which button, enum:{LEFT = 0, MIDDLE = 1 , RIGHT = 2}. Defaults to the left mouse button if not specified.
/session/:sessionId/doubleclick
POST /session/:sessionId/doubleclick
- Double-clicks at the current mouse coordinates (set by moveto).
- URL Parameters:
:sessionId- ID of the session to route the command to.
/session/:sessionId/touch/click
POST /session/:sessionId/touch/click
- Single tap on the touch enabled device.
- URL Parameters:
:sessionId- ID of the session to route the command to.
- JSON Parameters:
element-{string}ID of the element to single tap on.
/session/:sessionId/touch/down
POST /session/:sessionId/touch/down
- Finger down on the screen.
- URL Parameters:
:sessionId- ID of the session to route the command to.
- JSON Parameters:
x-{number}X coordinate on the screen.y-{number}Y coordinate on the screen.
/session/:sessionId/touch/up
POST /session/:sessionId/touch/up
- Finger up on the screen.
- URL Parameters:
:sessionId- ID of the session to route the command to.
- JSON Parameters:
x-{number}X coordinate on the screen.y-{number}Y coordinate on the screen.
session/:sessionId/touch/move
POST session/:sessionId/touch/move
- Finger move on the screen.
- URL Parameters:
:sessionId- ID of the session to route the command to.
- JSON Parameters:
x-{number}X coordinate on the screen.y-{number}Y coordinate on the screen.
session/:sessionId/touch/scroll
POST session/:sessionId/touch/scroll
- Scroll on the touch screen using finger based motion events. Use this command to start scrolling at a particular screen location.
- URL Parameters:
:sessionId- ID of the session to route the command to.
- JSON Parameters:
element-{string}ID of the element where the scroll starts.xoffset-{number}The x offset in pixels to scroll by.yoffset-{number}The y offset in pixels to scroll by.
session/:sessionId/touch/scroll
POST session/:sessionId/touch/scroll
- Scroll on the touch screen using finger based motion events. Use this command if you don't care where the scroll starts on the screen.
- URL Parameters:
:sessionId- ID of the session to route the command to.
- JSON Parameters:
xoffset-{number}The x offset in pixels to scrollby.yoffset-{number}The y offset in pixels to scrollby.
session/:sessionId/touch/doubleclick
POST session/:sessionId/touch/doubleclick
- Double tap on the touch screen using finger motion events.
- URL Parameters:
:sessionId- ID of the session to route the command to.
- JSON Parameters:
element-{string}ID of the element to double tap on.
session/:sessionId/touch/longclick
POST session/:sessionId/touch/longclick
- Long press on the touch screen using finger motion events.
- URL Parameters:
:sessionId- ID of the session to route the command to.
- JSON Parameters:
element-{string}ID of the element to long press on.
session/:sessionId/touch/flick
POST session/:sessionId/touch/flick
- Flick on the touch screen using finger motion events. This flickcommand starts at a particulat screen location.
- URL Parameters:
:sessionId- ID of the session to route the command to.
- JSON Parameters:
element-{string}ID of the element where the flick starts.xoffset-{number}The x offset in pixels to flick by.yoffset-{number}The y offset in pixels to flick by.speed-{number}The speed in pixels per seconds.
session/:sessionId/touch/flick
POST session/:sessionId/touch/flick
- Flick on the touch screen using finger motion events. Use this flick command if you don't care where the flick starts on the screen.
- URL Parameters:
:sessionId- ID of the session to route the command to.
- JSON Parameters:
xspeed-{number}The x speed in pixels per second.yspeed-{number}The y speed in pixels per second.
/session/:sessionId/location
GET /session/:sessionId/location
- Get the current geo location.
- URL Parameters:
:sessionId- ID of the session to route the command to.
- Returns:
{latitude: number, longitude: number, altitude: number}The current geo location.
POST /session/:sessionId/location
- Set the current geo location.
- URL Parameters:
:sessionId- ID of the session to route the command to.
- JSON Parameters:
location-{latitude: number, longitude: number, altitude: number}The new location.
/session/:sessionId/local_storage
GET /session/:sessionId/local_storage
- Get all keys of the storage.
- URL Parameters:
:sessionId- ID of the session to route the command to.
- Returns:
{Array.<string>}The list of keys.
- Potential Errors:
NoSuchWindow- If the currently selected window has been closed.
POST /session/:sessionId/local_storage
- Set the storage item for the given key.
- URL Parameters:
:sessionId- ID of the session to route the command to.
- JSON Parameters:
key-{string}The key to set.value-{string}The value to set.
- Potential Errors:
NoSuchWindow- If the currently selected window has been closed.
DELETE /session/:sessionId/local_storage
- Clear the storage.
- URL Parameters:
:sessionId- ID of the session to route the command to.
- Potential Errors:
NoSuchWindow- If the currently selected window has been closed.
/session/:sessionId/local_storage/key/:key
GET /session/:sessionId/local_storage/key/:key
- Get the storage item for the given key.
- URL Parameters:
:sessionId- ID of the session to route the command to.:key- The key to get.
- Potential Errors:
NoSuchWindow- If the currently selected window has been closed.
DELETE /session/:sessionId/local_storage/key/:key
- Remove the storage item for the given key.
- URL Parameters:
:sessionId- ID of the session to route the command to.:key- The key to remove.
- Potential Errors:
NoSuchWindow- If the currently selected window has been closed.
/session/:sessionId/local_storage/size
GET /session/:sessionId/local_storage/size
- Get the number of items in the storage.
- URL Parameters:
:sessionId- ID of the session to route the command to.
- Returns:
{number}The number of items in the storage.
- Potential Errors:
NoSuchWindow- If the currently selected window has been closed.
/session/:sessionId/session_storage
GET /session/:sessionId/session_storage
- Get all keys of the storage.
- URL Parameters:
:sessionId- ID of the session to route the command to.
- Returns:
{Array.<string>}The list of keys.
- Potential Errors:
NoSuchWindow- If the currently selected window has been closed.
POST /session/:sessionId/session_storage
- Set the storage item for the given key.
- URL Parameters:
:sessionId- ID of the session to route the command to.
- JSON Parameters:
key-{string}The key to set.value-{string}The value to set.
- Potential Errors:
NoSuchWindow- If the currently selected window has been closed.
DELETE /session/:sessionId/session_storage
- Clear the storage.
- URL Parameters:
:sessionId- ID of the session to route the command to.
- Potential Errors:
NoSuchWindow- If the currently selected window has been closed.
/session/:sessionId/session_storage/key/:key
GET /session/:sessionId/session_storage/key/:key
- Get the storage item for the given key.
- URL Parameters:
:sessionId- ID of the session to route the command to.:key- The key to get.
- Potential Errors:
NoSuchWindow- If the currently selected window has been closed.
DELETE /session/:sessionId/session_storage/key/:key
- Remove the storage item for the given key.
- URL Parameters:
:sessionId- ID of the session to route the command to.:key- The key to remove.
- Potential Errors:
NoSuchWindow- If the currently selected window has been closed.
/session/:sessionId/session_storage/size
GET /session/:sessionId/session_storage/size
- Get the number of items in the storage.
- URL Parameters:
:sessionId- ID of the session to route the command to.
- Returns:
{number}The number of items in the storage.
- Potential Errors:
NoSuchWindow- If the currently selected window has been closed.
/session/:sessionId/log
POST /session/:sessionId/log
- Get the log for a given log type. Log buffer is reset after each request.
- URL Parameters:
:sessionId- ID of the session to route the command to.
- JSON Parameters:
type-{string}The log type. This must be provided.
- Returns:
{Array.<object>}The list of log entries.
/session/:sessionId/log/types
GET /session/:sessionId/log/types
- Get available log types.
- URL Parameters:
:sessionId- ID of the session to route the command to.
- Returns:
{Array.<string>}The list of available log types.
/session/:sessionId/application_cache/status
GET /session/:sessionId/application_cache/status
- Get the status of the html5 application cache.
- URL Parameters:
:sessionId- ID of the session to route the command to.
- Returns:
{number}Status code for application cache: {UNCACHED = 0, IDLE = 1, CHECKING = 2, DOWNLOADING = 3, UPDATE_READY = 4, OBSOLETE = 5}
6 - Legacy Selenium Desired Capabilities
This documentation previously located on the wiki
See JSON Wire Protocol for common capabilities.
Remote Driver Specific
| Key | Type | Description |
|---|---|---|
| webdriver.remote.sessionid | string | WebDriver session ID for the session. Readonly and only returned if the server implements a server-side webdriver-backed selenium. |
| webdriver.remote.quietExceptions | boolean | Disable automatic screnshot capture on exceptions. This is False by default. |
Grid Specific
| Key | Type | Description |
|---|---|---|
| path | string | Path to route request to, or maybe listen on. |
| seleniumProtocol | string | Which protocol to use. Accepted values: WebDriver, Selenium. |
| maxInstances | integer | Maximum number of instances to allow to connect to grid |
| environment | string | Possible duplicate of browserName? See RegistrationRequest |
Selenium RC Specific
| Key | Type | Description |
|---|---|---|
| proxy_pac | boolean | Legacy proxy mechanism. Do not use. |
| commandLineFlags | string | Flags to pass to browser command line. |
| executablePath | string | Path to browser executable. |
| timeoutInSeconds | long integer | Timeout to wait for the browser to launch, in seconds. |
| onlyProxySeleniumTraffic | boolean | Whether to only proxy selenium traffic. See browserlaunchers.Proxies |
| avoidProxy | boolean | ??? See browserlaunchers.Proxies |
| proxyEverything | boolean | ??? See browserlaunchers.Proxies |
| proxyRequired | boolean | ??? See browserlaunchers.Proxies |
| browserSideLog | boolean | ??? See AbstractBrowserLauncher. |
| optionsSet | boolean | ??? See BrowserOptions. |
| singleWindow | boolean | Whether to enable single window mode. |
| dontInjectRegex | javascript RegExp | Regular expression that proxy injection mode can use to know when to bypss injection. Ignored if not in proxy injection mode. |
| userJSInjection | boolean | ??? Whether to inject user JS. Ignored if not in proxy injection mode. |
| userExtensions | string | Path to a JavaScript file that will be loaded into selenium. |
Selenese-Backed-WebDriver specific
| Key | Type | Description |
|---|---|---|
| selenium.server.url | string | URL of Selenium server to use, to back this WebDriver |
Firefox specific
| Key | Type | Description |
|---|---|---|
| captureNetworkTraffic | boolean | Whether to capture network traffic. |
| addCustomRequestHeaders | boolean | Whether to add custom request headers. |
| trustAllSSLCertificates | boolean | Whether to trust all SSL certificates. |
| changeMaxConnections | boolean | ??? See FirefoxChromeLauncher. |
| firefoxProfileTemplate | string | ??? See FirefoxChromeLauncher. |
| profile | string | ??? See FirefoxChromeLauncher |
FirefoxProfile settings
Preferences accepted by the FirefoxProfile with special meaning, in the WebDriver API:
| Key | Type | Description |
|---|---|---|
| webdriver_accept_untrusted_certs | boolean | Whether to trust all SSL certificates. TODO: Maybe in some way different to the acceptSslCerts or trustAllSSLCertificates capabilities. |
| webdriver_assume_untrusted_issuer | boolean | Whether to trust all SSL certificate issuers. TODO: Maybe in some way different to the acceptSslCerts or trustAllSSLCertificates capabilities. |
| webdriver.log.driver | string | Level at which to log FirefoxDriver logging statements to a temporary file, so that they can be retrieved by a getLogs command. Available options; DEBUG, INFO, WARNING, ERROR, OFF. Defaults to OFF. |
| webdriver.log.file | string | Path to file to which to copy firefoxdriver logging output. Defaults to no file (like /dev/null). |
| webdriver.load.strategy | string | Experimental API. Defines different strategies for how long to wait until a page is loaded. Values: unstable, conservative. Defaults to conservative. |
| webdriver_firefox_port | integer | Port to listen on for WebDriver commands. Defaults to 7055. |
IE specific
| Key | Type | Description |
|---|---|---|
| killProcessesByName | boolean | Whether to try to kill processes by name, instead (or addition) to killing processes we happen to have handles to. |
| honorSystemProxy | boolean | Whether to honor the system proxy. |
| ensureCleanSession | boolean | Whether to make sure the session has no cookies or temporary internet files on Windows. I believe this is passed to the IEDriver as well, but ignored by it. |
Safari specific
| Key | Type | Description |
|---|---|---|
| honorSystemProxy | boolean | Whether to honour the sysem proxy. |
| ensureCleanSession | boolean | Whether to make sure the session has no cookies, cache entries. And that any registry and proxy settings are restored after the session. |
7 - Legacy developer documentation
7.1 - Crazy Fun Build Tool
This documentation previously located on the wiki
WebDriver is a large project: if we tried to push everything into a single monolithic build file it eventually becomes unmanageable. We know this. We’ve tried it. So we broke the single Rakefile into a series of build.desc files. Each of these describe a part of the build.
Let’s take a look at a build.desc file. This is part of the main test build.desc:
java_test(name = "single",
  srcs = [
    "SingleTestSuite.java",
  ],
  deps = [
    ":tests",
    "//java/server/src/org/openqa/selenium/server",
    "//java/client/test/org/openqa/selenium/v1:selenium-backed-webdriver-test",
    "//java/client/test/org/openqa/selenium/firefox:test",
  ]  ])
Targets
This highlights most of the key concepts. Firstly, it declares target, in this case there is a single java_test target.
Each target has a name attribute.
Target Names
The combination of the location of the “build.desc” file and the name are used to derive the rake tasks that are generated. All task names are prefixed with “//” followed by the path to the directory containing the “build.desc” file relative to the Rakefile, followed by a “:” and then the name of the target within the “build.desc”. An example makes this far clearer :)
The rake task generated by this example is //java/client/test/org/openqa/selenium:single
Short Target Names
As a shortcut, if a target is named after the directory containing the “build.desc” file, you can omit the part of the rake task name after the colon. In our example: //java/server/src/org/openqa/selenium/server is the same as //java/server/src/org/openqa/selenium/server:server.
Implicit Targets
Some build rules supply implicit targets, and provide related extensions to a normal build target. Examples include generating archives of source code, or running tests. These are declared by appending a further colon and the name of the implicit target to the full name of a build rule. In our example, you could run the tests using “//java/client/test/org/openqa/selenium:single:run”
Each of the rules described below have a list of implicit targets that are associated with them.
Outputs
Each target specified in a “build.desc” file produces one and only one output. This is important. Keep it in mind. Generally, all output files are placed in the “build” directory, relative to the rake task name. In our example, the output of “//java/org/openqa/selenium/server” would be found in “build/java/org/openqa/selenium/server.jar”. Build rules should output the names and locations of any files that they generate.
Dependencies
Take a look at the “deps” section of the “single” target above. The ":tests" is a reference to a target in the current “build.desc” file, in this case, it’s a “java_library” target immediately above. You’ll also see that there’s a reference to several full paths. For example "//java/server/src/org/openqa/selenium/server" This refers to another target defined in a crazy fun build.desc file.
Browsers
The py_test and js_test rules have special handling for running the same tests in multiple browsers. Relevant browser-specific meta-data is held in rake-tasks/browsers.rb. The general way to use this is to append _browsername to the target name; without the _browsername suffix, the tests will be run for all browsers.
As an example, if we had a js_test rule //foo/bar, we would run its tests in firefox by running the target //foo/bar_ff:run or we would run in all available browsers by running the target //foo/bar:run
Build Targets
You can list all the build targets using the -T option. e.g.
./go -T
Being a brief description of the available targets that you can use.
Common Attributes
The following attributes are required for all build targets:
| Attribute Name | Type | Meaning |
|---|---|---|
| name | string | Used to derive the rake target and (often) the name of the generated binary |
The following attributes are commonly used:
| Attribute Name | Type | Meaning |
|---|---|---|
| srcs | array | The raw source to be build for this target |
| deps | array | Prerequisites of this target |
java_library
- Output: JAR file named after the “name” attribute if the “srcs” attribute is set.
- Implicit Targets: run (if “main” attribute specifiec), project, project-srcs, uber, zip
- Required Attributes: “name” and at least one of “srcs” or “deps”.
| Attribute Name | Type | Meaning |
|---|---|---|
| deps | array | As above |
| srcs | array | As above |
| resources | array | Any resources that should be copied into the jar file. |
| main | string | The full classname of the main class of the jar (used for creating executable jars) |
java_test
- Output: JAR file named after the “name” attribute if the “srcs” attribute is set.
- Implicit Targets: run, project, project-srcs, uber, zip
- Required Attributes: “name” and at least one of “srcs” or “deps”.
| Attribute Name | Type | Meaning |
|---|---|---|
| deps | array | As above. |
| srcs | array | As above. |
| resources | array | Any resources that should be copied into the jar file. |
| main | string | The alternative class to use for running these tests. |
| args | string | The argument line to pass to the main class |
| sysproperties | array | An array of maps containing System properties that should be set |
js_deps
- Output: Marker file to indicate task is up to date.
- Implicit Targets: None
- Required Attributes: “name” and “srcs”
| Attribute Name | Type | Meaning |
|---|---|---|
| name | string | As above |
| srcs | array | As above |
| deps | array | As above |
js_binary
- Output: A monolithic JS file containing all dependencies and sources compiled using the closure compiler without optimizations.
- Implicit Targets: None
- Required Attributes: At least one of srcs or deps.
| Attribute Name | Type | Meaning |
|---|---|---|
| name | string | As above |
| srcs | array | As above |
| deps | array | As above |
js_fragment
- Output: Source of an anonymous function representing the exported function, compiled by the closure compiler with all optimizations turned on.
- Implicit Targets: None
- Required Attributes: name, module, function, deps
| Attribute Name | Type | Meaning |
|---|---|---|
| name | string | As above |
| module | string | The name of the module containing the function |
| function | string | The full name of the function to export |
| deps | array | As above |
js_fragment_header
- Output: A C header file with all js_fragment dependencies declared as constants.
- Implicit Targets: None
- Required Attributes: name, deps
| Attribute Name | Type | Meaning |
|---|---|---|
| name | string | As above |
| srcs | array | As above |
| deps | array | As above |
js_test
- Output:
- Implicit Targets:
_BROWSER:run, run - Required Attributes: None.
| Attribute Name | Type | Meaning |
|---|---|---|
| deps | array | As above. |
| srcs | array | As above. |
| path | string | The path at which to expect the test files to be hosted on the test server. |
| browsers | array | List of browsers, from rake_tasks/browsers.rb, to run the tests in. Will only attempt to run tests in those browsers which are available on the system. If absent, defaults to all browsers on the system. |
Assuming browsers = [‘ff’, ‘chrome’], for target //foo, the implicit targets: //foo_ff:run and //foo_chrome:run will be generated, which run the tests in each of those browsers, and the implicit target //foo:run will be generated, which runs the tests in both ff and chrome.
py_test
- Output: Creates the directory structure required to run the listed python tests.
- Implicit Targets:
_BROWSER:run, run - Required Attributes: name.
| Attribute Name | Type | Meaning |
|---|---|---|
| deps | array | Other py_test rule(s), whose tests should also be run. |
| common_tests | array | Test file(s) to be run in all browsers. These tests will be passed through a template, with browser-specific substitutions, so that they are laid out properly for each browser in the python output file tree. |
| BROWSER_specific_tests | array | Test file(s) to be run only in browser BROWSER. |
| resources | array | Resources which should be copied to the python directory structure. |
| browsers | array | List of browsers, from rake_tasks/browsers.rb, to run the tests in. Will only attempt to run tests in those browsers which are available on the system. If absent, defaults to all browsers on the system. |
Note: Every py_test invocation is performed in a new virtualenv.
rake_task
- Output: A crazy fun build rule that can be referred to “blow the escape” hatch and use ordinary rake targets.
- Implicit Targets: None
- Required Attributes: name, task_name, out.
| Attribute Name | Type | Meaning |
|---|---|---|
| name | string | As above |
| task_name | string | The ordinary rake target to call |
| out | string | The file that is generated, relative to the Rakefile |
gcc_library
- Output: Shared library file named after the “name” attribute if the “srcs” attribute is set.
- Implicit Targets: None.
- Required Attributes: “name” and “srcs”.
| Attribute Name | Type | Meaning |
|---|---|---|
| srcs | array | As above |
| arch | string | “amd64” for 64-bit builds, “i386” for 32-bit builds. |
| args | string | Arguments to the compiler (-I flags, for example). |
| link_args | string | Arguments to the linker (-l flags, for example) |
Note: When building a new library for the first time, the build will succeed but copying to pre-built will fail with a similar message:
cp build/cpp/amd64/libimetesthandler64.so
go aborted!
can't convert nil into String
Solution: Copy the just-built library to the appropriate prebuilt folder (cpp/prebuilt/arch/).
7.2 - Buck Build Tool
This documentation previously located on the wiki
You can read the documentation for the legacy Crazy Fun Build tool.
Building Selenium with Buck
The easiest thing to do is to just run “./go”. The build process will download the right version of Buck for you so long as there’s no .nobuckcheck file in the root of the project. The download ends up in buck-out/crazy-fun/HASH/buck.pex where HASH is the value of the current buck version (given in the .buckversion file in the root of the project.
If you’d like to build and run our fork of Buck, then:
git clone https://github.com/SeleniumHQ/buck.git
cd buck && ant
export PATH=`pwd`/bin:$PATH
cd ~/src/selenium
buck build chrome firefox htmlunit remote leg-rc
buck test --all
Updating the buck.pex
Should you need to update the version of Buck that is downloaded:
- Checkout the source to Buck and build the PEX:
buck build --show-output buck - Figure out the git hash of the version you’ve just built. Normally that’ll be the HEAD of master. Put that full hash into the
.buckversionof the main selenium project. - Put the md5 hash of the PEX into the
.buckhashfile in the main selenium project. - Create a new release of SeleniumHQ’s Buck fork on GitHub. The name is
buck-release-$VERSION, where $VERSION is whatever’s in.buckversionin the main selenium project. - Upload the PEX to the release, and make the release public.
- Commit the changes to the main selenium project and push them.
7.3 - Adding new drivers to Selenium 2 code
This documentation previously located on the wiki \
Introduction
WebDriver has a comprehensive suite of tests that describe the expected behavior of a new implementation. We’ll assume that you’re implementing the driver in Java for the sake of simplicity, but you can take a look at any of the existing implementations for how we handle more complex builds or other languages once you’ve read this.
Writing a New WebDriver Implementation
Create New Top-Level Directories
Create a new top-level folder, parallel to “common” and “firefox”, named after your browser. In this, create a “src/java” and a “test/java” directory. It should be obvious what goes where.
Set Up a Test Suite
Copy one of the existing test suites to your test tree, and modify it for your new browser. This will probably cause you to modify the “Ignore.java” class, which is to be expected, and to add a holding class for your implementation in the source tree. You must include the “common” directory in order to pick up all the tests. For now, as long as nothing causes a fatal crash, leave the tests as they are.
Once you’ve added the test suite, add a “build.desc” CrazyFunBuild file in the top level of your project. Model it after the one in the “htmlunit” directory. You should then be able to run your tests from the command line using the “go” script.
At this point, we expect total and catastrophic failure when tests are being run.
Start Implementing
If your browser runs out of process, it is strongly encouraged to make use of the JsonWireProtocol. This will make the client-side (the APIs that users use) relatively cheap to implement, and means that you get Java, C#, Ruby and Python support for significantly less effort since you can extend the remote client.
Implementation Tips
Where to Start
As mentioned, has a suite of tests. The suggested order to make these pass is roughly:
- ElementFindingTest — needed because element location is key
- PageLoadingTest
- ChildrenFindingTest — more finding elements
- FormHandlingTest
- FrameSwitchingTest
- ExecutingJavascriptTest
- JavascriptEnabledDriverTest
At this point, you’ll have a reasonably complete working driver. After that, it’s probably best to get the user interactions correct:
- CorrectEventFiringTest
- TypingTest
Before spelunking into the cutting-edge stuff:
- AlertsTest
It’s not necessary to get every test working in a class before moving on. I tend to go as far down a class as I can, and then switch to the next class on the list when the going gets tough. This allows you to maintain reasonable velocity and still cover the basics.
Running a Single Test
It’s far from ideal, but the method we use is to modify the SingleTestSuite class in the common project, and then modify the module it’s run from via the IDE’s UI (that is, just go into the launch configuration (in IDEA) and modify the module used: don’t move the file!) This class should be self-explanatory.
Ignoring Tests
At some point you’ll want to stop running tests on an ad-hoc basis and make use of a continuous build product to ensure that you’re not introducing regressions. At this point, the process is to run the tests from the command line. This will generate a list of failing tests. Go through each of these tests and add or modify the “@Ignore” associated with the test. Re-run the tests. It may take a few iterations, but your build will eventually go green. Nice.
The build makes use of ant behind the scenes and stores logs in “build/build_log.xml” and the test logs in “build/test_logs”
7.4 - Selenium's Continuous Integration Implementation
This documentation previously located on the wiki
General architecture
We have a number of Google Compute Engine virtual machines running Ubuntu, currently hosted at {0..29}.ci.seleniumhq.org - they have publicly addressable DNS set up to point ab.{0..29}.ci.seleniumhq.org pointing at them as well, so that cookie tests can do subdomain lookups.
One of these machines, ci.seleniumhq.org, is running jenkins. If you want a login on jenkins, get in touch with juangj. The Build All Java job polls SCM for changes, and does the following:
- Does a clean build of the ‘release’ target, any tests which are going to be run, and any artifacts (e.g. the IEDriverServer executable) which will be required to run those tests
- Tars up the entire built working directory and publishes it to http://ci.seleniumhq.org/selenium-trunk-r${REVISION}.tgz - this is used later by test runs
- Publishes the selenium-server-standalone jar to http://ci.seleniumhq.org/selenium-server-standalone-r${REVISION}.tgz - this is copied down directly by SauceLabs when running tests.
- Zips up the IEDriverServer and publishes it to http://ci.seleniumhq.org/IEDriverServer-Win32-r${REVISION}.zip - this is copied down directly by SauceLabs to run IE tests This machine is backed by a 1TB persistent disk, which can hold many build artifacts, but they should be cleared out occasionally (particularly when moving disk between zones).
When this build is successful, it triggers downstream builds for each OS/browser/test combination we care about. It also triggers a downstream clean build to ensure our maven poms are still in order (“Maven build”).
Apart from “Maven build” which runs on the same build node as the compile (a beefy, 8-CPU machine with 32GB RAM), all downstream builds run on separate build nodes.
The downstream builds are configured using environment variables, as per the SauceDriver class. The downstream builds download the selenium-trunk tar from the build master, and then run tests (which should already have been compiled by the Build All Java rule). Two of these downstream builds are special; “HtmlUnit Java Tests” and “Small Tests” just run headless locally. The others use SauceLabs.
A note about networking: The build nodes are set up on an internal network 10.1.0/24, so network communication between them is incredibly fast and free.
When a non-headless browser test is running, the test-file servlet hosts the test files on ports determined by an environment variable (231${EXECUTOR_NUMBER} and 241${EXECUTOR_NUMBER} - EXECUTOR_NUMBER is currently always equal to 0). The hostname used by tests is set by an environment variable (ab.${NODE_NAME}.ci.seleniumhq.org where NODE_NAME in {0..29}). A browser is requested from SauceLabs using our credentials (stored in jenkins-wide environment variables, set on the System Configuration page). Jenkins is currently set to run three test-classes at a time in parallel, per test run, again on the System Configuration page.
The tests are run, and the results get notified to IRC.
Thanks to SauceLabs and Google for donating the infrastructure to run all of these tests.
FAQ
I want to run my tests on Sauce like Jenkins does (my tests are failing on CI, but work fine on my machine!)
See the SauceDriver page
I want to add a new browser (Firefox has released a new version!)
Jenkins doesn’t have a great concept of templates. I (dawagner) have some selenium scripts which automate the UI of Jenkins, to create new jobs using canned settings. If you want to do it manually, here are roughly the steps to take:
- Find the most similar config(s) you want to copy. If it’s a new Firefox release, find the latest firefox (which should have roughly 6 builds associated with it: Javascript + Java {Windows,Linux} **{Native,Synthesized}
- For each of those builds, create a New Job (menu on the left hand side of the home page, when logged in)
- Name the job in the style of the others. Select “Copy existing job”, and enter the job you’re copying.
- Scroll through the job it’s pre-populated. Replace the version numbers, browser name, and any other details that need replacing. For firefox updates, there are currently three places you should be replacing the number (the “browser_version” field, and two in the Build Execute Shell)
- Save
- Go to the Build All Java task, configure it, add your new build to the “Projects to build” field where there are many others listed.**
If it’s a firefox update, you probably also want to delete an existing build.
7.5 - Google Summer of Code 2011
This documentation previously located on the wiki
What is Google Summer of Code?
Since 2005, Google has administered Google Summer of Code Program to encourage student participation in open source development. The program has several goals:
- Inspire young developers to begin participating in open source development
- Provide students in Computer Science and related fields the opportunity to do work related to their academic pursuits during the summer
- Give students more exposure to real-world software development scenarios (e.g., distributed development, software licensing questions, mailing-list etiquette, etc.)
- Get more open source code created and released for the benefit of all
- Help open source projects identify and bring in new developers and committers
Google will pay successful student contributors a $5000 USD stipend, enabling them to focus on their coding projects for three months. The deadline for application is April 8, 2011.
When participating in the Selenium - Google Summer of Code program, students will learn that testing, and building automated testing tools, can be both fun and an integral part of delivering high quality software. The collaborative effort with Selenium contributors can provide you with a new toolset to develop and document a set of components used by thousands of people. You will gain valuable professional experience towards your career development and ultimately help drive higher quality web applications everywhere.
Please Email questions to GSoC coordinator Adam Goucher
Student Eligibility
- 18 years of age or older by April 26, 2010
- Currently enrolled in an accredited institution such as colleges, university, master programs, PhD programs and undergraduate programs
- Residents and nationals of countries other than Iran, Syria, Cuba, Sudan, North Korea and Myanmar (Burma) with whom we are prohibited by U.S. law from engaging in commerce
- Strong skills in some or more of the following: Web Application Development, JavaScript, Python, Flash, iPhone / Android
- Self-directed, resourceful, responsible, communicative
- Ability to work full-time from May 24 – August 20, 2010 (students residing in SF Bay Area may have an opportunity to work on-site from time to time with some of our mentors)
- More info on Student Eligibility can be found here
If you meet the above requirements, we’d love to have you apply to Selenium for this year’s Google Summer of Code.
Next steps and deadlines
- Read Expectations to understand what is expected of you.
- Read Applications to find out what to put on your application.
- Take a look at the Project Ideas. If any interest you, feel free to contact the proposer for details. You can also discuss your own project ideas with the people mentioned or talk about them on our developer mailing list or on IRC #selenium on freenode
- Submit your application directly to Google before April 8, 2011. You can modify your application with your mentors’ feedback after your initial submission, the final version of your application is due April 23, 2011.
- Selenium GSoC team will finish reviewing applications and match students with mentors by April 23, 2011.
- Google announces accepted students on April 26, 2011.
Please Email questions to GSoC coordinator Adam Goucher
Project Ideas
These are project ideas proposed by mentors. Please send a post to the developer mailing list if you are interested in it or email GSoC coordinator Adam Goucher.
A Scriptable Proxy
Mentor Patrick Lightbody(?)
Difficulty
<unknown>
Description Selenium is a browser control framework, but sometimes you want to do things to/with the traffic generates. The ‘right’ way to do this is to put a proxy in the middle and use its API to do get / fiddle with the traffic information. This project extends the BrowserMob proxy to add the APIs that users of Selenium would need.
Tags Se-RC, Se2
Image Based Locators
Mentor
<unknown>
Difficulty
<unknown>
Description Sikuli gets a lot of play for its ability to interact with items on the page based on Images. This project would add Image Based Locators to the list of available ones.
Tags Se-RC, Se2, Se-IDE
Selenese Runner
Mentor Adam Goucher
Difficulty
<unknown>
Description It is possible to run Selenese scripts outside of Se-IDE with the -htmlSuite option on the server. There are a number of downsides to this, like the need to start/stop the server constantly. This project will create a standalone ‘runner’ for Selenese scripts to interact with the server – and remove the related code from the server.
Tags Se-RC, Se, Se-IDE
Perspective mentors
It’s not too late to apply to be a mentor, if you are interested, please add your project idea here and discuss logistics with Adam Goucher
Expectations
Summary
This page covers, in detail, the expectations for Google Summer of Code students in regards to communication. This is useful for Selenium projects which haven’t codified their expectations–they can point to this document and use it as is.
The Google Summer of Code coding period is very short. On top of that, many students haven’t done a lot of real-world development/engineering work previously; one of the primary purposes of the program is to introduce students to F/OSS and real-world development scenarios. On top of that, most mentors and students are in different locations–so face-to-face time is difficult. Because of this, it’s vitally important to the success of the GSoC project for all expectations to be specified before students begin coding on May 26th. This should be the first step in a long series of frequent communication between student and mentor(s).
This document walks through various expectations for students and mentors, as well as addressing various ways to communicate effectively.
40 hour work week
Students are expected to work at least 40 hours a week on their GSoC project. This is essentially a full-time job.
The benefits for the GSoC project are huge:
- the chance to become part of a project community over the long term–this can lead to involvement with other projects, social network, good friends, valuable resources, …
- the chance to work with real developers on a real project
- the end result of the student’s project can be used for resume material that is available for all future employers to see
The final point is an important one for a beginning developer. Employers greatly appreciate having a referenceable body of work when looking at potential employees. Your code says more about your abilities than any amount of algorithms on a whiteboard can.
And of course, the program will provide you with 5000 USD in income and a really cool t-shirt.
Some GsoC students have become prominent technology bloggers, committers to open source projects, speakers at conferences, mentors for other students, and more…
Self-motivation and steady schedule
The student is expected to be self-motivated. The mentor may push the student to excel, but if the student is not self-motivated to work, then the student probably won’t get much out of participating. The student should schedule time to work on the project each day and keep to a regular schedule. It’s not acceptable to fiddle around for days on end and then pull an all-nighter just before deadlines. It will show in your code.
Regular Weekly Meeting and Frequent Communication with mentor
Regular weekly meeting with your mentor is a must. The planned meeting should cover:
- what you’re currently working on
- how far you’ve gotten
- how you’re implementing it
- what you plan on working on next
- what issues have come up
- what you did to get around them
- what’s blocking you if you’re stuck
- code review, when applicable
The mentor is one of the most valuable resources for GSoC projects. The mentor is both a solid developer and a solid engineer. The mentor likely has worked on the project for long enough to know the history of decisions, how things are architected, the other people involved, the process for doing things, and all other cultural lore that will help the student be most successful.
Before the GSoC project starts, the mentor and student should iron out answers to the following questions:
- When is the regular, scheduled communication scheduled? Weekly? Every two days? Mondays, Wednesdays, Fridays?
- What is the best medium to use for regular, scheduled communication? VOIP? Telephone call? Face-to-face?
- What is the best medium to use for non-scheduled communication? Email? Instant messenger?
DO:
- be considerate of your time and your mentor’s time and plan for your regular meeting
- Consider emailing the answers to the above agenda ahead of time so you can spend your time productively on coming up with solutions, code reviews, and planning for the next milestones.
- talk to your mentors and developers on the mailing list / IRC frequently, outside of your planned meeting
- your mentor is not the only person that can help you out and keep you stay on track, Selenium has a nice community and you will learn a lot from the other people as well.
- let your mentor know what your schedule is
- Are you going on vacation, moving, writing papers for class? If your mentor doesn’t know where you’ll be or to expect a lag in your productivity, your mentor can’t help you course correct or plan accordingly.
AVOID:
- going for more than a week without communicating with your mentor
- The project timeline doesn’t allow for unplanned gaps in communication.
Version control
Students should be using version control for their project.
DO:
- commit-early/commit-often
- This allows issues to be caught quickly and prevents the dreaded one-massive-commit-before-deadline.
- use quality commit messages
Bad examples: Fixed a bug. Tweaks.
Good examples: Fixed a memory leak where the thingamajig wasn’t getting freed after the parent doohicky was freed. Fixed bug #902 (on Google Code) by changing the comparison used for duplicate removal. Implemented Joe’s good idea about rendering in a separate buffer and then swapping the buffer in after rendering is complete. Improved HTML by simplifying tables.
- refer to specific bug numbers, links, and issues as much as possible
- The history in version control is frequently the best timeline log of what happened, why, and who did it.
AVOID:
- checking in multiple non-related changes in one big commit
- If something is bad about one of the changes and someone needs to roll it back, it’s more difficult to do so.
- checking in changes that haven’t been tested
Communication with project
Most F/OSS projects have mailing lists for project members and the community and/or have IRC channels to communicate. These communication channels allow the student to keep in touch with the other project members and are an incredibly valuable resource. Other members of the project may be better versed in various parts of the project, they may provide a fallback if the mentor isn’t available, and they may be a good sounding board for figuring out the specific behavior for features. You are assigned a mentor, but the whole community is there to help you learn. Make use of all the resources at your disposal.
Shyness is a common problem for students who are new to open source development. At the beginning of the project, the student is encouraged to send a “Hello! I’m … and I’m working on a GSoC project on … and here’s a link to the proposal.” email to project mailing lists and encouraged to log in and say “hi” on IRC. Break the ice early–it makes the rest of the project easier. If you don’t know where you announce yourself, ask your mentor.
Project mailing lists
Mailing lists are a great way to work out feature specifications and expected behavior.
Often mailing lists are archived and the archives are a rich source of information regarding prior discussions, decisions, and technical errata.
DO:
- search through the archives for answers before asking on the list
- be courteous at all times
- be specific
- Cite data, references, and use links wherever possible when discussing technical things.
- be patient
- Don’t expect an answer within minutes or hours; people often read their mailing-list messages once per day.
AVOID:
- being rude
- Since most mailing lists are archived or recorded, it’s likely anything you say will be available for everyone to see forever; exercise good manners in all aspects of life.
- saying things with all capital letters and excessive punctuation
- This is perceived as shouting
- getting into heated arguments
- If someone insults you, it’s best to ignore it.
IRC
Most F/OSS projects have an IRC channel and some have more than one. People from the project and its community “hang out” on these channels and talk about various things. Some projects have regularly scheduled meetings to cover the status of the project, how development is going, status of major blocking bugs, map out future plans, …
If the project has an IRC channel, it’s a good idea to hang out there. This allows the student to interact with the community and also a forum for working out problems and ideas in real time.
DO:
- hang out on the project IRC channels when you’re working on the project
- take time to interact with people who are on the IRC channel This builds community and it’s easier to get help from people who are familiar with you than people who aren’t.
AVOID:
- saying things with all capital letters and excessive punctuation This is perceived as shouting.
- poor grammar It makes it harder for other people to understand what you’re trying to say.
- being rude
We’re all real people with real feelings and if you’re rude it’s likely people will interact with you and help you less; also it’s not uncommon for IRC history to be recorded and archived for all to see forever.
See:
Design documents
It’s a good idea for the student to maintain design documents during the course of the GSoC project. These design documents should cover:
- the project plan, with additional detail to flesh out the original program application
- deviations from the project plan and how and why the original design plan changed
- any issues that could not be worked out or overcome
- possible future directions
- any resources used or relevant specifications
The student and mentor should work out what design documents should be maintained during the course of the GSoC.
One thing to note is that the student shouldn’t spend all his/her time doing design documents. It’s important to keep track of the design, but it’s also important to get some code done. The mentor should be able to help the student strike a balance between these two goals.
Blogging
Students should get in the habit of blogging about about his/her work at least once every two weeks. Historically, students who do learn much faster, are more productive, and develop a stronger tie to the community. Some have gone on to become contributors, others have given talks / presentations at conferences. How would you like to see your career grow?
Application
Evaluation Criteria
We recognized that very few students have exposures to Selenium during their studies and will therefore evaluate you based on your:
- ability to think, learn, and reason
- talents (what have you accomplished thus far, programming and otherwise)
- attitude, communications, ability to work well with the community and your mentor
- availability and commitment to succeeding in GSoC and potential for continuous involvement with community
- in a nutshell, what makes you a good person to lead that project initiative :-)
As long as you get your application in before April 9, you will have until April 18 to fine-tune your proposal with our mentors.
Preparing Your Proposal
Here are some questions to get you started. You don’t have to follow it and your application will still be considered, but it’s a good place to start.
Feel free to include anything else you feel is important. One liner answers are not likely going to be considered. In the meanwhile, do feel free to introduce yourself to the community and discuss your project proposal by writing to our developer mailing list.
General Questions:
- Give us a short introduction of yourself.
- Email address and phone number we can reach you at.
- What are you studying? What year of study will you be in September 2010?
- How much time can you devote to Summer of code? What else are you doing this summer?
Your Experience:
- How did you get started with programming? How long have you been doing it? Why do you love it? Any personal projects you can show us? Have you participated in coding contests / taught / mentor other students?
- What are your programming interests? Are you a C guy - do you like to get down and dirty with the linux kernel? Do you know more about Java than your peers? Or are you more of a python/ruby person? What about JavaScript? You know, what’s your style?
- Have you worked for a sofware company as a programmer before?
- Have you worked on an open source project before? Which ones? Describe your participation
- Do you have a blog? A resume?
- What makes you a good person for Google Summer of Code? What do you want to get out of it?
Project Questions:
- What idea did you choose?
- Elaborate on the idea and describe what you would like to accomplish during the summer. This question is especially important if you have your own idea instead of picking one from our list, as we want to have a good understanding of what you’re proposing so we can help you take the idea forward.
- Give us a brief time-line of the project for the things you’d like to accomplish. It’s OK to include thinking time (“investigation”) in your work schedule. Work should include:
- investigation
- programming
- documentation
- dissemination
- How do you plan to test your code? What version control and build systems do you plan to use?
- If your project is very successful, do you wish to contributing to it further once Google Summer of Code is complete?
Sample Proposal Outline
A good proposal will have the following component:
- Name and Contact Information. Include email, phone(s), IM, Skype, etc.
- Title. One liner on the goal to your project.
- Synopsis. Short summary, what would your project do?
- Benefits to Community. Why would Google and Selenium be proud to sponsor this work? How would open source or society as a whole benefit?
- Deliverables. We want to know that you have a plan and that at the end of the summer, something get delivered. :-) Give a brief, clear work breakdown structure with milestones and deadlines. Make sure to label deliverables as optional or required. You may want plan to start by producing some kind of whitepaper, or planning the project in traditional Software Engineering style. It’s OK to include thinking time (“investigation”) in your work schedule. Work should include:
- investigation
- programming
- documentation
- dissemination
- Description. A small list of project details. Your mentors can give you some guidance on this, but start by letting us know you are thinking :-)
- rough architecture
- links to parallel projects that you may get insights from
- what version control and build system do you plan to use
- how do you plan to test
- best practices to get your code accepted, etc.
- Bio. Who are you? What makes you the best person to work on this project?
- Summarize your education, work, and open source experience.
- List your skills and give evidence of your qualifications. Convince us that you can do the work.
- Any published papers, successful open source projects, etc? Please tell us!
- Please list any non-Summer-of-Code plans you have for the Summer, especially employment and class-taking. Be specific about schedules and time commitments.
7.6 - Developer Tips
This documentation previously located on the wiki
Running an Individual Test
When developing WebDriver, it is common to want to run a single test rather than the entire test suite for a particular driver.
You can run all the tests in a given test class this way:
./go test_firefox onlyRun=CombinedInputActionsTest
You can also run a single test directly from the command line by typing:
./go test_firefox method=foo
Not Halting On Errors Or Failures
The test suite will halt on errors and failures by default. You can disable this behaviour by setting the haltonerror or haltonfailure environmental variables to 0.
Reviewing the Logs For the Tests
When you run the tests, the test results don’t appear on the screen. They are written to the `./build/test_logs’ folder. A pair of files are written. Their names are relatively consistent and include the details of the tests which were run. The pair comprise a txt file and an xml file. The xml file contains more information about the runtime environment such as the path, Ant version, etc. These files are overwritten the next time the same test target is executed so you may want to archive results if they’re important to you.
Using Rake
Rake is very similar to using other build tools such as “make” or “ant”. You can specify a “target” to run by adding it as a parameter, and you can add more than one target at a time. Note that since WebDriver does not rely on ruby being installed and uses JRuby, rake should not be involved directly - use the go script instead. For example, in order to clean the build and then build and run the HtmlUnitDriver tests:
./go clean test_htmlunit
The default target that’s used will compile the code and run all the tests. More interesting targets are:
| Target | Description |
|---|---|
| clean | Delete the contents of the build directory, removing all compiled artifacts |
| test | Compile the dependencies of and run all the tests for the HtmlUnitDriver, FirefoxDriver, and InternetExplorerDriver as well as the support library’s tests |
| firefox | Compile the FirefoxDriver |
| htmlunit | Compile the HtmlUnitDriver |
| ie | Compile the InternetExplorerDriver. This won’t compile the C++ on a non-Windows system, but will always compile the Java, no matter which OS you happen to be using |
| support | Guess what this does :) |
| test_htmlunit | Compile the dependencies and then run the tests for the HtmlUnitDriver. The same “test_x” pattern can be followed for all the compilation targets in this table. |
Running a remote Debugger with Java tests
You can run the tests in debug mode and wait for a remote java listener (which one would setup in eclipse or intellij).
./go debug=true suspend=true test_firefox
Debugging the Firefox Driver
Getting output from the Firefox process itself
This is usually useful to debug issues with Firefox starting up. The Java system property webdriver.firefox.logfile will instruct the FirefoxDriver to redirect the output to a file:
java -Dwebdriver.firefox.logfile=/dev/stdout -cp selenium-2.jar <sometest>
Outputting to the Error Console
A common technique used for debugging of the Firefox driver extension is debug statements. The two following methods can be used from almost any Javascript code inside the extension:
Logger.dumpn()- Logs a string into console (and converts arguments to strings). For example:Logger.dumpn("Found element: " + node).Logger.dump()- Gets a single argument, an object, and dumps its entire contents: implemented interfaces, data fields, methods, etc.
Getting output from the error console to a file
To see output generated using the Logger utility, one has to open up Firefox’s error console - difficult or simply impossible on remote machines. Fortunately, there’s a way to get the contents of the output dumped to a file:
FirefoxProfile p = new FirefoxProfile();
p.setPreference("webdriver.log.file", "/tmp/firefox_console");
WebDriver driver = new FirefoxDriver(p);
...
The webdriver.log.file preference will instruct the Logger to dump all contents of the console to the specified file.
webdriver.log.file
Getting even more output to the command line
When suspecting additional logging from Firefox could be beneficial, one can crank debugging level all the way up:
export NSPR_LOG_MODULES=all:3
Setting this environment variable will cause Firefox to log additional messages to the console. Use this environment variable together with webdriver.firefox.logfile to get a hold of Firefox’s output to the console.
Debugging the Internet Explorer Driver
In order to get detailed information from IEDriverServer.exe you can run tests with the option devMode=true, this option will set logging level to DEBUG and redirect log output to the file iedriver.log
./go test_ie devMode=true
Adding a test
Most of WebDriver’s test cases live under java/client/test/org/openqa/selenium. For example, to demonstrate an issue with clicking on elements, a test case should be added to ClickTest. The test cases already have a driver instance - no need to create one. The test use pages that are served by an in-process server, served from common/src/web. Their URLs are provided by the Pages class, so when adding a page and add it to the Pages class as well.
Manually interacting with RemoteWebDriverServer
We can use a web browser or tools such as telnet to interact with a RemoteWebDriverServer e.g. to debug the JSON protocol. Here’s a simple example of checking the status of a server installed on the local machine
In a web browser
http://localhost:8080/wd/hub/status/
In telnet
telnet localhost 8080

GET /wd/hub/status/ HTTP/1.0
On Macs and Unix in general try curl
curl http://localhost:8080/wd/hub/status
And on linux wget
wget http://localhost:8080/wd/hub/status
In all these cases the RemoteWebDriverServer should respond with
{status:0}
7.7 - Snapshot of Roadmaps for Selenium Releases
Preparation for Selenium 2
Date unknown This documentation previously located on the wiki
The following issues need to be resolved before the final release:
| Issue | Summary | HtmlUnitDriver Progress | FirefoxDriver Progress | InternetExplorerDriver Progress | ChromeDriver Progress |
|---|---|---|---|---|---|
| 27 | Handle alerts in Javascript-enabled browsers | n/a | Started | Started | Not Started |
| 32 | User guide | Started | |||
| 34 | Support HTTP Basic and Digest Authentication | Not Started | |||
| 35 | Selenium emulation | Done for Java and C# | |||
| 36 | Support for drag and drop behaviour | n/a | Done | Done | Started |
| none | Example tests | Not Started |
A final release will be made once these are implemented in Firefox, IE and at least one webkit-based browser.
The Future
The following are also planned:
- JsonWireProtocol — The formalisation of the current RemoteWebDriver wire protocol in JSON.
Preparation for Selenium 3
As of Mar 16, 2015 This documentation previously located on the wiki
User Visible Changes
- Migrate all drivers to use the status strings rather than status codes in responses
- Update client bindings to also cope with that
- Write a new runner for the html-suite tests
- Segment the build to remove RC
Clean up
- Using WebDriver after quit() should be an IllegalStateException
- Actions to have a single end point
- Capabilities to be the same as the spec
- Multiple calls to WebDriver.quit() should still be safe.
- Clean up WebDriver constructors, pulling heavy initialization logic into a Builder class
- Migrate to Netty or webbit server
- Delete unnecessary cruft
- Land a cleaner end point for the rc emulation
Preparation for Selenium 4
This documentation previously located on the wiki As of April 12, 2017
- Finish the W3C WebDriver Spec
- Implement the local end requirements for the spec in selenium
- Implement protocol conversion in the standalone server
- Ship 4.0
Development Partners


Selenium Level Sponsors


Support the Selenium Project
Learn more or view the full list of sponsors.