Grid
Want to run tests in parallel across multiple machines? Then, Grid is for you.
Selenium Grid allows the execution of WebDriver scripts on remote machines
by routing commands sent by the client to remote browser instances.
Grid aims to:
- Provide an easy way to run tests in parallel on multiple machines
- Allow testing on different browser versions
- Enable cross platform testing
Interested? Go through the following sections to understand
how Grid works, and how to set up your own.
1 - Getting started with Selenium Grid
Instructions for a simple Selenium Grid
Quick start
- Prerequisites
- Java 11 or higher installed
- Browser(s) installed
- Browser driver(s)
- Download the Selenium Server jar file from the latest release
- Start the Grid
java -jar selenium-server-<version>.jar standalone
- Point* your WebDriver tests to http://localhost:4444
- (Optional) Check running tests and available capabilities by opening your browser at http://localhost:4444
*Wondering how to point your tests to http://localhost:4444?
Check the RemoteWebDriver section.
To learn more about the different configuration options, go through the sections below.
Grid roles
Grid is composed by six different components, which gives
you the option to deploy it in different ways.
Depending on your needs, you can start each one of them on its own (Distributed), group
them in Hub & Node, or all in one on a single machine (Standalone).
Standalone
Standalone combines all Grid components seamlessly
into one. Running a Grid in Standalone mode gives you a fully functional Grid
with a single command, within a single process. Standalone can only run on a
single machine.
Standalone is also the easiest mode to spin up a Selenium Grid. By default, the server
will listen for RemoteWebDriver requests on http://localhost:4444.
By default, the server will detect the available drivers that it can use from the System
PATH.
java -jar selenium-server-<version>.jar standalone
After starting successfully the Grid in Standalone mode, point your WebDriver tests
to http://localhost:4444.
Common use cases for Standalone are:
- Develop or debug tests using
RemoteWebDriver locally - Running quick test suites before pushing code
- Have a easy to setup Grid in a CI/CD tool (GitHub Actions, Jenkins, etc…)
Hub and Node
Hub and Node is the most used role because it allows to:
- Combine different machines in a single Grid
- Machines with different operating systems and/or browser versions, for example
- Have a single entry point to run WebDriver tests in different environments
- Scaling capacity up or down without tearing down the Grid
Hub
A Hub is composed by the following components:
Router, Distributor, Session Map, New Session Queue, and Event Bus.
java -jar selenium-server-<version>.jar hub
By default, the server will listen for RemoteWebDriver requests on http://localhost:4444.
Node
During startup time, the Node will detect the available drivers that it can use from the System
PATH.
The command below assumes the Node is running on the same machine where the Hub is running.
java -jar selenium-server-<version>.jar node
More than one Node on the same machine
Node 1
java -jar selenium-server-<version>.jar node --port 5555
Node 2
java -jar selenium-server-<version>.jar node --port 6666
Node and Hub on different machines
Hub and Nodes talk to each other via HTTP and the Event Bus
(the Event Bus lives inside the Hub). A Node sends a message to the Hub via the Event Bus to
start the registration process. When the Hub receives the message, reaches out to the Node via HTTP to
confirm its existence.
To successfully register a Node to a Hub, it is important to expose the Event Bus ports (4442 and 4443 by
default) on the Hub machine. This also applies for the Node port. With that, both Hub and Node will
be able to communicate.
If the Hub is using the default ports, the --hub flag can be used to register the Node
java -jar selenium-server-<version>.jar node --hub http://<hub-ip>:4444
When the Hub is not using the default ports, the --publish-events and --subscribe-events flags are needed.
For example, if the Hub uses ports 8886, 8887, and 8888
java -jar selenium-server-<version>.jar hub --publish-events tcp://<hub-ip>:8886 --subscribe-events tcp://<hub-ip>:8887 --port 8888
The Node needs to use those ports to register successfully
java -jar selenium-server-<version>.jar node --publish-events tcp://<hub-ip>:8886 --subscribe-events tcp://<hub-ip>:8887
Distributed
When using a Distributed Grid, each component is started separately, and ideally on different machines.
It is important to expose all ports properly in order to allow fluent communication between all components.
- Event Bus: enables internal communication between different Grid components.
Default ports are: 4442, 4443, and 5557.
java -jar selenium-server-<version>.jar event-bus --publish-events tcp://<event-bus-ip>:4442 --subscribe-events tcp://<event-bus-ip>:4443 --port 5557
- New Session Queue: adds new session requests to a queue, which will be queried by the Distributor
Default port is 5559.
java -jar selenium-server-<version>.jar sessionqueue --port 5559
- Session Map: maps session IDs to the Node where the session is running
Default Session Map port is 5556. Session Map interacts with the Event Bus.
java -jar selenium-server-<version>.jar sessions --publish-events tcp://<event-bus-ip>:4442 --subscribe-events tcp://<event-bus-ip>:4443 --port 5556
- Distributor: queries the New Session Queue for new session requests, and assigns them to a Node when the capabilities match. Nodes register to the Distributor the way they register to the Hub in a Hub/Node Grid.
Default Distributor port is 5553. Distributor interacts with New Session Queue, Session Map, Event Bus, and the Node(s).
java -jar selenium-server-<version>.jar distributor --publish-events tcp://<event-bus-ip>:4442 --subscribe-events tcp://<event-bus-ip>:4443 --sessions http://<sessions-ip>:5556 --sessionqueue http://<new-session-queue-ip>:5559 --port 5553 --bind-bus false
- Router: redirects new session requests to the queue, and redirects running sessions requests to the Node running that session.
Default Router port is 4444. Router interacts with New Session Queue, Session Map, and Distributor.
java -jar selenium-server-<version>.jar router --sessions http://<sessions-ip>:5556 --distributor http://<distributor-ip>:5553 --sessionqueue http://<new-session-queue-ip>:5559 --port 4444
- Node(s)
Default Node port is 5555.
java -jar selenium-server-<version>.jar node --publish-events tcp://<event-bus-ip>:4442 --subscribe-events tcp://<event-bus-ip>:4443
Add metadata to your tests and consume it via GraphQL
or visualize parts of it (like se:name) through the Selenium Grid UI.
Metadata can be added by prefixing a capability with se:. Here is a quick example in Java showing that.
ChromeOptions chromeOptions = new ChromeOptions();
chromeOptions.setCapability("browserVersion", "100");
chromeOptions.setCapability("platformName", "Windows");
// Showing a test name instead of the session id in the Grid UI
chromeOptions.setCapability("se:name", "My simple test");
// Other type of metadata can be seen in the Grid UI by clicking on the
// session info or via GraphQL
chromeOptions.setCapability("se:sampleMetadata", "Sample metadata value");
WebDriver driver = new RemoteWebDriver(new URL("http://gridUrl:4444"), chromeOptions);
driver.get("http://www.google.com");
driver.quit();
Querying Selenium Grid
After starting a Grid, there are mainly two ways of querying its status, through the Grid
UI or via an API call.
The Grid UI can be reached by opening your preferred browser and heading to
http://localhost:4444.
API calls can be done through the http://localhost:4444/status
endpoint or using GraphQL
For simplicity, all command examples shown in this page assume that components are running
locally. More detailed examples and usages can be found in the
Configuring Components section.
Using the Java 11 HTTP Client
Selenium v4.5
By default, Grid will use AsyncHttpClient.
AsyncHttpClient is an open-source library built on top of Netty. It allows the execution of HTTP
requests and responses asynchronously. Additionally it also provides WebSocket support. Hence it
is a good fit.
However, AsyncHttpClient is not been actively maintained since June 2021. It coincides with the
fact that Java 11+ provides a built-in HTTP and WebSocket client. Currently, Selenium
has plans to upgrade the minimum version supported to Java 11. However, it is a sizeable effort.
Aligning it with major releases and accompanied announcements is crucial to ensure the user
experience is intact.
To do use the Java 11 client, you will need to download the selenium-http-jdk-client jar file
and use the --ext flag to make it available in the Grid jar’s classpath.
The jar file can be downloaded directly from repo1.maven.org
and then start the Grid in the following way:
java -Dwebdriver.http.factory=jdk-http-client -jar selenium-server-<version>.jar --ext selenium-http-jdk-client-<version>.jar standalone
An alternative to downloading the selenium-http-jdk-client jar file is to use Coursier.
java -Dwebdriver.http.factory=jdk-http-client -jar selenium-server-<version>.jar --ext $(coursier fetch -p org.seleniumhq.selenium:selenium-http-jdk-client:<version>) standalone
If you are using the Hub/Node(s) mode or the Distributed mode, setting the -Dwebdriver.http.factory=jdk-http-client
and --ext flags needs to be done for each one of the components.
Grid sizes
Choosing a Grid role depends on what operating systems and browsers need to be supported,
how many parallel sessions need to be executed, the amount of available machines, and how
powerful (CPU, RAM) those machines are.
Creating sessions concurrently relies on the available processors to the Distributor.
For example, if a machine has 4 CPUs, the Distributor will only be able to create up
to 4 sessions concurrently.
By default, the maximum amount of concurrent sessions a Node supports is limited by
the number of CPUs available. For example, if the Node machine has 8CPUs, it can run
up to 8 concurrent browser sessions (with the exception of Safari, which is always one).
Additionally, it is expected that each browser session should use around 1GB RAM.
In general, it is a recommended to have Nodes as small as possible. Instead of having
a machine with 32CPUs and 32GB RAM to run 32 concurrent browser sessions, it is better to
have 32 small Nodes in order to better isolate processes. With this, if a Node
fails, it will do it in an isolated way. Docker is a good tool to achieve this approach.
Note that the default values (1CPU/1GB RAM per browser) are a recommendation and they could
not apply to your context. It is recommended to use them as a reference, but measuring
performance continuously will help to determine the ideal values for your environment.
Grid sizes are relative to the amount of supported concurrent sessions and amount of
Nodes, and there is no “one size fits all”. Sizes mentioned below are rough estimations
thay can vary between different environments. For example a Hub/Node with 120 Nodes
might work well when the Hub has enough resources. Values below are not set on stone,
and feedback is welcomed!
Small
Standalone or Hub/Node with 5 or less Nodes.
Middle
Hub/Node between 6 and 60 Nodes.
Large
Hub/Node between 60 and 100 Nodes. Distributed with over 100 Nodes.
Warning
Selenium Grid must be protected from external access using appropriate
firewall permissions.
Failure to protect your Grid could result in one or more of the following occurring:
- You provide open access to your Grid infrastructure
- You allow third parties to access internal web applications and files
- You allow third parties to run custom binaries
See this blog post on Detectify, which gives a good
overview of how a publicly exposed Grid could be misused:
Don’t Leave your Grid Wide Open
Further reading
2 - When to Use Grid
Is Grid right for you?
When would you use a Selenium Grid?
- To run your tests in parallel, against different browser types, browser versions, operating systems
- To reduce the time needed to execute a test suite
Selenium Grid runs test suites in parallel against multiple machines (called Nodes).
For large and long-running test suites, this can save minutes, hours, or perhaps days.
This shortens the turnaround time for test results as your application under test (AUT)
changes.
Grid can run tests (in parallel) against multiple different browsers, and it can
run against multiple instances of the same browser. As an example, let’s imagine
a Grid with six Nodes. The first machine has Firefox’s latest version,
the second has Firefox “latest minus one”, the third gets the latest Chrome, and
the remaining three machines are Mac Minis, which allows for three tests to run in
parallel on the latest version of Safari.
Execution time can be expressed as a simple formula:
Number of Tests * Average Test Time / Number of Nodes = Total Execution Time
   15      *       45s        /        1        =      11m 15s   // Without Grid
   15      *       45s        /        5        =      2m 15s    // Grid with 5 Nodes
   15      *       45s        /        15       =      45s       // Grid with 15 Nodes
  100      *       120s       /        15       =      13m 20s   // Would take over 3 hours without Grid
As the test suite is executing, the Grid allocates the tests to run against these
browsers as configured in the tests.
A configuration such as this can greatly speed up the execution time of even the largest Selenium test suites.
Selenium Grid is a completely native part of the Selenium project, and is maintained in parallel by the same team
of committers who work in the core Selenium development. Recognizing the importance of test execution speed, Grid
has been a critical part of the Selenium project since the earliest days.
3 - Selenium Grid Components
Understand how to use the different Grid components
Selenium Grid 4 is a ground-up rewrite from previous versions. In addition to a comprehensive
set of improvements to performance and standards compliance, the different functions of the grid were
broken out to reflect a more modern age of computing and software development. Purpose-build for containerization
and cloud-distributed scalability, Selenium Grid 4 is a wholly new solution for the modern era.
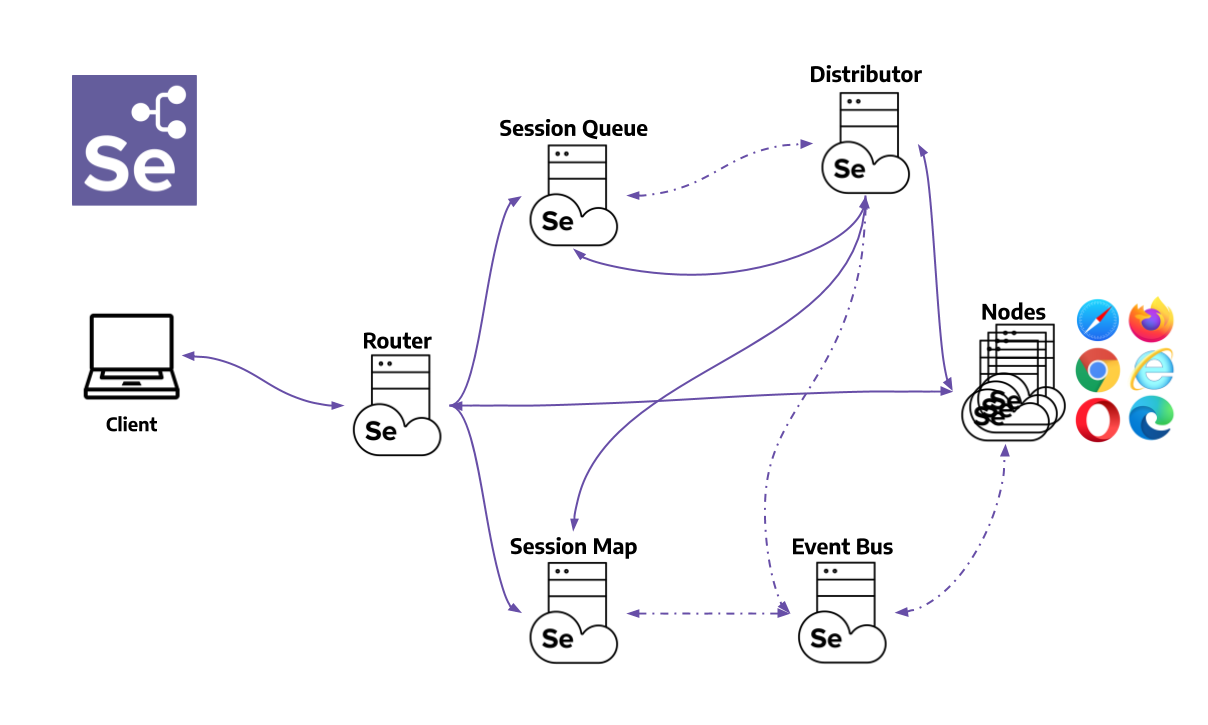
Router
The Router is the entry point of the Grid, receiving all external requests, and forwards them to
the correct component.
If the Router receives a new session request, it will be forwarded to the New Session Queue.
If the request belongs to an existing session, the Router will query the Session Map to get
the Node ID where the session is running, and then the request will be forwarded directly to the
Node.
The Router balances the load in the Grid by sending the requests to the component that is able
to handle them better, without overloading any component that is not needed in the process.
Distributor
The Distributor has two main responsibilities:
Register and keep track of all Nodes and their capabilities
A Node registers to the Distributor by sending a Node registration event through
the Event Bus. The Distributor reads it, and then tries to reach the Node via HTTP
to confirm its existence. If the request is successful, the Distributor registers the Node
and keeps track of all Nodes capabilities through the GridModel.
Query the New Session Queue and process any pending new session requests
When a new session request is sent to the Router, it gets forwarded to the New Session Queue,
where it will wait in the queue. The Distributor will poll the New Session Queue for pending
new session requests, and then finds a suitable Node where the session can be created. After the
session has been created, the Distributor stores in the Session Map the relation between the
session id and Node where the session is being executed.
Session Map
The Session Map is a data store that keeps the relationship between the session id and the Node
where the session is running. It supports the Router in the process of forwarding a request to the
Node. The Router will ask the Session Map for the Node associated to a session id.
New Session Queue
The New Session Queue holds all the new session requests in a FIFO order. It has configurable
parameters for setting the request timeout and request retry interval (how often the timeout will
be checked).
The Router adds the new session request to the New Session Queue and waits for the response.
The New Session Queue regularly checks if any request in the queue has timed out, if so the request
is rejected and removed immediately.
The Distributor regularly checks if a slot is available. If so, the Distributor polls the
New Session Queue for the first matching request. The Distributor then attempts to create
a new session.
Once the requested capabilities match the capabilities of any of the free Node slots, the Distributor
attempts to get the available slot. If all the slots are busy, the Distributor will send the request back
to the queue. If request times out while retrying or adding to the front of the queue, it will be rejected.
After a session is created successfully, the Distributor sends the session information to the New Session Queue,
which then gets sent back to the Router, and finally to the client.
Node
A Grid can contain multiple Nodes. Each Node manages the slots for the available browsers of the machine
where it is running.
The Node registers itself to the Distributor through the Event Bus, and its configuration is sent as
part of the registration message.
By default, the Node auto-registers all browser drivers available on the path of the machine where it runs.
It also creates one slot per available CPU for Chromium based browsers and Firefox. For Safari, only one slot is
created. Through a specific configuration, it can run sessions in Docker
containers or relay commands.
A Node only executes the received commands, it does not evaluate, make judgments, or control anything other
than the flow of commands and responses. The machines where the Node is running does not need to have the
same operating system as the other components. For example, A Windows Node might have the capability of
offering IE Mode on Edge as a browser option, whereas this would not be possible on Linux or Mac, and a Grid can
have multiple Nodes configured with Windows, Mac, or Linux.
Event Bus
The Event Bus serves as a communication path between the Nodes, Distributor, New Session Queue,
and Session Map. The Grid does most of its internal communication through messages, avoiding expensive HTTP
calls. When starting the Grid in its fully distributed mode, the Event Bus is the first component that
should be started.
Running your own Grid
Looking forward to using all these components and run your own Grid?
Head to the
“Getting Started”
section to understand how to put all these pieces together.
4 - Configuration of Components
Here you can see how each Grid component can be configured individually based on common configuration values and component-specific configuration values.
4.1 - Configuration help
Get information about all the available options to configure Grid.
The help commands display information based on the current code implementation.
Hence, it will provide accurate information in case the documentation is not updated.
It is the easiest way to learn about Grid 4 configuration for any new version.
Info Command
The info command provides detailed docs on the following topics:
- Configuring Selenium
- Security
- Session Map setup
- Tracing
Config help
Quick config help and overview is provided by running:
java -jar selenium-server-<version>.jar info config
Security
To get details on setting up the Grid servers for secure communication and node registration:
java -jar selenium-server-<version>.jar info security
Session Map setup
By default, Grid uses a local session map to store session information.
Grid supports additional storage options like Redis and JDBC - SQL supported databases.
To set up different session storage, use the following command to get setup steps:
java -jar selenium-server-<version>.jar info sessionmap
Setting up tracing with OpenTelemetry and Jaeger
By default, tracing is enabled. To export traces and visualize them via Jaeger, use the following command for instructions:
java -jar selenium-server-<version>.jar info tracing
List the Selenium Grid commands
java -jar selenium-server-<version>.jar --config-help
It will show all the available commands and description for each one.
Component help commands
Pass –help config option after the Selenium role to get component-specific config information.
Standalone
java -jar selenium-server-<version>.jar standalone --help
Hub
java -jar selenium-server-<version>.jar hub --help
Sessions
java -jar selenium-server-<version>.jar sessions --help
New Session Queue
java -jar selenium-server-<version>.jar sessionqueue --help
Distributor
java -jar selenium-server-<version>.jar distributor --help
Router
java -jar selenium-server-<version>.jar router --help
Node
java -jar selenium-server-<version>.jar node --help
4.2 - CLI options in the Selenium Grid
All Grid components configuration CLI options in detail.
Different sections are available to configure a Grid. Each section has options can be configured
through command line arguments.
A complete description of the component to section mapping can be seen below.
Note that this documentation could be outdated if an option was modified or added
but has not been documented yet. In case you bump into this situation, please check
the “Config help” section and feel free to send us a
pull request updating this page.
Sections
Distributor
| Option | Type | Value/Example | Description |
|---|
--healthcheck-interval | int | 120 | How often, in seconds, will the health check run for all Nodes. This ensures the server can ping all the Nodes successfully. |
--distributor | uri | http://localhost:5553 | Url of the distributor. |
--distributor-host | string | localhost | Host on which the distributor is listening. |
--distributor-implementation | string | org.openqa.selenium.grid.distributor.local.LocalDistributor | Full class name of non-default distributor implementation |
--distributor-port | int | 5553 | Port on which the distributor is listening. |
--reject-unsupported-caps | boolean | false | Allow the Distributor to reject a request immediately if the Grid does not support the requested capability. Rejecting requests immediately is suitable for a Grid setup that does not spin up Nodes on demand. |
--slot-matcher | string | org.openqa.selenium.grid.data.DefaultSlotMatcher | Full class name of non-default slot matcher to use. This is used to determine whether a Node can support a particular session. |
--slot-selector | string | org.openqa.selenium.grid.distributor.selector.DefaultSlotSelector | Full class name of non-default slot selector. This is used to select a slot in a Node once the Node has been matched. |
--newsession-threadpool-size | int | 24 | The Distributor uses a fixed-sized thread pool to create new sessions as it consumes new session requests from the queue. This allows configuring the size of the thread pool. The default value is no. of available processors * 3. Note: If the no. of threads is way greater than the available processors it will not always increase the performance. A high number of threads causes more context switching which is an expensive operation. |
--purge-nodes-interval | int | 30 | How often, in seconds, will the Distributor purge Nodes that have been down for a while. This is calculated based on the heartbeat received from a particular node. |
Docker
| Option | Type | Value/Example | Description |
|---|
--docker-assets-path | string | /opt/selenium/assets | Absolute path where assets will be stored |
--docker- | string[] | selenium/standalone-firefox:latest '{"browserName": "firefox"}' | Docker configs which map image name to stereotype capabilities (example `-D selenium/standalone-firefox:latest ‘{“browserName”: “firefox”}’) |
--docker-devices | string[] | /dev/kvm:/dev/kvm | Exposes devices to a container. Each device mapping declaration must have at least the path of the device in both host and container separated by a colon like in this example: /device/path/in/host:/device/path/in/container |
--docker-host | string | localhost | Host name where the Docker daemon is running |
--docker-port | int | 2375 | Port where the Docker daemon is running |
--docker-url | string | http://localhost:2375 | URL for connecting to the Docker daemon |
--docker-video-image | string | selenium/video:latest | Docker image to be used when video recording is enabled |
--docker-host-config-keys | string[] | Dns DnsOptions DnsSearch ExtraHosts Binds | Specify which docker host configuration keys should be passed to browser containers. Keys name can be found in the Docker API documentation, or by running docker inspect the node-docker container. |
Events
| Option | Type | Value/Example | Description |
|---|
--bind-bus | boolean | false | Whether the connection string should be bound or connected.
When true, the component will be bound to the Event Bus (as in the Event Bus will also be started by the component, typically by the Distributor and the Hub).
When false, the component will connect to the Event Bus. |
--events-implementation | string | org.openqa.selenium.events.zeromq.ZeroMqEventBus | Full class name of non-default event bus implementation |
--publish-events | string | tcp://*:4442 | Connection string for publishing events to the event bus |
--subscribe-events | string | tcp://*:4443 | Connection string for subscribing to events from the event bus |
Logging
| Option | Type | Value/Example | Description |
|---|
--http-logs | boolean | false | Enable http logging. Tracing should be enabled to log http logs. |
--log-encoding | string | UTF-8 | Log encoding |
--log | string | Windows path example :
'\path\to\file\gridlog.log'
or
'C:\path\path\to\file\gridlog.log'
Linux/Unix/MacOS path example :
'/path/to/file/gridlog.log' | File to write out logs. Ensure the file path is compatible with the operating system’s file path. |
--log-level | string | “INFO” | Log level. Default logging level is INFO. Log levels are described here https://docs.oracle.com/en/java/javase/11/docs/api/java.logging/java/util/logging/Level.html |
--plain-logs | boolean | true | Use plain log lines |
--structured-logs | boolean | false | Use structured logs |
--tracing | boolean | true | Enable trace collection |
--log-timestamp-format | string | HH:mm:ss.SSS | Allows the configure log timestamp format |
Network
| Option | Type | Value/Example | Description |
|---|
--relax-checks | boolean | false | Relax checks on origin header and content type of incoming requests, in contravention of strict W3C spec compliance. |
Node
| Option | Type | Value/Example | Description | |
|---|
--detect-drivers | boolean | true | Autodetect which drivers are available on the current system, and add them to the Node. | |
--driver-configuration | string[] | display-name="Firefox Nightly" max-sessions=2 webdriver-path="/usr/local/bin/geckodriver" stereotype="{\"browserName\": \"firefox\", \"browserVersion\": \"86\", \"moz:firefoxOptions\": {\"binary\":\"/Applications/Firefox Nightly.app/Contents/MacOS/firefox-bin\"}}" | List of configured drivers a Node supports. It is recommended to provide this type of configuration through a toml config file to improve readability | |
--driver-factory | string[] | org.openqa.selenium.example.LynxDriverFactory '{"browserName": "lynx"}' | Mapping of fully qualified class name to a browser configuration that this matches against. | |
--driver-implementation | string[] | "firefox" | Drivers that should be checked. If specified, will skip autoconfiguration. | |
--node-implementation | string | "org.openqa.selenium.grid.node.local.LocalNodeFactory" | Full classname of non-default Node implementation. This is used to manage a session’s lifecycle. | |
--grid-url | string | https://grid.example.com | Public URL of the Grid as a whole (typically the address of the Hub or the Router) | |
--heartbeat-period | int | 60 | How often, in seconds, will the Node send heartbeat events to the Distributor to inform it that the Node is up. | |
--max-sessions | int | 8 | Maximum number of concurrent sessions. Default value is the number of available processors. | |
--override-max-sessions | boolean | false | The # of available processors is the recommended max sessions value (1 browser session per processor). Setting this flag to true allows the recommended max value to be overwritten. Session stability and reliability might suffer as the host could run out of resources. | |
--register-cycle | int | 10 | How often, in seconds, the Node will try to register itself for the first time to the Distributor. | |
--register-period | int | 120 | How long, in seconds, will the Node try to register to the Distributor for the first time. After this period is completed, the Node will not attempt to register again. | |
--session-timeout | int | 300 | Let X be the session-timeout in seconds. The Node will automatically kill a session that has not had any activity in the last X seconds. This will release the slot for other tests. | |
--vnc-env-var | string[] | SE_START_XVFB SE_START_VNC SE_START_NO_VNC | Environment variable to check in order to determine if a vnc stream is available or not. | |
--no-vnc-port | int | 7900 | If VNC is available, sets the port where the local noVNC stream can be obtained | |
--drain-after-session-count | int | 1 | Drain and shutdown the Node after X sessions have been executed. Useful for environments like Kubernetes. A value higher than zero enables this feature. | |
--hub | string | http://localhost:4444 | The address of the Hub in a Hub-and-Node configuration. Can be a hostname or IP address (hostname), in which case the Hub will be assumed to be http://hostname:4444, the --grid-url will be the same --publish-events will be tcp://hostname:4442 and --subscribe-events will be tcp://hostname:4443. If hostname contains a port number, that will be used for --grid-url but the URIs for the event bus will remain the same. Any of these default values may be overridden but setting the correct flags. If the hostname has a protocol (such as https) that will be used too. | |
--enable-cdp | boolean | true | Enable CDP proxying in Grid. A Grid admin can disable CDP if the network doesnot allow websockets. True by default. | |
--enable-managed-downloads | boolean | false | This causes the Node to auto manage files downloaded for a given session on the Node. | |
--selenium-manager | boolean | false | When drivers are not available on the current system, use Selenium Manager. False by default. | |
--connection-limit-per-session | int | 10 | Let X be the maximum number of websocket connections per session.This will ensure one session is not able to exhaust the connection limit of the host. | |
Relay
| Option | Type | Value/Example | Description |
|---|
--service-url | string | http://localhost:4723 | URL for connecting to the service that supports WebDriver commands like an Appium server or a cloud service. |
--service-host | string | localhost | Host name where the service that supports WebDriver commands is running |
--service-port | int | 4723 | Port where the service that supports WebDriver commands is running |
--service-status-endpoint | string | /status | Optional, endpoint to query the WebDriver service status, an HTTP 200 response is expected |
--service-protocol-version | string | HTTP/1.1 | Optional, enforce a specific protocol version in HttpClient when communicating with the endpoint service status |
--service-configuration | string[] | max-sessions=2 stereotype='{"browserName": "safari", "platformName": "iOS", "appium:platformVersion": "14.5"}}' | Configuration for the service where calls will be relayed to. It is recommended to provide this type of configuration through a toml config file to improve readability. |
Router
| Option | Type | Value/Example | Description |
|---|
--password | string | myStrongPassword | Password clients must use to connect to the server. Both this and the username need to be set in order to be used. |
--username | string | admin | User name clients must use to connect to the server. Both this and the password need to be set in order to be used. |
--sub-path | string | my_company/selenium_grid | A sub-path that should be considered for all user facing routes on the Hub/Router/Standalone. |
--disable-ui | boolean | true | Disable the Grid UI. |
Server
| Option | Type | Value/Example | Description |
|---|
--external-url | string | http://10.0.1.1:33333 | External URL where component is generally available. Useful on complex network topologies when components are on different networks and proxy servers are involved. |
--allow-cors | boolean | true | Whether the Selenium server should allow web browser connections from any host |
--host | string | localhost | Server IP or hostname: usually determined automatically. |
--bind-host | boolean | true | Whether the server should bind to the host address/name, or only use it to" report its reachable url. Helpful in complex network topologies where the server cannot report itself with the current IP/hostname but rather an external IP or hostname (e.g. inside a Docker container) |
--https-certificate | path | /path/to/cert.pem | Server certificate for https. Get more detailed information by running “java -jar selenium-server.jar info security” |
--https-private-key | path | /path/to/key.pkcs8 | Private key for https. Get more detailed information by running “java -jar selenium-server.jar info security” |
--max-threads | int | 24 | Maximum number of listener threads. Default value is: (available processors) * 3. |
--port | int | 4444 | Port to listen on. There is no default as this parameter is used by different components, for example, Router/Hub/Standalone will use 4444 and Node will use 5555. |
SessionQueue
| Option | Type | Value/Example | Description |
|---|
--sessionqueue | uri | http://localhost:1237 | Address of the session queue server. |
-sessionqueue-host | string | localhost | Host on which the session queue server is listening. |
--sessionqueue-port | int | 1234 | Port on which the session queue server is listening. |
--session-request-timeout | int | 300 | Timeout in seconds. A new incoming session request is added to the queue. Requests sitting in the queue for longer than the configured time will timeout. |
--session-retry-interval | int | 5 | Retry interval in seconds. If all slots are busy, new session request will be retried after the given interval. |
--maximum-response-delay | int | 8 | How often, in seconds, will the the SessionQueue response in case there is no data, to reduce the http requests while polling for new session requests. |
Sessions
| Option | Type | Value/Example | Description |
|---|
--sessions | uri | http://localhost:1234 | Address of the session map server. |
--sessions-host | string | localhost | Host on which the session map server is listening. |
--sessions-port | int | 1234 | Port on which the session map server is listening. |
Configuration examples
All the options mentioned above can be used when starting the Grid components. They are a good
way of exploring the Grid options, and trying out values to find a suitable configuration.
We recommend the use of Toml files to configure a Grid.
Configuration files improve readability, and you can also check them in source control.
When needed, you can combine a Toml file configuration with CLI arguments.
Command-line flags
To pass config options as command-line flags, identify the valid options for the component
and follow the template below.
java -jar selenium-server-<version>.jar <component> --<option> value
Standalone, setting max sessions and main port
java -jar selenium-server-<version>.jar standalone --max-sessions 4 --port 4444
Hub, setting a new session request timeout, a main port, and disabling tracing
java -jar selenium-server-<version>.jar hub --session-request-timeout 500 --port 3333 --tracing false
Node, with 4 max sessions, with debug(fine) log, 7777 as port, and only with Firefox and Edge
java -jar selenium-server-<version>.jar node --max-sessions 4 --log-level "fine" --port 7777 --driver-implementation "firefox" --driver-implementation "edge"
Distributor, setting Session Map server url, Session Queue server url, and disabling bus
java -jar selenium-server-<version>.jar distributor --sessions http://localhost:5556 --sessionqueue http://localhost:5559 --bind-bus false
Setting custom capabilities for matching specific Nodes
Important: Custom capabilities need to be set in the configuration in all Nodes. They also
need to be included always in every session request.
Start the Hub
java -jar selenium-server-<version>.jar hub
Start the Node A with custom cap set to true
java -jar selenium-server-<version>.jar node --detect-drivers false --driver-configuration display-name="Chrome (custom capability true)" max-sessions=1 stereotype='{"browserName":"chrome","gsg:customcap":true}' --port 6161
Start the Node B with custom cap set to false
java -jar selenium-server-<version>.jar node --detect-drivers false --driver-configuration display-name="Chrome (custom capability true)" max-sessions=1 stereotype='{"browserName":"chrome","gsg:customcap":false}' --port 6262
Matching Node A
ChromeOptions options = new ChromeOptions();
options.setCapability("gsg:customcap", true);
WebDriver driver = new RemoteWebDriver(new URL("http://localhost:4444"), options);
driver.get("https://selenium.dev");
driver.quit();
Set the custom capability to false in order to match the Node B.
Enabling Managed downloads by the Node
At times a test may need to access files that were downloaded by it on the Node.
To retrieve such files, following can be done.
Start the Hub
java -jar selenium-server-<version>.jar hub
Start the Node with manage downloads enabled
java -jar selenium-server-<version>.jar node --enable-managed-downloads true
Set the capability at the test level
Tests that want to use this feature should set the capability "se:downloadsEnabled"to true
options.setCapability("se:downloadsEnabled", true);
How does this work
- The Grid infrastructure will try to match a session request with
"se:downloadsEnabled" against ONLY those nodes which were started with --enable-managed-downloads true - If a session is matched, then the Node automatically sets the required capabilities to let the browser know, as to where should a file be downloaded.
- The Node now allows a user to:
- List all the files that were downloaded for a specific session and
- Retrieve a specific file from the list of files.
- The directory into which files were downloaded for a specific session gets automatically cleaned up when the session ends (or) timesout due to inactivity.
Note: Currently this capability is ONLY supported on:
EdgeFirefox andChrome browser
Listing files that can be downloaded for current session:
- The endpoint to
GET from is /session/<sessionId>/se/files. - The session needs to be active in order for the command to work.
- The raw response looks like below:
{
  "value": {
    "names": [
      "Red-blue-green-channel.jpg"
    ]
  }
}
In the response the list of file names appear under the key names.
Dowloading a file:
- The endpoint to
POST from is /session/<sessionId>/se/files with a payload of the form {"name": "fileNameGoesHere} - The session needs to be active in order for the command to work.
- The raw response looks like below:
{
	"value": {
		"filename": "Red-blue-green-channel.jpg",
		"contents": "Base64EncodedStringContentsOfDownloadedFileAsZipGoesHere"
	}
}
- The response blob contains two keys,
filename - The file name that was downloaded.contents - Base64 encoded zipped contents of the file.
- The file contents are Base64 encoded and they need to be unzipped.
List files that can be downloaded
The below mentioned curl example can be used to list all the files that were downloaded by the current session in the Node, and which can be retrieved locally.
curl -X GET "http://localhost:4444/session/90c0149a-2e75-424d-857a-e78734943d4c/se/files"
A sample response would look like below:
{
  "value": {
    "names": [
      "Red-blue-green-channel.jpg"
    ]
  }
}
Retrieve a downloaded file
Assuming the downloaded file is named Red-blue-green-channel.jpg, and using curl, the
file could be downloaded with the following command:
curl -H "Accept: application/json" \
-H "Content-Type: application/json; charset=utf-8" \
-X POST -d '{"name":"Red-blue-green-channel.jpg"}' \
"http://localhost:4444/session/18033434-fa4f-4d11-a7df-9e6d75920e19/se/files"
A sample response would look like below:
{
  "value": {
    "filename": "Red-blue-green-channel.jpg",
    "contents": "UEsDBBQACAgIAJpagVYAAAAAAAAAAAAAAAAaAAAAUmVkLWJsAAAAAAAAAAAAUmVkLWJsdWUtZ3JlZW4tY2hhbm5lbC5qcGdQSwUGAAAAAAEAAQBIAAAAcNkAAAAA"
  }
}
Complete sample code in Java
Below is an example in Java that does the following:
- Sets the capability to indicate that the test requires automatic managing of downloaded files.
- Triggers a file download via a browser.
- Lists the files that are available for retrieval from the remote node (These are essentially files that were downloaded in the current session)
- Picks one file and downloads the file from the remote node to the local machine.
import com.google.common.collect.ImmutableMap;

import org.openqa.selenium.By;
import org.openqa.selenium.io.Zip;
import org.openqa.selenium.json.Json;
import org.openqa.selenium.remote.RemoteWebDriver;
import org.openqa.selenium.remote.http.HttpClient;
import org.openqa.selenium.remote.http.HttpRequest;
import org.openqa.selenium.remote.http.HttpResponse;

import java.io.File;
import java.net.URL;
import java.nio.file.Files;
import java.util.List;
import java.util.Map;
import java.util.Optional;
import java.util.concurrent.TimeUnit;

import static org.openqa.selenium.remote.http.Contents.asJson;
import static org.openqa.selenium.remote.http.Contents.string;
import static org.openqa.selenium.remote.http.HttpMethod.GET;
import static org.openqa.selenium.remote.http.HttpMethod.POST;

public class DownloadsSample {

  public static void main(String[] args) throws Exception {
    // Assuming the Grid is running locally.
    URL gridUrl = new URL("http://localhost:4444");
    ChromeOptions options = new ChromeOptions();
    options.setCapability("se:downloadsEnabled", true);
    RemoteWebDriver driver = new RemoteWebDriver(gridUrl, options);
    try {
      demoFileDownloads(driver, gridUrl);
    } finally {
      driver.quit();
    }
  }

	private static void demoFileDownloads(RemoteWebDriver driver, URL gridUrl) throws Exception {
		driver.get("https://www.selenium.dev/selenium/web/downloads/download.html");
		// Download the two available files on the page
		driver.findElement(By.id("file-1")).click();
		driver.findElement(By.id("file-2")).click();

		// The download happens in a remote Node, which makes it difficult to know when the file
		// has been completely downloaded. For demonstration purposes, this example uses a
		// 10-second sleep which should be enough time for a file to be downloaded.
		// We strongly recommend to avoid hardcoded sleeps, and ideally, to modify your
		// application under test, so it offers a way to know when the file has been completely
		// downloaded.
		TimeUnit.SECONDS.sleep(10);

		//This is the endpoint which will provide us with list of files to download and also to
		//let us download a specific file.
		String downloadsEndpoint = String.format("/session/%s/se/files", driver.getSessionId());

		String fileToDownload;

		try (HttpClient client = HttpClient.Factory.createDefault().createClient(gridUrl)) {
			// To list all files that are were downloaded on the remote node for the current session
			// we trigger GET request.
			HttpRequest request = new HttpRequest(GET, downloadsEndpoint);
			HttpResponse response = client.execute(request);
			Map<String, Object> jsonResponse = new Json().toType(string(response), Json.MAP_TYPE);
			@SuppressWarnings("unchecked")
			Map<String, Object> value = (Map<String, Object>) jsonResponse.get("value");
			@SuppressWarnings("unchecked")
			List<String> names = (List<String>) value.get("names");
			// Let's say there were "n" files downloaded for the current session, we would like
			// to retrieve ONLY the first file.
			fileToDownload = names.get(0);
		}

		// Now, let's download the file
		try (HttpClient client = HttpClient.Factory.createDefault().createClient(gridUrl)) {
			// To retrieve a specific file from one or more files that were downloaded by the current session
			// on a remote node, we use a POST request.
			HttpRequest request = new HttpRequest(POST, downloadsEndpoint);
			request.setContent(asJson(ImmutableMap.of("name", fileToDownload)));
			HttpResponse response = client.execute(request);
			Map<String, Object> jsonResponse = new Json().toType(string(response), Json.MAP_TYPE);
			@SuppressWarnings("unchecked")
			Map<String, Object> value = (Map<String, Object>) jsonResponse.get("value");
			// The returned map would contain 2 keys,
			// filename - This represents the name of the file (same as what was provided by the test)
			// contents - Base64 encoded String which contains the zipped file.
			String zippedContents = value.get("contents").toString();
			// The file contents would always be a zip file and has to be unzipped.
			File downloadDir = Zip.unzipToTempDir(zippedContents, "download", "");
			// Read the file contents
			File downloadedFile = Optional.ofNullable(downloadDir.listFiles()).orElse(new File[]{})[0];
			String fileContent = String.join("", Files.readAllLines(downloadedFile.toPath()));
			System.out.println("The file which was "
					+ "downloaded in the node is now available in the directory: "
					+ downloadDir.getAbsolutePath() + " and has the contents: " + fileContent);
		}
	}


}
4.3 - TOML configuration options
Grid configuration examples using Toml files.
All the options shown in CLI options can be configured through
a TOML file. This page shows configuration examples for the
different Grid components.
Note that this documentation could be outdated if an option was modified or added
but has not been documented yet. In case you bump into this situation, please check
the “Config help” section and feel free to send us a
pull request updating this page.
Overview
Selenium Grid uses TOML format for config files.
The config file consists of sections and each section has options and its respective value(s).
Refer to the TOML documentation for detailed usage guidance. In case of
parsing errors, validate the config using TOML linter.
The general configuration structure has the following pattern:
[section1]
option1="value"

[section2]
option2=["value1","value2"]
option3=true
Below are some examples of Grid components configured with a Toml file, the component can be
started in the following way:
java -jar selenium-server-<version>.jar <component> --config /path/to/file/<file-name>.toml
Standalone
A Standalone server, running on port 4449, and a new session request timeout of 500 seconds.
[server]
port = 4449

[sessionqueue]
session-request-timeout = 500
Specific browsers and a limit of max sessions
A Standalone server or a Node which only has Firefox and Chrome enabled by default.
[node]
drivers = ["chrome", "firefox"]
max-sessions = 3
Configuring and customising drivers
Standalone or Node server with customised drivers, which allows things like having Firefox Beta
or Nightly, and having different browser versions.
[node]
detect-drivers = false
[[node.driver-configuration]]
max-sessions = 100
display-name = "Firefox Nightly"
stereotype = "{\"browserName\": \"firefox\", \"browserVersion\": \"93\", \"platformName\": \"MAC\", \"moz:firefoxOptions\": {\"binary\": \"/Applications/Firefox Nightly.app/Contents/MacOS/firefox-bin\"}}"
[[node.driver-configuration]]
display-name = "Chrome Beta"
stereotype = "{\"browserName\": \"chrome\", \"browserVersion\": \"94\", \"platformName\": \"MAC\", \"goog:chromeOptions\": {\"binary\": \"/Applications/Google Chrome Beta.app/Contents/MacOS/Google Chrome Beta\"}}"
[[node.driver-configuration]]
display-name = "Chrome Dev"
stereotype = "{\"browserName\": \"chrome\", \"browserVersion\": \"95\", \"platformName\": \"MAC\", \"goog:chromeOptions\": {\"binary\": \"/Applications/Google Chrome Dev.app/Contents/MacOS/Google Chrome Dev\"}}"
webdriver-executable = '/path/to/chromedriver/95/chromedriver'
Standalone or Node with Docker
A Standalone or Node server that is able to run each new session in a Docker container. Disabling
drivers detection, having maximum 2 concurrent sessions. Stereotypes configured need to be mapped
to a Docker image, and the Docker daemon needs to be exposed via http/tcp. In addition, it is
possible to define which device files, accessible on the host, will be available in containers
through the devices property. Refer to the docker documentation
for more information about how docker device mapping works.
[node]
detect-drivers = false
max-sessions = 2

[docker]
configs = [
    "selenium/standalone-chrome:93.0", "{\"browserName\": \"chrome\", \"browserVersion\": \"91\"}",
    "selenium/standalone-firefox:92.0", "{\"browserName\": \"firefox\", \"browserVersion\": \"92\"}"
]
#Optionally define all device files that should be mapped to docker containers
#devices = [
#    "/dev/kvm:/dev/kvm"
#]
url = "http://localhost:2375"
video-image = "selenium/video:latest"
Relaying commands to a service endpoint that supports WebDriver
It is useful to connect an external service that supports WebDriver to Selenium Grid.
An example of such service could be a cloud provider or an Appium server. In this way,
Grid can enable more coverage to platforms and versions not present locally.
The following is an en example of connecting an Appium server to Grid.
[node]
detect-drivers = false

[relay]
# Default Appium/Cloud server endpoint
url = "http://localhost:4723/wd/hub"
status-endpoint = "/status"
# Optional, enforce a specific protocol version in HttpClient when communicating with the endpoint service status (e.g. HTTP/1.1, HTTP/2)
protocol-version = "HTTP/1.1"
# Stereotypes supported by the service. The initial number is "max-sessions", and will allocate
# that many test slots to that particular configuration
configs = [
  "5", "{\"browserName\": \"chrome\", \"platformName\": \"android\", \"appium:platformVersion\": \"11\"}"
]
Basic auth enabled
It is possible to protect a Grid with basic auth by configuring the Router/Hub/Standalone with
a username and password. This user/password combination will be needed when loading the Grid UI
or starting a new session.
[router]
username = "admin"
password = "myStrongPassword"
Here is a Java example showing how to start a session using the configured user and password.
ClientConfig clientConfig = ClientConfig.defaultConfig()
  .baseUrl(new URL("http://localhost:4444"))
  .authenticateAs(new UsernameAndPassword("admin", "myStrongPassword"));
HttpCommandExecutor executor = new HttpCommandExecutor(clientConfig);
RemoteWebDriver driver = new RemoteWebDriver(executor, new ChromeOptions());
In other languages, you can use the URL http://admin:myStrongPassword@localhost:4444
Setting custom capabilities for matching specific Nodes
Important: Custom capabilities need to be set in the configuration in all Nodes. They also
need to be included always in every session request.
[node]
detect-drivers = false

[[node.driver-configuration]]
display-name = "firefox"
stereotype = '{"browserName": "firefox", "platformName": "macOS", "browserVersion":"96", "networkname:applicationName":"node_1", "nodename:applicationName":"app_1" }'
max-sessions = 5
Here is a Java example showing how to match that Node
FirefoxOptions options = new FirefoxOptions();
options.setCapability("networkname:applicationName", "node_1");
options.setCapability("nodename:applicationName", "app_1");
options.setBrowserVersion("96");
options.setPlatformName("macOS");
WebDriver driver = new RemoteWebDriver(new URL("http://localhost:4444"), options);
driver.get("https://selenium.dev");
driver.quit();
Enabling Managed downloads by the Node.
The Node can be instructed to manage downloads automatically. This will cause the Node to save all files that were downloaded for a particular session into a temp directory, which can later be retrieved from the node.
To turn this capability on, use the below configuration:
[node]
enable-managed-downloads = true
Refer to the CLI section for a complete example.
5 - Grid architecture
The Grid is designed as a set of components that all fulfill a role in
maintaining the Grid. It can seem quite complicated, but hopefully
this document can help clear up any confusion.
The Key Components
The main components of the Grid are:
- Event Bus
- Used for sending messages which may be received asynchronously
between the other components.
- New Session Queue
- Maintains a list of incoming sessions which have yet to be
assigned to a Node by the Distributor.
- Distributor
- Responsible for maintaining a model of the available locations in
the Grid where a session may run (known as "slots") and taking any
incoming new
session requests and assigning them to a slot.
- Node
- Runs a WebDriver
session. Each session is assigned to a slot, and each node has
one or more slots.
- Session Map
- Maintains a mapping between the session
ID and the address of the Node the session is running on.
- Router
- Acts as the front-end of the Grid. This is the only part of the
Grid which may be exposed to the wider Web (though we strongly
caution against it). This routes incoming requests to either the
New Session Queue or the Node on which the session is running.
While discussing the Grid, there are some other useful concepts to
keep in mind:
- A slot is the place where a session can run.
- Each slot has a stereotype. This is the minimal set of
capabilities that a new session session request must match
before the Distributor will send that request to the Node owning
the slot.
- The Grid Model is how the Distributor tracks the state of the
Grid. As the name suggests, this may sometimes fall out of sync
with reality (perhaps because the Distributor has only just
started). It is used in preference to querying each Node so that
the Distributor can quickly assign a slot to a New Session request.
Synchronous and Asynchronous Calls
There are two main communication mechanisms used within the Grid:
- Synchronous “REST-ish” JSON over HTTP requests.
- Asynchronous events sent to the Event Bus.
How do we pick which communication mechanism to use? After all, we
could model the entire Grid in an event-based way, and it would work
out just fine.
The answer is that if the action being performed is synchronous
(eg. most WebDriver calls), or if missing the response would be
problematic, the Grid uses a synchronous call. If, instead, we want to
broadcast information to anyone who’s interested, or if missing the
response doesn’t matter, then we prefer to use the event bus.
One interesting thing to note is that the async calls are more
decoupled from their listeners than the synchronous calls are.
Start Up Sequence and Dependencies Between Components
Although the Grid is designed to allow components to start up in any
order, conceptually the order in which components starts is:
- The Event Bus and Session Map start first. These have no other
dependencies, not even on each other, and so are safe to start in
parallel.
- The Session Queue starts next.
- It is now possible to start the Distributor. This will periodically
connect to the Session Queue and poll for jobs, though this polling
might be initiated either by an event (that a New Session has been
added to the queue) or at regular intervals.
- The Router(s) can be started. New Session requests will be directed
to the Session Queue, and the Distributor will attempt to find a
slot to run the session on.
- We are now able to start a Node. See below for details about how
the Node is registered with the Grid. Once registration is
complete, the Grid is ready to serve traffic.
You can picture the dependencies between components this way, where a
“✅” indicates that there is a synchronous dependency between the
components.
| Event Bus | Distributor | Node | Router | Session Map | Session Queue |
|---|
| Event Bus | X | | | | | |
| Distributor | ✅ | X | ✅ | | | ✅ |
| Node | ✅ | | X | | | |
| Router | | | ✅ | X | ✅ | |
| Session Map | | | | | X | |
| Session Queue | ✅ | | | | | X |
Node Registration
The process of registering a new Node to the Grid is lightweight.
- When the Node starts, it should emit a “heart beat” event on a
regular basis. This heartbeat contains the node status.
- The Distributor listens for the heart beat events. When it sees
one, it attempts to
GET the /status endpoint of the Node. It
is from this information that the Grid is set up.
The Distributor will use the same /status endpoint to check the Node
on a regular basis, but the Node should continue sending heart beat
events even after started so that a Distributor without a persistent
store of the Grid state can be restarted and will (eventually) be up
to date and correct.
The Node Status Object
The Node Status is a JSON blob with the following fields:
| Name | Type | Description |
|---|
| availability | string | A string which is one of up, draining, or down. The important one is draining, which indicates that no new sessions should be sent to the Node, and once the last session on it closes, the Node will exit or restart. |
| externalUrl | string | The URI that the other components in the Grid should connect to. |
| lastSessionCreated | integer | The epoch timestamp of when the last session was created on this Node. The Distributor will attempt to send new sessions to the Node that has been idle longest if all other things are equal. |
| maxSessionCount | integer | Although a session count can be inferred by counting the number of available slots, this integer value is used to determine the maximum number of sessions that should be running simultaneously on the Node before it is considered “full”. |
| nodeId | string | A UUID used to identify this instance of the Node. |
| osInfo | object | An object with arch, name, and version fields. This is used by the Grid UI and the GraphQL queries. |
| slots | array | An array of Slot objects (described below) |
| version | string | The version of the Node (for Selenium, this will match the Selenium version number) |
It is recommended to put values in all fields.
The Slot Object
The Slot object represents a single slot within a Node. A “slot” is
where a single session may be run. It is possible that a Node will
have more slots than it can run concurrently. For example, a node may
be able to run up 10 sessions, but they could be any combination of
Chrome, Edge, or Firefox; in this case, the Node would indicate a “max
session count” of 10, and then also say it has 10 slots for Chrome, 10
for Edge, and 10 for Firefox.
| Name | Type | Description |
|---|
| id | string | UUID to refer to the slot |
| lastStarted | string | When the slot last had a session started, in ISO-8601 format |
| stereotype | object | The minimal set of capabilities this slot will match against. A minimal example is {"browserName": "firefox"} |
| session | object | The Session object (see below) |
The Session Object
This represents a running session within a slot
| Name | Type | Description |
|---|
| capabilities | object | The actual capabilities provided by the session. Will match the return value from the new session command |
| startTime | string | The start time of the session in ISO-8601 format |
| stereotype | object | The minimal set of capabilities this slot will match against. A minimal example is {"browserName": "firefox"} |
| uri | string | The URI used by the Node to communicate with the session |
6 - Advanced features of Selenium
To get all the details of the advanced features, understand how it works, and how to set up your own, please browse thorough the following sections.
6.1 - Observability in Selenium Grid
Table of Contents
Selenium Grid
Grid aids in scaling and distributing tests by executing tests on various browser and operating system combinations.
Observability
Observability has three pillars: traces, metrics and logs. Since Selenium Grid 4 is designed to be fully distributed, observability will make it easier to understand and debug the internals.
Distributed tracing
A single request or transaction spans multiple services and components. Tracing tracks the request lifecycle as each service executes the request. It is useful in debugging in an error scenario.
Some key terms used in tracing context are:
Trace
Tracing allows one to trace a request through multiple services, starting from its origin to its final destination. This request’s journey helps in debugging, monitoring the end-to-end flow, and identifying failures. A trace depicts the end-to-end request flow. Each trace has a unique id as its identifier.
Span
Each trace is made up of timed operations called spans. A span has a start and end time and it represents operations done by a service. The granularity of span depends on how it is instrumented. Each span has a unique identifier. All spans within a trace have the same trace id.
Span Attributes
Span attributes are key-value pairs which provide additional information about each span.
Events
Events are timed-stamped logs within a span. They provide additional context to the existing spans. Events also contain key-value pairs as event attributes.
Event logging
Logging is essential to debug an application. Logging is often done in a human-readable format. But for machines to search and analyze the logs, it has to have a well-defined format. Structured logging is a common practice of recording logs consistently in a fixed format. It commonly contains fields like:
- Timestamp
- Logging level
- Logger class
- Log message (This is further broken down into fields relevant to the operation where the log was recorded)
Logs and events are closely related. Events encapsulate all the possible information available to do a single unit of work. Logs are essentially subsets of an event. At the crux, both aid in debugging.
Refer following resources for detailed understanding:
- https://www.honeycomb.io/blog/how-are-structured-logs-different-from-events/
- https://charity.wtf/2019/02/05/logs-vs-structured-events/
Grid Observability
Selenium server is instrumented with tracing using OpenTelemetry. Every request to the server is traced from start to end. Each trace consists of a series of spans as a request is executed within the server.
Most spans in the Selenium server consist of two events:
- Normal event - records all information about a unit of work and marks successful completion of the work.
- Error event - records all information till the error occurs and then records the error information. Marks an exception event.
Running Selenium server
- Standalone
- Hub and Node
- Fully Distributed
- Docker
Visualizing Traces
All spans, events and their respective attributes are part of a trace. Tracing works while running the server in all of the above-mentioned modes.
By default, tracing is enabled in the Selenium server. Selenium server exports the traces via two exporters:
- Console - Logs all traces and their included spans at FINE level. By default, Selenium server prints logs at INFO level and above.
The log-level flag can be used to pass a logging level of choice while running the Selenium Grid jar/s.
java -jar selenium-server-4.0.0-<selenium-version>.jar standalone --log-level FINE
- Jaeger UI - OpenTelemetry provides the APIs and SDKs to instrument traces in the code. Whereas Jaeger is a tracing backend, that aids in collecting the tracing telemetry data and providing querying, filtering and visualizing features for the data.
Detailed instructions of visualizing traces using Jaeger UI can be obtained by running the command :
java -jar selenium-server-4.0.0-<selenium-version>.jar info tracing
A very good example and scripts to run the server and send traces to Jaeger
Leveraging event logs
Tracing has to be enabled for event logging as well, even if one does not wish to export traces to visualize them.
By default, tracing is enabled. No additional parameters need to be passed to see logs on the console.
All events within a span are logged at FINE level. Error events are logged at WARN level.
All event logs have the following fields :
| Field | Field value | Description |
|---|
| Event time | eventId | Timestamp of the event record in epoch nanoseconds. |
| Trace Id | tracedId | Each trace is uniquely identified by a trace id. |
| Span Id | spanId | Each span within a trace is uniquely identified by a span id. |
| Span Kind | spanKind | Span kind is a property of span indicating the type of span. It helps in understanding the nature of the unit of work done by the Span. |
| Event name | eventName | This maps to the log message. |
| Event attributes | eventAttributes | This forms the crux of the event logs, based on the operation executed, it has JSON formatted key-value pairs. This also includes a handler class attribute, to show the logger class. |
Sample log
FINE [LoggingOptions$1.lambda$export$1] - {
  "traceId": "fc8aef1d44b3cc8bc09eb8e581c4a8eb",
  "spanId": "b7d3b9865d3ddd45",
  "spanKind": "INTERNAL",
  "eventTime": 1597819675128886121,
  "eventName": "Session request execution complete",
  "attributes": {
    "http.status_code": 200,
    "http.handler_class": "org.openqa.selenium.grid.router.HandleSession",
    "http.url": "\u002fsession\u002fdd35257f104bb43fdfb06242953f4c85",
    "http.method": "DELETE",
    "session.id": "dd35257f104bb43fdfb06242953f4c85"
  }
}
In addition to the above fields, based on OpenTelemetry specification error logs consist of :
| Field | Field value | Description |
|---|
| Exception type | exception.type | The class name of the exception. |
| Exception message | exception.message | Reason for the exception. |
| Exception stacktrace | exception.stacktrace | Prints the call stack at the point of time when the exception was thrown. Helps in understanding the origin of the exception. |
Sample error log
WARN [LoggingOptions$1.lambda$export$1] - {
  "traceId": "7efa5ea57e02f89cdf8de586fe09f564",
  "spanId": "914df6bc9a1f6e2b",
  "spanKind": "INTERNAL",
  "eventTime": 1597820253450580272,
  "eventName": "exception",
  "attributes": {
    "exception.type": "org.openqa.selenium.ScriptTimeoutException",
    "exception.message": "Unable to execute request: java.sql.SQLSyntaxErrorException: Table 'mysql.sessions_mappa' doesn't exist ..." (full message will be printed),
    "exception.stacktrace": "org.openqa.selenium.ScriptTimeoutException: java.sql.SQLSyntaxErrorException: Table 'mysql.sessions_mappa' doesn't exist\nBuild info: version: '4.0.0-alpha-7', revision: 'Unknown'\nSystem info: host: 'XYZ-MacBook-Pro.local', ip: 'fe80:0:0:0:10d5:b63a:bdc6:1aff%en0', os.name: 'Mac OS X', os.arch: 'x86_64', os.version: '10.13.6', java.version: '11.0.7'\nDriver info: driver.version: unknown ...." (full stack will be printed),
    "http.handler_class": "org.openqa.selenium.grid.distributor.remote.RemoteDistributor",
    "http.url": "\u002fsession",
    "http.method": "POST"
  }
}
Note: Logs are pretty printed above for readability. Pretty printing for logs is turned off in Selenium server.
The steps above should set you up for seeing traces and logs.
References
- Understanding Tracing
- OpenTelemetry Tracing API Specification
- Selenium Wiki
- Structured logs vs events
- Jaeger framework
6.2 - GraphQL query support
GraphQL is a query language for APIs and a runtime for fulfilling those queries
with your existing data. It gives users the power to ask for exactly what they need and nothing more.
Enums
Enums represent possible sets of values for a field.
For example, the Node object has a field called status. The state is an enum
(specifically, of type Status) because it may be UP , DRAINING or UNAVAILABLE.
Scalars
Scalars are primitive values: Int, Float, String, Boolean, or ID.
When calling the GraphQL API, you must specify nested subfield until you return only scalars.
Structure of the Schema
The structure of grid schema is as follows:
{
    session(id: "<session-id>") : {
        id,
        capabilities,
        startTime,
        uri,
        nodeId,
        nodeUri,
        sessionDurationMillis
        slot : {
            id,
            stereotype,
            lastStarted
        }
    }
    grid: {
        uri,
        totalSlots,
        nodeCount,
        maxSession,
        sessionCount,
        version,
        sessionQueueSize
    }
    sessionsInfo: {
        sessionQueueRequests,
        sessions: [
            {
                id,
                capabilities,
                startTime,
                uri,
                nodeId,
                nodeUri,
                sessionDurationMillis
                slot : {
                    id,
                    stereotype,
                    lastStarted
                }
            }
        ]
    }
    nodesInfo: {
        nodes : [
            {
                id,
                uri,
                status,
                maxSession,
                slotCount,
                sessions: [
                    {
                        id,
                        capabilities,
                        startTime,
                        uri,
                        nodeId,
                        nodeUri,
                        sessionDurationMillis
                        slot : {
                            id,
                            stereotype,
                            lastStarted
                        }
                    }
                ],
                sessionCount,
                stereotypes,
                version,
                osInfo: {
                    arch,
                    name,
                    version
                }
            }
        ]
    }
}
Querying GraphQL
The best way to query GraphQL is by using curl requests. The query is interpreted as JSON. Ensure double quotes are properly escaped to avoid unexpected errors.
GraphQL allows you to fetch only the data that you want, nothing more nothing less.
Some of the example GraphQL queries are given below. You can build your own
queries as you like.
Querying the number of maxSession and sessionCount in the grid :
curl -X POST -H "Content-Type: application/json" --data '{"query": "{ grid { maxSession, sessionCount } }"}' -s <LINK_TO_GRAPHQL_ENDPOINT>
Generally on local machine the <LINK_TO_GRAPHQL_ENDPOINT> would be http://localhost:4444/graphql
Querying all details for session, node and the Grid :
curl -X POST -H "Content-Type: application/json" --data '{"query":"{ grid { uri, maxSession, sessionCount }, nodesInfo { nodes { id, uri, status, sessions { id, capabilities, startTime, uri, nodeId, nodeUri, sessionDurationMillis, slot { id, stereotype, lastStarted } }, slotCount, sessionCount }} }"}' -s <LINK_TO_GRAPHQL_ENDPOINT>
Query for getting the current session count in the Grid :
curl -X POST -H "Content-Type: application/json" --data '{"query":"{ grid { sessionCount } }"}' -s <LINK_TO_GRAPHQL_ENDPOINT>
Query for getting the max session count in the Grid :
curl -X POST -H "Content-Type: application/json" --data '{"query":"{ grid { maxSession } }"}' -s <LINK_TO_GRAPHQL_ENDPOINT>
Query for getting all session details for all nodes in the Grid :
curl -X POST -H "Content-Type: application/json" --data '{"query":"{ sessionsInfo { sessions { id, capabilities, startTime, uri, nodeId, nodeId, sessionDurationMillis } } }"}' -s <LINK_TO_GRAPHQL_ENDPOINT>
curl -X POST -H "Content-Type: application/json" --data '{"query":"{ sessionsInfo { sessions { id, slot { id, stereotype, lastStarted } } } }"}' -s <LINK_TO_GRAPHQL_ENDPOINT>
curl -X POST -H "Content-Type: application/json" --data '{"query":"{ session (id: \"<session-id>\") { id, capabilities, startTime, uri, nodeId, nodeUri, sessionDurationMillis, slot { id, stereotype, lastStarted } } } "}' -s <LINK_TO_GRAPHQL_ENDPOINT>
Querying the capabilities of each node in the grid :
curl -X POST -H "Content-Type: application/json" --data '{"query": "{ nodesInfo { nodes { stereotypes } } }"}' -s <LINK_TO_GRAPHQL_ENDPOINT>
Querying the status of each node in the grid :
curl -X POST -H "Content-Type: application/json" --data '{"query": "{ nodesInfo { nodes { status } } }"}' -s <LINK_TO_GRAPHQL_ENDPOINT>
Querying the URI of each node and the grid :
curl -X POST -H "Content-Type: application/json" --data '{"query": "{ nodesInfo { nodes { uri } } }"}' -s <LINK_TO_GRAPHQL_ENDPOINT>
Query for getting the current requests in the New Session Queue:
curl -X POST -H "Content-Type: application/json" --data '{"query":"{ sessionsInfo { sessionQueueRequests } }"}' -s <LINK_TO_GRAPHQL_ENDPOINT>
Query for getting the New Session Queue size :
curl -X POST -H "Content-Type: application/json" --data '{"query":"{ grid { sessionQueueSize } }"}' -s <LINK_TO_GRAPHQL_ENDPOINT>
6.3 - Grid endpoints
Grid
Grid Status
Grid status provides the current state of the Grid. It consists of details about every registered Node.
For every Node, the status includes information regarding Node availability, sessions, and slots.
curl --request GET 'http://localhost:4444/status'
Delete session
Deleting the session terminates the WebDriver session, quits the driver and removes it from the active sessions map.
Any request using the removed session-id or reusing the driver instance will throw an error.
curl --request DELETE 'http://localhost:4444/session/<session-id>'
Which URL should I use?
In the Standalone mode, the Grid URL is the Standalone server address.
In the Hub-Node mode, the Grid URL is the Hub server address.
In the fully distributed mode, the Grid URL is the Router server address.
Default URL for all the above modes is http://localhost:4444.
Distributor
Remove Node
To remove the Node from the Grid, use the curl command enlisted below.
It does not stop any ongoing session running on that Node.
The Node continues running as it is unless explicitly killed.
The Distributor is no longer aware of the Node and hence any matching new session request
will not be forwarded to that Node.
In the Standalone mode, the Distributor URL is the Standalone server address.
In the Hub-Node mode, the Distributor URL is the Hub server address.
curl --request DELETE 'http://localhost:4444/se/grid/distributor/node/<node-id>' --header 'X-REGISTRATION-SECRET: <secret> '
In the fully distributed mode, the URL is the Router server address.
curl --request DELETE 'http://localhost:4444/se/grid/distributor/node/<node-id>' --header 'X-REGISTRATION-SECRET: <secret>'
If no registration secret has been configured while setting up the Grid, then use
curl --request DELETE 'http://<Router-URL>/se/grid/distributor/node/<node-id>' --header 'X-REGISTRATION-SECRET;'
Drain Node
Node drain command is for graceful node shutdown.
Draining a Node stops the Node after all the ongoing sessions are complete.
However, it does not accept any new session requests.
In the Standalone mode, the Distributor URL is the Standalone server address.
In the Hub-Node mode, the Distributor URL is the Hub server address.
curl --request POST 'http://localhost:4444/se/grid/distributor/node/<node-id>/drain' --header 'X-REGISTRATION-SECRET: <secret> '
In the fully distributed mode, the URL is the Router server address.
curl --request POST 'http://localhost:4444/se/grid/distributor/node/<node-id>/drain' --header 'X-REGISTRATION-SECRET: <secret>'
If no registration secret has been configured while setting up the Grid, then use
curl --request POST 'http://<Router-URL>/se/grid/distributor/node/<node-id>/drain' --header 'X-REGISTRATION-SECRET;'
Node
The endpoints in this section are applicable for Hub-Node mode and fully distributed Grid mode where the
Node runs independently.
The default Node URL is http://localhost:5555 in case of one Node.
In case of multiple Nodes, use Grid status to get all Node details and locate the Node address.
Status
The Node status is essentially a health-check for the Node.
Distributor pings the node status at regular intervals and updates the Grid Model accordingly.
The status includes information regarding availability, sessions, and slots.
curl --request GET 'http://localhost:5555/status'
Drain
Distributor passes the drain command to the appropriate node identified by the node-id.
To drain the Node directly, use the curl command enlisted below.
Both endpoints are valid and produce the same result. Drain finishes the ongoing sessions before stopping the Node.
curl --request POST 'http://localhost:5555/se/grid/node/drain' --header 'X-REGISTRATION-SECRET: <secret>'
If no registration secret has been configured while setting up the Grid, then use
curl --request POST 'http://<node-URL>/se/grid/node/drain' --header 'X-REGISTRATION-SECRET;'
Check session owner
To check if a session belongs to a Node, use the curl command enlisted below.
curl --request GET 'http://localhost:5555/se/grid/node/owner/<session-id>' --header 'X-REGISTRATION-SECRET: <secret>'
If no registration secret has been configured while setting up the Grid, then use
curl --request GET 'http://<node-URL>/se/grid/node/owner/<session-id>' --header 'X-REGISTRATION-SECRET;'
It will return true if the session belongs to the Node else it will return false.
Delete session
Deleting the session terminates the WebDriver session, quits the driver and removes it from the active sessions map.
Any request using the removed session-id or reusing the driver instance will throw an error.
curl --request DELETE 'http://localhost:5555/se/grid/node/session/<session-id>' --header 'X-REGISTRATION-SECRET: <secret>'
If no registration secret has been configured while setting up the Grid, then use
curl --request DELETE 'http://<node-URL>/se/grid/node/session/<session-id>' --header 'X-REGISTRATION-SECRET;'
New Session Queue
Clear New Session Queue
New Session Request Queue holds the new session requests.
To clear the queue, use the curl command enlisted below.
Clearing the queue rejects all the requests in the queue. For each such request, the server returns an error response to the respective client.
The result of the clear command is the total number of deleted requests.
In the Standalone mode, the Queue URL is the Standalone server address.
In the Hub-Node mode, the Queue URL is the Hub server address.
curl --request DELETE 'http://localhost:4444/se/grid/newsessionqueue/queue' --header 'X-REGISTRATION-SECRET: <secret>'
In the fully distributed mode, the Queue URL is Router server address.
curl --request DELETE 'http://localhost:4444/se/grid/newsessionqueue/queue' --header 'X-REGISTRATION-SECRET: <secret>'
If no registration secret has been configured while setting up the Grid, then use
curl --request DELETE 'http://<Router-URL>/se/grid/newsessionqueue/queue' --header 'X-REGISTRATION-SECRET;'
Get New Session Queue Requests
New Session Request Queue holds the new session requests.
To get the current requests in the queue, use the curl command enlisted below.
The response returns the total number of requests in the queue and the request payloads.
In the Standalone mode, the Queue URL is the Standalone server address.
In the Hub-Node mode, the Queue URL is the Hub server address.
curl --request GET 'http://localhost:4444/se/grid/newsessionqueue/queue'
In the fully distributed mode, the Queue URL is Router server address.
curl --request GET 'http://localhost:4444/se/grid/newsessionqueue/queue'
6.4 - Customizing a Node
How to customize a Node
There are times when we would like a Node to be customized to our needs.
For e.g., we may like to do some additional setup before a session begins execution and some clean-up after a session runs to completion.
Following steps can be followed for this:
Create a class that extends org.openqa.selenium.grid.node.Node
Add a static method (this will be our factory method) to the newly created class whose signature looks like this:
public static Node create(Config config). Here:
Node is of type org.openqa.selenium.grid.node.NodeConfig is of type org.openqa.selenium.grid.config.Config
Within this factory method, include logic for creating your new Class.
To wire in this new customized logic into the hub, start the node and pass in the fully qualified class name of the above class to the argument --node-implementation
Let’s see an example of all this:
Custom Node as an uber jar
- Create a sample project using your favourite build tool (Maven|Gradle).
- Add the below dependency to your sample project.
- Add your customized Node to the project.
- Build an uber jar to be able to start the Node using
java -jar command. - Now start the Node using the command:
java -jar custom_node-server.jar node \
--node-implementation org.seleniumhq.samples.DecoratedLoggingNode
Note: If you are using Maven as a build tool, please prefer using maven-shade-plugin instead of maven-assembly-plugin because maven-assembly plugin seems to have issues with being able to merge multiple Service Provider Interface files (META-INF/services)
Custom Node as a regular jar
- Create a sample project using your favourite build tool (Maven|Gradle).
- Add the below dependency to your sample project.
- Add your customized Node to the project.
- Build a jar of your project using your build tool.
- Now start the Node using the command:
java -jar selenium-server-4.6.0.jar \
--ext custom_node-1.0-SNAPSHOT.jar node \
--node-implementation org.seleniumhq.samples.DecoratedLoggingNode
Below is a sample that just prints some messages on to the console whenever there’s an activity of interest (session created, session deleted, a webdriver command executed etc.,) on the Node.
Sample customized node
package org.seleniumhq.samples;

import java.io.IOException;
import java.net.URI;
import java.util.UUID;
import java.util.function.Supplier;
import org.openqa.selenium.Capabilities;
import org.openqa.selenium.NoSuchSessionException;
import org.openqa.selenium.WebDriverException;
import org.openqa.selenium.grid.config.Config;
import org.openqa.selenium.grid.data.CreateSessionRequest;
import org.openqa.selenium.grid.data.CreateSessionResponse;
import org.openqa.selenium.grid.data.NodeId;
import org.openqa.selenium.grid.data.NodeStatus;
import org.openqa.selenium.grid.data.Session;
import org.openqa.selenium.grid.log.LoggingOptions;
import org.openqa.selenium.grid.node.HealthCheck;
import org.openqa.selenium.grid.node.Node;
import org.openqa.selenium.grid.node.local.LocalNodeFactory;
import org.openqa.selenium.grid.security.Secret;
import org.openqa.selenium.grid.security.SecretOptions;
import org.openqa.selenium.grid.server.BaseServerOptions;
import org.openqa.selenium.internal.Either;
import org.openqa.selenium.io.TemporaryFilesystem;
import org.openqa.selenium.remote.SessionId;
import org.openqa.selenium.remote.http.HttpRequest;
import org.openqa.selenium.remote.http.HttpResponse;
import org.openqa.selenium.remote.tracing.Tracer;

public class DecoratedLoggingNode extends Node {

  private Node node;

  protected DecoratedLoggingNode(Tracer tracer, NodeId nodeId, URI uri, Secret registrationSecret, Duration sessionTimeout) {
    super(tracer, nodeId, uri, registrationSecret, sessionTimeout);
  }

  public static Node create(Config config) {
    LoggingOptions loggingOptions = new LoggingOptions(config);
    BaseServerOptions serverOptions = new BaseServerOptions(config);
    URI uri = serverOptions.getExternalUri();
    SecretOptions secretOptions = new SecretOptions(config);
    NodeOptions nodeOptions = new NodeOptions(config);
    Duration sessionTimeout = nodeOptions.getSessionTimeout();

    // Refer to the foot notes for additional context on this line.
    Node node = LocalNodeFactory.create(config);

    DecoratedLoggingNode wrapper = new DecoratedLoggingNode(loggingOptions.getTracer(),
        node.getId(),
        uri,
        secretOptions.getRegistrationSecret(),
        sessionTimeout);
    wrapper.node = node;
    return wrapper;
  }

  @Override
  public Either<WebDriverException, CreateSessionResponse> newSession(
      CreateSessionRequest sessionRequest) {
    return perform(() -> node.newSession(sessionRequest), "newSession");
  }

  @Override
  public HttpResponse executeWebDriverCommand(HttpRequest req) {
    return perform(() -> node.executeWebDriverCommand(req), "executeWebDriverCommand");
  }

  @Override
  public Session getSession(SessionId id) throws NoSuchSessionException {
    return perform(() -> node.getSession(id), "getSession");
  }

  @Override
  public HttpResponse uploadFile(HttpRequest req, SessionId id) {
    return perform(() -> node.uploadFile(req, id), "uploadFile");
  }

  @Override
  public HttpResponse downloadFile(HttpRequest req, SessionId id) {
    return perform(() -> node.downloadFile(req, id), "downloadFile");
  }

  @Override
  public TemporaryFilesystem getDownloadsFilesystem(UUID uuid) {
    return perform(() -> {
      try {
        return node.getDownloadsFilesystem(uuid);
      } catch (IOException e) {
        throw new RuntimeException(e);
      }
    }, "downloadsFilesystem");
  }

  @Override
  public TemporaryFilesystem getUploadsFilesystem(SessionId id) throws IOException {
    return perform(() -> {
      try {
        return node.getUploadsFilesystem(id);
      } catch (IOException e) {
        throw new RuntimeException(e);
      }
    }, "uploadsFilesystem");

  }

  @Override
  public void stop(SessionId id) throws NoSuchSessionException {
    perform(() -> node.stop(id), "stop");
  }

  @Override
  public boolean isSessionOwner(SessionId id) {
    return perform(() -> node.isSessionOwner(id), "isSessionOwner");
  }

  @Override
  public boolean isSupporting(Capabilities capabilities) {
    return perform(() -> node.isSupporting(capabilities), "isSupporting");
  }

  @Override
  public NodeStatus getStatus() {
    return perform(() -> node.getStatus(), "getStatus");
  }

  @Override
  public HealthCheck getHealthCheck() {
    return perform(() -> node.getHealthCheck(), "getHealthCheck");
  }

  @Override
  public void drain() {
    perform(() -> node.drain(), "drain");
  }

  @Override
  public boolean isReady() {
    return perform(() -> node.isReady(), "isReady");
  }

  private void perform(Runnable function, String operation) {
    try {
      System.err.printf("[COMMENTATOR] Before %s()%n", operation);
      function.run();
    } finally {
      System.err.printf("[COMMENTATOR] After %s()%n", operation);
    }
  }

  private <T> T perform(Supplier<T> function, String operation) {
    try {
      System.err.printf("[COMMENTATOR] Before %s()%n", operation);
      return function.get();
    } finally {
      System.err.printf("[COMMENTATOR] After %s()%n", operation);
    }
  }
}
Foot Notes:
In the above example, the line Node node = LocalNodeFactory.create(config); explicitly creates a LocalNode.
There are basically 2 types of user facing implementations of org.openqa.selenium.grid.node.Node available.
These classes are good starting points to learn how to build a custom Node and also to learn the internals of a Node.
org.openqa.selenium.grid.node.local.LocalNode - Used to represent a long running Node and is the default implementation that gets wired in when you start a node.- It can be created by calling
LocalNodeFactory.create(config);, where:LocalNodeFactory belongs to org.openqa.selenium.grid.node.localConfig belongs to org.openqa.selenium.grid.config
org.openqa.selenium.grid.node.k8s.OneShotNode - This is a special reference implementation wherein the Node gracefully shuts itself down after servicing one test session. This class is currently not available as part of any pre-built maven artifact.- You can refer to the source code here to understand its internals.
- To build it locally refer here.
- It can be created by calling
OneShotNode.create(config), where:OneShotNode belongs to org.openqa.selenium.grid.node.k8sConfig belongs to org.openqa.selenium.grid.config
6.5 - External datastore
Table of Contents
Introduction
Selenium Grid allows you to persist information related to currently running sessions into an external data store.
The external data store could be backed by your favourite database (or) Redis Cache system.
Setup
- Coursier - As a dependency resolver, so that we can download maven artifacts on the fly and make them available in our classpath
- Docker - To manage our PostGreSQL/Redis docker containers.
Database backed Session Map
For the sake of this illustration, we are going to work with PostGreSQL database.
We will spin off a PostGreSQL database as a docker container using a docker compose file.
Steps
You can skip this step if you already have a PostGreSQL database instance available at your disposal.
- Create a sql file named
init.sql with the below contents:
CREATE TABLE IF NOT EXISTS sessions_map(
    session_ids varchar(256),
    session_caps text,
    session_uri varchar(256),
    session_stereotype text,
    session_start varchar(256)
 );
- In the same directory as the
init.sql, create a file named docker-compose.yml with its contents as below:
version: '3.8'
services:
  db:
    image: postgres:9.6-bullseye
    restart: always
    environment:
      - POSTGRES_USER=seluser
      - POSTGRES_PASSWORD=seluser
      - POSTGRES_DB=selenium_sessions
    ports:
      - "5432:5432"
    volumes:
    - ./init.sql:/docker-entrypoint-initdb.d/init.sql
We can now start our database container by running:
Our database name is selenium_sessions with its username and password set to seluser
If you are working with an already running PostGreSQL DB instance, then you just need to create a database named selenium_sessions and the table sessions_map using the above mentioned SQL statement.
- Create a Selenium Grid configuration file named
sessions.toml with the below contents:
[sessions]
implementation = "org.openqa.selenium.grid.sessionmap.jdbc.JdbcBackedSessionMap"
jdbc-url = "jdbc:postgresql://localhost:5432/selenium_sessions"
jdbc-user = "seluser"
jdbc-password = "seluser"
Note: If you plan to use an existing PostGreSQL DB instance, then replace localhost:5432 with the actual host and port number of your instance.
- Below is a simple shell script (let’s call it
distributed.sh) that we will use to bring up our distributed Grid.
SE_VERSION=<current_selenium_version>
JAR_NAME=selenium-server-${SE_VERSION}.jar
PUBLISH="--publish-events tcp://localhost:4442"
SUBSCRIBE="--subscribe-events tcp://localhost:4443"
SESSIONS="--sessions http://localhost:5556"
SESSIONS_QUEUE="--sessionqueue http://localhost:5559"
echo 'Starting Event Bus'
java -jar $JAR_NAME event-bus $PUBLISH $SUBSCRIBE --port 5557 &
echo 'Starting New Session Queue'
java -jar $JAR_NAME sessionqueue --port 5559 &
echo 'Starting Sessions Map'
java -jar $JAR_NAME \
--ext $(coursier fetch -p org.seleniumhq.selenium:selenium-session-map-jdbc:${SE_VERSION} org.postgresql:postgresql:42.3.1) \
sessions $PUBLISH $SUBSCRIBE --port 5556 --config sessions.toml &
echo 'Starting Distributor'
java -jar $JAR_NAME  distributor $PUBLISH $SUBSCRIBE $SESSIONS $SESSIONS_QUEUE --port 5553 --bind-bus false &
echo 'Starting Router'
java -jar $JAR_NAME router $SESSIONS --distributor http://localhost:5553 $SESSIONS_QUEUE --port 4444 &
echo 'Starting Node'
java -jar $JAR_NAME node $PUBLISH $SUBSCRIBE &
At this point the current directory should contain the following files:
docker-compose.ymlinit.sqlsessions.tomldistributed.sh
You can now spawn the Grid by running distributed.sh shell script and quickly run a test. You will notice that the Grid now stores session information into the PostGreSQL database.
In the line which spawns a SessionMap on a machine:
export SE_VERSION=<current_selenium_version>
java -jar selenium-server-${SE_VERSION}.jar \
--ext $(coursier fetch -p org.seleniumhq.selenium:selenium-session-map-jdbc:${SE_VERSION} org.postgresql:postgresql:42.3.1) \
sessions --publish-events tcp://localhost:4442 \
--subscribe-events tcp://localhost:4443 \
--port 5556 --config sessions.toml
- The variable names from the above script have been replaced with their actual values for clarity.
- Remember to substitute
localhost with the actual hostname of the machine where your Event-Bus is running. - The arguments being passed to
coursier are basically the GAV (Group Artifact Version) Maven co-ordinates of: sessions.toml is the configuration file that we created earlier.
Redis backed Session Map
We will spin off a Redis Cache docker container using a docker compose file.
Steps
You can skip this step if you already have a Redis Cache instance available at your disposal.
- Create a file named
docker-compose.yml with its contents as below:
version: '3.8'
services:
  redis:
    image: redis:bullseye
    restart: always
    ports:
      - "6379:6379"
We can now start our Redis container by running:
- Create a Selenium Grid configuration file named
sessions.toml with the below contents:
[sessions]
scheme = "redis"
implementation = "org.openqa.selenium.grid.sessionmap.redis.RedisBackedSessionMap"
hostname = "localhost"
port = 6379
Note: If you plan to use an existing Redis Cache instance, then replace localhost and 6379 with the actual host and port number of your instance.
- Below is a simple shell script (let’s call it
distributed.sh) that we will use to bring up our distributed grid.
SE_VERSION=<current_selenium_version>
JAR_NAME=selenium-server-${SE_VERSION}.jar
PUBLISH="--publish-events tcp://localhost:4442"
SUBSCRIBE="--subscribe-events tcp://localhost:4443"
SESSIONS="--sessions http://localhost:5556"
SESSIONS_QUEUE="--sessionqueue http://localhost:5559"
echo 'Starting Event Bus'
java -jar $JAR_NAME event-bus $PUBLISH $SUBSCRIBE --port 5557 &
echo 'Starting New Session Queue'
java -jar $JAR_NAME sessionqueue --port 5559 &
echo 'Starting Session Map'
java -jar $JAR_NAME \
--ext $(coursier fetch -p org.seleniumhq.selenium:selenium-session-map-redis:${SE_VERSION}) \
sessions $PUBLISH $SUBSCRIBE --port 5556 --config sessions.toml &
echo 'Starting Distributor'
java -jar $JAR_NAME  distributor $PUBLISH $SUBSCRIBE $SESSIONS $SESSIONS_QUEUE --port 5553 --bind-bus false &
echo 'Starting Router'
java -jar $JAR_NAME router $SESSIONS --distributor http://localhost:5553 $SESSIONS_QUEUE --port 4444 &
echo 'Starting Node'
java -jar $JAR_NAME node $PUBLISH $SUBSCRIBE &
At this point the current directory should contain the following files:
docker-compose.ymlsessions.tomldistributed.sh
You can now spawn the Grid by running distributed.sh shell script and quickly run a test. You will notice that the Grid now stores session information into the Redis instance. You can perhaps make use of a Redis GUI such as TablePlus to see them (Make sure that you have setup a debug point in your test, because the values will get deleted as soon as the test runs to completion).
In the line which spawns a SessionMap on a machine:
export SE_VERSION=<current_selenium_version>
java -jar selenium-server-${SE_VERSION}.jar \
--ext $(coursier fetch -p org.seleniumhq.selenium:selenium-session-map-redis:${SE_VERSION}) \
sessions --publish-events tcp://localhost:4442 \
--subscribe-events tcp://localhost:4443 \
--port 5556 --config sessions.toml
- The variable names from the above script have been replaced with their actual values for clarity.
- Remember to substitute
localhost with the actual hostname of the machine where your Event-Bus is running. - The arguments being passed to
coursier are basically the GAV (Group Artifact Version) Maven co-ordinates of: sessions.toml is the configuration file that we created earlier.


