Selenium is an umbrella project for a range of tools and libraries
that enable and support the automation of web browsers.
It provides extensions to emulate user interaction with browsers,
a distribution server for scaling browser allocation,
and the infrastructure for implementations of the
W3C WebDriver specification
that lets you write interchangeable code for all major web browsers.
This project is made possible by volunteer contributors
who have put in thousands of hours of their own time,
and made the source code
freely available
for anyone to use, enjoy, and improve.
Selenium brings together browser vendors, engineers, and enthusiasts
to further an open discussion around automation of the web platform.
The project organises an annual conference
to teach and nurture the community.
At the core of Selenium is WebDriver,
an interface to write instruction sets that can be run interchangeably in many
browsers. Once you’ve installed everything, only a few lines of code get you inside
a browser. You can find a more comprehensive example in Writing your first Selenium script
See the Overview to check the different project
components and decide if Selenium is the right tool for you.
You should continue on to Getting Started
to understand how you can install Selenium and successfully use it as a test
automation tool, and scaling simple tests like this to run in large, distributed
environments on multiple browsers, on several different operating systems.
1 - Selenium Overview
Is Selenium for you? See an overview of the different project components.
Selenium is not just one tool or API;
it comprises many tools.
WebDriver
If you are beginning with desktop website or mobile website test automation, then you
are going to be using WebDriver APIs. WebDriver
uses browser automation APIs provided by browser vendors to control the browser and
run tests. This is as if a real user is operating the browser. Since
WebDriver does not require its API to be compiled with application
code, it is not intrusive. Hence, you are testing the
same application which you push live.
IDE
IDE (Integrated Development Environment)
is the tool you use to develop your Selenium test cases. It’s an easy-to-use Chrome
and Firefox extension and is generally the most efficient way to develop
test cases. It records the users’ actions in the browser for you, using
existing Selenium commands, with parameters defined by the context of
that element. This is not only a time-saver but also an excellent way
of learning Selenium script syntax.
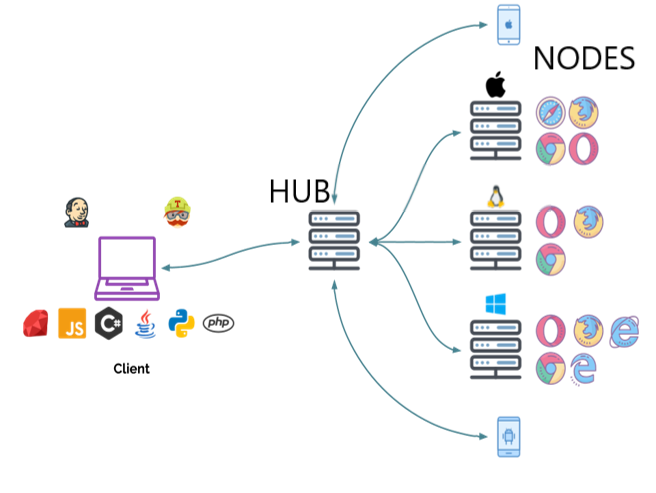
Grid
Selenium Grid allows you to run test cases in different
machines across different platforms. The control of
triggering the test cases is on the local end, and
when the test cases are triggered, they are automatically
executed by the remote end.
After the development of the WebDriver tests, you may face
the need to run your tests on multiple browsers and
operating system combinations.
This is where Grid comes into the picture.
1.1 - Selenium components
Building a test suite using WebDriver will require you to understand and
effectively use several components. As with everything in
software, different people use different terms for the same idea. Below is
a breakdown of how terms are used in this description.
Terminology
API: Application Programming Interface. This is the set of “commands”
you use to manipulate WebDriver.
Library: A code module that contains the APIs and the code necessary
to implement them. Libraries are specific to each language binding, eg .jar
files for Java, .dll files for .NET, etc.
Driver: Responsible for controlling the actual browser. Most drivers
are created by the browser vendors themselves. Drivers are generally
executable modules that run on the system with the browser itself,
not the system executing the test suite. (Although those may be the
same system.) NOTE: Some people refer to the drivers as proxies.
Framework: An additional library that is used as a support for WebDriver
suites. These frameworks may be test frameworks such as JUnit or NUnit.
They may also be frameworks supporting natural language features such
as Cucumber or Robotium. Frameworks may also be written and used for
tasks such as manipulating or configuring the system under test, data
creation, test oracles, etc.
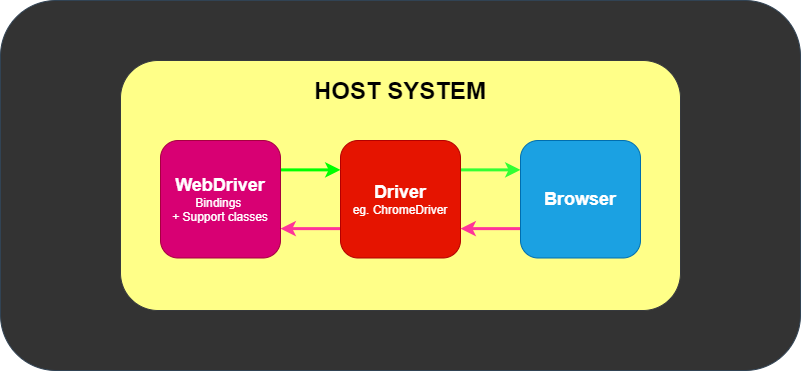
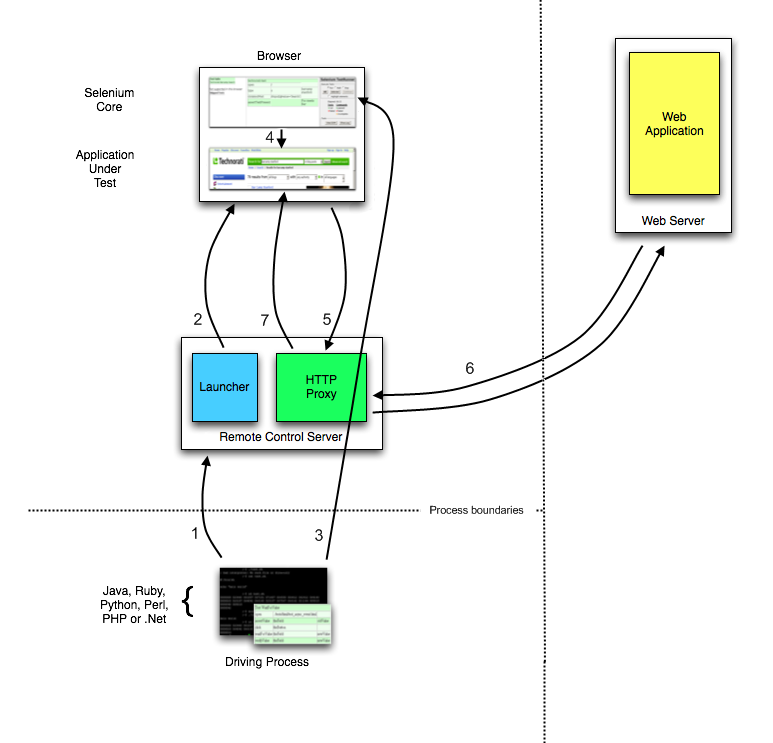
The Parts and Pieces
At its minimum, WebDriver talks to a browser through a driver. Communication
is two-way: WebDriver passes commands to the browser through the driver, and
receives information back via the same route.
The driver is specific to the browser, such as ChromeDriver for Google’s
Chrome/Chromium, GeckoDriver for Mozilla’s Firefox, etc. The driver runs on
the same system as the browser. This may or may not be the same system where
the tests themselves are executed.
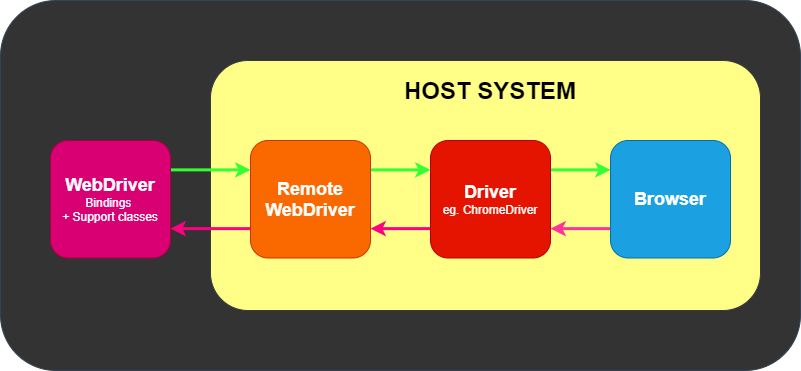
This simple example above is direct communication. Communication to the
browser may also be remote communication through Selenium Server or
RemoteWebDriver. RemoteWebDriver runs on the same system as the driver
and the browser.
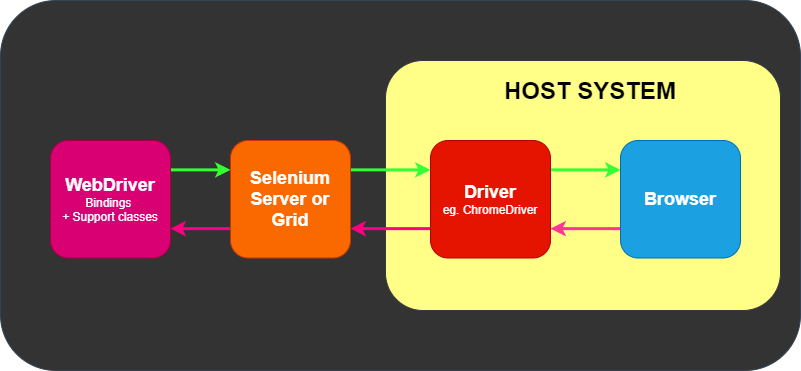
Remote communication can also take place using Selenium Server or Selenium
Grid, both of which in turn talk to the driver on the host system
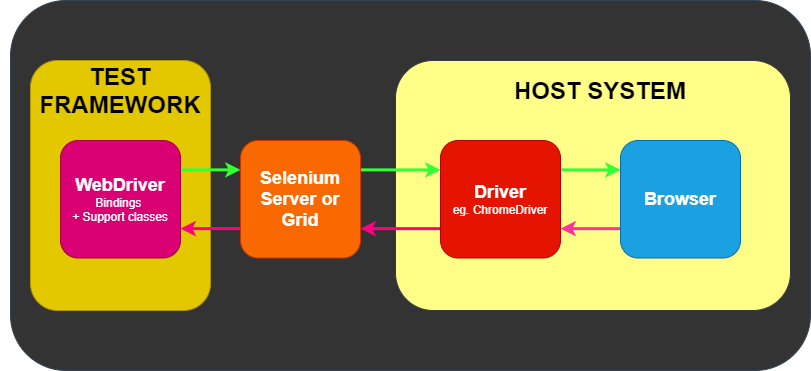
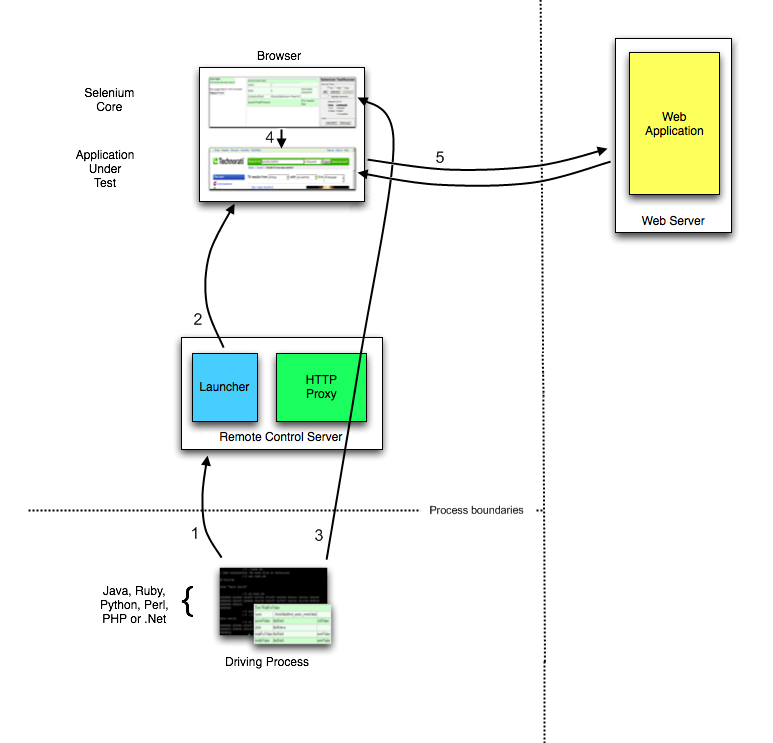
Where Frameworks fit in
WebDriver has one job and one job only: communicate with the browser via any
of the methods above. WebDriver does not know a thing about testing: it does not
know how to compare things, assert pass or fail, and it certainly does not know
a thing about reporting or Given/When/Then grammar.
This is where various frameworks come into play. At a minimum, you will need a
test framework that matches the language bindings, e.g., NUnit for .NET, JUnit
for Java, RSpec for Ruby, etc.
The test framework is responsible for running and executing your WebDriver
and related steps in your tests. As such, you can think of it looking akin
to the following image.
Natural language frameworks/tools such as Cucumber may exist as part of that
Test Framework box in the figure above, or they may wrap the Test Framework
entirely in their custom implementation.
1.2 - A deeper look at Selenium
Selenium is an umbrella project for a range of tools and libraries that enable and support the automation of web browsers.
Selenium controls web browsers
Selenium is many things
but at its core, it is a toolset for web browser automation
that uses the best techniques available
to remotely control browser instances
and emulate a user’s interaction with the browser.
Selenium allows users to simulate common activities performed by end-users;
entering text into fields,
selecting drop-down values and checking boxes,
and clicking links in documents.
It also provides many other controls such as mouse movement,
arbitrary JavaScript execution, and much more.
Although used primarily for front-end testing of websites,
Selenium is, at its core, a browser user agent library.
The interfaces are ubiquitous to their application,
encouraging composition with other libraries to suit your purpose.
One interface to rule them all
One of the project’s guiding principles
is to support a common interface for all (major) browser technologies.
Web browsers are incredibly complex, highly engineered applications,
performing their operations in entirely different ways
but which frequently look the same while doing so.
Even though the text is rendered in the same fonts,
the images are displayed in the same place
, and the links take you to the same destination.
What is happening underneath is as different as night and day.
Selenium “abstracts” these differences,
hiding their details and intricacies from the person writing the code.
This allows you to write several lines of code to perform a complicated workflow,
but these same lines will execute on Firefox,
Internet Explorer, Chrome, and all other supported browsers.
Tools and support
Selenium’s minimalist design approach gives it the
versatility to be included as a component in bigger applications.
The surrounding infrastructure provided under the Selenium umbrella
gives you the tools to put together
your grid of browsers
so tests can be run on different browsers and multiple operating systems
across a range of machines.
Imagine a bank of computers in your server room or data center
all firing up browsers at the same time
hitting your site’s links, forms,
and tables—testing your application 24 hours a day.
Through the simple programming interface
provided for the most common languages,
these tests will run tirelessly in parallel,
reporting back to you when errors occur.
It is an aim to help make this a reality for you,
by providing users with tools and documentation to not only control browsers
but to make it easy to scale and deploy such grids.
Who uses Selenium
Many of the most important companies in the world
have adopted Selenium for their browser-based testing,
often replacing years-long efforts involving other proprietary tools.
As it has grown in popularity, so have its requirements and challenges multiplied.
As the web becomes more complicated
and new technologies are added to websites,
it’s the mission of this project to keep up with them where possible.
Being an open-source project,
this support is provided through the generous donation of time from many volunteers,
every one of which has a “day job.”
Another mission of the project is to encourage
more volunteers to partake in this effort,
and build a strong community
so that the project can continue to keep up with emerging technologies
and remain a dominant platform for functional test automation.
2 - WebDriver
WebDriver drives a browser natively; learn more about it.
WebDriver drives a browser natively, as a user would, either locally
or on a remote machine using the Selenium server,
marks a leap forward in terms of browser automation.
Selenium WebDriver refers to both the language bindings
and the implementations of the individual browser controlling code.
This is commonly referred to as just WebDriver.
WebDriver is designed as a simple
and more concise programming interface.
WebDriver is a compact object-oriented API.
It drives the browser effectively.
2.1 - Getting started
If you are new to Selenium, we have a few resources that can help you get up to speed right away.
Selenium supports automation of all the major browsers in the market
through the use of WebDriver.
WebDriver is an API and protocol that defines a language-neutral interface
for controlling the behaviour of web browsers.
Each browser is backed by a specific WebDriver implementation, called a driver.
The driver is the component responsible for delegating down to the browser,
and handles communication to and from Selenium and the browser.
This separation is part of a conscious effort to have browser vendors
take responsibility for the implementation for their browsers.
Selenium makes use of these third party drivers where possible,
but also provides its own drivers maintained by the project
for the cases when this is not a reality.
The Selenium framework ties all of these pieces together
through a user-facing interface that enables the different browser backends
to be used transparently,
enabling cross-browser and cross-platform automation.
Selenium setup is quite different from the setup of other commercial tools.
Before you can start writing Selenium code, you have to
install the language bindings libraries for your language of choice, the browser you
want to use, and the driver for that browser.
Follow the links below to get up and going with Selenium WebDriver.
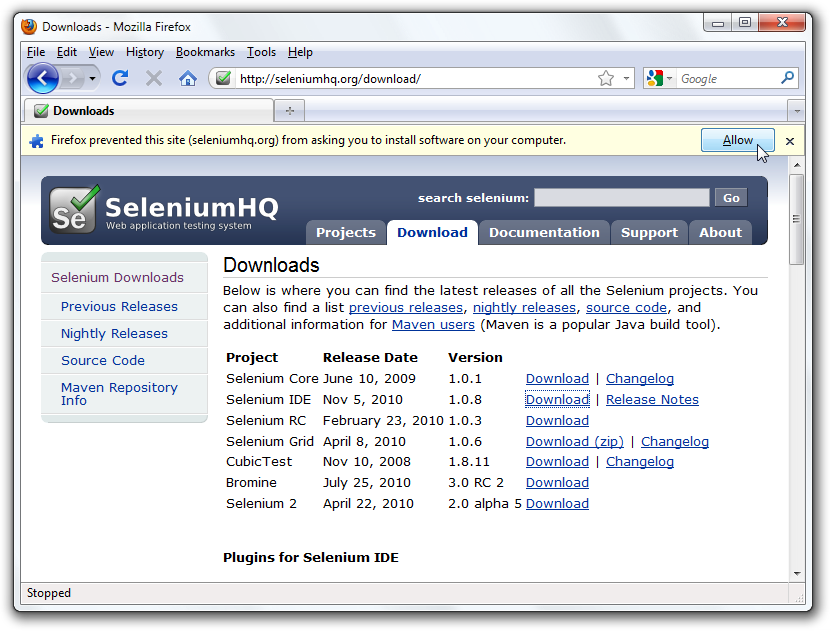
If you wish to start with a low-code/record and playback tool, please check
Selenium IDE
Once you get things working, if you want to scale up your tests, check out the
Selenium Grid.
2.1.1 - Install a Selenium library
Setting up the Selenium library for your favourite programming language.
First you need to install the Selenium bindings for your automation project.
The installation process for libraries depends on the language you choose to use.
Make sure you check the Selenium downloads page to make sure
you are using the latest version.
Further items of note for using Visual Studio Code (vscode) and C#
Install the compatible .NET SDK as per the section above.
Also install the vscode extensions (Ctrl-Shift-X) for C# and NuGet.
Follow the instruction here
to create and run the “Hello World” console project using C#.
You may also create a NUnit starter project using the command line dotnet new NUnit.
Make sure the file %appdata%\NuGet\nuget.config is configured properly as some developers reported that it will be empty due to some issues.
If nuget.config is empty, or not configured properly, then .NET builds will fail for Selenium Projects.
Add the following section to the file nuget.config if it is empty:
For more info about nuget.configclick here.
You may have to customize nuget.config to meet you needs.
Now, go back to vscode, press Ctrl-Shift-P, and type “NuGet Add Package”, and enter the required Selenium packages such as Selenium.WebDriver.
Press Enter and select the version.
Now you can use the examples in the documentation related to C# with vscode.
You can see the minimum required version of Ruby for any given Selenium version
on rubygems.org
Everything Selenium does is send the browser commands to do something or send requests for information.
Most of what you’ll do with Selenium is a combination of these basic commands
Click on the link to “View full example on GitHub” to see the code in context.
1. Start the session
For more details on starting a session read our documentation on driver sessions
Synchronizing the code with the current state of the browser is one of the biggest challenges
with Selenium, and doing it well is an advanced topic.
Essentially you want to make sure that the element is on the page before you attempt to locate it
and the element is in an interactable state before you attempt to interact with it.
An implicit wait is rarely the best solution, but it’s the easiest to demonstrate here, so
we’ll use it as a placeholder.
This ends the driver process, which by default closes the browser as well.
No more commands can be sent to this driver instance.
See Quitting Sessions.
Most Selenium users execute many sessions and need to organize them to minimize duplication and keep the code
more maintainable. Read on to learn about how to put this code into context for your use case with
Using Selenium.
2.1.3 - Organizing and Executing Selenium Code
Scaling Selenium execution with an IDE and a Test Runner library
Content Help
Note: This section needs additional and/or updated content
This page is very incomplete and has placeholders for things that need to be added or expounded on.
If you want to run more than a handful of one-off scripts, you need to
be able to organize and work with your code. This page should give you
ideas for how to actually do productive things with your Selenium code.
Common Uses
Most people use Selenium to execute automated tests for web applications,
but Selenium supports any use case of browser automation.
Repetitive Tasks
Perhaps you need to log into a website and download something, or submit a form.
You can create a Selenium script to run with a service at preset times.
Web Scraping
Are you looking to collect data from a site that doesn’t have an API? Selenium
will let you do this, but please make sure you are familiar with the website’s
terms of service as some websites do not permit it and others will even block Selenium.
Testing
Running Selenium for testing requires making assertions on actions taken by Selenium.
So a good assertion library is required. Additional features to provide structure for tests
require use of Test Runner.
IDEs
Regardless of how you use Selenium code,
you won’t be very effective writing or executing it without a good
Integrated Developer Environment. Here are some common options…
Even if you aren’t using Selenium for testing, if you have advanced use cases, it might make
sense to use a test runner to better organize your code. Being able to use before/after hooks
and run things in groups or in parallel can be very useful.
Choosing
There are many different test runners available.
All the code examples in this documentation can be found in (or is being moved to) our
example directories that use test runners and get executed every release to ensure all the code is correct and updated.
Here is a list of test runners with links. The first item is the one that is used by this repository and the one
that will be used for all examples on this page.
JUnit - A widely-used testing framework for Java-based Selenium tests.
TestNG - Offers extra features like parallel test execution and parameterized tests.
pytest - A preferred choice for many, thanks to its simplicity and powerful plugins.
unittest - Python’s standard library testing framework.
NUnit - A popular unit-testing framework for .NET.
RSpec - The most widely used testing library for running Selenium tests in Ruby.
Minitest - A lightweight testing framework that comes with Ruby standard library.
Jest - Primarily known as a testing framework for React, it can also be used for Selenium tests.
Mocha - The most common JS library for running Selenium tests.
Installing
This is very similar to what was required in Install a Selenium Library.
This code is only showing examples for what is being used in our Documentation Examples project.
Maven
Gradle
To use it in a project, add it to the requirements.txt file:
in the project’s csproj file, specify the dependency as a PackageReference in ItemGroup:
Add to project’s gemfile
In your project’s package.json, add requirement to dependencies:
The primary unique argument for starting a remote driver includes information about where to execute the code.
Read the details in the Remote Driver Section
In Selenium 3, capabilities were defined in a session by using Desired Capabilities classes.
As of Selenium 4, you must use the browser options classes.
For remote driver sessions, a browser options instance is required as it determines which browser will be used.
These options are described in the w3c specification for Capabilities.
Each browser has custom options that may be defined in addition to the ones defined in the specification.
browserName
Browser name is set by default when using an Options class instance.
This capability is optional, this is used to set the available browser version at remote end.
In recent versions of Selenium, if the version is not found on the system,
it will be automatically downloaded by Selenium Manager
Three types of page load strategies are available.
The page load strategy queries the
document.readyState
as described in the table below:
Strategy
Ready State
Notes
normal
complete
Used by default, waits for all resources to download
eager
interactive
DOM access is ready, but other resources like images may still be loading
none
Any
Does not block WebDriver at all
The document.readyState property of a document describes the loading state of the current document.
When navigating to a new page via URL, by default, WebDriver will hold off on completing a navigation
method (e.g., driver.navigate().get()) until the document ready state is complete. This does not
necessarily mean that the page has finished loading, especially for sites like Single Page Applications
that use JavaScript to dynamically load content after the Ready State returns complete. Note also
that this behavior does not apply to navigation that is a result of clicking an element or submitting a form.
If a page takes a long time to load as a result of downloading assets (e.g., images, css, js)
that aren’t important to the automation, you can change from the default parameter of normal to
eager or none to speed up the session. This value applies to the entire session, so make sure
that your waiting strategy is sufficient to minimize
flakiness.
normal (default)
WebDriver waits until the load
event fire is returned.
it('Navigate using normal page loading strategy',asyncfunction(){letdriver=awaitenv.builder().setChromeOptions(options.setPageLoadStrategy('normal')).build();awaitdriver.get('https://www.selenium.dev/selenium/web/blank.html');
This capability checks whether an expired (or)
invalid TLS Certificate is used while navigating
during a session.
If the capability is set to false, an
insecure certificate error
will be returned as navigation encounters any domain
certificate problems. If set to true, invalid certificate will be
trusted by the browser.
All self-signed certificates will be trusted by this capability by default.
Once set, acceptInsecureCerts capability will have an
effect for the entire session.
A WebDriver session is imposed with a certain session timeout
interval, during which the user can control the behaviour
of executing scripts or retrieving information from the browser.
Each session timeout is configured with
combination of different timeouts as described below:
Script Timeout
Specifies when to interrupt an executing script in
a current browsing context. The default timeout 30,000
is imposed when a new session is created by WebDriver.
Specifies the time interval in which web page
needs to be loaded in a current browsing context.
The default timeout 300,000 is imposed when a
new session is created by WebDriver. If page load limits
a given/default time frame, the script will be stopped by
TimeoutException.
This specifies the time to wait for the
implicit element location strategy when
locating elements. The default timeout 0
is imposed when a new session is created by WebDriver.
Specifies the state of current session’s user prompt handler.
Defaults to dismiss and notify state
User Prompt Handler
This defines what action must take when a
user prompt encounters at the remote-end. This is defined by
unhandledPromptBehavior capability and has the following states:
This new capability indicates if strict interactability checks
should be applied to input type=file elements. As strict interactability
checks are off by default, there is a change in behaviour
when using Element Send Keys with hidden file upload controls.
A proxy server acts as an intermediary for
requests between a client and a server. In simple terms,
the traffic flows through the proxy server
on its way to the address you requested and back.
A proxy server for automation scripts
with Selenium could be helpful for:
Capture network traffic
Mock backend calls made by the website
Access the required website under complex network
topologies or strict corporate restrictions/policies.
If you are in a corporate environment, and a
browser fails to connect to a URL, this is most
likely because the environment needs a proxy to be accessed.
Selenium WebDriver provides a way to proxy settings:
The Service classes are for managing the starting and stopping of local drivers.
They cannot be used with a Remote WebDriver session.
Service classes allow you to specify information about the driver,
like location and which port to use.
They also let you specify what arguments get passed
to the command line. Most of the useful arguments are related to logging.
Default Service instance
To start a driver with a default service instance:
Note: If you are using Selenium 4.6 or greater, you shouldn’t need to set a driver location.
If you cannot update Selenium or have an advanced use case, here is how to specify the driver location:
Logging functionality varies between browsers. Most browsers allow you to
specify location and level of logs. Take a look at the respective browser page:
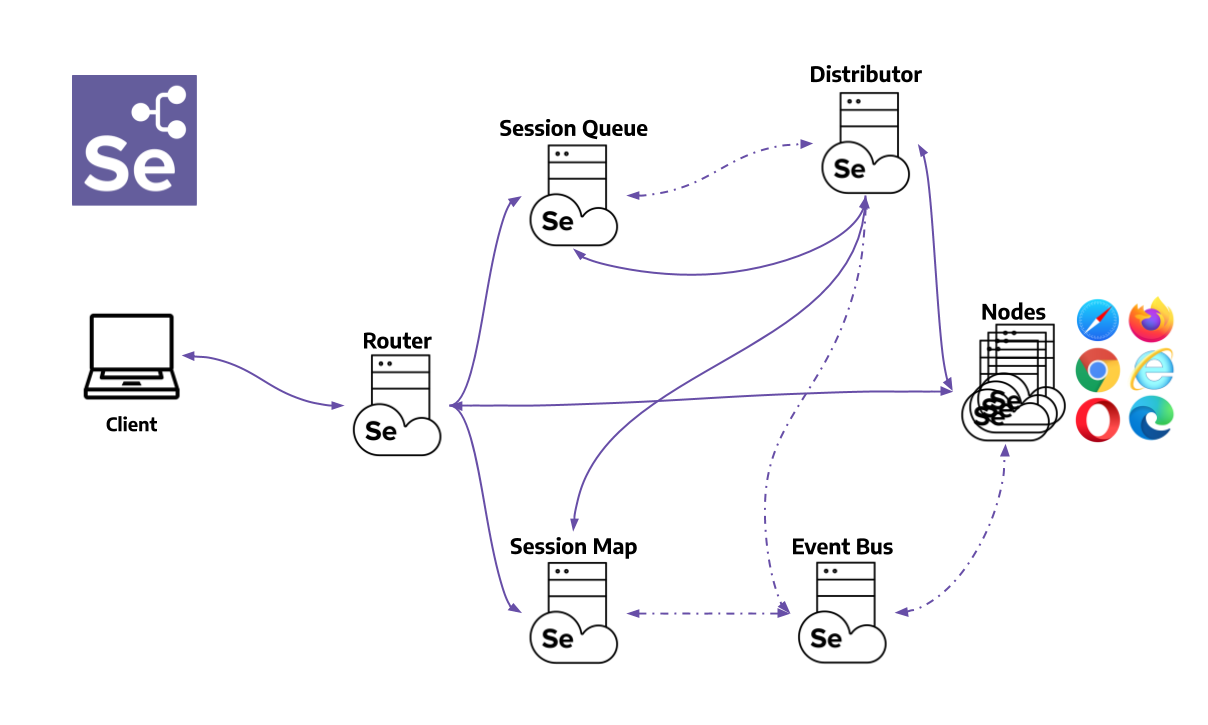
Selenium lets you automate browsers on remote computers if
there is a Selenium Grid running on them. The computer that
executes the code is referred to as the client computer, and the computer with the browser and driver is
referred to as the remote computer or sometimes as an end-node.
To direct Selenium tests to the remote computer, you need to use a Remote WebDriver class
and pass the URL including the port of the grid on that machine. Please see the grid documentation
for all the various ways the grid can be configured.
Basic Example
The driver needs to know where to send commands to and which browser to start on the Remote computer. So an address
and an options instance are both required.
Uploading a file is more complicated for Remote WebDriver sessions because the file you want to
upload is likely on the computer executing the code, but the driver on the
remote computer is looking for the provided path on its local file system.
The solution is to use a Local File Detector. When one is set, Selenium will bundle
the file, and send it to the remote machine, so the driver can see the reference to it.
Some bindings include a basic local file detector by default, and all of them allow
for a custom file detector.
Java does not include a Local File Detector by default, so you must always add one to do uploads.
Chrome, Edge and Firefox each allow you to set the location of the download directory.
When you do this on a remote computer, though, the location is on the remote computer’s local file system.
Selenium allows you to enable downloads to get these files onto the client computer.
Enable Downloads in the Grid
Regardless of the client, when starting the grid in node or standalone mode,
you must add the flag:
--enable-managed-downloads true
Enable Downloads in the Client
The grid uses the se:downloadsEnabled capability to toggle whether to be responsible for managing the browser location.
Each of the bindings have a method in the options class to set this.
Be aware that Selenium is not waiting for files to finish downloading,
so the list is an immediate snapshot of what file names are currently in the directory for the given session.
Each browser has implemented special functionality that is available only to that browser.
Each of the Selenium bindings has implemented a different way to use those features in a Remote Session
Java requires you to use the Augmenter class, which allows it to automatically pull in implementations for
all interfaces that match the capabilities used with the RemoteWebDriver
This feature is only available for Java client binding (Beta onwards). The Remote WebDriver client sends requests to the Selenium Grid server, which passes them to the WebDriver. Tracing should be enabled at the server and client-side to trace the HTTP requests end-to-end. Both ends should have a trace exporter setup pointing to the visualization framework.
By default, tracing is enabled for both client and server.
To set up the visualization framework Jaeger UI and Selenium Grid 4, please refer to Tracing Setup for the desired version.
For client-side setup, follow the steps below.
Add the required dependencies
Installation of external libraries for tracing exporter can be done using Maven.
Add the opentelemetry-exporter-jaeger and grpc-netty dependency in your project pom.xml:
Each browser has custom capabilities and unique features.
2.3.1 - Chrome specific functionality
These are capabilities and features specific to Google Chrome browsers.
By default, Selenium 4 is compatible with Chrome v75 and greater. Note that the version of
the Chrome browser and the version of chromedriver must match the major version.
Options
Capabilities common to all browsers are described on the Options page.
The args parameter is for a list of command line switches to be used when starting the browser.
There are two excellent resources for investigating these arguments:
The binary parameter takes the path of an alternate location of browser to use. With this parameter you can
use chromedriver to drive various Chromium based browsers.
Chromedriver has several default arguments it uses to start the browser.
If you do not want those arguments added, pass them into excludeSwitches.
A common example is to turn the popup blocker back on. A full list of default arguments
can be parsed from the
Chromium Source Code
Examples for creating a default Service object, and for setting driver location and port
can be found on the Driver Service page.
Log output
Getting driver logs can be helpful for debugging issues. The Service class lets you
direct where the logs will go. Logging output is ignored unless the user directs it somewhere.
File output
To change the logging output to save to a specific file:
Note: Java also allows setting console output by System Property; Property key: ChromeDriverService.CHROME_DRIVER_LOG_PROPERTY Property value: DriverService.LOG_STDOUT or DriverService.LOG_STDERR
There are 6 available log levels: ALL, DEBUG, INFO, WARNING, SEVERE, and OFF.
Note that --verbose is equivalent to --log-level=ALL and --silent is equivalent to --log-level=OFF,
so this example is just setting the log level generically:
Note: Java also allows setting log level by System Property: Property key: ChromeDriverService.CHROME_DRIVER_LOG_LEVEL_PROPERTY Property value: String representation of ChromiumDriverLogLevel enum
There are 2 features that are only available when logging to a file:
append log
readable timestamps
To use them, you need to also explicitly specify the log path and log level.
The log output will be managed by the driver, not the process, so minor differences may be seen.
Note: Java also allows toggling these features by System Property: Property keys: ChromeDriverService.CHROME_DRIVER_APPEND_LOG_PROPERTY and ChromeDriverService.CHROME_DRIVER_READABLE_TIMESTAMP Property value: "true" or "false"
Chromedriver and Chrome browser versions should match, and if they don’t the driver will error.
If you disable the build check, you can force the driver to be used with any version of Chrome.
Note that this is an unsupported feature, and bugs will not be investigated.
Note: Java also allows disabling build checks by System Property: Property key: ChromeDriverService.CHROME_DRIVER_DISABLE_BUILD_CHECK Property value: "true" or "false"
See the Chrome DevTools section for more information about using Chrome DevTools
2.3.2 - Edge specific functionality
These are capabilities and features specific to Microsoft Edge browsers.
Microsoft Edge is implemented with Chromium, with the earliest supported version of v79. Similar to Chrome,
the major version number of edgedriver must match the major version of the Edge browser.
Options
Capabilities common to all browsers are described on the Options page.
The args parameter is for a list of command line switches to be used when starting the browser.
There are two excellent resources for investigating these arguments:
The binary parameter takes the path of an alternate location of browser to use. With this parameter you can
use chromedriver to drive various Chromium based browsers.
MSEdgedriver has several default arguments it uses to start the browser.
If you do not want those arguments added, pass them into excludeSwitches.
A common example is to turn the popup blocker back on. A full list of default arguments
can be parsed from the
Chromium Source Code
Examples for creating a default Service object, and for setting driver location and port
can be found on the Driver Service page.
Log output
Getting driver logs can be helpful for debugging issues. The Service class lets you
direct where the logs will go. Logging output is ignored unless the user directs it somewhere.
File output
To change the logging output to save to a specific file:
Note: Java also allows setting console output by System Property; Property key: EdgeDriverService.EDGE_DRIVER_LOG_PROPERTY Property value: DriverService.LOG_STDOUT or DriverService.LOG_STDERR
There are 6 available log levels: ALL, DEBUG, INFO, WARNING, SEVERE, and OFF.
Note that --verbose is equivalent to --log-level=ALL and --silent is equivalent to --log-level=OFF,
so this example is just setting the log level generically:
Note: Java also allows setting log level by System Property: Property key: EdgeDriverService.EDGE_DRIVER_LOG_LEVEL_PROPERTY Property value: String representation of ChromiumDriverLogLevel enum
There are 2 features that are only available when logging to a file:
append log
readable timestamps
To use them, you need to also explicitly specify the log path and log level.
The log output will be managed by the driver, not the process, so minor differences may be seen.
Note: Java also allows toggling these features by System Property: Property keys: EdgeDriverService.EDGE_DRIVER_APPEND_LOG_PROPERTY and EdgeDriverService.EDGE_DRIVER_READABLE_TIMESTAMP Property value: "true" or "false"
Edge browser and msedgedriver versions should match, and if they don’t the driver will error.
If you disable the build check, you can force the driver to be used with any version of Edge.
Note that this is an unsupported feature, and bugs will not be investigated.
Note: Java also allows disabling build checks by System Property: Property key: EdgeDriverService.EDGE_DRIVER_DISABLE_BUILD_CHECK Property value: "true" or "false"
Microsoft Edge can be driven in “Internet Explorer Compatibility Mode”, which uses
the Internet Explorer Driver classes in conjunction with Microsoft Edge.
Read the Internet Explorer page for more details.
Special Features
Some browsers have implemented additional features that are unique to them.
Casting
You can drive Chrome Cast devices with Edge, including sharing tabs
The args parameter is for a list of Command line switches used when starting the browser. Commonly used args include -headless and "-profile", "/path/to/profile"
The binary parameter takes the path of an alternate location of browser to use. For example, with this parameter you can
use geckodriver to drive Firefox Nightly instead of the production version when both are present on your computer.
const{Builder}=require("selenium-webdriver");constfirefox=require('selenium-webdriver/firefox');constoptions=newfirefox.Options();letprofile='/path to custom profile';options.setProfile(profile);constdriver=newBuilder().forBrowser('firefox').setFirefoxOptions(options).build();
Service settings common to all browsers are described on the Service page.
Log output
Getting driver logs can be helpful for debugging various issues. The Service class lets you
direct where the logs will go. Logging output is ignored unless the user directs it somewhere.
File output
To change the logging output to save to a specific file:
Note: Java also allows setting console output by System Property; Property key: GeckoDriverService.GECKO_DRIVER_LOG_PROPERTY Property value: DriverService.LOG_STDOUT or DriverService.LOG_STDERR
Note: Java also allows setting log level by System Property: Property key: GeckoDriverService.GECKO_DRIVER_LOG_LEVEL_PROPERTY Property value: String representation of FirefoxDriverLogLevel enum
The driver logs everything that gets sent to it, including string representations of large binaries, so
Firefox truncates lines by default. To turn off truncation:
Note: Java also allows setting log level by System Property: Property key: GeckoDriverService.GECKO_DRIVER_LOG_NO_TRUNCATE Property value: "true" or "false"
The default directory for profiles is the system temporary directory. If you do not have access to that directory,
or want profiles to be created some place specific, you can change the profile root directory:
When working with an unfinished or unpublished extension, it will likely not be signed. As such, it can only
be installed as “temporary.” This can be done by passing in either a zip file or a directory, here’s an
example with a directory:
These are capabilities and features specific to Microsoft Internet Explorer browsers.
As of June 2022, Selenium officially no longer supports standalone Internet Explorer.
The Internet Explorer driver still supports running Microsoft Edge in “IE Compatibility Mode.”
Special considerations
The IE Driver is the only driver maintained by the Selenium Project directly.
While binaries for both the 32-bit and 64-bit
versions of Internet Explorer are available, there are some
known limitations
with the 64-bit driver. As such it is recommended to use the 32-bit driver.
Additional information about using Internet Explorer can be found on the
IE Driver Server page
Options
Starting a Microsoft Edge browser in Internet Explorer Compatibility mode with basic defined options looks like this:
If IE is not present on the system (default in Windows 11), you do not need to
use the two parameters above. IE Driver will use Edge and will automatically locate it.
If IE and Edge are both present on the system, you only need to set attaching to Edge,
IE Driver will automatically locate Edge on your system.
Here are a few common use cases with different capabilities:
fileUploadDialogTimeout
In some environments, Internet Explorer may timeout when opening the
File Upload dialog. IEDriver has a default timeout of 1000ms, but you
can increase the timeout using the fileUploadDialogTimeout capability.
When set to true, this capability clears the Cache,
Browser History and Cookies for all running instances
of InternetExplorer including those started manually
or by the driver. By default, it is set to false.
Using this capability will cause performance drop while
launching the browser, as the driver will wait until the cache
gets cleared before launching the IE browser.
This capability accepts a Boolean value as parameter.
InternetExplorer driver expects the browser zoom level to be 100%,
else the driver will throw an exception. This default behaviour
can be disabled by setting the ignoreZoomSetting to true.
This capability accepts a Boolean value as parameter.
Whether to skip the Protected Mode check while launching
a new IE session.
If not set and Protected Mode settings are not same for
all zones, an exception will be thrown by the driver.
If capability is set to true, tests may
become flaky, unresponsive, or browsers may hang.
However, this is still by far a second-best choice,
and the first choice should always be to actually
set the Protected Mode settings of each zone manually.
If a user is using this property,
only a “best effort” at support will be given.
This capability accepts a Boolean value as parameter.
Internet Explorer includes several command-line options
that enable you to troubleshoot and configure the browser.
The following describes few supported command-line options
-private : Used to start IE in private browsing mode. This works for IE 8 and later versions.
-k : Starts Internet Explorer in kiosk mode.
The browser opens in a maximized window that does not display the address bar, the navigation buttons, or the status bar.
-extoff : Starts IE in no add-on mode.
This option specifically used to troubleshoot problems with browser add-ons. Works in IE 7 and later versions.
Note: forceCreateProcessApi should to enabled in-order for command line arguments to work.
Service settings common to all browsers are described on the Service page.
Log output
Getting driver logs can be helpful for debugging various issues. The Service class lets you
direct where the logs will go. Logging output is ignored unless the user directs it somewhere.
File output
To change the logging output to save to a specific file:
Note: Java also allows setting console output by System Property; Property key: InternetExplorerDriverService.IE_DRIVER_LOGFILE_PROPERTY Property value: DriverService.LOG_STDOUT or DriverService.LOG_STDERR
Note: Java also allows setting log level by System Property: Property key: InternetExplorerDriverService.IE_DRIVER_LOGLEVEL_PROPERTY Property value: String representation of InternetExplorerDriverLogLevel.DEBUG.toString() enum
These are capabilities and features specific to Apple Safari browsers.
Unlike Chromium and Firefox drivers, the safaridriver is installed with the Operating System.
To enable automation on Safari, run the following command from the terminal:
safaridriver --enable
Options
Capabilities common to all browsers are described on the Options page.
Those looking to automate Safari on iOS should look to the Appium project.
Service
Service settings common to all browsers are described on the Service page.
Logging
Unlike other browsers, Safari doesn’t let you choose where logs are output, or change levels. The one option
available is to turn logs off or on. If logs are toggled on, they can be found at:~/Library/Logs/com.apple.WebDriver/.
Note: Java also allows setting console output by System Property; Property key: SafariDriverService.SAFARI_DRIVER_LOGGING Property value: "true" or "false"
Perhaps the most common challenge for browser automation is ensuring
that the web application is in a state to execute a particular
Selenium command as desired. The processes often end up in
a race condition where sometimes the browser gets into the right
state first (things work as intended) and sometimes the Selenium code
executes first (things do not work as intended). This is one of the
primary causes of flaky tests.
All navigation commands wait for a specific readyState value
based on the page load strategy (the
default value to wait for is "complete") before the driver returns control to the code.
The readyState only concerns itself with loading assets defined in the HTML,
but loaded JavaScript assets often result in changes to the site,
and elements that need to be interacted with may not yet be on the page
when the code is ready to execute the next Selenium command.
Similarly, in a lot of single page applications, elements get dynamically
added to a page or change visibility based on a click.
An element must be both present and
displayed on the page
in order for Selenium to interact with it.
Take this page for example: https://www.selenium.dev/selenium/web/dynamic.html
When the “Add a box!” button is clicked, a “div” element that does not exist is created.
When the “Reveal a new input” button is clicked, a hidden text field element is displayed.
In both cases the transition takes a couple seconds.
If the Selenium code is to click one of these buttons and interact with the resulting element,
it will do so before that element is ready and fail.
The first solution many people turn to is adding a sleep statement to
pause the code execution for a set period of time.
Because the code can’t know exactly how long it needs to wait, this
can fail when it doesn’t sleep long enough. Alternately, if the value is set too high
and a sleep statement is added in every place it is needed, the duration of
the session can become prohibitive.
Selenium provides two different mechanisms for synchronization that are better.
Implicit waits
Selenium has a built-in way to automatically wait for elements called an implicit wait.
An implicit wait value can be set either with the timeouts
capability in the browser options, or with a driver method (as shown below).
This is a global setting that applies to every element location call for the entire session.
The default value is 0, which means that if the element is not found, it will
immediately return an error. If an implicit wait is set, the driver will wait for the
duration of the provided value before returning the error. Note that as soon as the
element is located, the driver will return the element reference and the code will continue executing,
so a larger implicit wait value won’t necessarily increase the duration of the session.
Warning:
Do not mix implicit and explicit waits.
Doing so can cause unpredictable wait times.
For example, setting an implicit wait of 10 seconds
and an explicit wait of 15 seconds
could cause a timeout to occur after 20 seconds.
Solving our example with an implicit wait looks like this:
Explicit waits are loops added to the code that poll the application
for a specific condition to evaluate as true before it exits the loop and
continues to the next command in the code. If the condition is not met before a designated timeout value,
the code will give a timeout error. Since there are many ways for the application not to be in the desired state,
explicit waits are a great choice to specify the exact condition to wait for
in each place it is needed.
Another nice feature is that, by default, the Selenium Wait class automatically waits for the designated element to exist.
This example shows the condition being waited for as a lambda. Java also supports
Expected Conditions
The Wait class can be instantiated with various parameters that will change how the conditions are evaluated.
This can include:
Changing how often the code is evaluated (polling interval)
Specifying which exceptions should be handled automatically
Changing the total timeout length
Customizing the timeout message
For instance, if the element not interactable error is retried by default, then we can
add an action on a method inside the code getting executed (we just need to
make sure that the code returns true when it is successful):
The easiest way to customize Waits in Java is to use the FluentWait class:
Identifying and working with element objects in the DOM.
The majority of most people’s Selenium code involves working with web elements.
2.5.1 - File Upload
Because Selenium cannot interact with the file upload dialog, it provides a way
to upload files without opening the dialog. If the element is an input element with type file,
you can use the send keys method to send the full path to the file that will be uploaded.
```java
import org.openqa.selenium.By
import org.openqa.selenium.chrome.ChromeDriver
fun main() {
val driver = ChromeDriver()
driver.get("https://the-internet.herokuapp.com/upload")
driver.findElement(By.id("file-upload")).sendKeys("selenium-snapshot.jpg")
driver.findElement(By.id("file-submit")).submit()
if(driver.pageSource.contains("File Uploaded!")) {
println("file uploaded")
}
else{
println("file not uploaded")
}
}
```
2.5.2 - Locator strategies
Ways to identify one or more specific elements in the DOM.
A locator is a way to identify elements on a page. It is the argument passed to the
Finding element methods.
Check out our encouraged test practices for tips on
locators, including which to use when and
why to declare locators separately from the finding methods.
Traditional Locators
Selenium provides support for these 8 traditional location strategies in WebDriver:
Locator
Description
class name
Locates elements whose class name contains the search value (compound class names are not permitted)
css selector
Locates elements matching a CSS selector
id
Locates elements whose ID attribute matches the search value
name
Locates elements whose NAME attribute matches the search value
link text
Locates anchor elements whose visible text matches the search value
partial link text
Locates anchor elements whose visible text contains the search value. If multiple elements are matching, only the first one will be selected.
tag name
Locates elements whose tag name matches the search value
xpath
Locates elements matching an XPath expression
Creating Locators
To work on a web element using Selenium, we need to first locate it on the web page.
Selenium provides us above mentioned ways, using which we can locate element on the
page. To understand and create locator we will use the following HTML snippet.
<html><body><style>.information{background-color:white;color:black;padding:10px;}</style><h2>Contact Selenium</h2><formaction="/action_page.php"><inputtype="radio"name="gender"value="m"/>Male <inputtype="radio"name="gender"value="f"/>Female <br><br><labelfor="fname">First name:</label><br><inputclass="information"type="text"id="fname"name="fname"value="Jane"><br><br><labelfor="lname">Last name:</label><br><inputclass="information"type="text"id="lname"name="lname"value="Doe"><br><br><labelfor="newsletter">Newsletter:</label><inputtype="checkbox"name="newsletter"value="1"/><br><br><inputtype="submit"value="Submit"></form><p>To know more about Selenium, visit the official page
<ahref ="www.selenium.dev">Selenium Official Page</a></p></body></html>
class name
The HTML page web element can have attribute class. We can see an example in the
above shown HTML snippet. We can identify these elements using the class name locator
available in Selenium.
CSS is the language used to style HTML pages. We can use css selector locator strategy
to identify the element on the page. If the element has an id, we create the locator
as css = #id. Otherwise the format we follow is css =[attribute=value] .
Let us see an example from above HTML snippet. We will create locator for First Name
textbox, using css.
We can use the ID attribute of an element in a web page to locate it.
Generally the ID property should be unique for each element on the web page.
We will identify the Last Name field using it.
We can use the NAME attribute of an element in a web page to locate it.
Generally the NAME property should be unique for each element on the web page.
We will identify the Newsletter checkbox using it.
If the element we want to locate is a link, we can use the link text locator
to identify it on the web page. The link text is the text displayed of the link.
In the HTML snippet shared, we have a link available, let’s see how will we locate it.
letdriver=awaitnewBuilder().forBrowser('chrome').build();constloc=awaitdriver.findElement(By.linkText('Selenium Official Page'));
valdriver=ChromeDriver()valloc:WebElement=driver.findElement(By.linkText("Selenium Official Page"))
partial link text
If the element we want to locate is a link, we can use the partial link text locator
to identify it on the web page. The link text is the text displayed of the link.
We can pass partial text as value.
In the HTML snippet shared, we have a link available, lets see how will we locate it.
We can use the HTML TAG itself as a locator to identify the web element on the page.
From the above HTML snippet shared, lets identify the link, using its html tag “a”.
A HTML document can be considered as a XML document, and then we can use xpath
which will be the path traversed to reach the element of interest to locate the element.
The XPath could be absolute xpath, which is created from the root of the document.
Example - /html/form/input[1]. This will return the male radio button.
Or the xpath could be relative. Example- //input[@name=‘fname’]. This will return the
first name text box. Let us create locator for female radio button using xpath.
Selenium 4 introduces Relative Locators (previously
called Friendly Locators). These locators are helpful when it is not easy to construct a locator for
the desired element, but easy to describe spatially where the element is in relation to an element that does have
an easily constructed locator.
How it works
Selenium uses the JavaScript function
getBoundingClientRect()
to determine the size and position of elements on the page, and can use this information to locate neighboring elements.
Relative locator methods can take as the argument for the point of origin, either a previously located element reference,
or another locator. In these examples we’ll be using locators only, but you could swap the locator in the final method with
an element object and it will work the same.
Let us consider the below example for understanding the relative locators.
Available relative locators
Above
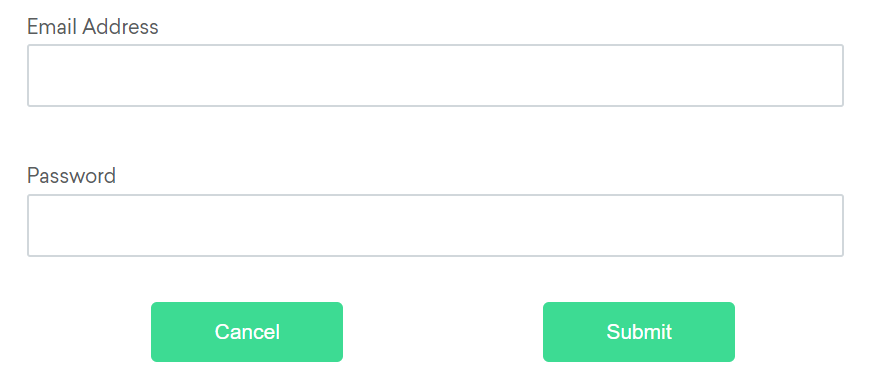
If the email text field element is not easily identifiable for some reason, but the password text field element is,
we can locate the text field element using the fact that it is an “input” element “above” the password element.
If the password text field element is not easily identifiable for some reason, but the email text field element is,
we can locate the text field element using the fact that it is an “input” element “below” the email element.
If the cancel button is not easily identifiable for some reason, but the submit button element is,
we can locate the cancel button element using the fact that it is a “button” element to the “left of” the submit element.
If the submit button is not easily identifiable for some reason, but the cancel button element is,
we can locate the submit button element using the fact that it is a “button” element “to the right of” the cancel element.
If the relative positioning is not obvious, or it varies based on window size, you can use the near method to
identify an element that is at most 50px away from the provided locator.
One great use case for this is to work with a form element that doesn’t have an easily constructed locator,
but its associated input label element does.
You can also chain locators if needed. Sometimes the element is most easily identified as being both above/below one element and right/left of another.
Locating the elements based on the provided locator values.
One of the most fundamental aspects of using Selenium is obtaining element references to work with.
Selenium offers a number of built-in locator strategies to uniquely identify an element.
There are many ways to use the locators in very advanced scenarios. For the purposes of this documentation,
let’s consider this HTML snippet:
<olid="vegetables"><liclass="potatoes">…
<liclass="onions">…
<liclass="tomatoes"><span>Tomato is a Vegetable</span>…
</ol><ulid="fruits"><liclass="bananas">…
<liclass="apples">…
<liclass="tomatoes"><span>Tomato is a Fruit</span>…
</ul>
First matching element
Many locators will match multiple elements on the page. The singular find element method will return a reference to the
first element found within a given context.
Evaluating entire DOM
When the find element method is called on the driver instance, it
returns a reference to the first element in the DOM that matches with the provided locator.
This value can be stored and used for future element actions. In our example HTML above, there are
two elements that have a class name of “tomatoes” so this method will return the element in the “vegetables” list.
Rather than finding a unique locator in the entire DOM, it is often useful to narrow the search to the scope
of another located element. In the above example there are two elements with a class name of “tomatoes” and
it is a little more challenging to get the reference for the second one.
One solution is to locate an element with a unique attribute that is an ancestor of the desired element and not an
ancestor of the undesired element, then call find element on that object:
Java and C# WebDriver, WebElement and ShadowRoot classes all implement a SearchContext interface, which is
considered a role-based interface. Role-based interfaces allow you to determine whether a particular
driver implementation supports a given feature. These interfaces are clearly defined and try
to adhere to having only a single role of responsibility.
Optimized locator
A nested lookup might not be the most effective location strategy since it requires two
separate commands to be issued to the browser.
There are several use cases for needing to get references to all elements that match a locator, rather
than just the first one. The plural find elements methods return a collection of element references.
If there are no matches, an empty list is returned. In this case,
references to all fruits and vegetable list items will be returned in a collection.
Often you get a collection of elements but want to work with a specific element, which means you
need to iterate over the collection and identify the one you want.
fromseleniumimportwebdriverfromselenium.webdriver.common.byimportBydriver=webdriver.Firefox()# Navigate to Urldriver.get("https://www.example.com")# Get all the elements available with tag name 'p'elements=driver.find_elements(By.TAG_NAME,'p')foreinelements:print(e.text)
usingOpenQA.Selenium;usingOpenQA.Selenium.Firefox;usingSystem.Collections.Generic;namespaceFindElementsExample{classFindElementsExample{publicstaticvoidMain(string[]args){IWebDriverdriver=newFirefoxDriver();try{// Navigate to Urldriver.Navigate().GoToUrl("https://example.com");// Get all the elements available with tag name 'p'IList<IWebElement>elements=driver.FindElements(By.TagName("p"));foreach(IWebElementeinelements){System.Console.WriteLine(e.Text);}}finally{driver.Quit();}}}}
const{Builder,By}=require('selenium-webdriver');(asyncfunctionexample(){letdriver=awaitnewBuilder().forBrowser('firefox').build();try{// Navigate to Url
awaitdriver.get('https://www.example.com');// Get all the elements available with tag 'p'
letelements=awaitdriver.findElements(By.css('p'));for(leteofelements){console.log(awaite.getText());}}finally{awaitdriver.quit();}})();
importorg.openqa.selenium.Byimportorg.openqa.selenium.firefox.FirefoxDriverfunmain(){valdriver=FirefoxDriver()try{driver.get("https://example.com")// Get all the elements available with tag name 'p'
valelements=driver.findElements(By.tagName("p"))for(elementinelements){println("Paragraph text:"+element.text)}}finally{driver.quit()}}
Find Elements From Element
It is used to find the list of matching child WebElements within the context of parent element.
To achieve this, the parent WebElement is chained with ‘findElements’ to access child elements
importorg.openqa.selenium.By;importorg.openqa.selenium.WebDriver;importorg.openqa.selenium.WebElement;importorg.openqa.selenium.chrome.ChromeDriver;importjava.util.List;publicclassfindElementsFromElement{publicstaticvoidmain(String[]args){WebDriverdriver=newChromeDriver();try{driver.get("https://example.com");// Get element with tag name 'div'WebElementelement=driver.findElement(By.tagName("div"));// Get all the elements available with tag name 'p'List<WebElement>elements=element.findElements(By.tagName("p"));for(WebElemente:elements){System.out.println(e.getText());}}finally{driver.quit();}}}
fromseleniumimportwebdriverfromselenium.webdriver.common.byimportBydriver=webdriver.Chrome()driver.get("https://www.example.com")# Get element with tag name 'div'element=driver.find_element(By.TAG_NAME,'div')# Get all the elements available with tag name 'p'elements=element.find_elements(By.TAG_NAME,'p')foreinelements:print(e.text)
usingOpenQA.Selenium;usingOpenQA.Selenium.Chrome;usingSystem.Collections.Generic;namespaceFindElementsFromElement{classFindElementsFromElement{publicstaticvoidMain(string[]args){IWebDriverdriver=newChromeDriver();try{driver.Navigate().GoToUrl("https://example.com");// Get element with tag name 'div'IWebElementelement=driver.FindElement(By.TagName("div"));// Get all the elements available with tag name 'p'IList<IWebElement>elements=element.FindElements(By.TagName("p"));foreach(IWebElementeinelements){System.Console.WriteLine(e.Text);}}finally{driver.Quit();}}}}
const{Builder,By}=require('selenium-webdriver');(asyncfunctionexample(){letdriver=newBuilder().forBrowser('chrome').build();awaitdriver.get('https://www.example.com');// Get element with tag name 'div'
letelement=driver.findElement(By.css("div"));// Get all the elements available with tag name 'p'
letelements=awaitelement.findElements(By.css("p"));for(leteofelements){console.log(awaite.getText());}})();
importorg.openqa.selenium.Byimportorg.openqa.selenium.chrome.ChromeDriverfunmain(){valdriver=ChromeDriver()try{driver.get("https://example.com")// Get element with tag name 'div'
valelement=driver.findElement(By.tagName("div"))// Get all the elements available with tag name 'p'
valelements=element.findElements(By.tagName("p"))for(einelements){println(e.text)}}finally{driver.quit()}}
Get Active Element
It is used to track (or) find DOM element which has the focus in the current browsing context.
importorg.openqa.selenium.*;importorg.openqa.selenium.chrome.ChromeDriver;publicclassactiveElementTest{publicstaticvoidmain(String[]args){WebDriverdriver=newChromeDriver();try{driver.get("http://www.google.com");driver.findElement(By.cssSelector("[name='q']")).sendKeys("webElement");// Get attribute of current active elementStringattr=driver.switchTo().activeElement().getAttribute("title");System.out.println(attr);}finally{driver.quit();}}}
fromseleniumimportwebdriverfromselenium.webdriver.common.byimportBydriver=webdriver.Chrome()driver.get("https://www.google.com")driver.find_element(By.CSS_SELECTOR,'[name="q"]').send_keys("webElement")# Get attribute of current active elementattr=driver.switch_to.active_element.get_attribute("title")print(attr)
usingOpenQA.Selenium;usingOpenQA.Selenium.Chrome;namespaceActiveElement{classActiveElement{publicstaticvoidMain(string[]args){IWebDriverdriver=newChromeDriver();try{// Navigate to Urldriver.Navigate().GoToUrl("https://www.google.com");driver.FindElement(By.CssSelector("[name='q']")).SendKeys("webElement");// Get attribute of current active elementstringattr=driver.SwitchTo().ActiveElement().GetAttribute("title");System.Console.WriteLine(attr);}finally{driver.Quit();}}}}
const{Builder,By}=require('selenium-webdriver');(asyncfunctionexample(){letdriver=awaitnewBuilder().forBrowser('chrome').build();awaitdriver.get('https://www.google.com');awaitdriver.findElement(By.css('[name="q"]')).sendKeys("webElement");// Get attribute of current active element
letattr=awaitdriver.switchTo().activeElement().getAttribute("title");console.log(`${attr}`)})();
importorg.openqa.selenium.Byimportorg.openqa.selenium.chrome.ChromeDriverfunmain(){valdriver=ChromeDriver()try{driver.get("https://www.google.com")driver.findElement(By.cssSelector("[name='q']")).sendKeys("webElement")// Get attribute of current active element
valattr=driver.switchTo().activeElement().getAttribute("title")print(attr)}finally{driver.quit()}}
2.5.4 - Interacting with web elements
A high-level instruction set for manipulating form controls.
There are only 5 basic commands that can be executed on an element:
These methods are designed to closely emulate a user’s experience, so,
unlike the Actions API, it attempts to perform two things
before attempting the specified action.
If it determines the element is outside the viewport, it
scrolls the element into view, specifically
it will align the bottom of the element with the bottom of the viewport.
It ensures the element is interactable
before taking the action. This could mean that the scrolling was unsuccessful, or that the
element is not otherwise displayed. Determining if an element is displayed on a page was too difficult to
define directly in the webdriver specification,
so Selenium sends an execute command with a JavaScript atom that checks for things that would keep
the element from being displayed. If it determines an element is not in the viewport, not displayed, not
keyboard-interactable, or not
pointer-interactable,
it returns an element not interactable error.
driver.get("https://www.selenium.dev/selenium/web/inputs.html");// Click on the element WebElementcheckInput=driver.findElement(By.name("checkbox_input"));checkInput.click();
# Navigate to urldriver.get("https://www.selenium.dev/selenium/web/inputs.html")# Click on the element driver.find_element(By.NAME,"color_input").click()
// Navigate to Urldriver.Navigate().GoToUrl("https://www.selenium.dev/selenium/web/inputs.html");// Click on the element IWebElementcheckInput=driver.FindElement(By.Name("checkbox_input"));checkInput.Click();
// Navigate to Url
driver.get("https://www.selenium.dev/selenium/web/inputs.html")// Click the element
driver.findElement(By.name("color_input")).click();
Send keys
The element send keys command
types the provided keys into an editable element.
Typically, this means an element is an input element of a form with a text type or an element
with a content-editable attribute. If it is not editable,
an invalid element state error is returned.
Here is the list of
possible keystrokes that WebDriver Supports.
// Clear field to empty it from any previous dataWebElementemailInput=driver.findElement(By.name("email_input"));emailInput.clear();//Enter TextStringemail="admin@localhost.dev";emailInput.sendKeys(email);
# Navigate to urldriver.get("https://www.selenium.dev/selenium/web/inputs.html")# Clear field to empty it from any previous datadriver.find_element(By.NAME,"email_input").clear()# Enter Textdriver.find_element(By.NAME,"email_input").send_keys("admin@localhost.dev")
//SendKeys// Clear field to empty it from any previous dataIWebElementemailInput=driver.FindElement(By.Name("email_input"));emailInput.Clear();//Enter TextStringemail="admin@localhost.dev";emailInput.SendKeys(email);
// Navigate to Url
driver.get("https://www.selenium.dev/selenium/web/inputs.html")//Clear field to empty it from any previous data
driver.findElement(By.name("email_input")).clear()// Enter text
driver.findElement(By.name("email_input")).sendKeys("admin@localhost.dev")
Clear
The element clear command resets the content of an element.
This requires an element to be editable,
and resettable. Typically,
this means an element is an input element of a form with a text type or an element
with acontent-editable attribute. If these conditions are not met,
an invalid element state error is returned.
//Clear Element// Clear field to empty it from any previous dataemailInput.clear();
# Navigate to urldriver.get("https://www.selenium.dev/selenium/web/inputs.html")# Clear field to empty it from any previous datadriver.find_element(By.NAME,"email_input").clear()
//Clear Element// Clear field to empty it from any previous dataemailInput.Clear();data=emailInput.GetAttribute("value");
// Navigate to Url
driver.get("https://www.selenium.dev/selenium/web/inputs.html")//Clear field to empty it from any previous data
driver.findElement(By.name("email_input")).clear()
Submit
In Selenium 4 this is no longer implemented with a separate endpoint and functions by executing a script. As
such, it is recommended not to use this method and to click the applicable form submission button instead.
2.5.5 - Information about web elements
What you can learn about an element.
There are a number of details you can query about a specific element.
Is Displayed
This method is used to check if the connected Element is
displayed on a webpage. Returns a Boolean value,
True if the connected element is displayed in the current
browsing context else returns false.
This functionality is mentioned in, but not defined by
the w3c specification due to the
impossibility of covering all potential conditions.
As such, Selenium cannot expect drivers to implement
this functionality directly, and now relies on
executing a large JavaScript function directly.
This function makes many approximations about an element’s
nature and relationship in the tree to return a value.
driver.get("https://www.selenium.dev/selenium/web/inputs.html");// isDisplayed // Get boolean value for is element displaybooleanisEmailVisible=driver.findElement(By.name("email_input")).isDisplayed();assertEquals(isEmailVisible,true);
# Navigate to the urldriver.get("https://www.selenium.dev/selenium/web/inputs.html")# Get boolean value for is element displayis_email_visible=driver.find_element(By.NAME,"email_input").is_displayed()
//Navigate to the urldriver.Url="https://www.selenium.dev/selenium/web/inputs.html";//Get boolean value for is element displayBooleanis_email_visible=driver.FindElement(By.Name("email_input")).Displayed;
//navigates to url
driver.get("https://www.selenium.dev/selenium/web/inputs.html")//returns true if element is displayed else returns false
valflag=driver.findElement(By.name("email_input")).isDisplayed()
Is Enabled
This method is used to check if the connected Element
is enabled or disabled on a webpage.
Returns a boolean value, True if the connected element is
enabled in the current browsing context else returns false.
//isEnabled//returns true if element is enabled else returns falsebooleanisEnabledButton=driver.findElement(By.name("button_input")).isEnabled();assertEquals(isEnabledButton,true);
# Navigate to urldriver.get("https://www.selenium.dev/selenium/web/inputs.html")# Returns true if element is enabled else returns falsevalue=driver.find_element(By.NAME,'button_input').is_enabled()
// Navigate to Urldriver.Navigate().GoToUrl("https://www.selenium.dev/selenium/web/inputs.html");// Store the WebElementIWebElementelement=driver.FindElement(By.Name("button_input"));// Prints true if element is enabled else returns falseSystem.Console.WriteLine(element.Enabled);
//navigates to url
driver.get("https://www.selenium.dev/selenium/web/inputs.html")//returns true if element is enabled else returns false
valattr=driver.findElement(By.name("button_input")).isEnabled()
Is Selected
This method determines if the referenced Element
is Selected or not. This method is widely used on
Check boxes, radio buttons, input elements, and option elements.
Returns a boolean value, True if referenced element is
selected in the current browsing context else returns false.
//isSelected//returns true if element is checked else returns falsebooleanisSelectedCheck=driver.findElement(By.name("checkbox_input")).isSelected();assertEquals(isSelectedCheck,true);
# Navigate to urldriver.get("https://www.selenium.dev/selenium/web/inputs.html")# Returns true if element is checked else returns falsevalue=driver.find_element(By.NAME,"checkbox_input").is_selected()
// Navigate to Urldriver.Navigate().GoToUrl("https://www.selenium.dev/selenium/web/inputs.html");// Returns true if element ins checked else returns falseboolvalue=driver.FindElement(By.Name("checkbox_input")).Selected;
//navigates to url
driver.get("https://www.selenium.dev/selenium/web/inputs.html")//returns true if element is checked else returns false
valattr=driver.findElement(By.name("checkbox_input")).isSelected()
Tag Name
It is used to fetch the TagName
of the referenced Element which has the focus in the current browsing context.
//TagName//returns TagName of the elementStringtagNameInp=driver.findElement(By.name("email_input")).getTagName();assertEquals(tagNameInp,"input");
# Navigate to urldriver.get("https://www.selenium.dev/selenium/web/inputs.html")# Returns TagName of the elementattr=driver.find_element(By.NAME,"email_input").tag_name
// Navigate to Urldriver.Navigate().GoToUrl("https://www.selenium.dev/selenium/web/inputs.html");// Returns TagName of the elementstringattr=driver.FindElement(By.Name("email_input")).TagName;
//navigates to url
driver.get("https://www.selenium.dev/selenium/web/inputs.html")//returns TagName of the element
valattr=driver.findElement(By.name("email_input")).getTagName()
Size and Position
It is used to fetch the dimensions and coordinates
of the referenced element.
The fetched data body contain the following details:
X-axis position from the top-left corner of the element
y-axis position from the top-left corner of the element
Height of the element
Width of the element
//GetRect// Returns height, width, x and y coordinates referenced elementRectangleres=driver.findElement(By.name("range_input")).getRect();// Rectangle class provides getX,getY, getWidth, getHeight methodsassertEquals(res.getX(),10);
# Navigate to urldriver.get("https://www.selenium.dev/selenium/web/inputs.html")# Returns height, width, x and y coordinates referenced elementres=driver.find_element(By.NAME,"range_input").rect
// Navigate to Urldriver.Navigate().GoToUrl("https://www.selenium.dev/selenium/web/inputs.html");varres=driver.FindElement(By.Name("range_input"));// Return x and y coordinates referenced elementSystem.Console.WriteLine(res.Location);// Returns height, widthSystem.Console.WriteLine(res.Size);
// Navigate to url
driver.get("https://www.selenium.dev/selenium/web/inputs.html")// Returns height, width, x and y coordinates referenced element
valres=driver.findElement(By.name("range_input")).rect// Rectangle class provides getX,getY, getWidth, getHeight methods
println(res.getX())
Get CSS Value
Retrieves the value of specified computed style property
of an element in the current browsing context.
// Retrieves the computed style property 'font-size' of fieldStringcssValue=driver.findElement(By.name("color_input")).getCssValue("font-size");assertEquals(cssValue,"13.3333px");
# Navigate to Urldriver.get('https://www.selenium.dev/selenium/web/colorPage.html')# Retrieves the computed style property 'color' of linktextcssValue=driver.find_element(By.ID,"namedColor").value_of_css_property('background-color')
// Navigate to Urldriver.Navigate().GoToUrl("https://www.selenium.dev/selenium/web/colorPage.html");// Retrieves the computed style property 'color' of linktextStringcssValue=driver.FindElement(By.Id("namedColor")).GetCssValue("background-color");
awaitdriver.get('https://www.selenium.dev/selenium/web/colorPage.html');// Returns background color of the element
letvalue=awaitdriver.findElement(By.id('namedColor')).getCssValue('background-color');
// Navigate to Url
driver.get("https://www.selenium.dev/selenium/web/colorPage.html")// Retrieves the computed style property 'color' of linktext
valcssValue=driver.findElement(By.id("namedColor")).getCssValue("background-color")
Text Content
Retrieves the rendered text of the specified element.
//GetText// Retrieves the text of the elementStringtext=driver.findElement(By.tagName("h1")).getText();assertEquals(text,"Testing Inputs");
# Navigate to urldriver.get("https://www.selenium.dev/selenium/web/linked_image.html")# Retrieves the text of the elementtext=driver.find_element(By.ID,"justanotherlink").text
// Navigate to urldriver.Url="https://www.selenium.dev/selenium/web/linked_image.html";// Retrieves the text of the elementStringtext=driver.FindElement(By.Id("justanotherlink")).Text;
awaitdriver.get('https://www.selenium.dev/selenium/web/linked_image.html');// Returns text of the element
lettext=awaitdriver.findElement(By.id('justanotherLink')).getText();
// Navigate to URL
driver.get("https://www.selenium.dev/selenium/web/linked_image.html")// retrieves the text of the element
valtext=driver.findElement(By.id("justanotherlink")).getText()
Fetching Attributes or Properties
Fetches the run time value associated with a
DOM attribute. It returns the data associated
with the DOM attribute or property of the element.
//FetchAttributes//identify the email text boxWebElementemailTxt=driver.findElement(By.name(("email_input")));//fetch the value property associated with the textboxStringvalueInfo=emailTxt.getAttribute("value");assertEquals(valueInfo,"admin@localhost");
# Navigate to the urldriver.get("https://www.selenium.dev/selenium/web/inputs.html")# Identify the email text boxemail_txt=driver.find_element(By.NAME,"email_input")# Fetch the value property associated with the textboxvalue_info=email_txt.get_attribute("value")
//Navigate to the urldriver.Url="https://www.selenium.dev/selenium/web/inputs.html";//identify the email text boxIWebElementemailTxt=driver.FindElement(By.Name(("email_input")));//fetch the value property associated with the textboxStringvalueInfo=eleSelLink.GetAttribute("value");
// identify the email text box
constemailElement=awaitdriver.findElement(By.xpath('//input[@name="email_input"]'));//fetch the attribute "name" associated with the textbox
constnameAttribute=awaitemailElement.getAttribute("name");
// Navigate to URL
driver.get("https://www.selenium.dev/selenium/web/inputs.html")//fetch the value property associated with the textbox
valattr=driver.findElement(By.name("email_input")).getAttribute("value")
2.6 - Browser interactions
Get browser information
Get title
You can read the current page title from the browser:
2.6.2 - JavaScript alerts, prompts and confirmations
WebDriver provides an API for working with the three types of native
popup messages offered by JavaScript. These popups are styled by the
browser and offer limited customisation.
Alerts
The simplest of these is referred to as an alert, which shows a
custom message, and a single button which dismisses the alert, labelled
in most browsers as OK. It can also be dismissed in most browsers by
pressing the close button, but this will always do the same thing as
the OK button. See an example alert.
WebDriver can get the text from the popup and accept or dismiss these
alerts.
//Click the link to activate the alertdriver.findElement(By.linkText("See an example alert")).click();//Wait for the alert to be displayed and store it in a variableAlertalert=wait.until(ExpectedConditions.alertIsPresent());//Store the alert text in a variableStringtext=alert.getText();//Press the OK buttonalert.accept();
element=driver.find_element(By.LINK_TEXT,"See an example alert")element.click()wait=WebDriverWait(driver,timeout=2)alert=wait.until(lambdad:d.switch_to.alert)text=alert.textalert.accept()
//Click the link to activate the alertdriver.FindElement(By.LinkText("See an example alert")).Click();//Wait for the alert to be displayed and store it in a variableIAlertalert=wait.Until(ExpectedConditions.AlertIsPresent());//Store the alert text in a variablestringtext=alert.Text;//Press the OK buttonalert.Accept();
# Click the link to activate the alertdriver.find_element(:link_text,'See an example alert').click# Store the alert reference in a variablealert=driver.switch_to.alert# Store the alert text in a variablealert_text=alert.text# Press on OK buttonalert.accept
//Click the link to activate the alert
driver.findElement(By.linkText("See an example alert")).click()//Wait for the alert to be displayed and store it in a variable
valalert=wait.until(ExpectedConditions.alertIsPresent())//Store the alert text in a variable
valtext=alert.getText()//Press the OK button
alert.accept()
Confirm
A confirm box is similar to an alert, except the user can also choose
to cancel the message. See
a sample confirm.
This example also shows a different approach to storing an alert:
//Click the link to activate the alertdriver.findElement(By.linkText("See a sample confirm")).click();//Wait for the alert to be displayedwait.until(ExpectedConditions.alertIsPresent());//Store the alert in a variableAlertalert=driver.switchTo().alert();//Store the alert in a variable for reuseStringtext=alert.getText();//Press the Cancel buttonalert.dismiss();
element=driver.find_element(By.LINK_TEXT,"See a sample confirm")driver.execute_script("arguments[0].click();",element)wait=WebDriverWait(driver,timeout=2)alert=wait.until(lambdad:d.switch_to.alert)text=alert.textalert.dismiss()
//Click the link to activate the alertdriver.FindElement(By.LinkText("See a sample confirm")).Click();//Wait for the alert to be displayedwait.Until(ExpectedConditions.AlertIsPresent());//Store the alert in a variableIAlertalert=driver.SwitchTo().Alert();//Store the alert in a variable for reusestringtext=alert.Text;//Press the Cancel buttonalert.Dismiss();
# Click the link to activate the alertdriver.find_element(:link_text,'See a sample confirm').click# Store the alert reference in a variablealert=driver.switch_to.alert# Store the alert text in a variablealert_text=alert.text# Press on Cancel buttonalert.dismiss
//Click the link to activate the alert
driver.findElement(By.linkText("See a sample confirm")).click()//Wait for the alert to be displayed
wait.until(ExpectedConditions.alertIsPresent())//Store the alert in a variable
valalert=driver.switchTo().alert()//Store the alert in a variable for reuse
valtext=alert.text//Press the Cancel button
alert.dismiss()
Prompt
Prompts are similar to confirm boxes, except they also include a text
input. Similar to working with form elements, you can use WebDriver’s
send keys to fill in a response. This will completely replace the placeholder
text. Pressing the cancel button will not submit any text.
See a sample prompt.
//Click the link to activate the alertdriver.findElement(By.linkText("See a sample prompt")).click();//Wait for the alert to be displayed and store it in a variableAlertalert=wait.until(ExpectedConditions.alertIsPresent());//Type your messagealert.sendKeys("Selenium");//Press the OK buttonalert.accept();
element=driver.find_element(By.LINK_TEXT,"See a sample prompt")driver.execute_script("arguments[0].click();",element)wait=WebDriverWait(driver,timeout=2)alert=wait.until(lambdad:d.switch_to.alert)alert.send_keys("Selenium")text=alert.textalert.accept()
//Click the link to activate the alertdriver.FindElement(By.LinkText("See a sample prompt")).Click();//Wait for the alert to be displayed and store it in a variableIAlertalert=wait.Until(ExpectedConditions.AlertIsPresent());//Type your messagealert.SendKeys("Selenium");//Press the OK buttonalert.Accept();
# Click the link to activate the alertdriver.find_element(:link_text,'See a sample prompt').click# Store the alert reference in a variablealert=driver.switch_to.alert# Type a messagealert.send_keys("selenium")# Press on Ok buttonalert.accept
letalert=awaitdriver.switchTo().alert();//Type your message
awaitalert.sendKeys(text);awaitalert.accept();
//Click the link to activate the alert
driver.findElement(By.linkText("See a sample prompt")).click()//Wait for the alert to be displayed and store it in a variable
valalert=wait.until(ExpectedConditions.alertIsPresent())//Type your message
alert.sendKeys("Selenium")//Press the OK button
alert.accept()
2.6.3 - Working with cookies
A cookie is a small piece of data that is sent from a website and stored in your computer.
Cookies are mostly used to recognise the user and load the stored information.
WebDriver API provides a way to interact with cookies with built-in methods:
Add Cookie
It is used to add a cookie to the current browsing context.
Add Cookie only accepts a set of defined serializable JSON object. Here is the link to the list of accepted JSON key values
First of all, you need to be on the domain that the cookie will be
valid for. If you are trying to preset cookies before
you start interacting with a site and your homepage is large / takes a while to load
an alternative is to find a smaller page on the site (typically the 404 page is small,
e.g. http://example.com/some404page)
importorg.openqa.selenium.*;importorg.openqa.selenium.chrome.ChromeDriver;publicclassaddCookie{publicstaticvoidmain(String[]args){WebDriverdriver=newChromeDriver();try{driver.get("http://www.example.com");// Adds the cookie into current browser contextdriver.manage().addCookie(newCookie("key","value"));}finally{driver.quit();}}}
fromseleniumimportwebdriverdriver=webdriver.Chrome()driver.get("http://www.example.com")# Adds the cookie into current browser contextdriver.add_cookie({"name":"key","value":"value"})
usingOpenQA.Selenium;usingOpenQA.Selenium.Chrome;namespaceAddCookie{classAddCookie{publicstaticvoidMain(string[]args){IWebDriverdriver=newChromeDriver();try{// Navigate to Urldriver.Navigate().GoToUrl("https://example.com");// Adds the cookie into current browser contextdriver.Manage().Cookies.AddCookie(newCookie("key","value"));}finally{driver.Quit();}}}}
require'selenium-webdriver'driver=Selenium::WebDriver.for:chromebegindriver.get'https://www.example.com'# Adds the cookie into current browser contextdriver.manage.add_cookie(name:"key",value:"value")ensuredriver.quitend
importorg.openqa.selenium.Cookieimportorg.openqa.selenium.chrome.ChromeDriverfunmain(){valdriver=ChromeDriver()try{driver.get("https://example.com")// Adds the cookie into current browser context
driver.manage().addCookie(Cookie("key","value"))}finally{driver.quit()}}
Get Named Cookie
It returns the serialized cookie data matching with the cookie name among all associated cookies.
importorg.openqa.selenium.*;importorg.openqa.selenium.chrome.ChromeDriver;publicclassgetCookieNamed{publicstaticvoidmain(String[]args){WebDriverdriver=newChromeDriver();try{driver.get("http://www.example.com");driver.manage().addCookie(newCookie("foo","bar"));// Get cookie details with named cookie 'foo'Cookiecookie1=driver.manage().getCookieNamed("foo");System.out.println(cookie1);}finally{driver.quit();}}}
fromseleniumimportwebdriverdriver=webdriver.Chrome()# Navigate to urldriver.get("http://www.example.com")# Adds the cookie into current browser contextdriver.add_cookie({"name":"foo","value":"bar"})# Get cookie details with named cookie 'foo'print(driver.get_cookie("foo"))
usingOpenQA.Selenium;usingOpenQA.Selenium.Chrome;namespaceGetCookieNamed{classGetCookieNamed{publicstaticvoidMain(string[]args){IWebDriverdriver=newChromeDriver();try{// Navigate to Urldriver.Navigate().GoToUrl("https://example.com");driver.Manage().Cookies.AddCookie(newCookie("foo","bar"));// Get cookie details with named cookie 'foo'varcookie=driver.Manage().Cookies.GetCookieNamed("foo");System.Console.WriteLine(cookie);}finally{driver.Quit();}}}}
require'selenium-webdriver'driver=Selenium::WebDriver.for:chromebegindriver.get'https://www.example.com'driver.manage.add_cookie(name:"foo",value:"bar")# Get cookie details with named cookie 'foo'putsdriver.manage.cookie_named('foo')ensuredriver.quitend
// Get cookie details with named cookie 'foo'
awaitdriver.manage().getCookie('foo').then(function(cookie){console.log('cookie details => ',cookie);});
importorg.openqa.selenium.Cookieimportorg.openqa.selenium.chrome.ChromeDriverfunmain(){valdriver=ChromeDriver()try{driver.get("https://example.com")driver.manage().addCookie(Cookie("foo","bar"))// Get cookie details with named cookie 'foo'
valcookie=driver.manage().getCookieNamed("foo")println(cookie)}finally{driver.quit()}}
Get All Cookies
It returns a ‘successful serialized cookie data’ for current browsing context.
If browser is no longer available it returns error.
importorg.openqa.selenium.*;importorg.openqa.selenium.chrome.ChromeDriver;importjava.util.Set;publicclassgetAllCookies{publicstaticvoidmain(String[]args){WebDriverdriver=newChromeDriver();try{driver.get("http://www.example.com");// Add few cookiesdriver.manage().addCookie(newCookie("test1","cookie1"));driver.manage().addCookie(newCookie("test2","cookie2"));// Get All available cookiesSet<Cookie>cookies=driver.manage().getCookies();System.out.println(cookies);}finally{driver.quit();}}}
fromseleniumimportwebdriverdriver=webdriver.Chrome()# Navigate to urldriver.get("http://www.example.com")driver.add_cookie({"name":"test1","value":"cookie1"})driver.add_cookie({"name":"test2","value":"cookie2"})# Get all available cookiesprint(driver.get_cookies())
usingOpenQA.Selenium;usingOpenQA.Selenium.Chrome;namespaceGetAllCookies{classGetAllCookies{publicstaticvoidMain(string[]args){IWebDriverdriver=newChromeDriver();try{// Navigate to Urldriver.Navigate().GoToUrl("https://example.com");driver.Manage().Cookies.AddCookie(newCookie("test1","cookie1"));driver.Manage().Cookies.AddCookie(newCookie("test2","cookie2"));// Get All available cookiesvarcookies=driver.Manage().Cookies.AllCookies;}finally{driver.Quit();}}}}
require'selenium-webdriver'driver=Selenium::WebDriver.for:chromebegindriver.get'https://www.example.com'driver.manage.add_cookie(name:"test1",value:"cookie1")driver.manage.add_cookie(name:"test2",value:"cookie2")# Get all available cookiesputsdriver.manage.all_cookiesensuredriver.quitend
importorg.openqa.selenium.Cookieimportorg.openqa.selenium.chrome.ChromeDriverfunmain(){valdriver=ChromeDriver()try{driver.get("https://example.com")driver.manage().addCookie(Cookie("test1","cookie1"))driver.manage().addCookie(Cookie("test2","cookie2"))// Get All available cookies
valcookies=driver.manage().cookiesprintln(cookies)}finally{driver.quit()}}
Delete Cookie
It deletes the cookie data matching with the provided cookie name.
importorg.openqa.selenium.*;importorg.openqa.selenium.chrome.ChromeDriver;publicclassdeleteCookie{publicstaticvoidmain(String[]args){WebDriverdriver=newChromeDriver();try{driver.get("http://www.example.com");driver.manage().addCookie(newCookie("test1","cookie1"));Cookiecookie1=newCookie("test2","cookie2");driver.manage().addCookie(cookie1);// delete a cookie with name 'test1'driver.manage().deleteCookieNamed("test1");/*
Selenium Java bindings also provides a way to delete
cookie by passing cookie object of current browsing context
*/driver.manage().deleteCookie(cookie1);}finally{driver.quit();}}}
fromseleniumimportwebdriverdriver=webdriver.Chrome()# Navigate to urldriver.get("http://www.example.com")driver.add_cookie({"name":"test1","value":"cookie1"})driver.add_cookie({"name":"test2","value":"cookie2"})# Delete a cookie with name 'test1'driver.delete_cookie("test1")
usingOpenQA.Selenium;usingOpenQA.Selenium.Chrome;namespaceDeleteCookie{classDeleteCookie{publicstaticvoidMain(string[]args){IWebDriverdriver=newChromeDriver();try{// Navigate to Urldriver.Navigate().GoToUrl("https://example.com");driver.Manage().Cookies.AddCookie(newCookie("test1","cookie1"));varcookie=newCookie("test2","cookie2");driver.Manage().Cookies.AddCookie(cookie);// delete a cookie with name 'test1' driver.Manage().Cookies.DeleteCookieNamed("test1");// Selenium .net bindings also provides a way to delete// cookie by passing cookie object of current browsing contextdriver.Manage().Cookies.DeleteCookie(cookie);}finally{driver.Quit();}}}}
require'selenium-webdriver'driver=Selenium::WebDriver.for:chromebegindriver.get'https://www.example.com'driver.manage.add_cookie(name:"test1",value:"cookie1")driver.manage.add_cookie(name:"test2",value:"cookie2")# delete a cookie with name 'test1'driver.manage.delete_cookie('test1')ensuredriver.quitend
// Delete a cookie with name 'test1'
awaitdriver.manage().deleteCookie('test1');
importorg.openqa.selenium.Cookieimportorg.openqa.selenium.chrome.ChromeDriverfunmain(){valdriver=ChromeDriver()try{driver.get("https://example.com")driver.manage().addCookie(Cookie("test1","cookie1"))valcookie1=Cookie("test2","cookie2")driver.manage().addCookie(cookie1)// delete a cookie with name 'test1'
driver.manage().deleteCookieNamed("test1")// delete cookie by passing cookie object of current browsing context.
driver.manage().deleteCookie(cookie1)}finally{driver.quit()}}
Delete All Cookies
It deletes all the cookies of the current browsing context.
importorg.openqa.selenium.*;importorg.openqa.selenium.chrome.ChromeDriver;publicclassdeleteAllCookies{publicstaticvoidmain(String[]args){WebDriverdriver=newChromeDriver();try{driver.get("http://www.example.com");driver.manage().addCookie(newCookie("test1","cookie1"));driver.manage().addCookie(newCookie("test2","cookie2"));// deletes all cookiesdriver.manage().deleteAllCookies();}finally{driver.quit();}}}
fromseleniumimportwebdriverdriver=webdriver.Chrome()# Navigate to urldriver.get("http://www.example.com")driver.add_cookie({"name":"test1","value":"cookie1"})driver.add_cookie({"name":"test2","value":"cookie2"})# Deletes all cookiesdriver.delete_all_cookies()
usingOpenQA.Selenium;usingOpenQA.Selenium.Chrome;namespaceDeleteAllCookies{classDeleteAllCookies{publicstaticvoidMain(string[]args){IWebDriverdriver=newChromeDriver();try{// Navigate to Urldriver.Navigate().GoToUrl("https://example.com");driver.Manage().Cookies.AddCookie(newCookie("test1","cookie1"));driver.Manage().Cookies.AddCookie(newCookie("test2","cookie2"));// deletes all cookiesdriver.Manage().Cookies.DeleteAllCookies();}finally{driver.Quit();}}}}
require'selenium-webdriver'driver=Selenium::WebDriver.for:chromebegindriver.get'https://www.example.com'driver.manage.add_cookie(name:"test1",value:"cookie1")driver.manage.add_cookie(name:"test2",value:"cookie2")# deletes all cookiesdriver.manage.delete_all_cookiesensuredriver.quitend
// Delete all cookies
awaitdriver.manage().deleteAllCookies();
importorg.openqa.selenium.Cookieimportorg.openqa.selenium.chrome.ChromeDriverfunmain(){valdriver=ChromeDriver()try{driver.get("https://example.com")driver.manage().addCookie(Cookie("test1","cookie1"))driver.manage().addCookie(Cookie("test2","cookie2"))// deletes all cookies
driver.manage().deleteAllCookies()}finally{driver.quit()}}
Same-Site Cookie Attribute
It allows a user to instruct browsers to control whether cookies
are sent along with the request initiated by third party sites.
It is introduced to prevent CSRF (Cross-Site Request Forgery) attacks.
Same-Site cookie attribute accepts two parameters as instructions
Strict:
When the sameSite attribute is set as Strict,
the cookie will not be sent along with
requests initiated by third party websites.
Lax:
When you set a cookie sameSite attribute to Lax,
the cookie will be sent along with the GET
request initiated by third party website.
Note: As of now this feature is landed in chrome(80+version),
Firefox(79+version) and works with Selenium 4 and later versions.
fromseleniumimportwebdriverdriver=webdriver.Chrome()driver.get("http://www.example.com")# Adds the cookie into current browser context with sameSite 'Strict' (or) 'Lax'driver.add_cookie({"name":"foo","value":"value",'sameSite':'Strict'})driver.add_cookie({"name":"foo1","value":"value",'sameSite':'Lax'})cookie1=driver.get_cookie('foo')cookie2=driver.get_cookie('foo1')print(cookie1)print(cookie2)
require'selenium-webdriver'driver=Selenium::WebDriver.for:chromebegindriver.get'https://www.example.com'# Adds the cookie into current browser context with sameSite 'Strict' (or) 'Lax'driver.manage.add_cookie(name:"foo",value:"bar",same_site:"Strict")driver.manage.add_cookie(name:"foo1",value:"bar",same_site:"Lax")putsdriver.manage.cookie_named('foo')putsdriver.manage.cookie_named('foo1')ensuredriver.quitend
// set a cookie on the current domain with sameSite 'Strict' (or) 'Lax'
awaitdriver.manage().addCookie({name:'key',value:'value',sameSite:'Strict'});awaitdriver.manage().addCookie({name:'key',value:'value',sameSite:'Lax'});
Frames are a now deprecated means of building a site layout from
multiple documents on the same domain. You are unlikely to work with
them unless you are working with an pre HTML5 webapp. Iframes allow
the insertion of a document from an entirely different domain, and are
still commonly used.
If you need to work with frames or iframes, WebDriver allows you to
work with them in the same way. Consider a button within an iframe.
If we inspect the element using the browser development tools, we might
see the following:
# This won't workdriver.find_element(:tag_name,'button').click
// This won't work
awaitdriver.findElement(By.css('button')).click();
//This won't work
driver.findElement(By.tagName("button")).click()
However, if there are no buttons outside of the iframe, you might
instead get a no such element error. This happens because Selenium is
only aware of the elements in the top level document. To interact with
the button, we will need to first switch to the frame, in a similar way
to how we switch windows. WebDriver offers three ways of switching to
a frame.
Using a WebElement
Switching using a WebElement is the most flexible option. You can
find the frame using your preferred selector and switch to it.
//Store the web elementWebElementiframe=driver.findElement(By.cssSelector("#modal>iframe"));//Switch to the framedriver.switchTo().frame(iframe);//Now we can click the buttondriver.findElement(By.tagName("button")).click();
# Store iframe web elementiframe=driver.find_element(By.CSS_SELECTOR,"#modal > iframe")# switch to selected iframedriver.switch_to.frame(iframe)# Now click on buttondriver.find_element(By.TAG_NAME,'button').click()
//Store the web elementIWebElementiframe=driver.FindElement(By.CssSelector("#modal>iframe"));//Switch to the framedriver.SwitchTo().Frame(iframe);//Now we can click the buttondriver.FindElement(By.TagName("button")).Click();
# Store iframe web elementiframe=driver.find_element(:css,'#modal > iframe')# Switch to the framedriver.switch_to.frameiframe# Now, Click on the buttondriver.find_element(:tag_name,'button').click
// Store the web element
constiframe=driver.findElement(By.css('#modal > iframe'));// Switch to the frame
awaitdriver.switchTo().frame(iframe);// Now we can click the button
awaitdriver.findElement(By.css('button')).click();
//Store the web element
valiframe=driver.findElement(By.cssSelector("#modal>iframe"))//Switch to the frame
driver.switchTo().frame(iframe)//Now we can click the button
driver.findElement(By.tagName("button")).click()
Using a name or ID
If your frame or iframe has an id or name attribute, this can be used
instead. If the name or ID is not unique on the page, then the first
one found will be switched to.
//Using the IDdriver.switchTo().frame("buttonframe");//Or using the name insteaddriver.switchTo().frame("myframe");//Now we can click the buttondriver.findElement(By.tagName("button")).click();
# Switch frame by iddriver.switch_to.frame('buttonframe')# Now, Click on the buttondriver.find_element(By.TAG_NAME,'button').click()
//Using the IDdriver.SwitchTo().Frame("buttonframe");//Or using the name insteaddriver.SwitchTo().Frame("myframe");//Now we can click the buttondriver.FindElement(By.TagName("button")).Click();
# Switch by IDdriver.switch_to.frame'buttonframe'# Now, Click on the buttondriver.find_element(:tag_name,'button').click
// Using the ID
awaitdriver.switchTo().frame('buttonframe');// Or using the name instead
awaitdriver.switchTo().frame('myframe');// Now we can click the button
awaitdriver.findElement(By.css('button')).click();
//Using the ID
driver.switchTo().frame("buttonframe")//Or using the name instead
driver.switchTo().frame("myframe")//Now we can click the button
driver.findElement(By.tagName("button")).click()
Using an index
It is also possible to use the index of the frame, such as can be
queried using window.frames in JavaScript.
// Switches to the second framedriver.switchTo().frame(1);
# Switch to the second framedriver.switch_to.frame(1)
// Switches to the second framedriver.SwitchTo().Frame(1);
# switching to second iframe based on indexiframe=driver.find_elements(By.TAG_NAME,'iframe')[1]# switch to selected iframedriver.switch_to.frame(iframe)
// Switches to the second frame
awaitdriver.switchTo().frame(1);
// Switches to the second frame
driver.switchTo().frame(1)
Leaving a frame
To leave an iframe or frameset, switch back to the default content
like so:
// Return to the top leveldriver.switchTo().defaultContent();
# switch back to default contentdriver.switch_to.default_content()
// Return to the top leveldriver.SwitchTo().DefaultContent();
# Return to the top leveldriver.switch_to.default_content
// Return to the top level
awaitdriver.switchTo().defaultContent();
// Return to the top level
driver.switchTo().defaultContent()
2.6.5 - Working with windows and tabs
Windows and tabs
Get window handle
WebDriver does not make the distinction between windows and tabs. If
your site opens a new tab or window, Selenium will let you work with it
using a window handle. Each window has a unique identifier which remains
persistent in a single session. You can get the window handle of the
current window by using:
// Navigate to Urldriver.get("https://www.selenium.dev/selenium/web/window_switching_tests/page_with_frame.html");//fetch handle of thisStringcurrHandle=driver.getWindowHandle();assertNotNull(currHandle);
// Navigate to Urldriver.Url="https://www.selenium.dev/selenium/web/window_switching_tests/page_with_frame.html";//fetch handle of thisStringcurrHandle=driver.CurrentWindowHandle;Assert.IsNotNull(currHandle);
Clicking a link which opens in a
new window
will focus the new window or tab on screen, but WebDriver will not know which
window the Operating System considers active. To work with the new window
you will need to switch to it. For this, we fetch all window handles,
and store them in an array. The array position fills in the order the
window is launched. So first position will be default browser, and so on.
//click on link to open a new windowdriver.findElement(By.linkText("Open new window")).click();//fetch handles of all windows, there will be two, [0]- default, [1] - new windowObject[]windowHandles=driver.getWindowHandles().toArray();driver.switchTo().window((String)windowHandles[1]);//assert on title of new windowStringtitle=driver.getTitle();assertEquals("Simple Page",title);
fromseleniumimportwebdriverfromselenium.webdriver.support.uiimportWebDriverWaitfromselenium.webdriver.supportimportexpected_conditionsasECwithwebdriver.Firefox()asdriver:# Open URLdriver.get("https://seleniumhq.github.io")# Setup wait for laterwait=WebDriverWait(driver,10)# Store the ID of the original windoworiginal_window=driver.current_window_handle# Check we don't have other windows open alreadyassertlen(driver.window_handles)==1# Click the link which opens in a new windowdriver.find_element(By.LINK_TEXT,"new window").click()# Wait for the new window or tabwait.until(EC.number_of_windows_to_be(2))# Loop through until we find a new window handleforwindow_handleindriver.window_handles:ifwindow_handle!=original_window:driver.switch_to.window(window_handle)break# Wait for the new tab to finish loading contentwait.until(EC.title_is("SeleniumHQ Browser Automation"))
//click on link to open a new windowdriver.FindElement(By.LinkText("Open new window")).Click();//fetch handles of all windows, there will be two, [0]- default, [1] - new windowIList<string>windowHandles=newList<string>(driver.WindowHandles);driver.SwitchTo().Window(windowHandles[1]);//assert on title of new windowStringtitle=driver.Title;Assert.AreEqual("Simple Page",title);
# Store the ID of the original windoworiginal_window=driver.window_handle# Check we don't have other windows open alreadyassert(driver.window_handles.length==1,'Expected one window')# Click the link which opens in a new windowdriver.find_element(link:'new window').click# Wait for the new window or tabwait.until{driver.window_handles.length==2}#Loop through until we find a new window handledriver.window_handles.eachdo|handle|ifhandle!=original_windowdriver.switch_to.windowhandlebreakendend#Wait for the new tab to finish loading contentwait.until{driver.title=='Selenium documentation'}
//Store the ID of the original window
constoriginalWindow=awaitdriver.getWindowHandle();//Check we don't have other windows open already
assert((awaitdriver.getAllWindowHandles()).length===1);//Click the link which opens in a new window
awaitdriver.findElement(By.linkText('new window')).click();//Wait for the new window or tab
awaitdriver.wait(async()=>(awaitdriver.getAllWindowHandles()).length===2,10000);//Loop through until we find a new window handle
constwindows=awaitdriver.getAllWindowHandles();windows.forEach(asynchandle=>{if(handle!==originalWindow){awaitdriver.switchTo().window(handle);}});//Wait for the new tab to finish loading content
awaitdriver.wait(until.titleIs('Selenium documentation'),10000);
//Store the ID of the original window
valoriginalWindow=driver.getWindowHandle()//Check we don't have other windows open already
assert(driver.getWindowHandles().size()===1)//Click the link which opens in a new window
driver.findElement(By.linkText("new window")).click()//Wait for the new window or tab
wait.until(numberOfWindowsToBe(2))//Loop through until we find a new window handle
for(windowHandleindriver.getWindowHandles()){if(!originalWindow.contentEquals(windowHandle)){driver.switchTo().window(windowHandle)break}}//Wait for the new tab to finish loading content
wait.until(titleIs("Selenium documentation"))
Closing a window or tab
When you are finished with a window or tab and it is not the
last window or tab open in your browser, you should close it and switch
back to the window you were using previously. Assuming you followed the
code sample in the previous section you will have the previous window
handle stored in a variable. Put this together and you will get:
#Close the tab or windowdriver.close#Switch back to the old tab or windowdriver.switch_to.windoworiginal_window
//Close the tab or window
awaitdriver.close();//Switch back to the old tab or window
awaitdriver.switchTo().window(originalWindow);
//Close the tab or window
driver.close()//Switch back to the old tab or window
driver.switchTo().window(originalWindow)
Forgetting to switch back to another window handle after closing a
window will leave WebDriver executing on the now closed page, and will
trigger a No Such Window Exception. You must switch
back to a valid window handle in order to continue execution.
Create new window (or) new tab and switch
Creates a new window (or) tab and will focus the new window or tab on screen.
You don’t need to switch to work with the new window (or) tab. If you have more than two windows
(or) tabs opened other than the new window, you can loop over both windows or tabs that WebDriver can see,
and switch to the one which is not the original.
Note: This feature works with Selenium 4 and later versions.
//Opens a new tab and switches to new tabdriver.switchTo().newWindow(WindowType.TAB);assertEquals("",driver.getTitle());//Opens a new window and switches to new windowdriver.switchTo().newWindow(WindowType.WINDOW);assertEquals("",driver.getTitle());
# Opens a new tab and switches to new tabdriver.switch_to.new_window('tab')# Opens a new window and switches to new windowdriver.switch_to.new_window('window')
//Opens a new tab and switches to new tabdriver.SwitchTo().NewWindow(WindowType.Tab);Assert.AreEqual("",driver.Title);//Opens a new window and switches to new windowdriver.SwitchTo().NewWindow(WindowType.Window);Assert.AreEqual("",driver.Title);
// Opens a new tab and switches to new tab
driver.switchTo().newWindow(WindowType.TAB)// Opens a new window and switches to new window
driver.switchTo().newWindow(WindowType.WINDOW)
Quitting the browser at the end of a session
When you are finished with the browser session you should call quit,
instead of close:
/**
* Example using JUnit
* https://junit.org/junit5/docs/current/api/org/junit/jupiter/api/AfterAll.html
*/@AfterAllpublicstaticvoidtearDown(){driver.quit();}
/*
Example using Visual Studio's UnitTesting
https://msdn.microsoft.com/en-us/library/microsoft.visualstudio.testtools.unittesting.aspx
*/[TestCleanup]publicvoidTearDown(){driver.Quit();}
/**
* Example using Mocha
* https://mochajs.org/#hooks
*/after('Tear down',asyncfunction(){awaitdriver.quit();});
/**
* Example using JUnit
* https://junit.org/junit5/docs/current/api/org/junit/jupiter/api/AfterAll.html
*/@AfterAllfuntearDown(){driver.quit()}
If not running WebDriver in a test context, you may consider using
try / finally which is offered by most languages so that an exception
will still clean up the WebDriver session.
Python’s WebDriver now supports the python context manager,
which when using the with keyword can automatically quit the driver at
the end of execution.
withwebdriver.Firefox()asdriver:# WebDriver code here...# WebDriver will automatically quit after indentation
Window management
Screen resolution can impact how your web application renders, so
WebDriver provides mechanisms for moving and resizing the browser
window.
//Access each dimension individuallyintwidth=driver.manage().window().getSize().getWidth();intheight=driver.manage().window().getSize().getHeight();//Or store the dimensions and query them laterDimensionsize=driver.manage().window().getSize();intwidth1=size.getWidth();intheight1=size.getHeight();
# Access each dimension individuallywidth=driver.get_window_size().get("width")height=driver.get_window_size().get("height")# Or store the dimensions and query them latersize=driver.get_window_size()width1=size.get("width")height1=size.get("height")
//Access each dimension individuallyintwidth=driver.Manage().Window.Size.Width;intheight=driver.Manage().Window.Size.Height;//Or store the dimensions and query them laterSystem.Drawing.Sizesize=driver.Manage().Window.Size;intwidth1=size.Width;intheight1=size.Height;
# Access each dimension individuallywidth=driver.manage.window.size.widthheight=driver.manage.window.size.height# Or store the dimensions and query them latersize=driver.manage.window.sizewidth1=size.widthheight1=size.height
//Access each dimension individually
valwidth=driver.manage().window().size.widthvalheight=driver.manage().window().size.height//Or store the dimensions and query them later
valsize=driver.manage().window().sizevalwidth1=size.widthvalheight1=size.height
// Access each dimension individuallyintx=driver.manage().window().getPosition().getX();inty=driver.manage().window().getPosition().getY();// Or store the dimensions and query them laterPointposition=driver.manage().window().getPosition();intx1=position.getX();inty1=position.getY();
# Access each dimension individuallyx=driver.get_window_position().get('x')y=driver.get_window_position().get('y')# Or store the dimensions and query them laterposition=driver.get_window_position()x1=position.get('x')y1=position.get('y')
//Access each dimension individuallyintx=driver.Manage().Window.Position.X;inty=driver.Manage().Window.Position.Y;//Or store the dimensions and query them laterPointposition=driver.Manage().Window.Position;intx1=position.X;inty1=position.Y;
#Access each dimension individuallyx=driver.manage.window.position.xy=driver.manage.window.position.y# Or store the dimensions and query them laterrect=driver.manage.window.rectx1=rect.xy1=rect.y
// Access each dimension individually
valx=driver.manage().window().position.xvaly=driver.manage().window().position.y// Or store the dimensions and query them later
valposition=driver.manage().window().positionvalx1=position.xvaly1=position.y
fromseleniumimportwebdriverdriver=webdriver.Chrome()driver.get("http://www.example.com")# Returns and base64 encoded string into imagedriver.save_screenshot('./image.png')driver.quit()
usingOpenQA.Selenium;usingOpenQA.Selenium.Chrome;usingOpenQA.Selenium.Support.UI;vardriver=newChromeDriver();driver.Navigate().GoToUrl("http://www.example.com");Screenshotscreenshot=(driverasITakesScreenshot).GetScreenshot();screenshot.SaveAsFile("screenshot.png",ScreenshotImageFormat.Png);// Format values are Bmp, Gif, Jpeg, Png, Tiff
require'selenium-webdriver'driver=Selenium::WebDriver.for:chromebegindriver.get'https://example.com/'# Takes and Stores the screenshot in specified pathdriver.save_screenshot('./image.png')end
// Captures the screenshot
letencodedString=awaitdriver.takeScreenshot();// save screenshot as below
// await fs.writeFileSync('./image.png', encodedString, 'base64');
Used to capture screenshot of an element for current browsing context.
The WebDriver endpoint screenshot
returns screenshot which is encoded in Base64 format.
fromseleniumimportwebdriverfromselenium.webdriver.common.byimportBydriver=webdriver.Chrome()driver.get("http://www.example.com")ele=driver.find_element(By.CSS_SELECTOR,'h1')# Returns and base64 encoded string into imageele.screenshot('./image.png')driver.quit()
usingOpenQA.Selenium;usingOpenQA.Selenium.Chrome;usingOpenQA.Selenium.Support.UI;// Webdrivervardriver=newChromeDriver();driver.Navigate().GoToUrl("http://www.example.com");// Fetch element using FindElementvarwebElement=driver.FindElement(By.CssSelector("h1"));// Screenshot for the elementvarelementScreenshot=(webElementasITakesScreenshot).GetScreenshot();elementScreenshot.SaveAsFile("screenshot_of_element.png");
# Works with Selenium4-alpha7 Ruby bindings and aboverequire'selenium-webdriver'driver=Selenium::WebDriver.for:chromebegindriver.get'https://example.com/'ele=driver.find_element(:css,'h1')# Takes and Stores the element screenshot in specified pathele.save_screenshot('./image.jpg')end
letheader=awaitdriver.findElement(By.css('h1'));// Captures the element screenshot
letencodedString=awaitheader.takeScreenshot(true);// save screenshot as below
// await fs.writeFileSync('./image.png', encodedString, 'base64');
//Creating the JavascriptExecutor interface object by Type castingJavascriptExecutorjs=(JavascriptExecutor)driver;//Button ElementWebElementbutton=driver.findElement(By.name("btnLogin"));//Executing JavaScript to click on elementjs.executeScript("arguments[0].click();",button);//Get return value from scriptStringtext=(String)js.executeScript("return arguments[0].innerText",button);//Executing JavaScript directlyjs.executeScript("console.log('hello world')");
# Stores the header elementheader=driver.find_element(By.CSS_SELECTOR,"h1")# Executing JavaScript to capture innerText of header elementdriver.execute_script('return arguments[0].innerText',header)
//creating Chromedriver instanceIWebDriverdriver=newChromeDriver();//Creating the JavascriptExecutor interface object by Type castingIJavaScriptExecutorjs=(IJavaScriptExecutor)driver;//Button ElementIWebElementbutton=driver.FindElement(By.Name("btnLogin"));//Executing JavaScript to click on elementjs.ExecuteScript("arguments[0].click();",button);//Get return value from scriptStringtext=(String)js.ExecuteScript("return arguments[0].innerText",button);//Executing JavaScript directlyjs.ExecuteScript("console.log('hello world')");
# Stores the header elementheader=driver.find_element(css:'h1')# Get return value from scriptresult=driver.execute_script("return arguments[0].innerText",header)# Executing JavaScript directlydriver.execute_script("alert('hello world')")
// Stores the header element
letheader=awaitdriver.findElement(By.css('h1'));// Executing JavaScript to capture innerText of header element
lettext=awaitdriver.executeScript('return arguments[0].innerText',header);
// Stores the header element
valheader=driver.findElement(By.cssSelector("h1"))// Get return value from script
valresult=driver.executeScript("return arguments[0].innerText",header)// Executing JavaScript directly
driver.executeScript("alert('hello world')")
Print Page
Prints the current page within the browser.
Note: This requires Chromium Browsers to be in headless mode
awaitdriver.get('https://www.selenium.dev/selenium/web/alerts.html');letbase64=awaitdriver.printPage({pageRanges:["1-2"]});// page can be saved as a PDF as below
// await fs.writeFileSync('./test.pdf', base64, 'base64');
Web applications can enable a public key-based authentication mechanism known as Web Authentication to authenticate users in a passwordless manner.
Web Authentication defines APIs that allows a user to create a public-key credential and register it with an authenticator.
An authenticator can be a hardware device or a software entity that stores user’s public-key credentials and retrieves them on request.
As the name suggests, Virtual Authenticator emulates such authenticators for testing.
Virtual Authenticator Options
A Virtual Authenticatior has a set of properties.
These properties are mapped as VirtualAuthenticatorOptions in the Selenium bindings.
options=VirtualAuthenticatorOptions()options.protocol=VirtualAuthenticatorOptions.Protocol.U2Foptions.has_resident_key=False# Register a virtual authenticatordriver.add_virtual_authenticator(options)
options=VirtualAuthenticatorOptions()options.protocol=VirtualAuthenticatorOptions.Protocol.CTAP2options.has_resident_key=Trueoptions.has_user_verification=Trueoptions.is_user_verified=True# Register a virtual authenticatordriver.add_virtual_authenticator(options)# parameters for Resident Credentialcredential_id=bytearray({1,2,3,4})rp_id="localhost"user_handle=bytearray({1})privatekey=urlsafe_b64decode(BASE64__ENCODED_PK)sign_count=0# create a resident credential using above parametersresident_credential=Credential.create_resident_credential(credential_id,rp_id,user_handle,privatekey,sign_count)
A low-level interface for providing virtualized device input actions to the web browser.
In addition to the high-level element interactions,
the Actions API provides granular control over
exactly what designated input devices can do. Selenium provides an interface for 3 kinds of input sources:
a key input for keyboard devices, a pointer input for a mouse, pen or touch devices,
and wheel inputs for scroll wheel devices (introduced in Selenium 4.2).
Selenium allows you to construct individual action commands assigned to specific
inputs and chain them together and call the associated perform method to execute them all at once.
Action Builder
In the move from the legacy JSON Wire Protocol to the new W3C WebDriver Protocol,
the low level building blocks of actions became especially detailed. It is extremely
powerful, but each input device has a number of ways to use it and if you need to
manage more than one device, you are responsible for ensuring proper synchronization between them.
Thankfully, you likely do not need to learn how to use the low level commands directly, since
almost everything you might want to do has been given a convenience method that combines the
lower level commands for you. These are all documented in
keyboard, mouse, pen, and wheel pages.
Pause
Pointer movements and Wheel scrolling allow the user to set a duration for the action, but sometimes you just need
to wait a beat between actions for things to work correctly.
An important thing to note is that the driver remembers the state of all the input
items throughout a session. Even if you create a new instance of an actions class, the depressed keys and
the location of the pointer will be in whatever state a previously performed action left them.
There is a special method to release all currently depressed keys and pointer buttons.
This method is implemented differently in each of the languages because
it does not get executed with the perform method.
A representation of any key input device for interacting with a web page.
There are only 2 actions that can be accomplished with a keyboard:
pressing down on a key, and releasing a pressed key.
In addition to supporting ASCII characters, each keyboard key has
a representation that can be pressed or released in designated sequences.
Keys
In addition to the keys represented by regular unicode,
unicode values have been assigned to other keyboard keys for use with Selenium.
Each language has its own way to reference these keys; the full list can be found
here.
This is a convenience method in the Actions API that combines keyDown and keyUp commands in one action.
Executing this command differs slightly from using the element method, but
primarily this gets used when needing to type multiple characters in the middle of other actions.
Here’s an example of using all of the above methods to conduct a copy / paste action.
Note that the key to use for this operation will be different depending on if it is a Mac OS or not.
This code will end up with the text: SeleniumSelenium!
A representation of any pointer device for interacting with a web page.
There are only 3 actions that can be accomplished with a mouse:
pressing down on a button, releasing a pressed button, and moving the mouse.
Selenium provides convenience methods that combine these actions in the most common ways.
Click and hold
This method combines moving the mouse to the center of an element with pressing the left mouse button.
This is useful for focusing a specific element:
There are a total of 5 defined buttons for a Mouse:
0 — Left Button (the default)
1 — Middle Button (currently unsupported)
2 — Right Button
3 — X1 (Back) Button
4 — X2 (Forward) Button
Context Click
This method combines moving to the center of an element with pressing and releasing the right mouse button (button 2).
This is otherwise known as “right-clicking”:
This method moves the mouse to the in-view center point of the element.
This is otherwise known as “hovering.”
Note that the element must be in the viewport or else the command will error.
These methods first move the mouse to the designated origin and then
by the number of pixels in the provided offset.
Note that the position of the mouse must be in the viewport or else the command will error.
Offset from Element
This method moves the mouse to the in-view center point of the element,
then moves by the provided offset.
This method moves the mouse from its current position by the offset provided by the user.
If the mouse has not previously been moved, the position will be in the upper left
corner of the viewport.
Note that the pointer position does not change when the page is scrolled.
Note that the first argument X specifies to move right when positive, while the second argument
Y specifies to move down when positive. So moveByOffset(30, -10) moves right 30 and up 10 from
the current mouse position.
A Pen is a type of pointer input that has most of the same behavior as a mouse, but can
also have event properties unique to a stylus. Additionally, while a mouse
has 5 buttons, a pen has 3 equivalent button states:
0 — Touch Contact (the default; equivalent to a left click)
2 — Barrel Button (equivalent to a right click)
5 — Eraser Button (currently unsupported by drivers)
This is the most common scenario. Unlike traditional click and send keys methods,
the actions class does not automatically scroll the target element into view,
so this method will need to be used if elements are not already inside the viewport.
This method takes a web element as the sole argument.
Regardless of whether the element is above or below the current viewscreen,
the viewport will be scrolled so the bottom of the element is at the bottom of the screen.
This is the second most common scenario for scrolling. Pass in an delta x and a delta y value for how much to scroll
in the right and down directions. Negative values represent left and up, respectively.
This scenario is effectively a combination of the above two methods.
To execute this use the “Scroll From” method, which takes 3 arguments.
The first represents the origination point, which we designate as the element,
and the second two are the delta x and delta y values.
If the element is out of the viewport,
it will be scrolled to the bottom of the screen, then the page will be scrolled by the provided
delta x and delta y values.
This scenario is used when you need to scroll only a portion of the screen, and it is outside the viewport.
Or is inside the viewport and the portion of the screen that must be scrolled
is a known offset away from a specific element.
This uses the “Scroll From” method again, and in addition to specifying the element,
an offset is specified to indicate the origin point of the scroll. The offset is
calculated from the center of the provided element.
If the element is out of the viewport,
it first will be scrolled to the bottom of the screen, then the origin of the scroll will be determined
by adding the offset to the coordinates of the center of the element, and finally
the page will be scrolled by the provided delta x and delta y values.
Note that if the offset from the center of the element falls outside of the viewport,
it will result in an exception.
Scroll from a offset of origin (element) by given amount
The final scenario is used when you need to scroll only a portion of the screen,
and it is already inside the viewport.
This uses the “Scroll From” method again, but the viewport is designated instead
of an element. An offset is specified from the upper left corner of the
current viewport. After the origin point is determined,
the page will be scrolled by the provided delta x and delta y values.
Note that if the offset from the upper left corner of the viewport falls outside of the screen,
it will result in an exception.
BiDirectional means that communication is happening in two directions simultaneously.
The traditional WebDriver model involves strict request/response commands which only allows for communication to
happen in one direction at any given time. In most cases this is what you want; it ensures that the browser is
doing the expected things in the right order, but there are a number of interesting things that can be done with
asynchronous interactions.
This functionality is currently available in a limited fashion with the [Chrome DevTools Protocol] (CDP),
but to address some of its drawbacks, the Selenium team, along with the major
browser vendors, have worked to create the new WebDriver BiDi Protocol.
This specification aims to create a stable, cross-browser API that leverages bidirectional
communication for enhanced browser automation and testing functionality,
including streaming events from the user agent to the controlling software via WebSockets.
Users will be able to listen for and record or manipulate events as they happen during the course of a Selenium session.
Note that Selenium is updating its entire implementation from WebDriver Classic to WebDriver BiDi (while
maintaining backwards compatibility as much as possible), but this section of documentation focuses on the new
functionality that bidirectional communication allows.
The low-level BiDi domains will be accessible in the code to the end user, but the goal is to provide
high-level APIs that are straightforward methods of real-world use cases. As such, the low-level
components will not be documented, and this section will focus only on the user-friendly
features that we encourage users to take advantage of.
If there is additional functionality you’d like to see, please raise a
feature request.
2.8.1 - WebDriver BiDi Logging Features
These features are related to logging. Because “logging” can refer to so many different things, these methods are made available via a “script” namespace.
Examples of working with Chrome DevTools Protocol in Selenium. CDP support is temporary until WebDriver BiDi has been implemented.
Many browsers provide “DevTools” – a set of tools that are integrated with the browser that
developers can use to debug web apps and explore the performance of their pages. Google Chrome’s
DevTools make use of a protocol called the Chrome DevTools Protocol (or “CDP” for short).
As the name suggests, this is not designed for testing, nor to have a stable API, so functionality
is highly dependent on the version of the browser.
Selenium is working to implement a standards-based, cross-browser, stable alternative to CDP called
[WebDriver BiDi]. Until the support for this new protocol has finished, Selenium plans to provide access
to CDP features where applicable.
Using Chrome DevTools Protocol with Selenium
Chrome and Edge have a method to send basic CDP commands.
This does not work for features that require bidirectional communication, and you need to know what domains to enable when
and the exact names and types of domains/methods/parameters.
To make working with CDP easier, and to provide access to the more advanced features, Selenium bindings
automatically generate classes and methods for the most common domains.
CDP methods and implementations can change from version to version, though, so you want to keep the
version of Chrome and the version of DevTools matching. Selenium supports the 3 most
recent versions of Chrome at any given time,
and tries to time releases to ensure that access to the latest versions are available.
This limitation provides additional challenges for several bindings, where dynamically
generated CDP support requires users to regularly update their code to reference the proper version of CDP.
In some cases an idealized implementation has been created that should work for any version of CDP without the
user needing to change their code, but that is not always available.
Examples of how to use CDP in your Selenium tests can be found on the following pages, but
we want to call out a couple commonly cited examples that are of limited practical value.
Geo Location — almost all sites use the IP address to determine physical location,
so setting an emulated geolocation rarely has the desired effect.
Overriding Device Metrics — Chrome provides a great API for setting Mobile Emulation
in the Options classes, which is generally superior to attempting to do this with CDP.
2.8.4.1 - Chrome DevTools Logging Features
Logging features using CDP.
While Selenium 4 provides direct access to the Chrome DevTools Protocol, these
methods will eventually be removed when WebDriver BiDi implemented.
While Selenium 4 provides direct access to the Chrome DevTools Protocol, these
methods will eventually be removed when WebDriver BiDi implemented.
Basic authentication
Some applications make use of browser authentication to secure pages.
It used to be common to handle them in the URL, but browsers stopped supporting this.
With this code you can insert the credentials into the header when necessary
Examples of working with Chrome DevTools Protocol in Selenium. CDP support is temporary until WebDriver BiDi has been implemented.
The following list of APIs will be growing as the WebDriver BiDirectional Protocol grows
and browser vendors implement the same.
Additionally, Selenium will try to support real-world use cases that internally use a combination of W3C BiDi protocol APIs.
If there is additional functionality you’d like to see, please raise a
feature request.
2.8.5.1 - Browsing Context
Commands
This section contains the APIs related to browsing context commands.
A reference browsing context is a top-level browsing context.
The API allows to pass the reference browsing context, which is used to create a new window. The implementation is operating system specific.
A reference browsing context is a top-level browsing context.
The API allows to pass the reference browsing context, which is used to create a new tab. The implementation is operating system specific.
Provides a tree of all browsing contexts descending from the parent browsing context, including the parent browsing context upto the depth value passed.
voidtestGetTreeWithDepth(){StringreferenceContextId=driver.getWindowHandle();BrowsingContextparentWindow=newBrowsingContext(driver,referenceContextId);parentWindow.navigate("https://www.selenium.dev/selenium/web/iframes.html",ReadinessState.COMPLETE);List<BrowsingContextInfo>contextInfoList=parentWindow.getTree(0);Assertions.assertEquals(1,contextInfoList.size());BrowsingContextInfoinfo=contextInfoList.get(0);Assertions.assertNull(info.getChildren());// since depth is 0Assertions.assertEquals(referenceContextId,info.getId());}
Listen to the JS Exceptions
and register callbacks to process the exception details.
logInspector.onJavaScriptLog(future::complete);driver.get("https://www.selenium.dev/selenium/web/bidi/logEntryAdded.html");driver.findElement(By.id("jsException")).click();JavascriptLogEntrylogEntry=future.get(5,TimeUnit.SECONDS);Assertions.assertEquals("Error: Not working",logEntry.getText());
constinspector=awaitLogInspector(driver)awaitinspector.onJavascriptException(function(log){logEntry=log})awaitdriver.get('https://www.selenium.dev/selenium/web/bidi/logEntryAdded.html')awaitdriver.findElement({id:'jsException'}).click()assert.equal(logEntry.text,'Error: Not working')assert.equal(logEntry.type,'javascript')assert.equal(logEntry.level,'error')
try(Networknetwork=newNetwork(driver)){network.addIntercept(newAddInterceptParameters(InterceptPhase.AUTH_REQUIRED));network.onAuthRequired(responseDetails->// Does not handle the alertnetwork.continueWithAuthNoCredentials(responseDetails.getRequest().getRequestId()));driver.get("https://the-internet.herokuapp.com/basic_auth");
try(Networknetwork=newNetwork(driver)){network.addIntercept(newAddInterceptParameters(InterceptPhase.AUTH_REQUIRED));network.onAuthRequired(responseDetails->// Does not handle the alertnetwork.cancelAuth(responseDetails.getRequest().getRequestId()));driver.get("https://the-internet.herokuapp.com/basic_auth");
Support classes provide optional higher level features.
The core libraries of Selenium try to be low level and non-opinionated.
The Support classes in each language provide opinionated wrappers for common interactions
that may be used to simplify some behaviors.
2.9.1 - Waiting with Expected Conditions
These are classes used to describe what needs to be waited for.
Expected Conditions are used with Explicit Waits.
Instead of defining the block of code to be executed with a lambda, an expected
conditions method can be created to represent common things that get waited on. Some
methods take locators as arguments, others take elements as arguments.
You will occasionally want to validate the colour of something as part of your tests;
the problem is that colour definitions on the web are not constant.
Would it not be nice if there was an easy way to compare
a HEX representation of a colour with a RGB representation of a colour,
or a RGBA representation of a colour with a HSLA representation of a colour?
You can now start creating colour objects.
Every colour object will need to be created from a string representation of
your colour.
Supported colour representations are:
You can now safely query an element
to get its colour/background colour knowing that
any response will be correctly parsed
and converted into a valid Color object:
Select lists have special behaviors compared to other elements.
The Select object will now give you a series of commands
that allow you to interact with a <select> element.
If you are using Java or .NET make sure that you’ve properly required the support package
in your code. See the full code from GitHub in any of the examples below.
Note that this class only works for HTML elements select and option.
It is possible to design drop-downs with JavaScript overlays using div or li,
and this class will not work for those.
Types
Select methods may behave differently depending on which type of <select> element is being worked with.
Single select
This is the standard drop-down object where one and only one option may be selected.
<selectname="selectomatic"><optionselected="selected"id="non_multi_option"value="one">One</option><optionvalue="two">Two</option><optionvalue="four">Four</option><optionvalue="still learning how to count, apparently">Still learning how to count, apparently</option></select>
Multiple select
This select list allows selecting and deselecting more than one option at a time.
This only applies to <select> elements with the multiple attribute.
First locate a <select> element, then use it to initialize a Select object.
Note that as of Selenium 4.5, you can’t create a Select object if the <select> element is disabled.
Get a list of selected options in the <select> element. For a standard select list
this will only be a list with one element, for a multiple select list it can contain
zero or many elements.
The Select class provides three ways to select an option.
Note that for multiple select type Select lists, you can repeat these methods
for each element you want to select.
ThreadGuard checks that a driver is called only from the same thread that created it.
Threading issues especially when running tests in Parallel may have mysterious
and hard to diagnose errors. Using this wrapper prevents this category of errors
and will raise an exception when it happens.
The following example simulate a clash of threads:
publicclassDriverClash{//thread main (id 1) created this driverprivateWebDriverprotectedDriver=ThreadGuard.protect(newChromeDriver());static{System.setProperty("webdriver.chrome.driver","<Set path to your Chromedriver>");}//Thread-1 (id 24) is calling the same driver causing the clash to happenRunnabler1=()->{protectedDriver.get("https://selenium.dev");};Threadthr1=newThread(r1);voidrunThreads(){thr1.start();}publicstaticvoidmain(String[]args){newDriverClash().runThreads();}}
The result shown below:
Exception in thread "Thread-1" org.openqa.selenium.WebDriverException:
Thread safety error; this instance of WebDriver was constructed
on thread main (id 1)and is being accessed by thread Thread-1 (id 24)
This is not permitted and *will* cause undefined behaviour
As seen in the example:
protectedDriver Will be created in Main thread
We use Java Runnable to spin up a new process and a new Thread to run the process
Both Thread will clash because the Main Thread does not have protectedDriver in it’s memory.
ThreadGuard.protect will throw an exception.
Note:
This does not replace the need for using ThreadLocal to manage drivers when running parallel.
2.10 - Troubleshooting Assistance
How to get manage WebDriver problems.
It is not always obvious the root cause of errors in Selenium.
The most common Selenium-related error is a result of poor synchronization.
Read about Waiting Strategies. If you aren’t sure if it
is a synchronization strategy you can try temporarily hard coding a large sleep
where you see the issue, and you’ll know if adding an explicit wait can help.
Note that many errors that get reported to the project are actually caused by
issues in the underlying drivers that Selenium sends the commands to. You can rule
out a driver problem by executing the command in multiple browsers.
If you have questions about how to do things, check out the Support options
for ways get assistance.
If you think you’ve found a problem with Selenium code, go ahead and file a
Bug Report
on GitHub.
2.10.1 - Understanding Common Errors
How to get deal with various problems in your Selenium code.
Invalid Selector Exception
CSS and XPath Selectors are sometimes difficult to get correct.
Likely Cause
The CSS or XPath selector you are trying to use has invalid characters or an invalid query.
An element goes stale when it was previously located, but can not be currently accessed.
Elements do not get relocated automatically; the driver creates a reference ID for the element and
has a particular place it expects to find it in the DOM. If it can not find the element
in the current DOM, any action using that element will result in this exception.
Common Causes
This can happen when:
You have refreshed the page, or the DOM of the page has dynamically changed.
You have navigated to a different page.
You have switched to another window or into or out of a frame or iframe.
Common Solutions
The DOM has changed
When the page is refreshed or items on the page have moved around, there is still
an element with the desired locator on the page, it is just no longer accessible
by the element object being used, and the element must be relocated before it can be used again.
This is often done in one of two ways:
Always relocate the element every time you go to use it. The likelihood of
the element going stale in the microseconds between locating and using the element
is small, though possible. The downside is that this is not the most efficient approach,
especially when running on a remote grid.
Wrap the Web Element with another object that stores the locator, and caches the
located Selenium element. When taking actions with this wrapped object, you can
attempt to use the cached object if previously located, and if it is stale, exception
can be caught, the element relocated with the stored locator, and the method re-tried.
This is more efficient, but it can cause problems if the locator you’re using
references a different element (and not the one you want) after the page has changed.
The Context has changed
Element objects are stored for a given context, so if you move to a different context —
like a different window or a different frame or iframe — the element reference will
still be valid, but will be temporarily inaccessible. In this scenario, it won’t
help to relocate the element, because it doesn’t exist in the current context.
To fix this, you need to make sure to switch back to the correct context before using the element.
The Page has changed
This scenario is when you haven’t just changed contexts, you have navigated to another page
and have destroyed the context in which the element was located.
You can’t just relocate it from the current context,
and you can’t switch back to an active context where it is valid. If this is the reason
for your error, you must both navigate back to the correct location and relocate it.
2.10.1.1 - Unable to Locate Driver Error
Troubleshooting missing path to driver executable.
Historically, this is the most common error beginning Selenium users get
when trying to run code for the first time:
The path to the driver executable must
be set by the webdriver.chrome.driver system property;
for more information, see https://chromedriver.chromium.org/.
The latest version can be downloaded from https://chromedriver.chromium.org/downloads
The executable chromedriver needs to be available in the path.
The file geckodriver does not exist. The driver can be downloaded at https://github.com/mozilla/geckodriver/releases"
Unable to locate the chromedriver executable;
Likely cause
Through WebDriver, Selenium supports all major browsers.
In order to drive the requested browser, Selenium needs to
send commands to it via an executable driver.
This error means the necessary driver could not be
found by any of the means Selenium attempts to use.
Possible solutions
There are several ways to ensure Selenium gets the driver it needs.
Use the latest version of Selenium
As of Selenium 4.6, Selenium downloads the correct driver for you.
You shouldn’t need to do anything. If you are using the latest version
of Selenium and you are getting an error,
please turn on logging
and file a bug report with that information.
If you want to read more information about how Selenium manages driver downloads for you,
you can read about the Selenium Manager.
This is a flexible option to change location of drivers without having to update your code,
and will work on multiple machines without requiring that each machine put the
drivers in the same place.
You can either place the drivers in a directory that is already listed in PATH,
or you can place them in a directory and add it to PATH.
To see what directories are already on PATH, open a Terminal and execute:
echo$PATH
If the location to your driver is not already in a directory listed,
you can add a new directory to PATH:
You can test if it has been added correctly by checking the version of the driver:
chromedriver --version
To see what directories are already on PATH, open a Command Prompt and execute:
echo %PATH%
If the location to your driver is not already in a directory listed,
you can add a new directory to PATH:
setx PATH "%PATH%;C:\WebDriver\bin"
You can test if it has been added correctly by checking the version of the driver:
chromedriver.exe --version
Specify the location of the driver
If you cannot upgrade to the latest version of Selenium, you
do not want Selenium to download drivers for you, and you can’t figure
out the environment variables, you can specify the location of the driver in the Service object.
Specifying the location in the code itself has the advantage of not needing
to figure out Environment Variables on your system, but has the drawback of
making the code less flexible.
Driver management libraries
Before Selenium managed drivers itself, other projects were created to
do so for you.
If you can’t use Selenium Manager because you are using
an older version of Selenium (please upgrade),
or need an advanced feature not yet implemented by Selenium Manager,
you might try one of these tools to keep your drivers automatically updated:
Note: The Opera driver no longer works with the latest functionality of Selenium and is currently officially unsupported.
2.10.2 - Logging Selenium commands
Getting information about Selenium execution.
Turning on logging is a valuable way to get extra information that might help you determine
why you might be having a problem.
Getting a logger
Java logs are typically created per class. You can work with the default logger to
work with all loggers. To filter out specific classes, see Filtering
Java Logging is not exactly straightforward, and if you are just looking for an easy way
to look at the important Selenium logs,
take a look at the Selenium Logger project
Python logs are typically created per module. You can match all submodules by referencing the top
level module. So to work with all loggers in selenium module, you can do this:
.NET logger is managed with a static class, so all access to logging is managed simply by referencing Log from the OpenQA.Selenium.Internal.Logging namespace.
If you want to see as much debugging as possible in all the classes,
you can turn on debugging globally in Ruby by setting $DEBUG = true.
For more fine-tuned control, Ruby Selenium created its own Logger class to wrap the default Logger class.
This implementation provides some interesting additional features.
Obtain the logger directly from the #loggerclass method on the Selenium::WebDriver module:
Things get complicated when you use PyTest, though. By default, PyTest hides logging unless the test
fails. You need to set 3 things to get PyTest to display logs on passing tests.
To always output logs with PyTest you need to run with additional arguments.
First, -s to prevent PyTest from capturing the console.
Second, -p no:logging, which allows you to override the default PyTest logging settings so logs can
be displayed regardless of errors.
So you need to set these flags in your IDE, or run PyTest on command line like:
pytest -s -p no:logging
Finally, since you turned off logging in the arguments above, you now need to add configuration to
turn it back on:
logging.basicConfig(level=logging.WARN)
.NET has 6 logger levels: Error, Warn, Info, Debug, Trace and None. The default level is Info.
Things are logged as warnings if they are something the user needs to take action on. This is often used
for deprecations. For various reasons, Selenium project does not follow standard Semantic Versioning practices.
Our policy is to mark things as deprecated for 3 releases and then remove them, so deprecations
may be logged as warnings.
Java logs actionable content at logger level WARN
Example:
May 08, 2023 9:23:38 PM dev.selenium.troubleshooting.LoggingTest logging
WARNING: this is a warning
Python logs actionable content at logger level — WARNING
Details about deprecations are logged at this level.
Example:
WARNING selenium:test_logging.py:23 this is a warning
.NET logs actionable content at logger level Warn.
Example:
11:04:40.986 WARN LoggingTest: this is a warning
Ruby logs actionable content at logger level — :warn.
Details about deprecations are logged at this level.
For example:
2023-05-08 20:53:13 WARN Selenium [:example_id] this is a warning
Because these items can get annoying, we’ve provided an easy way to turn them off, see filtering section below.
Content Help
Note: This section needs additional and/or updated content
This is the default level where Selenium logs things that users should be aware of but do not need to take actions on.
This might reference a new method or direct users to more information about something
Java logs useful information at logger level INFO
Example:
May 08, 2023 9:23:38 PM dev.selenium.troubleshooting.LoggingTest logging
INFO: this is useful information
Python logs useful information at logger level — INFO
Example:
INFO selenium:test_logging.py:22 this is useful information
.NET logs useful information at logger level Info.
Example:
11:04:40.986 INFO LoggingTest: this is useful information
Ruby logs useful information at logger level — :info.
Example:
2023-05-08 20:53:13 INFO Selenium [:example_id] this is useful information
Logs useful information at level: INFO
Content Help
Note: This section needs additional and/or updated content
Java logging is managed on a per class level, so
instead of using the root logger (Logger.getLogger("")), set the level you want to use on a per-class
basis:
Ruby’s logger allows you to opt in (“allow”) or opt out (“ignore”) of log messages based on their IDs.
Everything that Selenium logs includes an ID. You can also turn on or off all deprecation notices by
using :deprecations.
These methods accept one or more symbols or an array of symbols:
Are you still using Selenium 3? This guide will help you upgrade to the latest release!
Upgrading to Selenium 4 should be a painless process if you are using one of the officially
supported languages (Ruby, JavaScript, C#, Python, and Java). There might be some cases where
a few issues can happen, and this guide will help you to sort them out. We will go through
the steps to upgrade your project dependencies and understand the major deprecations and
changes the version upgrade brings.
These are the steps we will follow to upgrade to Selenium 4:
Preparing our test code
Upgrading dependencies
Potential errors and deprecation messages
Note: while Selenium 3.x versions were being developed, support for the W3C WebDriver standard
was implemented. Both this new protocol and the legacy JSON Wire Protocol were supported. Around
version 3.11, Selenium code became compliant with the level W3C 1 specification. The W3C compliant
code in the latest version of Selenium 3 will work as expected in Selenium 4.
Preparing our test code
Selenium 4 removes support for the legacy protocol and uses the W3C WebDriver standard by
default under the hood. For most things, this implementation will not affect end users.
The major exceptions are Capabilities and the Actions class.
Capabilities
If the test capabilities are not structured to be W3C compliant, may cause a session to not
be started. Here is the list of W3C WebDriver standard capabilities:
browserName
browserVersion (replaces version)
platformName (replaces platform)
acceptInsecureCerts
pageLoadStrategy
proxy
timeouts
unhandledPromptBehavior
An up-to-date list of standard capabilities can be found at
W3C WebDriver.
Any capability that is not contained in the list above, needs to include a vendor prefix.
This applies to browser specific capabilities as well as cloud vendor specific capabilities.
For example, if your cloud vendor uses build and name capabilities for your tests, you need
to wrap them in a cloud:options block (check with your cloud vendor for the appropriate prefix).
The utility methods to find elements in the Java bindings (FindsBy interfaces) have been removed
as they were meant for internal use only. The following code samples explain this better.
Check the subsections below to install Selenium 4 and have your project dependencies upgraded.
Java
The process of upgrading Selenium depends on which build tool is being used. We will cover the
most common ones for Java, which are Maven and
Gradle. The minimum Java version required is still 8.
Maven
Before
<dependencies><!-- more dependencies ... --><dependency><groupId>org.seleniumhq.selenium</groupId><artifactId>selenium-java</artifactId><version>3.141.59</version></dependency><!-- more dependencies ... --></dependencies>
After
<dependencies><!-- more dependencies ... --><dependency><groupId>org.seleniumhq.selenium</groupId><artifactId>selenium-java</artifactId><version>4.4.0</version></dependency><!-- more dependencies ... --></dependencies>
After making the change, you could execute mvn clean compile on the same directory where the
pom.xml file is.
Gradle
Before
plugins {
id 'java'
}
group 'org.example'
version '1.0-SNAPSHOT'
repositories {
mavenCentral()
}
dependencies {
testImplementation 'org.junit.jupiter:junit-jupiter-api:5.7.0'
testRuntimeOnly 'org.junit.jupiter:junit-jupiter-engine:5.7.0'
implementation group: 'org.seleniumhq.selenium', name: 'selenium-java', version: '3.141.59'
}
test {
useJUnitPlatform()
}
After
plugins {
id 'java'
}
group 'org.example'
version '1.0-SNAPSHOT'
repositories {
mavenCentral()
}
dependencies {
testImplementation 'org.junit.jupiter:junit-jupiter-api:5.7.0'
testRuntimeOnly 'org.junit.jupiter:junit-jupiter-engine:5.7.0'
implementation group: 'org.seleniumhq.selenium', name: 'selenium-java', version: '4.4.0'
}
test {
useJUnitPlatform()
}
After making the change, you could execute ./gradlew clean build
on the same directory where the build.gradle file is.
To check all the Java releases, you can head to MVNRepository.
C#
The place to get updates for Selenium 4 in C# is NuGet. Under the
Selenium.WebDriver package you
can get the instructions to update to the latest version. Inside of Visual Studio, through the
NuGet Package Manager you can execute:
The most important change to use Python is the minimum required version. Selenium 4 will
require a minimum Python 3.7 or higher. More details can be found at the
Python Package Index. To upgrade from the
command line, you can execute:
pip install selenium==4.4.3
Ruby
The update details for Selenium 4 can be seen at the
selenium-webdriver
gem in RubyGems. To install the latest version, you can execute:
gem install selenium-webdriver
To add it to your Gemfile:
gem 'selenium-webdriver', '~> 4.4.0'
JavaScript
The selenium-webdriver package can be found at the Node package manager,
npmjs. Selenium 4 can be found
here. To install it, you
could either execute:
Waits are also expecting different parameters now. WebDriverWait is now expecting a Duration
instead of a long for timeout in seconds and milliseconds. The withTimeout and pollingEvery
utility methods from FluentWait have switched from expecting (long time, TimeUnit unit) to
expect (Duration duration).
Merging capabilities is no longer changing the calling object
It was possible to merge a different set of capabilities into another set, and it was
mutating the calling object. Now, the result of the merge operation needs to be assigned.
Before
MutableCapabilitiescapabilities=newMutableCapabilities();capabilities.setCapability("platformVersion","Windows 10");FirefoxOptionsoptions=newFirefoxOptions();options.setHeadless(true);options.merge(capabilities);// As a result, the `options` object was getting modified.
After
MutableCapabilitiescapabilities=newMutableCapabilities();capabilities.setCapability("platformVersion","Windows 10");FirefoxOptionsoptions=newFirefoxOptions();options.setHeadless(true);options=options.merge(capabilities);// The result of the `merge` call needs to be assigned to an object.
Firefox Legacy
Before GeckoDriver was around, the Selenium project had a driver implementation to automate
Firefox (version <48). However, this implementation is not needed anymore as it does not work
in recent versions of Firefox. To avoid major issues when upgrading to Selenium 4, the setLegacy
option will be shown as deprecated. The recommendation is to stop using the old implementation
and rely only on GeckoDriver. The following code will show the setLegacy line deprecated after
upgrading.
Instead of it, AddAdditionalOption is recommended. Here is an example showing this:
Before
var browserOptions = new ChromeOptions();
browserOptions.PlatformName = "Windows 10";
browserOptions.BrowserVersion = "latest";
var cloudOptions = new Dictionary<string, object>();
browserOptions.AddAdditionalCapability("cloud:options", cloudOptions, true);
After
var browserOptions = new ChromeOptions();
browserOptions.PlatformName = "Windows 10";
browserOptions.BrowserVersion = "latest";
var cloudOptions = new Dictionary<string, object>();
browserOptions.AddAdditionalOption("cloud:options", cloudOptions);
Python
executable_path has been deprecated, please pass in a Service object
In Selenium 4, you’ll need to set the driver’s executable_path from a Service object to prevent deprecation warnings. (Or don’t set the path and instead make sure that the driver you need is on the System PATH.)
We went through the major changes to be taken into consideration when upgrading to Selenium 4.
Covering the different aspects to cover when test code is prepared for the upgrade, including
suggestions on how to prevent potential issues that can show up when using the new version of
Selenium. To finalize, we also covered a set of possible issues that you can bump into after
upgrading, and we shared potential fixes for those issues.
Selenium Manager is a command-line tool implemented in Rust that provides automated driver and browser management for Selenium. Selenium bindings use this tool by default, so you do not need to download it or add anything to your code or do anything else to use it.
Motivation
TL;DR:Selenium Manager is the official driver manager of the Selenium project, and it is shipped out of the box with every Selenium release.
Selenium uses the native support implemented by each browser to carry out the automation process. For this reason, Selenium users need to place a component called driver (chromedriver, geckodriver, msedgedriver, etc.) between the script using the Selenium API and the browser. For many years, managing these drivers was a manual process for Selenium users. This way, they had to download the required driver for a browser (chromedriver for Chrome, geckodriver for Firefox, etc.) and place it in the PATH or export the driver path as a system property (Java, JavaScript, etc.). But this process was cumbersome and led to maintainability issues.
Let’s consider an example. Imagine you manually downloaded the required chromedriver for driving your Chrome with Selenium. When you did this process, the stable version of Chrome was 113, so you downloaded chromedriver 113 and put it in your PATH. At that moment, your Selenium script executed correctly. But the problem is that Chrome is evergreen. This name refers to Chrome’s ability to upgrade automatically and silently to the next stable version when available. This feature is excellent for end-users but potentially dangerous for browser automation. Let’s go back to the example to discover it. Your local Chrome eventually updates to version 115. And that moment, your Selenium script is broken due to the incompatibility between the manually downloaded driver (113) and the Chrome version (115). Thus, your Selenium script fails with the following error message: “session not created: This version of ChromeDriver only supports Chrome version 113”.
This problem is the primary reason for the existence of the so-called driver managers (such as WebDriverManager for Java,
webdriver-manager for Python, webdriver-manager for JavaScript, WebDriverManager.Net for C#, and webdrivers for Ruby). All these projects were an inspiration and a clear sign that the community needed this feature to be built in Selenium. Thus, the Selenium project has created Selenium Manager, the official driver manager for Selenium, shipped out of the box with each Selenium release as of version 4.6.
Usage
TL;DR:Selenium Manager is used by the Selenium bindings when the drivers (chromedriver, geckodriver, etc.) are unavailable.
Driver management through Selenium Manager is opt-in for the Selenium bindings. Thus, users can continue managing their drivers manually (putting the driver in the PATH or using system properties) or rely on a third-party driver manager to do it automatically. Selenium Manager only operates as a fallback: if no driver is provided, Selenium Manager will come to the rescue.
Selenium Manager is a CLI (command line interface) tool implemented in Rust to allow cross-platform execution and compiled for Windows, Linux, and macOS. The Selenium Manager binaries are shipped with each Selenium release. This way, each Selenium binding language invokes Selenium Manager to carry out the automated driver and browser management explained in the following sections.
Automated driver management
TL;DR:Selenium Manager automatically discovers, downloads, and caches the drivers required by Selenium when these drivers are unavailable.
The primary feature of Selenium Manager is called automated driver management. Let’s consider an example to understand it. Suppose we want to driver Chrome with Selenium (see the doc about how to start a session with Selenium). Before the session begins, and when the driver is unavailable, Selenium Manager manages chromedriver for us. We use the term management for this feature (and not just download) since this process is broader and implies different steps:
Browser version discovery. Selenium Manager discovers the browser version (e.g., Chrome, Firefox, Edge) installed in the machine that executes Selenium. This step uses shell commands (e.g., google-chrome --version).
Driver version discovery. With the discovered browser version, the proper driver version is resolved. For this step, the online metadata/endpoints maintained by the browser vendors (e.g., chromedriver, geckodriver, or msedgedriver) are used.
Driver download. The driver URL is obtained with the resolved driver version; with that URL, the driver artifact is downloaded, uncompressed, and stored locally.
Driver cache. Uncompressed driver binaries are stored in a local cache folder (~/.cache/selenium). The next time the same driver is required, it will be used from there if the driver is already in the cache.
Automated browser management
TL;DR:Selenium Manager automatically discovers, downloads, and caches the browsers driven with Selenium (Chrome, Firefox, and Edge) when these browsers are not installed in the local system.
As of Selenium 4.11.0, Selenium Manager also implements automated browser management. With this feature, Selenium Manager allows us to discover, download, and cache the different browser releases, making them seamlessly available for Selenium. Internally, Selenium Manager uses an equivalent management procedure explained in the section before, but this time, for browser releases.
The browser automatically managed by Selenium Manager are:
Let’s consider again the typical example of driving Chrome with Selenium. And this time, suppose Chrome is not installed on the local machine when starting a new session). In that case, the current stable CfT release will be discovered, downloaded, and cached (in ~/.cache/selenium/chrome) by Selenium Manager.
But there is more. In addition to the stable browser version, Selenium Manager also allows downloading older browser versions (in the case of CfT, starting in version 113, the first version published as CfT). To set a browser version with Selenium, we use a browser option called browserVersion.
Let’s consider another simple example. Suppose we set browserVersion to 114 using Chrome options. In this case, Selenium Manager will check if Chrome 114 is already installed. If it is, it will be used. If not, Selenium Manager will manage (i.e., discover, download, and cache) CfT 114. And in either case, the chromedriver is also managed. Finally, Selenium will start Chrome to be driven programmatically, as usual.
But there is even more. In addition to fixed browser versions (e.g., 113, 114, 115, etc.), we can use the following labels for browserVersion:
stable: Current CfT version.
beta: Next version to stable.
dev: Version in development at this moment.
canary: Nightly build for developers.
esr: Extended Support Release (only for Firefox).
When these labels are specified, Selenium Manager first checks if a given browser is already installed (beta, dev, etc.), and when it is not detected, the browser is automatically managed.
Edge in Windows
Automated Edge management by Selenium Manager in Windows is different from other browsers. Both Chrome and Firefox (and Edge in macOS and Linux) are downloaded automatically to the local cache (~/.cache/selenium) by Selenium Manager. Nevertheless, the same cannot be done for Edge in Windows. The reason is that the Edge installer for Windows is distributed as a Microsoft Installer (MSI) file, designed to be executed with administrator rights. This way, when Edge is attempted to be installed with Selenium Manager in Windows with a non-administrator session, a warning message will be displayed by Selenium Manager as follows:
edge can only be installed in Windows with administrator permissions
Therefore, administrator permissions are required to install Edge in Windows automatically through Selenium Manager, and Edge is eventually installed in the usual program files folder (e.g., C:\Program Files (x86)\Microsoft\Edge).
Data collection
Selenium Manager will report anonymised usage statistics to Plausible. This allows the Selenium team to understand more about how Selenium is being used so that we can better focus our development efforts. The data being collected is:
Data
Purpose
Selenium version
This allows the Selenium developers to safely deprecate and remove features, as well as determine which new features may be available to you
Language binding
Programming language used to execute Selenium scripts (Java, JavaScript, Python, .Net, Ruby)
OS and architecture Selenium Manager is running on
The Selenium developers can use this information to help prioritise bug reports, and to identify if there are systemic OS-related issues
Browser and browser version
Helping for prioritising bug reports
Rough geolocation
Derived from the IP address you connect from. This is useful for determining where we need to focus our documentation efforts
Selenium Manager sends these data to Plausible once a day. This period is based on the TTL value (see configuration).
Opting out of data collection
Data collection is on by default. To disable it, set the SE_AVOID_STATS environment variable to true. You may also disable data collection in the configuration file (see below) by setting avoid-stats = true.
Configuration
TL;DR:Selenium Manager should work silently and transparently for most users. Nevertheless, there are scenarios (e.g., to specify a custom cache path or setup globally a proxy) where custom configuration can be required.
Selenium Manager is a CLI tool. Therefore, under the hood, the Selenium bindings call Selenium Manager by invoking shell commands. Like any other CLI tool, arguments can be used to specify specific capabilities in Selenium Manager. The different arguments supported by Selenium Manager can be checked by running the following command:
$ ./selenium-manager --help
In addition to CLI arguments, Selenium Manager allows two additional mechanisms for configuration:
Configuration file. Selenium Manager uses a file called se-config.toml located in the Selenium cache (by default, at ~/.cache/selenium) for custom configuration values. This TOML file contains a key-value collection used for custom configuration.
Environmental variables. Each configuration key has its equivalence in environmental variables by converting each key name to uppercase, replacing the dash symbol (-) with an underscore (_), and adding the prefix SE_.
The configuration file is honored by Selenium Manager when it is present, and the corresponding CLI parameter is not specified. Besides, the environmental variables are used when neither of the previous options (CLI arguments and configuration file) is specified. In other words, the order of preference for Selenium Manager custom configuration is as follows:
CLI arguments.
Configuration file.
Environment variables.
Notice that the Selenium bindings use the CLI arguments to specify configuration values, which in turn, are defined in each binding using browser options.
The following table summarizes all the supported arguments supported by Selenium Manager and their correspondence key in the configuration file and environment variables.
CLI argument
Configuration file
Env variable
Description
--browser BROWSER
browser = "BROWSER"
SE_BROWSER=BROWSER
Browser name: chrome, firefox, edge, iexplorer, safari, safaritp, or webview2
--driver <DRIVER>
driver = "DRIVER"
SE_DRIVER=DRIVER
Driver name: chromedriver, geckodriver, msedgedriver, IEDriverServer, or safaridriver
--browser-version <BROWSER_VERSION>
browser-version = "BROWSER_VERSION"
SE_BROWSER_VERSION=BROWSER_VERSION
Major browser version (e.g., 105, 106, etc. Also: beta, dev, canary -or nightly-, and esr -in Firefox- are accepted)
--driver-version <DRIVER_VERSION>
driver-version = "DRIVER_VERSION"
SE_DRIVER_VERSION=DRIVER_VERSION
Driver version (e.g., 106.0.5249.61, 0.31.0, etc.)
--browser-path <BROWSER_PATH>
browser-path = "BROWSER_PATH"
SE_BROWSER_PATH=BROWSER_PATH
Browser path (absolute) for browser version detection (e.g., /usr/bin/google-chrome, /Applications/Google Chrome.app/Contents/MacOS/Google Chrome, C:\Program Files\Google\Chrome\Application\chrome.exe)
--driver-mirror-url <DRIVER_MIRROR_URL>
driver-mirror-url = "DRIVER_MIRROR_URL"
SE_DRIVER_MIRROR_URL=DRIVER_MIRROR_URL
Mirror URL for driver repositories
--browser-mirror-url <BROWSER_MIRROR_URL>
browser-mirror-url = "BROWSER_MIRROR_URL"
SE_BROWSER_MIRROR_URL=BROWSER_MIRROR_URL
Mirror URL for browser repositories
--output <OUTPUT>
output = "OUTPUT"
SE_OUTPUT=OUTPUT
Output type: LOGGER (using INFO, WARN, etc.), JSON (custom JSON notation), SHELL (Unix-like), or MIXED (INFO, WARN, DEBUG, etc. to stderr and minimal JSON to stdout). Default: LOGGER
--os <OS>
os = "OS"
SE_OS=OS
Operating system for drivers and browsers (i.e., windows, linux, or macos)
--arch <ARCH>
arch = "ARCH"
SE_ARCH=ARCH
System architecture for drivers and browsers (i.e., x32, x64, or arm64)
--proxy <PROXY>
proxy = "PROXY"
SE_PROXY=PROXY
HTTP proxy for network connection (e.g., myproxy:port, myuser:mypass@myproxy:port)
--timeout <TIMEOUT>
timeout = TIMEOUT
SE_TIMEOUT=TIMEOUT
Timeout for network requests (in seconds). Default: 300
--offline
offline = true
SE_OFFLINE=true
Offline mode (i.e., disabling network requests and downloads)
--force-browser-download
force-browser-download = true
SE_FORCE_BROWSER_DOWNLOAD=true
Force to download browser, e.g., when a browser is already installed in the system, but you want Selenium Manager to download and use it
--avoid-browser-download
avoid-browser-download = true
SE_AVOID_BROWSER_DOWNLOAD=true
Avoid to download browser, e.g., when a browser is supposed to be downloaded by Selenium Manager, but you prefer to avoid it
--debug
debug = true
SE_DEBUG=true
Display DEBUG messages
--trace
trace = true
SE_TRACE=true
Display TRACE messages
--cache-path <CACHE_PATH>
cache-path="CACHE_PATH"
SE_CACHE_PATH=CACHE_PATH
Local folder used to store downloaded assets (drivers and browsers), local metadata, and configuration file. See next section for details. Default: ~/.cache/selenium. For Windows paths in the TOML configuration file, double backslashes are required (e.g., C:\\custom\\cache).
--ttl <TTL>
ttl = TTL
SE_TTL=TTL
Time-to-live in seconds. See next section for details. Default: 3600 (1 hour)
--language-binding <LANGUAGE>
language-binding = "LANGUAGE"
SE_LANGUAGE_BINDING=LANGUAGE
Language that invokes Selenium Manager (e.g., Java, JavaScript, Python, DotNet, Ruby)
--avoid-stats
avoid-stats = true
SE_AVOID_STATS=true
Avoid sends usage statistics to plausible.io. Default: false
In addition to the configuration keys specified in the table before, there are some special cases, namely:
Browser version. In addition to browser-version, we can use the specific configuration keys to specify custom versions per supported browser. This way, the keys chrome-version, firefox-version, edge-version, etc., are supported. The same applies to environment variables (i.e., SE_CHROME_VERSION, SE_FIREFOX_VERSION, SE_EDGE_VERSION, etc.).
Driver version. Following the same pattern, we can use chromedriver-version, geckodriver-version, msedgedriver-version, etc. (in the configuration file), and SE_CHROMEDRIVER_VERSION, SE_GECKODRIVER_VERSION, SE_MSEDGEDRIVER_VERSION, etc. (as environment variables).
Browser path. Following the same pattern, we can use chrome-path, firefox-path, edge-path, etc. (in the configuration file), and SE_CHROME_PATH, SE_FIREFOX_PATH, SE_EDGE_PATH, etc. (as environment variables). The Selenium bindings also allow to specify a custom location of the browser path using options, namely: Chrome), Edge, or Firefox.
Driver mirror. Following the same pattern, we can use chromedriver-mirror-url, geckodriver-mirror-url, msedgedriver-mirror-url, etc. (in the configuration file), and SE_CHROMEDRIVER_MIRROR_URL, SE_GECKODRIVER_MIRROR_URL, SE_MSEDGEDRIVER_MIRROR_URL, etc. (as environment variables).
Browser mirror. Following the same pattern, we can use chrome-mirror-url, firefox-mirror-url, edge-mirror-url, etc. (in the configuration file), and SE_CHROME_MIRROR_URL, SE_FIREFOX_MIRROR_URL, SE_EDGE_MIRROR_URL, etc. (as environment variables).
Caching
TL;DR:The drivers and browsers managed by Selenium Manager are stored in a local folder (~/.cache/selenium).
The cache in Selenium Manager is a local folder (~/.cache/selenium by default) in which the downloaded assets (drivers and browsers) are stored. For the sake of performance, when a driver or browser is already in the cache (i.e., there is a cache hint), Selenium Manager uses it from there.
In addition to the downloaded drivers and browsers, two additional files live in the cache’s root:
Configuration file (se-config.toml). This file is optional and, as explained in the previous section, allows to store custom configuration values for Selenium Manager. This file is maintained by the end-user and read by Selenium Manager.
Metadata file (se-metadata.json). This file contains versions discovered by Selenium Manger making network requests (e.g., using the CfT JSON endpoints) and the time-to-live (TTL) in which they are valid. Selenium Manager automatically maintains this file.
The TTL in Selenium Manager is inspired by the TTL for DNS, a well-known mechanism that refers to how long some values are cached before they are automatically refreshed. In the case of Selenium Manager, these values are the versions found by making network requests for driver and browser version discovery. By default, the TTL is 3600 seconds (i.e., 1 hour) and can be tuned using configuration values or disabled by setting this configuration value to 0.
The TTL mechanism is a way to improve the overall performance of Selenium. It is based on the fact that the discovered driver and browser versions (e.g., the proper chromedriver version for Chrome 115 is 115.0.5790.170) will likely remain the same in the short term. Therefore, the discovered versions are written in the metadata file and read from there instead of making the same consecutive network request. This way, during the driver version discovery (step 2 of the automated driver management process previously introduced), Selenium Manager first reads the file metadata. When a fresh resolution (i.e., a driver/browser version valid during a TTL) is found, that version is used (saving some time in making a new network request). If not found or the TTL has expired, a network request is made, and the result is stored in the metadata file.
Let’s consider an example. A Selenium binding asks Selenium Manager to resolve chromedriver. Selenium Manager detects that Chrome 115 is installed, so it makes a network request to the CfT endpoints to discover the proper chromedriver version (115.0.5790.170, at that moment). This version is stored in the metadata file and considered valid during the next hour (TTL). If Selenium Manager is asked to resolve chromedriver during that time (which is likely to happen in the execution of a test suite), the chromedriver version is discovered by reading the metadata file instead of making a new request to the CfT endpoints. After one hour, the chromedriver version stored in the cache will be considered as stale, and Selenium Manager will refresh it by making a new network request to the corresponding endpoint.
Selenium Manager includes two additional arguments two handle the cache, namely:
--clear-cache: To remove the cache folder (equivalent to the environment variable SE_CLEAR_CACHE=true).
--clear-metadata: To remove the metadata file (equivalent to the environment variable SE_CLEAR_METADATA=true).
Versioning
Selenium Manager follows the same versioning schema as Selenium. Nevertheless, we use the major version 0 for Selenium Manager releases because it is still in beta. For example, the Selenium Manager binaries shipped with Selenium 4.12.0 corresponds to version 0.4.12.
Getting Selenium Manager
For most users, direct interaction with Selenium Manager is not required since the Selenium bindings use it internally. Nevertheless, if you want to play with Selenium Manager or use it for your use case involving driver or browser management, you can get the Selenium Manager binaries in different ways:
From the Selenium repository. The Selenium Manager source code is stored in the main Selenium repo under the folder rust. Moreover, you can find the compiled versions for Windows, Linux, and macOS in the Selenium Manager Artifacts repo. The stable Selenium Manager binaries (i.e., those distributed in the latest stable Selenium version) are linked in this file.
From the build workflow. Selenium Manager is compiled using a GitHub Actions workflow. This workflow creates binaries for Windows, Linux, and macOS. You can download these binaries from these workflow executions.
From the cache. As of version 4.15.0 of the Selenium Java bindings, the Selenium Manager binary is extracted and copied to the cache folder. For instance, the Selenium Manager binary shipped with Selenium 4.15.0 is stored in the folder ~/.cache/selenium/manager/0.4.15).
Examples
Let’s consider a typical example: we want to manage chromedriver automatically. For that, we invoke Selenium Manager as follows (notice that the flag --debug is optional, but it helps us to understand what Selenium Manager is doing):
$ ./selenium-manager --browser chrome --debug
DEBUG chromedriver not found in PATH
DEBUG chrome detected at C:\Program Files\Google\Chrome\Application\chrome.exe
DEBUG Running command: wmic datafile where name='C:\\Program Files\\Google\\Chrome\\Application\\chrome.exe' get Version /value
DEBUG Output: "\r\r\n\r\r\nVersion=116.0.5845.111\r\r\n\r\r\n\r\r\n\r"
DEBUG Detected browser: chrome 116.0.5845.111
DEBUG Discovering versions from https://googlechromelabs.github.io/chrome-for-testing/known-good-versions-with-downloads.json
DEBUG Required driver: chromedriver 116.0.5845.96
DEBUG Downloading chromedriver 116.0.5845.96 from https://edgedl.me.gvt1.com/edgedl/chrome/chrome-for-testing/116.0.5845.96/win64/chromedriver-win64.zip
INFO Driver path: C:\Users\boni\.cache\selenium\chromedriver\win64\116.0.5845.96\chromedriver.exe
INFO Browser path: C:\Program Files\Google\Chrome\Application\chrome.exe
In this case, the local Chrome (in Windows) is detected by Selenium Manager. Then, using its version and the CfT endpoints, the proper chromedriver version (115, in this example) is downloaded to the local cache. Finally, Selenium Manager provides two results: i) the driver path (downloaded) and ii) the browser path (local).
Let’s consider another example. Now we want to use Chrome beta. Therefore, we invoke Selenium Manager specifying that version label as follows (notice that the CfT beta is discovered, downloaded, and stored in the local cache):
$ ./selenium-manager --browser chrome --browser-version beta --debug
DEBUG chromedriver not found in PATH
DEBUG chrome not found in PATH
DEBUG chrome beta not found in the system
DEBUG Discovering versions from https://googlechromelabs.github.io/chrome-for-testing/last-known-good-versions-with-downloads.json
DEBUG Required browser: chrome 117.0.5938.22
DEBUG Downloading chrome 117.0.5938.22 from https://edgedl.me.gvt1.com/edgedl/chrome/chrome-for-testing/117.0.5938.22/win64/chrome-win64.zip
DEBUG chrome 117.0.5938.22 has been downloaded at C:\Users\boni\.cache\selenium\chrome\win64\117.0.5938.22\chrome.exe
DEBUG Discovering versions from https://googlechromelabs.github.io/chrome-for-testing/known-good-versions-with-downloads.json
DEBUG Required driver: chromedriver 117.0.5938.22
DEBUG Downloading chromedriver 117.0.5938.22 from https://edgedl.me.gvt1.com/edgedl/chrome/chrome-for-testing/117.0.5938.22/win64/chromedriver-win64.zip
INFO Driver path: C:\Users\boni\.cache\selenium\chromedriver\win64\117.0.5938.22\chromedriver.exe
INFO Browser path: C:\Users\boni\.cache\selenium\chrome\win64\117.0.5938.22\chrome.exe
Selenium Grid
Selenium Manager allows you to configure the drivers automatically when setting up Selenium Grid. To that aim, you need to include the argument --selenium-manager true in the command to start Selenium Grid. For more details, visit the Selenium Grid starting page.
Moreover, Selenium Manager also allows managing Selenium Grid releases automatically. For that, the argument --grid is used as follows:
$ ./selenium-manager --grid
After this command, Selenium Manager discovers the latest version of Selenium Grid, storing the selenium-server.jar in the local cache.
Optionally, the argument --grid allows to specify a Selenium Grid version (--grid <GRID_VERSION>).
Known Limitations
Connectivity issues
Selenium Manager requests remote endpoints (like Chrome for Testing (CfT), among others) to discover and download drivers and browsers from online repositories. When this operation is done in a corporate environment with a proxy or firewall, it might lead to connectivity problems like the following:
error sending request for url (https://googlechromelabs.github.io/chrome-for-testing/known-good-versions-with-downloads.json)
error trying to connect: dns error: failed to lookup address information
error trying to connect: An existing connection was forcibly closed by the remote host. (os error 10054)
When that happens, consider the following solutions:
Use the proxy capabilities of Selenium (see documentation). Alternatively, use the environment variable SE_PROXY to set the proxy URL or use the configuration file (see configuration).
Review your network setup to enable the remote requests and downloads required by Selenium Manager.
Custom package managers
If you are using a Linux package manager (Anaconda, snap, etc) that requires a specific driver be used for your browsers,
you’ll need to either specify the
driver location,
the browser location,
or both, depending on the requirements.
Alternative architectures
Selenium supports all five architectures managed by Google’s Chrome for Testing, and all six drivers provided for Microsoft Edge.
Each release of the Selenium bindings comes with three separate Selenium Manager binaries — one for Linux, Windows, and Mac.
The Mac version supports both x64 and aarch64 (Intel and Apple).
The Windows version should work for both x86 and x64 (32-bit and 64-bit OS).
The Linux version has only been verified to work for x64.
Reasons for not supporting more architectures:
Neither Chrome for Testing nor Microsoft Edge supports additional architectures, so Selenium Manager would need to
manage something unofficial for it to work.
We currently build the binaries from existing GitHub actions runners, which do not support these architectures
Any additional architectures would get distributed with all Selenium releases, increasing the total build size
If you are running Linux on arm64/aarch64, 32-bit architecture, or a Raspberry Pi, Selenium Manager will not work for you.
The biggest issue for people is that they used to get custom-built drivers and put them on PATH and have them work.
Now that Selenium Manager is responsible for locating drivers on PATH, this approach no longer works, and users
need to use a Service class and set the location directly.
There are a number of advantages to having Selenium Manager look for drivers on PATH instead of managing that logic
in each of the bindings, so that’s currently a trade-off we are comfortable with.
However, as of Selenium 4.13.0, the Selenium bindings allow locating the Selenium Manager binary using an environment variable called SE_MANAGER_PATH. If this variable is set, the bindings will use its value as the Selenium Manager path in the local filesystem. This feature will allow users to provide a custom compilation of Selenium Manager, for instance, if the default binaries (compiled for Windows, Linux, and macOS) are incompatible with a given system (e.g., ARM64 in Linux).
Browser dependencies
When automatically managing browsers in Linux, Selenium Manager relies on the releases published by the browser vendors (i.e., Chrome, Firefox, and Edge). These releases are portable in most cases. Nevertheless, there might be cases in which existing libraries are required. In Linux, this problem might be experienced when trying to run Firefox, e.g., as follows:
libdbus-glib-1.so.2: cannot open shared object file: No such file or directory
Couldn't load XPCOM.
If that happens, the solution is to install that library, for instance, as follows:
sudo apt-get install libdbus-glib-1-2
A similar issue might happen when trying to execute Chrome for Testing in Linux:
error while loading shared libraries: libatk-1.0.so.0: cannot open shared object file: No such file or directory
In this case, the library to be installed is the following:
To learn more about the different configuration options, go through the sections below.
Grid roles
Grid is composed by six different components, which gives
you the option to deploy it in different ways.
Depending on your needs, you can start each one of them on its own (Distributed), group
them in Hub & Node, or all in one on a single machine (Standalone).
Standalone
Standalone combines all Grid components seamlessly
into one. Running a Grid in Standalone mode gives you a fully functional Grid
with a single command, within a single process. Standalone can only run on a
single machine.
Standalone is also the easiest mode to spin up a Selenium Grid. By default, the server
will listen for RemoteWebDriver requests on http://localhost:4444.
By default, the server will detect the available drivers that it can use from the System
PATH.
Hub and Nodes talk to each other via HTTP and the Event Bus
(the Event Bus lives inside the Hub). A Node sends a message to the Hub via the Event Bus to
start the registration process. When the Hub receives the message, reaches out to the Node via HTTP to
confirm its existence.
To successfully register a Node to a Hub, it is important to expose the Event Bus ports (4442 and 4443 by
default) on the Hub machine. This also applies for the Node port. With that, both Hub and Node will
be able to communicate.
If the Hub is using the default ports, the --hub flag can be used to register the Node
Distributor: queries the New Session Queue for new session requests, and assigns them to a Node when the capabilities match. Nodes register to the Distributor the way they register to the Hub in a Hub/Node Grid.
Default Distributor port is 5553. Distributor interacts with New Session Queue, Session Map, Event Bus, and the Node(s).
Add metadata to your tests and consume it via GraphQL
or visualize parts of it (like se:name) through the Selenium Grid UI.
Metadata can be added by prefixing a capability with se:. Here is a quick example in Java showing that.
ChromeOptionschromeOptions=newChromeOptions();chromeOptions.setCapability("browserVersion","100");chromeOptions.setCapability("platformName","Windows");// Showing a test name instead of the session id in the Grid UIchromeOptions.setCapability("se:name","My simple test");// Other type of metadata can be seen in the Grid UI by clicking on the // session info or via GraphQLchromeOptions.setCapability("se:sampleMetadata","Sample metadata value");WebDriverdriver=newRemoteWebDriver(newURL("http://gridUrl:4444"),chromeOptions);driver.get("http://www.google.com");driver.quit();
Querying Selenium Grid
After starting a Grid, there are mainly two ways of querying its status, through the Grid
UI or via an API call.
The Grid UI can be reached by opening your preferred browser and heading to
http://localhost:4444.
For simplicity, all command examples shown in this page assume that components are running
locally. More detailed examples and usages can be found in the
Configuring Components section.
By default, Grid will use AsyncHttpClient.
AsyncHttpClient is an open-source library built on top of Netty. It allows the execution of HTTP
requests and responses asynchronously. Additionally it also provides WebSocket support. Hence it
is a good fit.
However, AsyncHttpClient is not been actively maintained since June 2021. It coincides with the
fact that Java 11+ provides a built-in HTTP and WebSocket client. Currently, Selenium
has plans to upgrade the minimum version supported to Java 11. However, it is a sizeable effort.
Aligning it with major releases and accompanied announcements is crucial to ensure the user
experience is intact.
To do use the Java 11 client, you will need to download the selenium-http-jdk-client jar file
and use the --ext flag to make it available in the Grid jar’s classpath.
The jar file can be downloaded directly from repo1.maven.org
and then start the Grid in the following way:
If you are using the Hub/Node(s) mode or the Distributed mode, setting the -Dwebdriver.http.factory=jdk-http-client
and --ext flags needs to be done for each one of the components.
Grid sizes
Choosing a Grid role depends on what operating systems and browsers need to be supported,
how many parallel sessions need to be executed, the amount of available machines, and how
powerful (CPU, RAM) those machines are.
Creating sessions concurrently relies on the available processors to the Distributor.
For example, if a machine has 4 CPUs, the Distributor will only be able to create up
to 4 sessions concurrently.
By default, the maximum amount of concurrent sessions a Node supports is limited by
the number of CPUs available. For example, if the Node machine has 8CPUs, it can run
up to 8 concurrent browser sessions (with the exception of Safari, which is always one).
Additionally, it is expected that each browser session should use around 1GB RAM.
In general, it is a recommended to have Nodes as small as possible. Instead of having
a machine with 32CPUs and 32GB RAM to run 32 concurrent browser sessions, it is better to
have 32 small Nodes in order to better isolate processes. With this, if a Node
fails, it will do it in an isolated way. Docker is a good tool to achieve this approach.
Note that the default values (1CPU/1GB RAM per browser) are a recommendation and they could
not apply to your context. It is recommended to use them as a reference, but measuring
performance continuously will help to determine the ideal values for your environment.
Grid sizes are relative to the amount of supported concurrent sessions and amount of
Nodes, and there is no “one size fits all”. Sizes mentioned below are rough estimations
thay can vary between different environments. For example a Hub/Node with 120 Nodes
might work well when the Hub has enough resources. Values below are not set on stone,
and feedback is welcomed!
Small
Standalone or Hub/Node with 5 or less Nodes.
Middle
Hub/Node between 6 and 60 Nodes.
Large
Hub/Node between 60 and 100 Nodes. Distributed with over 100 Nodes.
Warning
Selenium Grid must be protected from external access using appropriate
firewall permissions.
Failure to protect your Grid could result in one or more of the following occurring:
You provide open access to your Grid infrastructure
You allow third parties to access internal web applications and files
Advanced Features: explore more possibilities through Grid’s features.
4.2 - When to Use Grid
Is Grid right for you?
When would you use a Selenium Grid?
To run your tests in parallel, against different browser types, browser versions, operating systems
To reduce the time needed to execute a test suite
Selenium Grid runs test suites in parallel against multiple machines (called Nodes).
For large and long-running test suites, this can save minutes, hours, or perhaps days.
This shortens the turnaround time for test results as your application under test (AUT)
changes.
Grid can run tests (in parallel) against multiple different browsers, and it can
run against multiple instances of the same browser. As an example, let’s imagine
a Grid with six Nodes. The first machine has Firefox’s latest version,
the second has Firefox “latest minus one”, the third gets the latest Chrome, and
the remaining three machines are Mac Minis, which allows for three tests to run in
parallel on the latest version of Safari.
Execution time can be expressed as a simple formula:
Number of Tests * Average Test Time / Number of Nodes = Total Execution Time
15 * 45s / 1 = 11m 15s // Without Grid
15 * 45s / 5 = 2m 15s // Grid with 5 Nodes
15 * 45s / 15 = 45s // Grid with 15 Nodes
100 * 120s / 15 = 13m 20s // Would take over 3 hours without Grid
As the test suite is executing, the Grid allocates the tests to run against these
browsers as configured in the tests.
A configuration such as this can greatly speed up the execution time of even the largest Selenium test suites.
Selenium Grid is a completely native part of the Selenium project, and is maintained in parallel by the same team
of committers who work in the core Selenium development. Recognizing the importance of test execution speed, Grid
has been a critical part of the Selenium project since the earliest days.
4.3 - Selenium Grid Components
Understand how to use the different Grid components
Selenium Grid 4 is a ground-up rewrite from previous versions. In addition to a comprehensive
set of improvements to performance and standards compliance, the different functions of the grid were
broken out to reflect a more modern age of computing and software development. Purpose-build for containerization
and cloud-distributed scalability, Selenium Grid 4 is a wholly new solution for the modern era.
Router
The Router is the entry point of the Grid, receiving all external requests, and forwards them to
the correct component.
If the Router receives a new session request, it will be forwarded to the New Session Queue.
If the request belongs to an existing session, the Router will query the Session Map to get
the Node ID where the session is running, and then the request will be forwarded directly to the
Node.
The Router balances the load in the Grid by sending the requests to the component that is able
to handle them better, without overloading any component that is not needed in the process.
Distributor
The Distributor has two main responsibilities:
Register and keep track of all Nodes and their capabilities
A Node registers to the Distributor by sending a Node registration event through
the Event Bus. The Distributor reads it, and then tries to reach the Node via HTTP
to confirm its existence. If the request is successful, the Distributor registers the Node
and keeps track of all Nodes capabilities through the GridModel.
Query the New Session Queue and process any pending new session requests
When a new session request is sent to the Router, it gets forwarded to the New Session Queue,
where it will wait in the queue. The Distributor will poll the New Session Queue for pending
new session requests, and then finds a suitable Node where the session can be created. After the
session has been created, the Distributor stores in the Session Map the relation between the
session id and Node where the session is being executed.
Session Map
The Session Map is a data store that keeps the relationship between the session id and the Node
where the session is running. It supports the Router in the process of forwarding a request to the
Node. The Router will ask the Session Map for the Node associated to a session id.
New Session Queue
The New Session Queue holds all the new session requests in a FIFO order. It has configurable
parameters for setting the request timeout and request retry interval (how often the timeout will
be checked).
The Router adds the new session request to the New Session Queue and waits for the response.
The New Session Queue regularly checks if any request in the queue has timed out, if so the request
is rejected and removed immediately.
The Distributor regularly checks if a slot is available. If so, the Distributor polls the
New Session Queue for the first matching request. The Distributor then attempts to create
a new session.
Once the requested capabilities match the capabilities of any of the free Node slots, the Distributor
attempts to get the available slot. If all the slots are busy, the Distributor will send the request back
to the queue. If request times out while retrying or adding to the front of the queue, it will be rejected.
After a session is created successfully, the Distributor sends the session information to the New Session Queue,
which then gets sent back to the Router, and finally to the client.
Node
A Grid can contain multiple Nodes. Each Node manages the slots for the available browsers of the machine
where it is running.
The Node registers itself to the Distributor through the Event Bus, and its configuration is sent as
part of the registration message.
By default, the Node auto-registers all browser drivers available on the path of the machine where it runs.
It also creates one slot per available CPU for Chromium based browsers and Firefox. For Safari, only one slot is
created. Through a specific configuration, it can run sessions in Docker
containers or relay commands.
A Node only executes the received commands, it does not evaluate, make judgments, or control anything other
than the flow of commands and responses. The machines where the Node is running does not need to have the
same operating system as the other components. For example, A Windows Node might have the capability of
offering IE Mode on Edge as a browser option, whereas this would not be possible on Linux or Mac, and a Grid can
have multiple Nodes configured with Windows, Mac, or Linux.
Event Bus
The Event Bus serves as a communication path between the Nodes, Distributor, New Session Queue,
and Session Map. The Grid does most of its internal communication through messages, avoiding expensive HTTP
calls. When starting the Grid in its fully distributed mode, the Event Bus is the first component that
should be started.
Running your own Grid
Looking forward to using all these components and run your own Grid?
Head to the “Getting Started”
section to understand how to put all these pieces together.
4.4 - Configuration of Components
Here you can see how each Grid component can be configured individually based on common configuration values and component-specific configuration values.
4.4.1 - Configuration help
Get information about all the available options to configure Grid.
The help commands display information based on the current code implementation.
Hence, it will provide accurate information in case the documentation is not updated.
It is the easiest way to learn about Grid 4 configuration for any new version.
Info Command
The info command provides detailed docs on the following topics:
Configuring Selenium
Security
Session Map setup
Tracing
Config help
Quick config help and overview is provided by running:
java -jar selenium-server-<version>.jar info config
Security
To get details on setting up the Grid servers for secure communication and node registration:
java -jar selenium-server-<version>.jar info security
Session Map setup
By default, Grid uses a local session map to store session information.
Grid supports additional storage options like Redis and JDBC - SQL supported databases.
To set up different session storage, use the following command to get setup steps:
java -jar selenium-server-<version>.jar info sessionmap
Setting up tracing with OpenTelemetry and Jaeger
By default, tracing is enabled. To export traces and visualize them via Jaeger, use the following command for instructions:
java -jar selenium-server-<version>.jar info tracing
All Grid components configuration CLI options in detail.
Different sections are available to configure a Grid. Each section has options can be configured
through command line arguments.
A complete description of the component to section mapping can be seen below.
Note that this documentation could be outdated if an option was modified or added
but has not been documented yet. In case you bump into this situation, please check
the “Config help” section and feel free to send us a
pull request updating this page.
Full class name of non-default distributor implementation
--distributor-port
int
5553
Port on which the distributor is listening.
--reject-unsupported-caps
boolean
false
Allow the Distributor to reject a request immediately if the Grid does not support the requested capability. Rejecting requests immediately is suitable for a Grid setup that does not spin up Nodes on demand.
--slot-matcher
string
org.openqa.selenium.grid.data.DefaultSlotMatcher
Full class name of non-default slot matcher to use. This is used to determine whether a Node can support a particular session.
Full class name of non-default slot selector. This is used to select a slot in a Node once the Node has been matched.
--newsession-threadpool-size
int
24
The Distributor uses a fixed-sized thread pool to create new sessions as it consumes new session requests from the queue. This allows configuring the size of the thread pool. The default value is no. of available processors * 3. Note: If the no. of threads is way greater than the available processors it will not always increase the performance. A high number of threads causes more context switching which is an expensive operation.
Docker configs which map image name to stereotype capabilities (example `-D selenium/standalone-firefox:latest ‘{“browserName”: “firefox”}’)
--docker-devices
string[]
/dev/kvm:/dev/kvm
Exposes devices to a container. Each device mapping declaration must have at least the path of the device in both host and container separated by a colon like in this example: /device/path/in/host:/device/path/in/container
--docker-host
string
localhost
Host name where the Docker daemon is running
--docker-port
int
2375
Port where the Docker daemon is running
--docker-url
string
http://localhost:2375
URL for connecting to the Docker daemon
--docker-video-image
string
selenium/video:latest
Docker image to be used when video recording is enabled
--docker-host-config-keys
string[]
Dns DnsOptions DnsSearch ExtraHosts Binds
Specify which docker host configuration keys should be passed to browser containers. Keys name can be found in the Docker API documentation, or by running docker inspect the node-docker container.
Events
Option
Type
Value/Example
Description
--bind-bus
boolean
false
Whether the connection string should be bound or connected. When true, the component will be bound to the Event Bus (as in the Event Bus will also be started by the component, typically by the Distributor and the Hub). When false, the component will connect to the Event Bus.
--events-implementation
string
org.openqa.selenium.events.zeromq.ZeroMqEventBus
Full class name of non-default event bus implementation
--publish-events
string
tcp://*:4442
Connection string for publishing events to the event bus
--subscribe-events
string
tcp://*:4443
Connection string for subscribing to events from the event bus
Logging
Option
Type
Value/Example
Description
--http-logs
boolean
false
Enable http logging. Tracing should be enabled to log http logs.
--log-encoding
string
UTF-8
Log encoding
--log
string
Windows path example : '\path\to\file\gridlog.log' or 'C:\path\path\to\file\gridlog.log'
Linux/Unix/MacOS path example : '/path/to/file/gridlog.log'
File to write out logs. Ensure the file path is compatible with the operating system’s file path.
Full classname of non-default Node implementation. This is used to manage a session’s lifecycle.
--grid-url
string
https://grid.example.com
Public URL of the Grid as a whole (typically the address of the Hub or the Router)
--heartbeat-period
int
60
How often, in seconds, will the Node send heartbeat events to the Distributor to inform it that the Node is up.
--max-sessions
int
8
Maximum number of concurrent sessions. Default value is the number of available processors.
--override-max-sessions
boolean
false
The # of available processors is the recommended max sessions value (1 browser session per processor). Setting this flag to true allows the recommended max value to be overwritten. Session stability and reliability might suffer as the host could run out of resources.
--register-cycle
int
10
How often, in seconds, the Node will try to register itself for the first time to the Distributor.
--register-period
int
120
How long, in seconds, will the Node try to register to the Distributor for the first time. After this period is completed, the Node will not attempt to register again.
--session-timeout
int
300
Let X be the session-timeout in seconds. The Node will automatically kill a session that has not had any activity in the last X seconds. This will release the slot for other tests.
--vnc-env-var
string
START_XVFB
Environment variable to check in order to determine if a vnc stream is available or not.
--no-vnc-port
int
7900
If VNC is available, sets the port where the local noVNC stream can be obtained
--drain-after-session-count
int
1
Drain and shutdown the Node after X sessions have been executed. Useful for environments like Kubernetes. A value higher than zero enables this feature.
--hub
string
http://localhost:4444
The address of the Hub in a Hub-and-Node configuration. Can be a hostname or IP address (hostname), in which case the Hub will be assumed to be http://hostname:4444, the --grid-url will be the same --publish-events will be tcp://hostname:4442 and --subscribe-events will be tcp://hostname:4443. If hostname contains a port number, that will be used for --grid-url but the URIs for the event bus will remain the same. Any of these default values may be overridden but setting the correct flags. If the hostname has a protocol (such as https) that will be used too.
--enable-cdp
boolean
true
Enable CDP proxying in Grid. A Grid admin can disable CDP if the network doesnot allow websockets. True by default.
--enable-managed-downloads
boolean
false
This causes the Node to auto manage files downloaded for a given session on the Node.
--selenium-manager
boolean
false
When drivers are not available on the current system, use Selenium Manager. False by default.
Relay
Option
Type
Value/Example
Description
--service-url
string
http://localhost:4723
URL for connecting to the service that supports WebDriver commands like an Appium server or a cloud service.
--service-host
string
localhost
Host name where the service that supports WebDriver commands is running
--service-port
int
4723
Port where the service that supports WebDriver commands is running
--service-status-endpoint
string
/status
Optional, endpoint to query the WebDriver service status, an HTTP 200 response is expected
--service-protocol-version
string
HTTP/1.1
Optional, enforce a specific protocol version in HttpClient when communicating with the endpoint service status
Configuration for the service where calls will be relayed to. It is recommended to provide this type of configuration through a toml config file to improve readability.
Router
Option
Type
Value/Example
Description
--password
string
myStrongPassword
Password clients must use to connect to the server. Both this and the username need to be set in order to be used.
--username
string
admin
User name clients must use to connect to the server. Both this and the password need to be set in order to be used.
--sub-path
string
my_company/selenium_grid
A sub-path that should be considered for all user facing routes on the Hub/Router/Standalone.
--disable-ui
boolean
true
Disable the Grid UI.
Server
Option
Type
Value/Example
Description
--external-url
string
http://10.0.1.1:33333
External URL where component is generally available. Useful on complex network topologies when components are on different networks and proxy servers are involved.
--allow-cors
boolean
true
Whether the Selenium server should allow web browser connections from any host
--host
string
localhost
Server IP or hostname: usually determined automatically.
--bind-host
boolean
true
Whether the server should bind to the host address/name, or only use it to" report its reachable url. Helpful in complex network topologies where the server cannot report itself with the current IP/hostname but rather an external IP or hostname (e.g. inside a Docker container)
--https-certificate
path
/path/to/cert.pem
Server certificate for https. Get more detailed information by running “java -jar selenium-server.jar info security”
--https-private-key
path
/path/to/key.pkcs8
Private key for https. Get more detailed information by running “java -jar selenium-server.jar info security”
--max-threads
int
24
Maximum number of listener threads. Default value is: (available processors) * 3.
--port
int
4444
Port to listen on. There is no default as this parameter is used by different components, for example, Router/Hub/Standalone will use 4444 and Node will use 5555.
SessionQueue
Option
Type
Value/Example
Description
--sessionqueue
uri
http://localhost:1237
Address of the session queue server.
-sessionqueue-host
string
localhost
Host on which the session queue server is listening.
--sessionqueue-port
int
1234
Port on which the session queue server is listening.
--session-request-timeout
int
300
Timeout in seconds. A new incoming session request is added to the queue. Requests sitting in the queue for longer than the configured time will timeout.
--session-retry-interval
int
5
Retry interval in seconds. If all slots are busy, new session request will be retried after the given interval.
Sessions
Option
Type
Value/Example
Description
--sessions
uri
http://localhost:1234
Address of the session map server.
--sessions-host
string
localhost
Host on which the session map server is listening.
--sessions-port
int
1234
Port on which the session map server is listening.
Configuration examples
All the options mentioned above can be used when starting the Grid components. They are a good
way of exploring the Grid options, and trying out values to find a suitable configuration.
We recommend the use of Toml files to configure a Grid.
Configuration files improve readability, and you can also check them in source control.
When needed, you can combine a Toml file configuration with CLI arguments.
Command-line flags
To pass config options as command-line flags, identify the valid options for the component
and follow the template below.
java -jar selenium-server-<version>.jar <component> --<option> value
The Grid infrastructure will try to match a session request with "se:downloadsEnabled" against ONLY those nodes which were started with --enable-managed-downloads true
If a session is matched, then the Node automatically sets the required capabilities to let the browser know, as to where should a file be downloaded.
The Node now allows a user to:
List all the files that were downloaded for a specific session and
Retrieve a specific file from the list of files.
The directory into which files were downloaded for a specific session gets automatically cleaned up when the session ends (or) timesout due to inactivity.
Note: Currently this capability is ONLY supported on:
Edge
Firefox and
Chrome browser
Listing files that can be downloaded for current session:
The endpoint to GET from is /session/<sessionId>/se/files.
The session needs to be active in order for the command to work.
contents - Base64 encoded zipped contents of the file.
The file contents are Base64 encoded and they need to be unzipped.
List files that can be downloaded
The below mentioned curl example can be used to list all the files that were downloaded by the current session in the Node, and which can be retrieved locally.
curl -X GET "http://localhost:4444/session/90c0149a-2e75-424d-857a-e78734943d4c/se/files"
Below is an example in Java that does the following:
Sets the capability to indicate that the test requires automatic managing of downloaded files.
Triggers a file download via a browser.
Lists the files that are available for retrieval from the remote node (These are essentially files that were downloaded in the current session)
Picks one file and downloads the file from the remote node to the local machine.
importcom.google.common.collect.ImmutableMap;importorg.openqa.selenium.By;importorg.openqa.selenium.io.Zip;importorg.openqa.selenium.json.Json;importorg.openqa.selenium.remote.RemoteWebDriver;importorg.openqa.selenium.remote.http.HttpClient;importorg.openqa.selenium.remote.http.HttpRequest;importorg.openqa.selenium.remote.http.HttpResponse;importjava.io.File;importjava.net.URL;importjava.nio.file.Files;importjava.util.List;importjava.util.Map;importjava.util.Optional;importjava.util.concurrent.TimeUnit;import staticorg.openqa.selenium.remote.http.Contents.asJson;import staticorg.openqa.selenium.remote.http.Contents.string;import staticorg.openqa.selenium.remote.http.HttpMethod.GET;import staticorg.openqa.selenium.remote.http.HttpMethod.POST;publicclassDownloadsSample{publicstaticvoidmain(String[]args)throwsException{// Assuming the Grid is running locally.URLgridUrl=newURL("http://localhost:4444");ChromeOptionsoptions=newChromeOptions();options.setCapability("se:downloadsEnabled",true);RemoteWebDriverdriver=newRemoteWebDriver(gridUrl,options);try{demoFileDownloads(driver,gridUrl);}finally{driver.quit();}}privatestaticvoiddemoFileDownloads(RemoteWebDriverdriver,URLgridUrl)throwsException{driver.get("https://www.selenium.dev/selenium/web/downloads/download.html");// Download the two available files on the pagedriver.findElement(By.id("file-1")).click();driver.findElement(By.id("file-2")).click();// The download happens in a remote Node, which makes it difficult to know when the file// has been completely downloaded. For demonstration purposes, this example uses a// 10-second sleep which should be enough time for a file to be downloaded.// We strongly recommend to avoid hardcoded sleeps, and ideally, to modify your// application under test, so it offers a way to know when the file has been completely// downloaded.TimeUnit.SECONDS.sleep(10);//This is the endpoint which will provide us with list of files to download and also to//let us download a specific file.StringdownloadsEndpoint=String.format("/session/%s/se/files",driver.getSessionId());StringfileToDownload;try(HttpClientclient=HttpClient.Factory.createDefault().createClient(gridUrl)){// To list all files that are were downloaded on the remote node for the current session// we trigger GET request.HttpRequestrequest=newHttpRequest(GET,downloadsEndpoint);HttpResponseresponse=client.execute(request);Map<String,Object>jsonResponse=newJson().toType(string(response),Json.MAP_TYPE);@SuppressWarnings("unchecked")Map<String,Object>value=(Map<String,Object>)jsonResponse.get("value");@SuppressWarnings("unchecked")List<String>names=(List<String>)value.get("names");// Let's say there were "n" files downloaded for the current session, we would like// to retrieve ONLY the first file.fileToDownload=names.get(0);}// Now, let's download the filetry(HttpClientclient=HttpClient.Factory.createDefault().createClient(gridUrl)){// To retrieve a specific file from one or more files that were downloaded by the current session// on a remote node, we use a POST request.HttpRequestrequest=newHttpRequest(POST,downloadsEndpoint);request.setContent(asJson(ImmutableMap.of("name",fileToDownload)));HttpResponseresponse=client.execute(request);Map<String,Object>jsonResponse=newJson().toType(string(response),Json.MAP_TYPE);@SuppressWarnings("unchecked")Map<String,Object>value=(Map<String,Object>)jsonResponse.get("value");// The returned map would contain 2 keys,// filename - This represents the name of the file (same as what was provided by the test)// contents - Base64 encoded String which contains the zipped file.StringzippedContents=value.get("contents").toString();// The file contents would always be a zip file and has to be unzipped.FiledownloadDir=Zip.unzipToTempDir(zippedContents,"download","");// Read the file contentsFiledownloadedFile=Optional.ofNullable(downloadDir.listFiles()).orElse(newFile[]{})[0];StringfileContent=String.join("",Files.readAllLines(downloadedFile.toPath()));System.out.println("The file which was "+"downloaded in the node is now available in the directory: "+downloadDir.getAbsolutePath()+" and has the contents: "+fileContent);}}}
4.4.3 - TOML configuration options
Grid configuration examples using Toml files.
All the options shown in CLI options can be configured through
a TOML file. This page shows configuration examples for the
different Grid components.
Note that this documentation could be outdated if an option was modified or added
but has not been documented yet. In case you bump into this situation, please check
the “Config help” section and feel free to send us a
pull request updating this page.
Overview
Selenium Grid uses TOML format for config files.
The config file consists of sections and each section has options and its respective value(s).
Refer to the TOML documentation for detailed usage guidance. In case of
parsing errors, validate the config using TOML linter.
The general configuration structure has the following pattern:
A Standalone or Node server that is able to run each new session in a Docker container. Disabling
drivers detection, having maximum 2 concurrent sessions. Stereotypes configured need to be mapped
to a Docker image, and the Docker daemon needs to be exposed via http/tcp. In addition, it is
possible to define which device files, accessible on the host, will be available in containers
through the devices property. Refer to the docker documentation
for more information about how docker device mapping works.
[node]detect-drivers=falsemax-sessions=2[docker]configs=["selenium/standalone-chrome:93.0","{\"browserName\": \"chrome\", \"browserVersion\": \"91\"}","selenium/standalone-firefox:92.0","{\"browserName\": \"firefox\", \"browserVersion\": \"92\"}"]#Optionally define all device files that should be mapped to docker containers#devices = [# "/dev/kvm:/dev/kvm"#]url="http://localhost:2375"video-image="selenium/video:latest"
Relaying commands to a service endpoint that supports WebDriver
It is useful to connect an external service that supports WebDriver to Selenium Grid.
An example of such service could be a cloud provider or an Appium server. In this way,
Grid can enable more coverage to platforms and versions not present locally.
The following is an en example of connecting an Appium server to Grid.
[node]detect-drivers=false[relay]# Default Appium/Cloud server endpointurl="http://localhost:4723/wd/hub"status-endpoint="/status"# Optional, enforce a specific protocol version in HttpClient when communicating with the endpoint service status (e.g. HTTP/1.1, HTTP/2)protocol-version="HTTP/1.1"# Stereotypes supported by the service. The initial number is "max-sessions", and will allocate # that many test slots to that particular configurationconfigs=["5","{\"browserName\": \"chrome\", \"platformName\": \"android\", \"appium:platformVersion\": \"11\"}"]
Basic auth enabled
It is possible to protect a Grid with basic auth by configuring the Router/Hub/Standalone with
a username and password. This user/password combination will be needed when loading the Grid UI
or starting a new session.
The Node can be instructed to manage downloads automatically. This will cause the Node to save all files that were downloaded for a particular session into a temp directory, which can later be retrieved from the node.
To turn this capability on, use the below configuration:
The Grid is designed as a set of components that all fulfill a role in
maintaining the Grid. It can seem quite complicated, but hopefully
this document can help clear up any confusion.
The Key Components
The main components of the Grid are:
Event Bus
Used for sending messages which may be received asynchronously
between the other components.
New Session Queue
Maintains a list of incoming sessions which have yet to be
assigned to a Node by the Distributor.
Distributor
Responsible for maintaining a model of the available locations in
the Grid where a session may run (known as "slots") and taking any
incoming new
session requests and assigning them to a slot.
Node
Runs a WebDriver
session. Each session is assigned to a slot, and each node has
one or more slots.
Session Map
Maintains a mapping between the session
ID and the address of the Node the session is running on.
Router
Acts as the front-end of the Grid. This is the only part of the
Grid which may be exposed to the wider Web (though we strongly
caution against it). This routes incoming requests to either the
New Session Queue or the Node on which the session is running.
While discussing the Grid, there are some other useful concepts to
keep in mind:
A slot is the place where a session can run.
Each slot has a stereotype. This is the minimal set of
capabilities that a new session session request must match
before the Distributor will send that request to the Node owning
the slot.
The Grid Model is how the Distributor tracks the state of the
Grid. As the name suggests, this may sometimes fall out of sync
with reality (perhaps because the Distributor has only just
started). It is used in preference to querying each Node so that
the Distributor can quickly assign a slot to a New Session request.
Synchronous and Asynchronous Calls
There are two main communication mechanisms used within the Grid:
Synchronous “REST-ish” JSON over HTTP requests.
Asynchronous events sent to the Event Bus.
How do we pick which communication mechanism to use? After all, we
could model the entire Grid in an event-based way, and it would work
out just fine.
The answer is that if the action being performed is synchronous
(eg. most WebDriver calls), or if missing the response would be
problematic, the Grid uses a synchronous call. If, instead, we want to
broadcast information to anyone who’s interested, or if missing the
response doesn’t matter, then we prefer to use the event bus.
One interesting thing to note is that the async calls are more
decoupled from their listeners than the synchronous calls are.
Start Up Sequence and Dependencies Between Components
Although the Grid is designed to allow components to start up in any
order, conceptually the order in which components starts is:
The Event Bus and Session Map start first. These have no other
dependencies, not even on each other, and so are safe to start in
parallel.
The Session Queue starts next.
It is now possible to start the Distributor. This will periodically
connect to the Session Queue and poll for jobs, though this polling
might be initiated either by an event (that a New Session has been
added to the queue) or at regular intervals.
The Router(s) can be started. New Session requests will be directed
to the Session Queue, and the Distributor will attempt to find a
slot to run the session on.
We are now able to start a Node. See below for details about how
the Node is registered with the Grid. Once registration is
complete, the Grid is ready to serve traffic.
You can picture the dependencies between components this way, where a
“✅” indicates that there is a synchronous dependency between the
components.
Event Bus
Distributor
Node
Router
Session Map
Session Queue
Event Bus
X
Distributor
✅
X
✅
✅
Node
✅
X
Router
✅
X
✅
Session Map
X
Session Queue
✅
X
Node Registration
The process of registering a new Node to the Grid is lightweight.
When the Node starts, it should emit a “heart beat” event on a
regular basis. This heartbeat contains the node status.
The Distributor listens for the heart beat events. When it sees
one, it attempts to GET the /status endpoint of the Node. It
is from this information that the Grid is set up.
The Distributor will use the same /status endpoint to check the Node
on a regular basis, but the Node should continue sending heart beat
events even after started so that a Distributor without a persistent
store of the Grid state can be restarted and will (eventually) be up
to date and correct.
The Node Status Object
The Node Status is a JSON blob with the following fields:
Name
Type
Description
availability
string
A string which is one of up, draining, or down. The important one is draining, which indicates that no new sessions should be sent to the Node, and once the last session on it closes, the Node will exit or restart.
externalUrl
string
The URI that the other components in the Grid should connect to.
lastSessionCreated
integer
The epoch timestamp of when the last session was created on this Node. The Distributor will attempt to send new sessions to the Node that has been idle longest if all other things are equal.
maxSessionCount
integer
Although a session count can be inferred by counting the number of available slots, this integer value is used to determine the maximum number of sessions that should be running simultaneously on the Node before it is considered “full”.
nodeId
string
A UUID used to identify this instance of the Node.
osInfo
object
An object with arch, name, and version fields. This is used by the Grid UI and the GraphQL queries.
slots
array
An array of Slot objects (described below)
version
string
The version of the Node (for Selenium, this will match the Selenium version number)
It is recommended to put values in all fields.
The Slot Object
The Slot object represents a single slot within a Node. A “slot” is
where a single session may be run. It is possible that a Node will
have more slots than it can run concurrently. For example, a node may
be able to run up 10 sessions, but they could be any combination of
Chrome, Edge, or Firefox; in this case, the Node would indicate a “max
session count” of 10, and then also say it has 10 slots for Chrome, 10
for Edge, and 10 for Firefox.
Name
Type
Description
id
string
UUID to refer to the slot
lastStarted
string
When the slot last had a session started, in ISO-8601 format
stereotype
object
The minimal set of capabilities this slot will match against. A minimal example is {"browserName": "firefox"}
session
object
The Session object (see below)
The Session Object
This represents a running session within a slot
Name
Type
Description
capabilities
object
The actual capabilities provided by the session. Will match the return value from the new session command
startTime
string
The start time of the session in ISO-8601 format
stereotype
object
The minimal set of capabilities this slot will match against. A minimal example is {"browserName": "firefox"}
uri
string
The URI used by the Node to communicate with the session
4.6 - Advanced features of Selenium
To get all the details of the advanced features, understand how it works, and how to set up your own, please browse thorough the following sections.
Grid aids in scaling and distributing tests by executing tests on various browser and operating system combinations.
Observability
Observability has three pillars: traces, metrics and logs. Since Selenium Grid 4 is designed to be fully distributed, observability will make it easier to understand and debug the internals.
Distributed tracing
A single request or transaction spans multiple services and components. Tracing tracks the request lifecycle as each service executes the request. It is useful in debugging in an error scenario.
Some key terms used in tracing context are:
Trace
Tracing allows one to trace a request through multiple services, starting from its origin to its final destination. This request’s journey helps in debugging, monitoring the end-to-end flow, and identifying failures. A trace depicts the end-to-end request flow. Each trace has a unique id as its identifier.
Span
Each trace is made up of timed operations called spans. A span has a start and end time and it represents operations done by a service. The granularity of span depends on how it is instrumented. Each span has a unique identifier. All spans within a trace have the same trace id.
Span Attributes
Span attributes are key-value pairs which provide additional information about each span.
Events
Events are timed-stamped logs within a span. They provide additional context to the existing spans. Events also contain key-value pairs as event attributes.
Event logging
Logging is essential to debug an application. Logging is often done in a human-readable format. But for machines to search and analyze the logs, it has to have a well-defined format. Structured logging is a common practice of recording logs consistently in a fixed format. It commonly contains fields like:
Timestamp
Logging level
Logger class
Log message (This is further broken down into fields relevant to the operation where the log was recorded)
Logs and events are closely related. Events encapsulate all the possible information available to do a single unit of work. Logs are essentially subsets of an event. At the crux, both aid in debugging.
Refer following resources for detailed understanding:
Selenium server is instrumented with tracing using OpenTelemetry. Every request to the server is traced from start to end. Each trace consists of a series of spans as a request is executed within the server.
Most spans in the Selenium server consist of two events:
Normal event - records all information about a unit of work and marks successful completion of the work.
Error event - records all information till the error occurs and then records the error information. Marks an exception event.
All spans, events and their respective attributes are part of a trace. Tracing works while running the server in all of the above-mentioned modes.
By default, tracing is enabled in the Selenium server. Selenium server exports the traces via two exporters:
Console - Logs all traces and their included spans at FINE level. By default, Selenium server prints logs at INFO level and above.
The log-level flag can be used to pass a logging level of choice while running the Selenium Grid jar/s.
java -jar selenium-server-4.0.0-<selenium-version>.jar standalone --log-level FINE
Jaeger UI - OpenTelemetry provides the APIs and SDKs to instrument traces in the code. Whereas Jaeger is a tracing backend, that aids in collecting the tracing telemetry data and providing querying, filtering and visualizing features for the data.
Detailed instructions of visualizing traces using Jaeger UI can be obtained by running the command :
java -jar selenium-server-4.0.0-<selenium-version>.jar info tracing
Tracing has to be enabled for event logging as well, even if one does not wish to export traces to visualize them. By default, tracing is enabled. No additional parameters need to be passed to see logs on the console.
All events within a span are logged at FINE level. Error events are logged at WARN level.
All event logs have the following fields :
Field
Field value
Description
Event time
eventId
Timestamp of the event record in epoch nanoseconds.
Trace Id
tracedId
Each trace is uniquely identified by a trace id.
Span Id
spanId
Each span within a trace is uniquely identified by a span id.
Span Kind
spanKind
Span kind is a property of span indicating the type of span. It helps in understanding the nature of the unit of work done by the Span.
Event name
eventName
This maps to the log message.
Event attributes
eventAttributes
This forms the crux of the event logs, based on the operation executed, it has JSON formatted key-value pairs. This also includes a handler class attribute, to show the logger class.
GraphQL is a query language for APIs and a runtime for fulfilling those queries
with your existing data. It gives users the power to ask for exactly what they need and nothing more.
Enums
Enums represent possible sets of values for a field.
For example, the Node object has a field called status. The state is an enum
(specifically, of type Status) because it may be UP , DRAINING or UNAVAILABLE.
Scalars
Scalars are primitive values: Int, Float, String, Boolean, or ID.
When calling the GraphQL API, you must specify nested subfield until you return only scalars.
The best way to query GraphQL is by using curl requests. The query is interpreted as JSON. Ensure double quotes are properly escaped to avoid unexpected errors.
GraphQL allows you to fetch only the data that you want, nothing more nothing less.
Some of the example GraphQL queries are given below. You can build your own
queries as you like.
Querying the number of maxSession and sessionCount in the grid :
Grid status provides the current state of the Grid. It consists of details about every registered Node.
For every Node, the status includes information regarding Node availability, sessions, and slots.
cURL GET 'http://localhost:4444/status'
Delete session
Deleting the session terminates the WebDriver session, quits the driver and removes it from the active sessions map.
Any request using the removed session-id or reusing the driver instance will throw an error.
In the Standalone mode, the Grid URL is the Standalone server address.
In the Hub-Node mode, the Grid URL is the Hub server address.
In the fully distributed mode, the Grid URL is the Router server address.
Default URL for all the above modes is http://localhost:4444.
Distributor
Remove Node
To remove the Node from the Grid, use the cURL command enlisted below.
It does not stop any ongoing session running on that Node.
The Node continues running as it is unless explicitly killed.
The Distributor is no longer aware of the Node and hence any matching new session request
will not be forwarded to that Node.
In the Standalone mode, the Distributor URL is the Standalone server address.
In the Hub-Node mode, the Distributor URL is the Hub server address.
Node drain command is for graceful node shutdown.
Draining a Node stops the Node after all the ongoing sessions are complete.
However, it does not accept any new session requests.
In the Standalone mode, the Distributor URL is the Standalone server address.
In the Hub-Node mode, the Distributor URL is the Hub server address.
cURL --request POST 'http://localhost:4444/se/grid/distributor/node/<node-id>/drain' --header 'X-REGISTRATION-SECRET: <secret> '
In the fully distributed mode, the URL is the Distributor server address.
cURL --request POST 'http://localhost:5553/se/grid/distributor/node/<node-id>/drain' --header 'X-REGISTRATION-SECRET: <secret>'
If no registration secret has been configured while setting up the Grid, then use
cURL --request POST 'http://<Distributor-URL>/se/grid/distributor/node/<node-id>/drain' --header 'X-REGISTRATION-SECRET;'
Node
The endpoints in this section are applicable for Hub-Node mode and fully distributed Grid mode where the
Node runs independently.
The default Node URL is http://localhost:5555 in case of one Node.
In case of multiple Nodes, use Grid status to get all Node details and locate the Node address.
Status
The Node status is essentially a health-check for the Node.
Distributor pings the node status are regular intervals and updates the Grid Model accordingly.
The status includes information regarding availability, sessions, and slots.
cURL --request GET 'http://localhost:5555/status'
Drain
Distributor passes the drain command to the appropriate node identified by the node-id.
To drain the Node directly, use the cuRL command enlisted below.
Both endpoints are valid and produce the same result. Drain finishes the ongoing sessions before stopping the Node.
cURL --request POST 'http://localhost:5555/se/grid/node/drain' --header 'X-REGISTRATION-SECRET: <secret>'
If no registration secret has been configured while setting up the Grid, then use
cURL --request POST 'http://<node-URL>/se/grid/node/drain' --header 'X-REGISTRATION-SECRET;'
Check session owner
To check if a session belongs to a Node, use the cURL command enlisted below.
cURL --request GET 'http://localhost:5555/se/grid/node/owner/<session-id>' --header 'X-REGISTRATION-SECRET: <secret>'
If no registration secret has been configured while setting up the Grid, then use
cURL --request GET 'http://<node-URL>/se/grid/node/owner/<session-id>' --header 'X-REGISTRATION-SECRET;'
It will return true if the session belongs to the Node else it will return false.
Delete session
Deleting the session terminates the WebDriver session, quits the driver and removes it from the active sessions map.
Any request using the removed session-id or reusing the driver instance will throw an error.
New Session Request Queue holds the new session requests.
To clear the queue, use the cURL command enlisted below.
Clearing the queue rejects all the requests in the queue. For each such request, the server returns an error response to the respective client.
The result of the clear command is the total number of deleted requests.
In the Standalone mode, the Queue URL is the Standalone server address.
In the Hub-Node mode, the Queue URL is the Hub server address.
New Session Request Queue holds the new session requests.
To get the current requests in the queue, use the cURL command enlisted below.
The response returns the total number of requests in the queue and the request payloads.
In the Standalone mode, the Queue URL is the Standalone server address.
In the Hub-Node mode, the Queue URL is the Hub server address.
cURL --request GET 'http://localhost:4444/se/grid/newsessionqueue/queue'
In the fully distributed mode, the Queue URL is New Session Queue server address.
cURL --request GET 'http://localhost:5559/se/grid/newsessionqueue/queue'
4.6.4 - Customizing a Node
How to customize a Node
There are times when we would like a Node to be customized to our needs.
For e.g., we may like to do some additional setup before a session begins execution and some clean-up after a session runs to completion.
Following steps can be followed for this:
Create a class that extends org.openqa.selenium.grid.node.Node
Add a static method (this will be our factory method) to the newly created class whose signature looks like this:
public static Node create(Config config). Here:
Node is of type org.openqa.selenium.grid.node.Node
Config is of type org.openqa.selenium.grid.config.Config
Within this factory method, include logic for creating your new Class.
To wire in this new customized logic into the hub, start the node and pass in the fully qualified class name of the above class to the argument --node-implementation
Let’s see an example of all this:
Custom Node as an uber jar
Create a sample project using your favourite build tool (Maven|Gradle).
Note: If you are using Maven as a build tool, please prefer using maven-shade-plugin instead of maven-assembly-plugin because maven-assembly plugin seems to have issues with being able to merge multiple Service Provider Interface files (META-INF/services)
Custom Node as a regular jar
Create a sample project using your favourite build tool (Maven|Gradle).
Below is a sample that just prints some messages on to the console whenever there’s an activity of interest (session created, session deleted, a webdriver command executed etc.,) on the Node.
Sample customized node
packageorg.seleniumhq.samples;importjava.io.IOException;importjava.net.URI;importjava.util.UUID;importjava.util.function.Supplier;importorg.openqa.selenium.Capabilities;importorg.openqa.selenium.NoSuchSessionException;importorg.openqa.selenium.WebDriverException;importorg.openqa.selenium.grid.config.Config;importorg.openqa.selenium.grid.data.CreateSessionRequest;importorg.openqa.selenium.grid.data.CreateSessionResponse;importorg.openqa.selenium.grid.data.NodeId;importorg.openqa.selenium.grid.data.NodeStatus;importorg.openqa.selenium.grid.data.Session;importorg.openqa.selenium.grid.log.LoggingOptions;importorg.openqa.selenium.grid.node.HealthCheck;importorg.openqa.selenium.grid.node.Node;importorg.openqa.selenium.grid.node.local.LocalNodeFactory;importorg.openqa.selenium.grid.security.Secret;importorg.openqa.selenium.grid.security.SecretOptions;importorg.openqa.selenium.grid.server.BaseServerOptions;importorg.openqa.selenium.internal.Either;importorg.openqa.selenium.io.TemporaryFilesystem;importorg.openqa.selenium.remote.SessionId;importorg.openqa.selenium.remote.http.HttpRequest;importorg.openqa.selenium.remote.http.HttpResponse;importorg.openqa.selenium.remote.tracing.Tracer;publicclassDecoratedLoggingNodeextendsNode{privateNodenode;protectedDecoratedLoggingNode(Tracertracer,NodeIdnodeId,URIuri,SecretregistrationSecret,DurationsessionTimeout){super(tracer,nodeId,uri,registrationSecret,sessionTimeout);}publicstaticNodecreate(Configconfig){LoggingOptionsloggingOptions=newLoggingOptions(config);BaseServerOptionsserverOptions=newBaseServerOptions(config);URIuri=serverOptions.getExternalUri();SecretOptionssecretOptions=newSecretOptions(config);NodeOptionsnodeOptions=newNodeOptions(config);DurationsessionTimeout=nodeOptions.getSessionTimeout();// Refer to the foot notes for additional context on this line.Nodenode=LocalNodeFactory.create(config);DecoratedLoggingNodewrapper=newDecoratedLoggingNode(loggingOptions.getTracer(),node.getId(),uri,secretOptions.getRegistrationSecret(),sessionTimeout);wrapper.node=node;returnwrapper;}@OverridepublicEither<WebDriverException,CreateSessionResponse>newSession(CreateSessionRequestsessionRequest){returnperform(()->node.newSession(sessionRequest),"newSession");}@OverridepublicHttpResponseexecuteWebDriverCommand(HttpRequestreq){returnperform(()->node.executeWebDriverCommand(req),"executeWebDriverCommand");}@OverridepublicSessiongetSession(SessionIdid)throwsNoSuchSessionException{returnperform(()->node.getSession(id),"getSession");}@OverridepublicHttpResponseuploadFile(HttpRequestreq,SessionIdid){returnperform(()->node.uploadFile(req,id),"uploadFile");}@OverridepublicHttpResponsedownloadFile(HttpRequestreq,SessionIdid){returnperform(()->node.downloadFile(req,id),"downloadFile");}@OverridepublicTemporaryFilesystemgetDownloadsFilesystem(UUIDuuid){returnperform(()->{try{returnnode.getDownloadsFilesystem(uuid);}catch(IOExceptione){thrownewRuntimeException(e);}},"downloadsFilesystem");}@OverridepublicTemporaryFilesystemgetUploadsFilesystem(SessionIdid)throwsIOException{returnperform(()->{try{returnnode.getUploadsFilesystem(id);}catch(IOExceptione){thrownewRuntimeException(e);}},"uploadsFilesystem");}@Overridepublicvoidstop(SessionIdid)throwsNoSuchSessionException{perform(()->node.stop(id),"stop");}@OverridepublicbooleanisSessionOwner(SessionIdid){returnperform(()->node.isSessionOwner(id),"isSessionOwner");}@OverridepublicbooleanisSupporting(Capabilitiescapabilities){returnperform(()->node.isSupporting(capabilities),"isSupporting");}@OverridepublicNodeStatusgetStatus(){returnperform(()->node.getStatus(),"getStatus");}@OverridepublicHealthCheckgetHealthCheck(){returnperform(()->node.getHealthCheck(),"getHealthCheck");}@Overridepublicvoiddrain(){perform(()->node.drain(),"drain");}@OverridepublicbooleanisReady(){returnperform(()->node.isReady(),"isReady");}privatevoidperform(Runnablefunction,Stringoperation){try{System.err.printf("[COMMENTATOR] Before %s()%n",operation);function.run();}finally{System.err.printf("[COMMENTATOR] After %s()%n",operation);}}private<T>Tperform(Supplier<T>function,Stringoperation){try{System.err.printf("[COMMENTATOR] Before %s()%n",operation);returnfunction.get();}finally{System.err.printf("[COMMENTATOR] After %s()%n",operation);}}}
Foot Notes:
In the above example, the line Node node = LocalNodeFactory.create(config); explicitly creates a LocalNode.
There are basically 2 types of user facing implementations of org.openqa.selenium.grid.node.Node available.
These classes are good starting points to learn how to build a custom Node and also to learn the internals of a Node.
org.openqa.selenium.grid.node.local.LocalNode - Used to represent a long running Node and is the default implementation that gets wired in when you start a node.
It can be created by calling LocalNodeFactory.create(config);, where:
LocalNodeFactory belongs to org.openqa.selenium.grid.node.local
Config belongs to org.openqa.selenium.grid.config
org.openqa.selenium.grid.node.k8s.OneShotNode - This is a special reference implementation wherein the Node gracefully shuts itself down after servicing one test session. This class is currently not available as part of any pre-built maven artifact.
You can refer to the source code here to understand its internals.
Selenium Grid allows you to persist information related to currently running sessions into an external data store.
The external data store could be backed by your favourite database (or) Redis Cache system.
Setup
Coursier - As a dependency resolver, so that we can download maven artifacts on the fly and make them available in our classpath
Docker - To manage our PostGreSQL/Redis docker containers.
Database backed Session Map
For the sake of this illustration, we are going to work with PostGreSQL database.
We will spin off a PostGreSQL database as a docker container using a docker compose file.
Steps
You can skip this step if you already have a PostGreSQL database instance available at your disposal.
Create a sql file named init.sql with the below contents:
We can now start our database container by running:
docker-compose up -d
Our database name is selenium_sessions with its username and password set to seluser
If you are working with an already running PostGreSQL DB instance, then you just need to create a database named selenium_sessions and the table sessions_map using the above mentioned SQL statement.
Create a Selenium Grid configuration file named sessions.toml with the below contents:
At this point the current directory should contain the following files:
docker-compose.yml
init.sql
sessions.toml
distributed.sh
You can now spawn the Grid by running distributed.sh shell script and quickly run a test. You will notice that the Grid now stores session information into the PostGreSQL database.
In the line which spawns a SessionMap on a machine:
At this point the current directory should contain the following files:
docker-compose.yml
sessions.toml
distributed.sh
You can now spawn the Grid by running distributed.sh shell script and quickly run a test. You will notice that the Grid now stores session information into the Redis instance. You can perhaps make use of a Redis GUI such as TablePlus to see them (Make sure that you have setup a debug point in your test, because the values will get deleted as soon as the test runs to completion).
In the line which spawns a SessionMap on a machine:
The InternetExplorerDriver is a standalone server which implements WebDriver’s wire protocol.
This driver has been tested with IE 11, and on Windows 10. It might work with older versions
of IE and Windows, but this is not supported.
The driver supports running 32-bit and 64-bit versions of the browser. The choice of how to
determine which “bit-ness” to use in launching the browser depends on which version of the
IEDriverServer.exe is launched. If the 32-bit version of IEDriverServer.exe is launched,
the 32-bit version of IE will be launched. Similarly, if the 64-bit version of
IEDriverServer.exe is launched, the 64-bit version of IE will be launched.
Installing
You do not need to run an installer before using the InternetExplorerDriver, though some
configuration is required. The standalone server executable must be downloaded from
the Downloads page and placed in your
PATH.
Pros
Runs in a real browser and supports JavaScript
Cons
Obviously the InternetExplorerDriver will only work on Windows!
Comparatively slow (though still pretty snappy :)
Command-Line Switches
As a standalone executable, the behavior of the IE driver can be modified through various
command-line arguments. To set the value of these command-line arguments, you should
consult the documentation for the language binding you are using. The command line
switches supported are described in the table below. All -<switch>, –<switch>
and /<switch> are supported.
Switch
Meaning
–port=<portNumber>
Specifies the port on which the HTTP server of the IE driver will listen for commands from language bindings. Defaults to 5555.
–host=<hostAdapterIPAddress>
Specifies the IP address of the host adapter on which the HTTP server of the IE driver will listen for commands from language bindings. Defaults to 127.0.0.1.
–log-level=<logLevel>
Specifies the level at which logging messages are output. Valid values are FATAL, ERROR, WARN, INFO, DEBUG, and TRACE. Defaults to FATAL.
–log-file=<logFile>
Specifies the full path and file name of the log file. Defaults to stdout.
–extract-path=<path>
Specifies the full path to the directory used to extract supporting files used by the server. Defaults to the TEMP directory if not specified.
–silent
Suppresses diagnostic output when the server is started.
Important System Properties
The following system properties (read using System.getProperty() and set using
System.setProperty() in Java code or the “-DpropertyName=value” command line flag)
are used by the InternetExplorerDriver:
Property
What it means
webdriver.ie.driver
The location of the IE driver binary.
webdriver.ie.driver.host
Specifies the IP address of the host adapter on which the IE driver will listen.
webdriver.ie.driver.loglevel
Specifies the level at which logging messages are output. Valid values are FATAL, ERROR, WARN, INFO, DEBUG, and TRACE. Defaults to FATAL.
webdriver.ie.driver.logfile
Specifies the full path and file name of the log file.
webdriver.ie.driver.silent
Suppresses diagnostic output when the IE driver is started.
webdriver.ie.driver.extractpath
Specifies the full path to the directory used to extract supporting files used by the server. Defaults to the TEMP directory if not specified.
Required Configuration
The IEDriverServer executable must be downloaded and placed in your PATH.
On IE 7 or higher on Windows Vista, Windows 7, or Windows 10, you must set the Protected Mode settings for each zone to be the same value. The value can be on or off, as long as it is the same for every zone. To set the Protected Mode settings, choose “Internet Options…” from the Tools menu, and click on the Security tab. For each zone, there will be a check box at the bottom of the tab labeled “Enable Protected Mode”.
Additionally, “Enhanced Protected Mode” must be disabled for IE 10 and higher. This option is found in the Advanced tab of the Internet Options dialog.
The browser zoom level must be set to 100% so that the native mouse events can be set to the correct coordinates.
For Windows 10, you also need to set “Change the size of text, apps, and other items” to 100% in display settings.
For IE 11 only, you will need to set a registry entry on the target computer so that the driver can maintain a connection to the instance of Internet Explorer it creates. For 32-bit Windows installations, the key you must examine in the registry editor is HKEY_LOCAL_MACHINE\SOFTWARE\Microsoft\Internet Explorer\Main\FeatureControl\FEATURE_BFCACHE. For 64-bit Windows installations, the key is HKEY_LOCAL_MACHINE\SOFTWARE\Wow6432Node\Microsoft\Internet Explorer\Main\FeatureControl\FEATURE_BFCACHE. Please note that the FEATURE_BFCACHE subkey may or may not be present, and should be created if it is not present. Important: Inside this key, create a DWORD value named iexplore.exe with the value of 0.
Native Events and Internet Explorer
As the InternetExplorerDriver is Windows-only, it attempts to use so-called “native”, or OS-level
events to perform mouse and keyboard operations in the browser. This is in contrast to using
simulated JavaScript events for the same operations. The advantage of using native events is that
it does not rely on the JavaScript sandbox, and it ensures proper JavaScript event propagation
within the browser. However, there are currently some issues with mouse events when the IE
browser window does not have focus, and when attempting to hover over elements.
Browser Focus
The challenge is that IE itself appears to not fully respect the Windows messages we send the
IE browser window (WM\_MOUSEDOWN and WM\_MOUSEUP) if the window doesn’t have the focus.
Specifically, the element being clicked on will receive a focus window around it, but the click
will not be processed by the element. Arguably, we shouldn’t be sending messages at all; rather,
we should be using the SendInput() API, but that API explicitly requires the window to have the
focus. We have two conflicting goals with the WebDriver project.
First, we strive to emulate the user as closely as possible. This means using native events
rather than simulating the events using JavaScript.
Second, we want to not require focus of the browser window being automated. This means that
just forcing the browser window to the foreground is suboptimal.
An additional consideration is the possibility of multiple IE instances running under multiple
WebDriver instances, which means any such “bring the window to the foreground” solution will
have to be wrapped in some sort of synchronizing construct (mutex?) within the IE driver’s
C++ code. Even so, this code will still be subject to race conditions, if, for example, the
user brings another window to the foreground between the driver bringing IE to the foreground
and executing the native event.
The discussion around the requirements of the driver and how to prioritize these two
conflicting goals is ongoing. The current prevailing wisdom is to prioritize the former over
the latter, and document that your machine will be unavailable for other tasks when using
the IE driver. However, that decision is far from finalized, and the code to implement it is
likely to be rather complicated.
Hovering Over Elements
When you attempt to hover over elements, and your physical mouse cursor is within the boundaries
of the IE browser window, the hover will not work. More specifically, the hover will appear
to work for a fraction of a second, and then the element will revert back to its previous
state. The prevailing theory why this occurs is that IE is doing hit-testing of some sort
during its event loop, which causes it to respond to the physical mouse position when the
physical cursor is within the window bounds. The WebDriver development team has been unable
to discover a workaround for this behavior of IE.
Clicking <option> Elements or Submitting Forms and alert()
There are two places where the IE driver does not interact with elements using native events.
This is in clicking <option> elements within a <select> element. Under normal circumstances,
the IE driver calculates where to click based on the position and size of the element, typically
as returned by the JavaScript getBoundingClientRect() method. However, for <option> elements,
getBoundingClientRect() returns a rectangle with zero position and zero size. The IE driver
handles this one scenario by using the click() Automation Atom, which essentially sets
the .selected property of the element and simulates the onChange event in JavaScript.
However, this means that if the onChange event of the <select> element contains JavaScript
code that calls alert(), confirm() or prompt(), calling WebElement’s click() method will
hang until the modal dialog is manually dismissed. There is no known workaround for this behavior
using only WebDriver code.
Similarly, there are some scenarios when submitting an HTML form via WebElement’s submit()
method may have the same effect. This can happen if the driver calls the JavaScript submit()
function on the form, and there is an onSubmit event handler that calls the JavaScript alert(),
confirm(), or prompt() functions.
This restriction is filed as issue 3508 (on Google Code).
Multiple instances of InternetExplorerDriver
With the creation of the IEDriverServer.exe, it should be possible to create and use multiple
simultaneous instances of the InternetExplorerDriver. However, this functionality is largely
untested, and there may be issues with cookies, window focus, and the like. If you attempt to
use multiple instances of the IE driver, and run into such issues, consider using the
RemoteWebDriver and virtual machines.
There are 2 solutions for problem with cookies (and another session items) shared between
multiple instances of InternetExplorer.
The first is to start your InternetExplorer in private mode. After that InternetExplorer will be
started with clean session data and will not save changed session data at quiting. To do so you
need to pass 2 specific capabilities to driver: ie.forceCreateProcessApi with true value
and ie.browserCommandLineSwitches with -private value. Be note that it will work only
for InternetExplorer 8 and newer, and Windows Registry
HKLM_CURRENT_USER\\Software\\Microsoft\\Internet Explorer\\Main path should contain key
TabProcGrowth with 0 value.
The second is to clean session during InternetExplorer starting. For this you need to pass
specific ie.ensureCleanSession capability with true value to driver. This clears the cache
for all running instances of InternetExplorer, including those started manually.
Running IEDriverServer.exe Remotely
The HTTP server started by the IEDriverServer.exe sets an access control list to only accept
connections from the local machine, and disallows incoming connections from remote machines.
At present, this cannot be changed without modifying the source code to the IEDriverServer.exe.
To run the Internet Explorer driver on a remote machine, use the Java standalone remote server
in connection with your language binding’s equivalent of RemoteWebDriver.
Running IEDriverServer.exe Under a Windows Service
Attempting to use IEDriverServer.exe as part of a Windows Service application is expressly
unsupported. Service processes, and processes spawned by them, have much different requirements
than those executing in a regular user context. IEDriverServer.exe is explicitly untested in
that environment, and includes Windows API calls that are documented to be prohibited to be used
in service processes. While it may be possible to get the IE driver to work while running under
a service process, users encountering problems in that environment will need to seek out their
own solutions.
5.1 - Internet Explorer Driver Internals
More detailed information on the IE Driver.
Client Code Into the Driver
We use the W3C WebDriver protocol to communicate with a local instance of an HTTP server. This greatly simplifies the implementation of the language-specific code, and minimzes the number of entry points into the C++ DLL that must be called using a native-code interop technology such as JNA, ctypes, pinvoke or DL.
Memory Management
The IE driver utilizes the Active Template Library (ATL) to take advantage of its implementation of smart pointers to COM objects. This makes reference counting and cleanup of COM objects much easier.
Why Do We Require Protected Mode Settings Changes?
IE 7 on Windows Vista introduced the concept of Protected Mode, which allows for some measure of protection to the underlying Windows OS when browsing. The problem is that when you manipulate an instance of IE via COM, and you navigate to a page that would cause a transition into or out of Protected Mode, IE requires that another browser session be created. This will orphan the COM object of the previous session, not allowing you to control it any longer.
In IE 7, this will usually manifest itself as a new top-level browser window; in IE 8, a new IExplore.exe process will be created, but it will usually (not always!) seamlessly attach it to the existing IE top-level frame window. Any browser automation framework that drives IE externally (as opposed to using a WebBrowser control) will run into these problems.
In order to work around that problem, we dictate that to work with IE, all zones must have the same Protected Mode setting. As long as it’s on for all zones, or off for all zones, we can prevent the transistions to different Protected Mode zones that would invalidate our browser object. It also allows users to continue to run with UAC turned on, and to run securely in the browser if they set Protected Mode “on” for all zones.
In earlier releases of the IE driver, if the user’s Protected Mode settings were not correctly set, we would launch IE, and the process would simply hang until the HTTP request timed out. This was suboptimal, as it gave no indication what needed to be set. Erring on the side of caution, we do not modify the user’s Protected Mode settings. Current versions, however check that the Protected Mode settings are properly set, and will return an error response if they are not.
There are two ways that we could simulate keyboard and mouse input. The first way, which is used in parts of webdriver, is to synthesize events on the DOM. This has a number of drawbacks, since each browser (and version of a browser) has its own unique quirks; to model each of these is a demanding task, and impossible to get completely right (for example, it’s hard to tell what window.selection should be and this is a read-only property on some browsers) The alternative approach is to synthesize keyboard and mouse input at the OS level, ideally without stealing focus from the user (who tends to be doing other things on their computer as long-running webdriver tests run)
The code for doing this is in interactions.cpp The key thing to note here is that we use PostMessages to push window events on to the message queue of the IE instance. Typing, in particular, is interesting: we only send the “keydown” and “keyup” messages. The “keypress” event is created if necessary by IE’s internal event processing. Because the key press event is not always generated (for example, not every character is printable, and if the default event bubbling is cancelled, listeners don’t see the key press event) we send a “probe” event in after the key down. Once we see that this has been processed, we know that the key press event is on the stack of events to be processed, and that it is safe to send the key up event. If this was not done, it is possible for events to fire in the wrong order, which is definitely sub-optimal.
Working On the InternetExplorerDriver
Currently, there are tests that will run for the InternetExplorerDriver in all languages (Java, C#, Python, and Ruby), so you should be able to test your changes to the native code no matter what language you’re comfortable working in from the client side. For working on the C++ code, you’ll need Visual Studio 2010 Professional or higher. Unfortunately, the C++ code of the driver uses ATL to ease the pain of working with COM objects, and ATL is not supplied with Visual C++ 2010 Express Edition. If you’re using Eclipse, the process for making and testing modifications is:
Edit the C++ code in VS.
Build the code to ensure that it compiles
Do a complete rebuild when you are ready to run a test. This will cause the created DLL to be copied to the right place to allow its use in Eclipse
Load Eclipse (or some other IDE, such as Idea)
Edit the SingleTestSuite so that it is usingDriver(IE)
Create a JUnit run configuration that uses the “webdriver-internet-explorer” project. If you don’t do this, the test won’t work at all, and there will be a somewhat cryptic error message on the console.
Once the basic setup is done, you can start working on the code pretty quickly. You can attach to the process you execute your code from using Visual Studio (from the Debug menu, select Attach to Process…).
6 - Selenium IDE
The Selenium IDE is a browser extension that records and plays back a user’s actions.
Selenium’s Integrated Development Environment (Selenium IDE)
is an easy-to-use browser extension that records a user’s
actions in the browser using existing Selenium commands,
with parameters defined by the context of each element.
It provides an excellent way to learn Selenium syntax.
It’s available for Google Chrome, Mozilla Firefox, and Microsoft Edge.
Some guidelines and recommendations on testing from the Selenium project.
A note on “Best Practices”: We’ve intentionally avoided the phrase “Best
Practices” in this documentation. No one approach works for all situations.
We prefer the idea of “Guidelines and Recommendations.” We encourage
you to read through these and thoughtfully decide what approaches
will work for you in your particular environment.
Functional testing is challenging to get right for many reasons.
As if application state, complexity, and dependencies do not make testing difficult enough,
dealing with browsers (especially with cross-browser incompatibilities)
makes writing good tests a challenge.
Selenium provides tools to make functional user interaction easier,
but does not help you write well-architected test suites.
In this chapter, we offer advice, guidelines, and recommendations
on how to approach functional web page automation.
This chapter records software design patterns popular
amongst many of the users of Selenium
that have proven successful over the years.
Over time, projects tend to accumulate large numbers of tests. As the total number of tests increases,
it becomes harder to make changes to the codebase — a single “simple” change
may cause numerous tests to fail, even though the application still works properly.
Sometimes these problems are unavoidable, but when they do occur you want to be up
and running again as quickly as possible. The following design patterns and strategies
have been used before with WebDriver to help make tests easier to write and maintain.
They may help you too.
DomainDrivenDesign: Express your tests in the language of the end-user of the app.
PageObjects: A simple abstraction of the UI of your web app.
LoadableComponent: Modeling PageObjects as components.
BotStyleTests: Using a command-based approach to automating tests, rather than the object-based approach that PageObjects encourage
Loadable Component
What Is It?
The LoadableComponent is a base class that aims to make writing PageObjects less painful.
It does this by providing a standard way of ensuring that pages are loaded and providing
hooks to make debugging the failure of a page to load easier. You can use it to help
reduce the amount of boilerplate code in your tests, which in turn makes maintaining
your tests less tiresome.
There is currently an implementation in Java that ships as part of Selenium 2, but the approach used is simple enough to be implemented in any language.
Simple Usage
As an example of a UI that we’d like to model, take a look at
the new issue page. From the point of view of a test author,
this offers the service of being able to file a new issue. A basic Page Object would look like:
In order to turn this into a LoadableComponent, all we need to do is to set that as the base type:
publicclassEditIssueextendsLoadableComponent<EditIssue>{// rest of class ignored for now}
This signature looks a little unusual, but all it means is that this class
represents a LoadableComponent that loads the EditIssue page.
By extending this base class, we need to implement two new methods:
@Overrideprotectedvoidload(){driver.get("https://github.com/SeleniumHQ/selenium/issues/new");}@OverrideprotectedvoidisLoaded()throwsError{Stringurl=driver.getCurrentUrl();assertTrue("Not on the issue entry page: "+url,url.endsWith("/new"));}
The load method is used to navigate to the page, whilst the isLoaded method is used to
determine whether we are on the right page. Although the method looks like it should return
a boolean, instead it performs a series of assertions using JUnit’s Assert class.
There can be as few or as many assertions as you like. By using these assertions
it’s possible to give users of the class clear information that can be used to debug tests.
With a little rework, our PageObject looks like:
packagecom.example.webdriver;importorg.openqa.selenium.By;importorg.openqa.selenium.WebDriver;importorg.openqa.selenium.WebElement;importorg.openqa.selenium.support.FindBy;importorg.openqa.selenium.support.PageFactory;import staticjunit.framework.Assert.assertTrue;publicclassEditIssueextendsLoadableComponent<EditIssue>{privatefinalWebDriverdriver;// By default the PageFactory will locate elements with the same name or id// as the field. Since the summary element has a name attribute of "summary"// we don't need any additional annotations.privateWebElementsummary;// Same with the submit element, which has the ID "submit"privateWebElementsubmit;// But we'd prefer a different name in our code than "comment", so we use the// FindBy annotation to tell the PageFactory how to locate the element.@FindBy(name="comment")privateWebElementdescription;publicEditIssue(WebDriverdriver){this.driver=driver;// This call sets the WebElement fields.PageFactory.initElements(driver,this);}@Overrideprotectedvoidload(){driver.get("https://github.com/SeleniumHQ/selenium/issues/new");}@OverrideprotectedvoidisLoaded()throwsError{Stringurl=driver.getCurrentUrl();assertTrue("Not on the issue entry page: "+url,url.endsWith("/new"));}publicvoidsetSummary(StringissueSummary){clearAndType(summary,issueSummary);}publicvoidenterDescription(StringissueDescription){clearAndType(description,issueDescription);}publicIssueListsubmit(){submit.click();returnnewIssueList(driver);}privatevoidclearAndType(WebElementfield,Stringtext){field.clear();field.sendKeys(text);}}
That doesn’t seem to have bought us much, right? One thing it has done is encapsulate
the information about how to navigate to the page into the page itself, meaning that
this information’s not scattered through the code base. It also means that we can do this in our tests:
EditIssuepage=newEditIssue(driver).get();
This call will cause the driver to navigate to the page if that’s necessary.
Nested Components
LoadableComponents start to become more useful when they are used in conjunction
with other LoadableComponents. Using our example, we could view the “edit issue”
page as a component within a project’s website (after all, we access it via a tab
on that site). You also need to be logged in to file an issue. We could model this
as a tree of nested components:
+ ProjectPage
+---+ SecuredPage
+---+ EditIssue
What would this look like in code? For a start, each logical component would
have its own class. The “load” method in each of them would “get” the parent.
The end result, in addition to the EditIssue class above is:
packagecom.example.webdriver;importorg.openqa.selenium.By;importorg.openqa.selenium.NoSuchElementException;importorg.openqa.selenium.WebDriver;importorg.openqa.selenium.WebElement;import staticorg.junit.Assert.fail;publicclassSecuredPageextendsLoadableComponent<SecuredPage>{privatefinalWebDriverdriver;privatefinalLoadableComponent<?>parent;privatefinalStringusername;privatefinalStringpassword;publicSecuredPage(WebDriverdriver,LoadableComponent<?>parent,Stringusername,Stringpassword){this.driver=driver;this.parent=parent;this.username=username;this.password=password;}@Overrideprotectedvoidload(){parent.get();StringoriginalUrl=driver.getCurrentUrl();// Sign indriver.get("https://www.google.com/accounts/ServiceLogin?service=code");driver.findElement(By.name("Email")).sendKeys(username);WebElementpasswordField=driver.findElement(By.name("Passwd"));passwordField.sendKeys(password);passwordField.submit();// Now return to the original URLdriver.get(originalUrl);}@OverrideprotectedvoidisLoaded()throwsError{// If you're signed in, you have the option of picking a different login.// Let's check for the presence of that.try{WebElementdiv=driver.findElement(By.id("multilogin-dropdown"));}catch(NoSuchElementExceptione){fail("Cannot locate user name link");}}}
This shows that the components are all “nested” within each other.
A call to get() in EditIssue will cause all its dependencies to
load too. The example usage:
publicclassFooTest{privateEditIssueeditIssue;@BeforepublicvoidprepareComponents(){WebDriverdriver=newFirefoxDriver();ProjectPageproject=newProjectPage(driver,"selenium");SecuredPagesecuredPage=newSecuredPage(driver,project,"example","top secret");editIssue=newEditIssue(driver,securedPage);}@TestpublicvoiddemonstrateNestedLoadableComponents(){editIssue.get();editIssue.setSummary("Summary");editIssue.enterDescription("This is an example");}}
If you’re using a library such as Guiceberry in your tests,
the preamble of setting up the PageObjects can be omitted leading to nice, clear, readable tests.
Although PageObjects are a useful way of reducing duplication in your tests,
it’s not always a pattern that teams feel comfortable following.
An alternative approach is to follow a more “command-like” style of testing.
A “bot” is an action-oriented abstraction over the raw Selenium APIs.
This means that if you find that commands aren’t doing the Right Thing
for your app, it’s easy to change them. As an example:
publicclassActionBot{privatefinalWebDriverdriver;publicActionBot(WebDriverdriver){this.driver=driver;}publicvoidclick(Bylocator){driver.findElement(locator).click();}publicvoidsubmit(Bylocator){driver.findElement(locator).submit();}/**
* Type something into an input field. WebDriver doesn't normally clear these
* before typing, so this method does that first. It also sends a return key
* to move the focus out of the element.
*/publicvoidtype(Bylocator,Stringtext){WebElementelement=driver.findElement(locator);element.clear();element.sendKeys(text+"\n");}}
Once these abstractions have been built and duplication in your tests identified, it’s possible to layer PageObjects on top of bots.
7.2 - Overview of Test Automation
First, start by asking yourself whether or not you really need to use a browser.
Odds are that, at some point, if you are working on a complex web application,
you will need to open a browser and actually test it.
Functional end-user tests such as Selenium tests are expensive to run, however.
Furthermore, they typically require substantial infrastructure
to be in place to be run effectively.
It is a good rule to always ask yourself if what you want to test
can be done using more lightweight test approaches such as unit tests
or with a lower-level approach.
Once you have made the determination that you are in the web browser testing business,
and you have your Selenium environment ready to begin writing tests,
you will generally perform some combination of three steps:
Set up the data
Perform a discrete set of actions
Evaluate the results
You will want to keep these steps as short as possible;
one or two operations should be enough most of the time.
Browser automation has the reputation of being “flaky”,
but in reality, that is because users frequently demand too much of it.
In later chapters, we will return to techniques you can use
to mitigate apparent intermittent problems in tests,
in particular on how to overcome race conditions
between the browser and WebDriver.
By keeping your tests short
and using the web browser only when you have absolutely no alternative,
you can have many tests with minimal flake.
A distinct advantage of Selenium tests
is their inherent ability to test all components of the application,
from backend to frontend, from a user’s perspective.
So in other words, whilst functional tests may be expensive to run,
they also encompass large business-critical portions at one time.
Testing requirements
As mentioned before, Selenium tests can be expensive to run.
To what extent depends on the browser you are running the tests against,
but historically browsers’ behaviour has varied so much that it has often
been a stated goal to cross-test against multiple browsers.
Selenium allows you to run the same instructions against multiple browsers
on multiple operating systems,
but the enumeration of all the possible browsers,
their different versions, and the many operating systems they run on
will quickly become a non-trivial undertaking.
Let’s start with an example
Larry has written a web site which allows users to order their
custom unicorns.
The general workflow (what we will call the “happy path”) is something
like this:
Create an account
Configure the unicorn
Add it to the shopping cart
Check out and pay
Give feedback about the unicorn
It would be tempting to write one grand Selenium script
to perform all these operations–many will try.
Resist the temptation!
Doing so will result in a test that
a) takes a long time,
b) will be subject to some common issues around page rendering timing issues, and
c) is such that if it fails,
it will not give you a concise, “glanceable” method for diagnosing what went wrong.
The preferred strategy for testing this scenario would be
to break it down to a series of independent, speedy tests,
each of which has one “reason” to exist.
Let us pretend you want to test the second step:
Configuring your unicorn.
It will perform the following actions:
Create an account
Configure a unicorn
Note that we are skipping the rest of these steps,
we will test the rest of the workflow in other small, discrete test cases
after we are done with this one.
To start, you need to create an account.
Here you have some choices to make:
Do you want to use an existing account?
Do you want to create a new account?
Are there any special properties of such a user that need to be
taken into account before configuration begins?
Regardless of how you answer this question,
the solution is to make it part of the “set up the data” portion of the test.
If Larry has exposed an API that enables you (or anyone)
to create and update user accounts,
be sure to use that to answer this question.
If possible, you want to launch the browser only after you have a user “in hand”,
whose credentials you can just log in with.
If each test for each workflow begins with the creation of a user account,
many seconds will be added to the execution of each test.
Calling an API and talking to a database are quick,
“headless” operations that don’t require the expensive process of
opening a browser, navigating to the right pages,
clicking and waiting for the forms to be submitted, etc.
Ideally, you can address this set-up phase in one line of code,
which will execute before any browser is launched:
// Create a user who has read-only permissions--they can configure a unicorn,// but they do not have payment information set up, nor do they have// administrative privileges. At the time the user is created, its email// address and password are randomly generated--you don't even need to// know them.Useruser=UserFactory.createCommonUser();//This method is defined elsewhere.// Log in as this user.// Logging in on this site takes you to your personal "My Account" page, so the// AccountPage object is returned by the loginAs method, allowing you to then// perform actions from the AccountPage.AccountPageaccountPage=loginAs(user.getEmail(),user.getPassword());
# Create a user who has read-only permissions--they can configure a unicorn,# but they do not have payment information set up, nor do they have# administrative privileges. At the time the user is created, its email# address and password are randomly generated--you don't even need to# know them.user=user_factory.create_common_user()#This method is defined elsewhere.# Log in as this user.# Logging in on this site takes you to your personal "My Account" page, so the# AccountPage object is returned by the loginAs method, allowing you to then# perform actions from the AccountPage.account_page=login_as(user.get_email(),user.get_password())
// Create a user who has read-only permissions--they can configure a unicorn,// but they do not have payment information set up, nor do they have// administrative privileges. At the time the user is created, its email// address and password are randomly generated--you don't even need to// know them.Useruser=UserFactory.CreateCommonUser();//This method is defined elsewhere.// Log in as this user.// Logging in on this site takes you to your personal "My Account" page, so the// AccountPage object is returned by the loginAs method, allowing you to then// perform actions from the AccountPage.AccountPageaccountPage=LoginAs(user.Email,user.Password);
# Create a user who has read-only permissions--they can configure a unicorn,# but they do not have payment information set up, nor do they have# administrative privileges. At the time the user is created, its email# address and password are randomly generated--you don't even need to# know them.user=UserFactory.create_common_user#This method is defined elsewhere.# Log in as this user.# Logging in on this site takes you to your personal "My Account" page, so the# AccountPage object is returned by the loginAs method, allowing you to then# perform actions from the AccountPage.account_page=login_as(user.email,user.password)
// Create a user who has read-only permissions--they can configure a unicorn,
// but they do not have payment information set up, nor do they have
// administrative privileges. At the time the user is created, its email
// address and password are randomly generated--you don't even need to
// know them.
varuser=userFactory.createCommonUser();//This method is defined elsewhere.
// Log in as this user.
// Logging in on this site takes you to your personal "My Account" page, so the
// AccountPage object is returned by the loginAs method, allowing you to then
// perform actions from the AccountPage.
varaccountPage=loginAs(user.email,user.password);
// Create a user who has read-only permissions--they can configure a unicorn,
// but they do not have payment information set up, nor do they have
// administrative privileges. At the time the user is created, its email
// address and password are randomly generated--you don't even need to
// know them.
valuser=UserFactory.createCommonUser()//This method is defined elsewhere.
// Log in as this user.
// Logging in on this site takes you to your personal "My Account" page, so the
// AccountPage object is returned by the loginAs method, allowing you to then
// perform actions from the AccountPage.
valaccountPage=loginAs(user.getEmail(),user.getPassword())
As you can imagine, the UserFactory can be extended
to provide methods such as createAdminUser(), and createUserWithPayment().
The point is, these two lines of code do not distract you from the ultimate purpose of this test:
configuring a unicorn.
The intricacies of the Page Object model
will be discussed in later chapters, but we will introduce the concept here:
Your tests should be composed of actions,
performed from the user’s point of view,
within the context of pages in the site.
These pages are stored as objects,
which will contain specific information about how the web page is composed
and how actions are performed–
very little of which should concern you as a tester.
What kind of unicorn do you want?
You might want pink, but not necessarily.
Purple has been quite popular lately.
Does she need sunglasses? Star tattoos?
These choices, while difficult, are your primary concern as a tester–
you need to ensure that your order fulfillment center
sends out the right unicorn to the right person,
and that starts with these choices.
Notice that nowhere in that paragraph do we talk about buttons,
fields, drop-downs, radio buttons, or web forms.
Neither should your tests!
You want to write your code like the user trying to solve their problem.
Here is one way of doing this (continuing from the previous example):
// The Unicorn is a top-level Object--it has attributes, which are set here. // This only stores the values; it does not fill out any web forms or interact// with the browser in any way.Unicornsparkles=newUnicorn("Sparkles",UnicornColors.PURPLE,UnicornAccessories.SUNGLASSES,UnicornAdornments.STAR_TATTOOS);// Since we are already "on" the account page, we have to use it to get to the// actual place where you configure unicorns. Calling the "Add Unicorn" method// takes us there.AddUnicornPageaddUnicornPage=accountPage.addUnicorn();// Now that we're on the AddUnicornPage, we will pass the "sparkles" object to// its createUnicorn() method. This method will take Sparkles' attributes,// fill out the form, and click submit.UnicornConfirmationPageunicornConfirmationPage=addUnicornPage.createUnicorn(sparkles);
# The Unicorn is a top-level Object--it has attributes, which are set here.# This only stores the values; it does not fill out any web forms or interact# with the browser in any way.sparkles=Unicorn("Sparkles",UnicornColors.PURPLE,UnicornAccessories.SUNGLASSES,UnicornAdornments.STAR_TATTOOS)# Since we're already "on" the account page, we have to use it to get to the# actual place where you configure unicorns. Calling the "Add Unicorn" method# takes us there.add_unicorn_page=account_page.add_unicorn()# Now that we're on the AddUnicornPage, we will pass the "sparkles" object to# its createUnicorn() method. This method will take Sparkles' attributes,# fill out the form, and click submit.unicorn_confirmation_page=add_unicorn_page.create_unicorn(sparkles)
// The Unicorn is a top-level Object--it has attributes, which are set here. // This only stores the values; it does not fill out any web forms or interact// with the browser in any way.Unicornsparkles=newUnicorn("Sparkles",UnicornColors.Purple,UnicornAccessories.Sunglasses,UnicornAdornments.StarTattoos);// Since we are already "on" the account page, we have to use it to get to the// actual place where you configure unicorns. Calling the "Add Unicorn" method// takes us there.AddUnicornPageaddUnicornPage=accountPage.AddUnicorn();// Now that we're on the AddUnicornPage, we will pass the "sparkles" object to// its createUnicorn() method. This method will take Sparkles' attributes,// fill out the form, and click submit.UnicornConfirmationPageunicornConfirmationPage=addUnicornPage.CreateUnicorn(sparkles);
# The Unicorn is a top-level Object--it has attributes, which are set here.# This only stores the values; it does not fill out any web forms or interact# with the browser in any way.sparkles=Unicorn.new('Sparkles',UnicornColors.PURPLE,UnicornAccessories.SUNGLASSES,UnicornAdornments.STAR_TATTOOS)# Since we're already "on" the account page, we have to use it to get to the# actual place where you configure unicorns. Calling the "Add Unicorn" method# takes us there.add_unicorn_page=account_page.add_unicorn# Now that we're on the AddUnicornPage, we will pass the "sparkles" object to# its createUnicorn() method. This method will take Sparkles' attributes,# fill out the form, and click submit.unicorn_confirmation_page=add_unicorn_page.create_unicorn(sparkles)
// The Unicorn is a top-level Object--it has attributes, which are set here.
// This only stores the values; it does not fill out any web forms or interact
// with the browser in any way.
varsparkles=newUnicorn("Sparkles",UnicornColors.PURPLE,UnicornAccessories.SUNGLASSES,UnicornAdornments.STAR_TATTOOS);// Since we are already "on" the account page, we have to use it to get to the
// actual place where you configure unicorns. Calling the "Add Unicorn" method
// takes us there.
varaddUnicornPage=accountPage.addUnicorn();// Now that we're on the AddUnicornPage, we will pass the "sparkles" object to
// its createUnicorn() method. This method will take Sparkles' attributes,
// fill out the form, and click submit.
varunicornConfirmationPage=addUnicornPage.createUnicorn(sparkles);
// The Unicorn is a top-level Object--it has attributes, which are set here.
// This only stores the values; it does not fill out any web forms or interact
// with the browser in any way.
valsparkles=Unicorn("Sparkles",UnicornColors.PURPLE,UnicornAccessories.SUNGLASSES,UnicornAdornments.STAR_TATTOOS)// Since we are already "on" the account page, we have to use it to get to the
// actual place where you configure unicorns. Calling the "Add Unicorn" method
// takes us there.
valaddUnicornPage=accountPage.addUnicorn()// Now that we're on the AddUnicornPage, we will pass the "sparkles" object to
// its createUnicorn() method. This method will take Sparkles' attributes,
// fill out the form, and click submit.
unicornConfirmationPage=addUnicornPage.createUnicorn(sparkles)
Now that you have configured your unicorn,
you need to move on to step 3: making sure it actually worked.
// The exists() method from UnicornConfirmationPage will take the Sparkles // object--a specification of the attributes you want to see, and compare// them with the fields on the page.Assert.assertTrue("Sparkles should have been created, with all attributes intact",unicornConfirmationPage.exists(sparkles));
# The exists() method from UnicornConfirmationPage will take the Sparkles# object--a specification of the attributes you want to see, and compare# them with the fields on the page.assertunicorn_confirmation_page.exists(sparkles),"Sparkles should have been created, with all attributes intact"
// The exists() method from UnicornConfirmationPage will take the Sparkles // object--a specification of the attributes you want to see, and compare// them with the fields on the page.Assert.True(unicornConfirmationPage.Exists(sparkles),"Sparkles should have been created, with all attributes intact");
# The exists() method from UnicornConfirmationPage will take the Sparkles# object--a specification of the attributes you want to see, and compare# them with the fields on the page.expect(unicorn_confirmation_page.exists?(sparkles)).tobe,'Sparkles should have been created, with all attributes intact'
// The exists() method from UnicornConfirmationPage will take the Sparkles
// object--a specification of the attributes you want to see, and compare
// them with the fields on the page.
assert(unicornConfirmationPage.exists(sparkles),"Sparkles should have been created, with all attributes intact");
// The exists() method from UnicornConfirmationPage will take the Sparkles
// object--a specification of the attributes you want to see, and compare
// them with the fields on the page.
assertTrue("Sparkles should have been created, with all attributes intact",unicornConfirmationPage.exists(sparkles))
Note that the tester still has not done anything but talk about unicorns in this code–
no buttons, no locators, no browser controls.
This method of modelling the application
allows you to keep these test-level commands in place and unchanging,
even if Larry decides next week that he no longer likes Ruby-on-Rails
and decides to re-implement the entire site
in the latest Haskell bindings with a Fortran front-end.
Your page objects will require some small maintenance in order to
conform to the site redesign,
but these tests will remain the same.
Taking this basic design,
you will want to keep going through your workflows with the fewest browser-facing steps possible.
Your next workflow will involve adding a unicorn to the shopping cart.
You will probably want many iterations of this test in order to make sure the cart is keeping its state properly:
Is there more than one unicorn in the cart before you start?
How many can fit in the shopping cart?
If you create more than one with the same name and/or features, will it break?
Will it only keep the existing one or will it add another?
Each time you move through the workflow,
you want to try to avoid having to create an account,
login as the user, and configure the unicorn.
Ideally, you will be able to create an account
and pre-configure a unicorn via the API or database.
Then all you have to do is log in as the user, locate Sparkles,
and add her to the cart.
To automate or not to automate?
Is automation always advantageous? When should one decide to automate test
cases?
It is not always advantageous to automate test cases. There are times when
manual testing may be more appropriate. For instance, if the application’s user
interface will change considerably in the near future, then any automation
might need to be rewritten anyway. Also, sometimes there simply is not enough
time to build test automation. For the short term, manual testing may be more
effective. If an application has a very tight deadline, there is currently no
test automation available, and it’s imperative that the testing gets done within
that time frame, then manual testing is the best solution.
7.3 - Types of Testing
Acceptance testing
This type of testing is done to determine if a feature or system
meets the customer expectations and requirements.
This type of testing generally involves the customer’s
cooperation or feedback, being a validation activity that
answers the question:
Are we building the right product?
For web applications, the automation of this testing can be done
directly with Selenium by simulating user expected behaviour.
This simulation could be done by record/playback or through the
different supported languages as explained in this documentation.
Note: Acceptance testing is a subtype of functional testing,
which some people might also refer to.
Functional testing
This type of testing is done to determine if a
feature or system functions properly without issues. It checks
the system at different levels to ensure that all scenarios
are covered and that the system does what it’s
supposed to do. It’s a verification activity that
answers the question:
Are we building the product right?
This generally includes: the tests work without errors
(404, exceptions…), in a usable way (correct redirections), in an accessible way and matching its specifications
(see acceptance testing above).
For web applications, the automation of this testing can be
done directly with Selenium by simulating expected returns. This simulation could be done by record/playback or through
the different supported languages as explained in this documentation.
Integration Tests
Integration tests verify the interactions between different components or modules of a system. Several modules are together tested. The purpose of Integration tests is to make sure that all modules integrate and work together as expected. Automated integration tests help ensure that these interactions work as expected and that integrated components function properly together.
For example, Testing the flow of placing the order for an item in an ecommerce website along with payment.
System Tests
System Testing is a complete fully integrated product Testing. It is an end-to-end testing where in testing environment is similar to the production environment. Here, we navigate through all the features of the software and test if the end business / end feature works. We just test the end feature and don’t check for data flow or do functional testing and all.
For example, Testing the end to end flow from login to placing an order and rechecking the order in My Orders page and logoff from an ecommerce website.
Performance testing
As its name indicates, performance tests are done
to measure how well an application is performing.
There are two main sub-types for performance testing:
Load testing
Load testing is done to verify how well the
application works under different defined loads
(usually a particular number of users connected at once).
Stress testing
Stress testing is done to verify how well the
application works under stress (or above the maximum supported load).
Generally, performance tests are done by executing some
Selenium written tests simulating different users
hitting a particular function on the web app and
retrieving some meaningful measurements.
This is generally done by other tools that retrieve the metrics.
One such tool is JMeter.
For a web application, details to measure include
throughput, latency, data loss, individual component loading times, etc.
Note 1: All browsers have a performance tab in their
developers’ tools section (accessible by pressing F12)
Note 2: is a subtype of non-functional testing
as this is generally measured per system and not per function/feature.
Regression testing
This testing is generally done after a change, fix or feature addition.
To ensure that the change has not broken any of the existing
functionality, some already executed tests are executed again.
The set of re-executed tests can be full or partial
and can include several different types, depending
on the application and development team.
Test driven development (TDD)
Rather than a test type per se, TDD is an iterative
development methodology in which tests drive the design of a feature.
Each cycle starts by creating a set of unit tests that
the feature should eventually pass (they should fail their first time executed).
After this, development takes place to make the tests pass.
The tests are executed again, starting another cycle
and this process continues until all tests are passing.
This aims to speed up the development of an application
based on the fact that defects are less costly the earlier they are found.
Behavior-driven development (BDD)
BDD is also an iterative development methodology
based on the above TDD, in which the goal is to involve
all the parties in the development of an application.
Each cycle starts by creating some specifications
(which should fail). Then create the failing unit
tests (which should also fail) and then do the development.
This cycle is repeated until all types of tests are passing.
In order to do so, a specification language is
used. It should be understandable by all parties and
simple, standard and explicit.
Most tools use Gherkin as this language.
The goal is to be able to detect even more errors
than TDD, by targeting potential acceptance errors
too and make communication between parties smoother.
A set of tools are currently available
to write the specifications and match them with code functions,
such as Cucumber or SpecFlow.
A set of tools are built on top of Selenium to make this process
even faster by directly transforming the BDD specifications into
executable code.
Some of these are JBehave, Capybara and Robot Framework.
7.4 - Encouraged behaviors
Some guidelines and recommendations on testing from the Selenium project.
A note on “Best Practices”: We’ve intentionally avoided the phrase “Best
Practices” in this documentation. No one approach works for all situations.
We prefer the idea of “Guidelines and Recommendations”. We encourage
you to read through these and thoughtfully decide what approaches
will work for you in your particular environment.
Functional testing is difficult to get right for many reasons.
As if application state, complexity, and dependencies do not make testing difficult enough,
dealing with browsers (especially with cross-browser incompatibilities)
makes writing good tests a challenge.
Selenium provides tools to make functional user interaction easier,
but does not help you write well-architected test suites.
In this chapter we offer advice, guidelines, and recommendations
on how to approach functional web page automation.
This chapter records software design patterns popular
amongst many of the users of Selenium
that have proven successful over the years.
7.4.1 - Page object models
Note: this page has merged contents from multiple sources, including
the Selenium wiki
Overview
Within your web app’s UI, there are areas where your tests interact with.
A Page Object only models these as objects within the test code.
This reduces the amount of duplicated code and means that if the UI changes,
the fix needs only to be applied in one place.
Page Object is a Design Pattern that has become popular in test automation for
enhancing test maintenance and reducing code duplication. A page object is an
object-oriented class that serves as an interface to a page of your AUT. The
tests then use the methods of this page object class whenever they need to
interact with the UI of that page. The benefit is that if the UI changes for
the page, the tests themselves don’t need to change, only the code within the
page object needs to change. Subsequently, all changes to support that new UI
are located in one place.
Advantages
There is a clean separation between the test code and page-specific code, such as
locators (or their use if you’re using a UI Map) and layout.
There is a single repository for the services or operations the page offers
rather than having these services scattered throughout the tests.
In both cases, this allows any modifications required due to UI changes to all
be made in one place. Helpful information on this technique can be found on
numerous blogs as this ‘test design pattern’ is becoming widely used. We
encourage readers who wish to know more to search the internet for blogs
on this subject. Many have written on this design pattern and can provide
helpful tips beyond the scope of this user guide. To get you started,
we’ll illustrate page objects with a simple example.
Examples
First, consider an example, typical of test automation, that does not use a
page object:
/***
* Tests login feature
*/publicclassLogin{publicvoidtestLogin(){// fill login data on sign-in pagedriver.findElement(By.name("user_name")).sendKeys("userName");driver.findElement(By.name("password")).sendKeys("my supersecret password");driver.findElement(By.name("sign-in")).click();// verify h1 tag is "Hello userName" after logindriver.findElement(By.tagName("h1")).isDisplayed();assertThat(driver.findElement(By.tagName("h1")).getText(),is("Hello userName"));}}
There are two problems with this approach.
There is no separation between the test method and the AUT’s locators (IDs in
this example); both are intertwined in a single method. If the AUT’s UI changes
its identifiers, layout, or how a login is input and processed, the test itself
must change.
The ID-locators would be spread in multiple tests, in all tests that had to
use this login page.
Applying the page object techniques, this example could be rewritten like this
in the following example of a page object for a Sign-in page.
importorg.openqa.selenium.By;importorg.openqa.selenium.WebDriver;/**
* Page Object encapsulates the Sign-in page.
*/publicclassSignInPage{protectedWebDriverdriver;// <input name="user_name" type="text" value="">privateByusernameBy=By.name("user_name");// <input name="password" type="password" value="">privateBypasswordBy=By.name("password");// <input name="sign_in" type="submit" value="SignIn">privateBysigninBy=By.name("sign_in");publicSignInPage(WebDriverdriver){this.driver=driver;if(!driver.getTitle().equals("Sign In Page")){thrownewIllegalStateException("This is not Sign In Page,"+" current page is: "+driver.getCurrentUrl());}}/**
* Login as valid user
*
* @param userName
* @param password
* @return HomePage object
*/publicHomePageloginValidUser(StringuserName,Stringpassword){driver.findElement(usernameBy).sendKeys(userName);driver.findElement(passwordBy).sendKeys(password);driver.findElement(signinBy).click();returnnewHomePage(driver);}}
and page object for a Home page could look like this.
importorg.openqa.selenium.By;importorg.openqa.selenium.WebDriver;/**
* Page Object encapsulates the Home Page
*/publicclassHomePage{protectedWebDriverdriver;// <h1>Hello userName</h1>privateBymessageBy=By.tagName("h1");publicHomePage(WebDriverdriver){this.driver=driver;if(!driver.getTitle().equals("Home Page of logged in user")){thrownewIllegalStateException("This is not Home Page of logged in user,"+" current page is: "+driver.getCurrentUrl());}}/**
* Get message (h1 tag)
*
* @return String message text
*/publicStringgetMessageText(){returndriver.findElement(messageBy).getText();}publicHomePagemanageProfile(){// Page encapsulation to manage profile functionalityreturnnewHomePage(driver);}/* More methods offering the services represented by Home Page
of Logged User. These methods in turn might return more Page Objects
for example click on Compose mail button could return ComposeMail class object */}
So now, the login test would use these two page objects as follows.
There is a lot of flexibility in how the page objects may be designed, but
there are a few basic rules for getting the desired maintainability of your
test code.
Assertions in Page Objects
Page objects themselves should never make verifications or assertions. This is
part of your test and should always be within the test’s code, never in a page
object. The page object will contain the representation of the page, and the
services the page provides via methods but no code related to what is being
tested should be within the page object.
There is one, single, verification which can, and should, be within the page
object and that is to verify that the page, and possibly critical elements on
the page, were loaded correctly. This verification should be done while
instantiating the page object. In the examples above, both the SignInPage and
HomePage constructors check that the expected page is available and ready for
requests from the test.
Page Component Objects
A page object does not necessarily need to represent all the parts of a
page itself. This was noted by Martin Fowler in the early days, while first coining the term “panel objects”.
The same principles used for page objects can be used to
create “Page Component Objects”, as it was later called, that represent discrete chunks of the
page and can be included in page objects. These component objects can
provide references to the elements inside those discrete chunks, and
methods to leverage the functionality or behavior provided by them.
For example, a Products page has multiple products.
<!-- Inventory Item --><divclass="inventory_item"><divclass="inventory_item_name">Backpack</div><divclass="pricebar"><divclass="inventory_item_price">$29.99</div><buttonid="add-to-cart-backpack">Add to cart</button></div></div>
The Products page HAS-A list of products. This object relationship is called Composition. In simpler terms, something is composed of another thing.
publicabstractclassBasePage{protectedWebDriverdriver;publicBasePage(WebDriverdriver){this.driver=driver;}}// Page ObjectpublicclassProductsPageextendsBasePage{publicProductsPage(WebDriverdriver){super(driver);// No assertions, throws an exception if the element is not loadednewWebDriverWait(driver,Duration.ofSeconds(3)).until(d->d.findElement(By.className("header_container")));}// Returning a list of products is a service of the pagepublicList<Product>getProducts(){returndriver.findElements(By.className("inventory_item")).stream().map(e->newProduct(e))// Map WebElement to a product component.toList();}// Return a specific product using a boolean-valued function (predicate)// This is the behavioral Strategy Pattern from GoFpublicProductgetProduct(Predicate<Product>condition){returngetProducts().stream().filter(condition)// Filter by product name or price.findFirst().orElseThrow();}}
The Product component object is used inside the Products page object.
publicabstractclassBaseComponent{protectedWebElementroot;publicBaseComponent(WebElementroot){this.root=root;}}// Page Component ObjectpublicclassProductextendsBaseComponent{// The root element contains the entire componentpublicProduct(WebElementroot){super(root);// inventory_item}publicStringgetName(){// Locating an element begins at the root of the componentreturnroot.findElement(By.className("inventory_item_name")).getText();}publicBigDecimalgetPrice(){returnnewBigDecimal(root.findElement(By.className("inventory_item_price")).getText().replace("$","")).setScale(2,RoundingMode.UNNECESSARY);// Sanitation and formatting}publicvoidaddToCart(){root.findElement(By.id("add-to-cart-backpack")).click();}}
So now, the products test would use the page object and the page component object as follows.
publicclassProductsTest{@TestpublicvoidtestProductInventory(){varproductsPage=newProductsPage(driver);// page objectvarproducts=productsPage.getProducts();assertEquals(6,products.size());// expected, actual}@TestpublicvoidtestProductPrices(){varproductsPage=newProductsPage(driver);// Pass a lambda expression (predicate) to filter the list of products// The predicate or "strategy" is the behavior passed as parametervarbackpack=productsPage.getProduct(p->p.getName().equals("Backpack"));// page component objectvarbikeLight=productsPage.getProduct(p->p.getName().equals("Bike Light"));assertEquals(newBigDecimal("29.99"),backpack.getPrice());assertEquals(newBigDecimal("9.99"),bikeLight.getPrice());}}
The page and component are represented by their own objects. Both objects only have methods for the services they offer, which matches the real-world application in object-oriented programming.
You can even
nest component objects inside other component objects for more complex
pages. If a page in the AUT has multiple components, or common
components used throughout the site (e.g. a navigation bar), then it
may improve maintainability and reduce code duplication.
Other Design Patterns Used in Testing
There are other design patterns that also may be used in testing. Discussing all of these is
beyond the scope of this user guide. Here, we merely want to introduce the
concepts to make the reader aware of some of the things that can be done. As
was mentioned earlier, many have blogged on this topic and we encourage the
reader to search for blogs on these topics.
Implementation Notes
PageObjects can be thought of as facing in two directions simultaneously. Facing toward the developer of a test, they represent the services offered by a particular page. Facing away from the developer, they should be the only thing that has a deep knowledge of the structure of the HTML of a page (or part of a page) It’s simplest to think of the methods on a Page Object as offering the “services” that a page offers rather than exposing the details and mechanics of the page. As an example, think of the inbox of any web-based email system. Amongst the services it offers are the ability to compose a new email, choose to read a single email, and list the subject lines of the emails in the inbox. How these are implemented shouldn’t matter to the test.
Because we’re encouraging the developer of a test to try and think about the services they’re interacting with rather than the implementation, PageObjects should seldom expose the underlying WebDriver instance. To facilitate this, methods on the PageObject should return other PageObjects. This means we can effectively model the user’s journey through our application. It also means that should the way that pages relate to one another change (like when the login page asks the user to change their password the first time they log into a service when it previously didn’t do that), simply changing the appropriate method’s signature will cause the tests to fail to compile. Put another way; we can tell which tests would fail without needing to run them when we change the relationship between pages and reflect this in the PageObjects.
One consequence of this approach is that it may be necessary to model (for example) both a successful and unsuccessful login; or a click could have a different result depending on the app’s state. When this happens, it is common to have multiple methods on the PageObject:
publicclassLoginPage{publicHomePageloginAs(Stringusername,Stringpassword){// ... clever magic happens here}publicLoginPageloginAsExpectingError(Stringusername,Stringpassword){// ... failed login here, maybe because one or both of the username and password are wrong}publicStringgetErrorMessage(){// So we can verify that the correct error is shown}}
The code presented above shows an important point: the tests, not the PageObjects, should be responsible for making assertions about the state of a page. For example:
publicvoidtestMessagesAreReadOrUnread(){Inboxinbox=newInbox(driver);inbox.assertMessageWithSubjectIsUnread("I like cheese");inbox.assertMessageWithSubjectIsNotUnread("I'm not fond of tofu");}
could be re-written as:
publicvoidtestMessagesAreReadOrUnread(){Inboxinbox=newInbox(driver);assertTrue(inbox.isMessageWithSubjectIsUnread("I like cheese"));assertFalse(inbox.isMessageWithSubjectIsUnread("I'm not fond of tofu"));}
Of course, as with every guideline, there are exceptions, and one that is commonly seen with PageObjects is to check that the WebDriver is on the correct page when we instantiate the PageObject. This is done in the example below.
Finally, a PageObject need not represent an entire page. It may represent a section that appears frequently within a site or page, such as site navigation. The essential principle is that there is only one place in your test suite with knowledge of the structure of the HTML of a particular (part of a) page.
Summary
The public methods represent the services that the page offers
Try not to expose the internals of the page
Generally don’t make assertions
Methods return other PageObjects
Need not represent an entire page
Different results for the same action are modelled as different methods
Example
publicclassLoginPage{privatefinalWebDriverdriver;publicLoginPage(WebDriverdriver){this.driver=driver;// Check that we're on the right page.if(!"Login".equals(driver.getTitle())){// Alternatively, we could navigate to the login page, perhaps logging out firstthrownewIllegalStateException("This is not the login page");}}// The login page contains several HTML elements that will be represented as WebElements.// The locators for these elements should only be defined once.ByusernameLocator=By.id("username");BypasswordLocator=By.id("passwd");ByloginButtonLocator=By.id("login");// The login page allows the user to type their username into the username fieldpublicLoginPagetypeUsername(Stringusername){// This is the only place that "knows" how to enter a usernamedriver.findElement(usernameLocator).sendKeys(username);// Return the current page object as this action doesn't navigate to a page represented by another PageObjectreturnthis;}// The login page allows the user to type their password into the password fieldpublicLoginPagetypePassword(Stringpassword){// This is the only place that "knows" how to enter a passworddriver.findElement(passwordLocator).sendKeys(password);// Return the current page object as this action doesn't navigate to a page represented by another PageObjectreturnthis;}// The login page allows the user to submit the login formpublicHomePagesubmitLogin(){// This is the only place that submits the login form and expects the destination to be the home page.// A seperate method should be created for the instance of clicking login whilst expecting a login failure. driver.findElement(loginButtonLocator).submit();// Return a new page object representing the destination. Should the login page ever// go somewhere else (for example, a legal disclaimer) then changing the method signature// for this method will mean that all tests that rely on this behaviour won't compile.returnnewHomePage(driver);}// The login page allows the user to submit the login form knowing that an invalid username and / or password were enteredpublicLoginPagesubmitLoginExpectingFailure(){// This is the only place that submits the login form and expects the destination to be the login page due to login failure.driver.findElement(loginButtonLocator).submit();// Return a new page object representing the destination. Should the user ever be navigated to the home page after submiting a login with credentials // expected to fail login, the script will fail when it attempts to instantiate the LoginPage PageObject.returnnewLoginPage(driver);}// Conceptually, the login page offers the user the service of being able to "log into"// the application using a user name and password. publicHomePageloginAs(Stringusername,Stringpassword){// The PageObject methods that enter username, password & submit login have already defined and should not be repeated here.typeUsername(username);typePassword(password);returnsubmitLogin();}}
7.4.2 - Domain specific language
A domain specific language (DSL) is a system which provides the user with
an expressive means of solving a problem. It allows a user to
interact with the system on their terms – not just programmer-speak.
Your users, in general, do not care how your site looks. They do not
care about the decoration, animations, or graphics. They
want to use your system to push their new employees through the
process with minimal difficulty; they want to book travel to Alaska;
they want to configure and buy unicorns at a discount. Your job as
tester is to come as close as you can to “capturing” this mind-set.
With that in mind, we set about “modeling” the application you are
working on, such that the test scripts (the user’s only pre-release
proxy) “speak” for, and represent the user.
The goal is to use ubiquitous language. Rather than referring to “load data into this table” or
“click on the third column” it should be possible to use language such as “create a new account” or
“order displayed results by name”
With Selenium, DSL is usually represented by methods, written to make
the API simple and readable – they enable a report between the
developers and the stakeholders (users, product owners, business
intelligence specialists, etc.).
Benefits
Readable: Business stakeholders can understand it.
Writable: Easy to write, avoids unnecessary duplication.
Extensible: Functionality can (reasonably) be added
without breaking contracts and existing functionality.
Maintainable: By leaving the implementation details out of test
cases, you are well-insulated against changes to the AUT*.
Here is an example of a reasonable DSL method in Java.
For brevity’s sake, it assumes the driver object is pre-defined
and available to the method.
/**
* Takes a username and password, fills out the fields, and clicks "login".
* @return An instance of the AccountPage
*/publicAccountPageloginAsUser(Stringusername,Stringpassword){WebElementloginField=driver.findElement(By.id("loginField"));loginField.clear();loginField.sendKeys(username);// Fill out the password field. The locator we're using is "By.id", and we should// have it defined elsewhere in the class.WebElementpasswordField=driver.findElement(By.id("password"));passwordField.clear();passwordField.sendKeys(password);// Click the login button, which happens to have the id "submit".driver.findElement(By.id("submit")).click();// Create and return a new instance of the AccountPage (via the built-in Selenium// PageFactory).returnPageFactory.newInstance(AccountPage.class);}
This method completely abstracts the concepts of input fields,
buttons, clicking, and even pages from your test code. Using this
approach, all a tester has to do is call this method. This gives
you a maintenance advantage: if the login fields ever changed, you
would only ever have to change this method - not your tests.
publicvoidloginTest(){loginAsUser("cbrown","cl0wn3");// Now that we're logged in, do some other stuff--since we used a DSL to support// our testers, it's as easy as choosing from available methods.do.something();do.somethingElse();Assert.assertTrue("Something should have been done!",something.wasDone());// Note that we still haven't referred to a button or web control anywhere in this// script...}
It bears repeating: one of your primary goals should be writing an
API that allows your tests to address the problem at hand, and NOT
the problem of the UI. The UI is a secondary concern for your
users – they do not care about the UI, they just want to get their job
done. Your test scripts should read like a laundry list of things
the user wants to DO, and the things they want to KNOW. The tests
should not concern themselves with HOW the UI requires you to go
about it.
*AUT: Application under test
7.4.3 - Generating application state
Selenium should not be used to prepare a test case. All repetitive
actions and preparations for a test case, should be done through other
methods. For example, most web UIs have authentication (e.g. a login
form). Eliminating logging in via web browser before every test will
improve both the speed and stability of the test. A method should be
created to gain access to the AUT* (e.g. using an API to login and set a
cookie). Also, creating methods to pre-load data for
testing should not be done using Selenium. As mentioned previously,
existing APIs should be leveraged to create data for the AUT*.
*AUT: Application under test
7.4.4 - Mock external services
Eliminating the dependencies on external services will greatly improve
the speed and stability of your tests.
7.4.5 - Improved reporting
Selenium is not designed to report on the status of test cases
run. Taking advantage of the built-in reporting capabilities of unit
test frameworks is a good start. Most unit test frameworks have
reports that can generate xUnit or HTML formatted reports. xUnit
reports are popular for importing results to a Continuous Integration
(CI) server like Jenkins, Travis, Bamboo, etc. Here are some links
for more information regarding report outputs for several languages.
Although mentioned in several places, it is worth mentioning again.
We must ensure that the tests are isolated from one another.
Do not share test data. Imagine several tests that each query the database
for valid orders before picking one to perform an action on. Should two tests
pick up the same order you are likely to get unexpected behavior.
Clean up stale data in the application that might be picked up by another
test e.g. invalid order records.
Create a new WebDriver instance per test. This helps ensure test isolation
and makes parallelization simpler.
7.4.7 - Tips on working with locators
When to use which locators and how best to manage them in your code.
In general, if HTML IDs are available, unique, and consistently
predictable, they are the preferred method for locating an element on
a page. They tend to work very quickly, and forego much processing
that comes with complicated DOM traversals.
If unique IDs are unavailable, a well-written CSS selector is the
preferred method of locating an element. XPath works as well as CSS
selectors, but the syntax is complicated and frequently difficult to
debug. Though XPath selectors are very flexible, they are typically
not performance tested by browser vendors and tend to be quite slow.
Selection strategies based on linkText and partialLinkText have
drawbacks in that they only work on link elements. Additionally, they
call down to querySelectorAll selectors internally in WebDriver.
Tag name can be a dangerous way to locate elements. There are
frequently multiple elements of the same tag present on the page.
This is mostly useful when calling the findElements(By) method which
returns a collection of elements.
The recommendation is to keep your locators as compact and
readable as possible. Asking WebDriver to traverse the DOM structure
is an expensive operation, and the more you can narrow the scope of
your search, the better.
7.4.8 - Test independency
Write each test as its own unit. Write the tests in a way that will not be
reliant on other tests to complete:
Let us say there is a content management system with which you can create
some custom content which then appears on your website as a module after
publishing, and it may take some time to sync between the CMS and the
application.
A wrong way of testing your module is that the content is created and
published in one test, and then checking the module in another test. This
is not feasible as the content may not be available immediately for the
other test after publishing.
Instead, you can create a stub content which can be turned on and off
within the affected test, and use that for validating the module. However,
for content creation, you can still have a separate test.
7.4.9 - Consider using a fluent API
Martin Fowler coined the term “Fluent API”. Selenium already
implements something like this in their FluentWait class, which is
meant as an alternative to the standard Wait class.
You could enable the Fluent API design pattern in your page object
and then query the Google search page with a code snippet like this one:
The Google page object class with this fluent behavior
might look like this:
publicabstractclassBasePage{protectedWebDriverdriver;publicBasePage(WebDriverdriver){this.driver=driver;}}publicclassGoogleSearchPageextendsBasePage{publicGoogleSearchPage(WebDriverdriver){super(driver);// Generally do not assert within pages or components.// Effectively throws an exception if the lambda condition is not met.newWebDriverWait(driver,Duration.ofSeconds(3)).until(d->d.findElement(By.id("logo")));}publicGoogleSearchPagesetSearchString(Stringsstr){driver.findElement(By.id("gbqfq")).sendKeys(sstr);returnthis;}publicvoidclickSearchButton(){driver.findElement(By.id("gbqfb")).click();}}
7.4.10 - Fresh browser per test
Start each test from a clean, known state.
Ideally, spin up a new virtual machine for each test.
If spinning up a new virtual machine is not practical,
at least start a new WebDriver for each test.
Most browser drivers like GeckoDriver and ChromeDriver will start with a clean
known state with a new user profile, by default.
WebDriverdriver=newFirefoxDriver();
7.5 - Discouraged behaviors
Things to avoid when automating browsers with Selenium.
7.5.1 - Captchas
CAPTCHA, short for Completely Automated Public Turing test
to tell Computers and Humans Apart,
is explicitly designed to prevent automation, so do not try!
There are two primary strategies to get around CAPTCHA checks:
Disable CAPTCHAs in your test environment
Add a hook to allow tests to bypass the CAPTCHA
7.5.2 - File downloads
Whilst it is possible to start a download
by clicking a link with a browser under Selenium’s control,
the API does not expose download progress,
making it less than ideal for testing downloaded files.
This is because downloading files is not considered an important aspect
of emulating user interaction with the web platform.
Instead, find the link using Selenium
(and any required cookies)
and pass it to a HTTP request library like
libcurl.
The HtmlUnit driver can download attachments
by accessing them as input streams by implementing the
AttachmentHandler
interface. The AttachmentHandler can then be added to the HtmlUnit WebClient.
7.5.3 - HTTP response codes
For some browser configurations in Selenium RC,
Selenium acted as a proxy between the browser
and the site being automated.
This meant that all browser traffic passed through Selenium
could be captured or manipulated.
The captureNetworkTraffic() method
purported to capture all of the network traffic between the browser
and the site being automated,
including HTTP response codes.
Selenium WebDriver is a completely different approach
to browser automation,
preferring to act more like a user.
This is represented in the way you write tests with WebDriver.
In automated functional testing,
checking the status code
is not a particularly important detail of a test’s failure;
the steps that preceded it are more important.
The browser will always represent the HTTP status code,
imagine for example a 404 or a 500 error page.
A simple way to “fail fast” when you encounter one of these error pages
is to check the page title or content of a reliable point
(e.g. the <h1> tag) after every page load.
If you are using the page object model,
you can include this check in your class constructor
or similar point where the page load is expected.
Occasionally, the HTTP code may even be represented
in the browser’s error page
and you could use WebDriver to read this
and improve your debugging output.
Checking the webpage itself is in line
with WebDriver’s ideal practice
of representing and asserting upon the user’s view of the website.
If you insist, an advanced solution to capturing HTTP status codes
is to replicate the behaviour of Selenium RC by using a proxy.
WebDriver API provides the ability to set a proxy for the browser,
and there are a number of proxies that will
programmatically allow you to manipulate
the contents of requests sent to and received from the web server.
Using a proxy lets you decide how you want to respond
to redirection response codes.
Additionally, not every browser
makes the response codes available to WebDriver,
so opting to use a proxy
allows you to have a solution that works for every browser.
7.5.4 - Gmail, email and Facebook logins
For multiple reasons, logging into sites like Gmail and Facebook
using WebDriver is not recommended.
Aside from being against the usage terms for these sites
(where you risk having the account shut down),
it is slow and unreliable.
The ideal practice is to use the APIs that email providers offer,
or in the case of Facebook the developer tools service
which exposes an API for creating test accounts, friends and so forth.
Although using an API might seem like a bit of extra hard work,
you will be paid back in speed, reliability, and stability.
The API is also unlikely to change,
whereas webpages and HTML locators change often
and require you to update your test framework.
Logging in to third party sites using WebDriver
at any point of your test increases the risk
of your test failing because it makes your test longer.
A general rule of thumb is that longer tests
are more fragile and unreliable.
WebDriver implementations that are
W3C conformant
also annotate the navigator object
with a WebDriver property
so that Denial of Service attacks can be mitigated.
7.5.5 - Test dependency
A common idea and misconception about automated testing is regarding a
specific test order. Your tests should be able to run in any order,
and not rely on other tests to complete in order to be successful.
7.5.6 - Performance testing
Performance testing using Selenium and WebDriver
is generally not advised.
Not because it is incapable,
but because it is not optimised for the job
and you are unlikely to get good results.
It may seem ideal to performance test
in the context of the user but a suite of WebDriver tests
are subjected to many points of external and internal fragility
which are beyond your control;
for example browser startup speed,
speed of HTTP servers,
response of third party servers that host JavaScript or CSS,
and the instrumentation penalty
of the WebDriver implementation itself.
Variation at these points will cause variation in your results.
It is difficult to separate the difference
between the performance of your website
and the performance of external resources,
and it is also hard to tell what the performance penalty is
for using WebDriver in the browser,
especially if you are injecting scripts.
The other potential attraction is “saving time” —
carrying out functional and performance tests at the same time.
However, functional and performance tests have opposing objectives.
To test functionality, a tester may need to be patient
and wait for loading,
but this will cloud the performance testing results and vice versa.
To improve the performance of your website,
you will need to be able to analyse overall performance
independent of environment differences,
identify poor code practices,
breakdown of performance of individual resources
(i.e. CSS or JavaScript),
in order to know what to improve.
There are performance testing tools available
that can do this job already,
that provide reporting and analysis,
and can even make improvement suggestions.
Using WebDriver to spider through links
is not a recommended practice. Not because it cannot be done,
but because WebDriver is definitely not the most ideal tool for this.
WebDriver needs time to start up,
and can take several seconds, up to a minute
depending on how your test is written,
just to get to the page and traverse through the DOM.
Instead of using WebDriver for this,
you could save a ton of time
by executing a curl command,
or using a library such as BeautifulSoup
since these methods do not rely
on creating a browser and navigating to a page.
You are saving tonnes of time by not using WebDriver for this task.
7.5.8 - Two Factor Authentication
Two Factor Authentication (2FA) is an authorization
mechanism where a One Time Password (OTP) is generated using “Authenticator”
mobile apps such as “Google Authenticator”, “Microsoft Authenticator”
etc., or by SMS, e-mail to authenticate. Automating this seamlessly
and consistently is a big challenge in Selenium. There are some ways
to automate this process. But that will be another layer on top of our
Selenium tests and not as secure. So, you should avoid automating 2FA.
There are few options to get around 2FA checks:
If you want the functionality to still be tested, one option is to ask your team to create a “special token” that will work in test environment. That won’t require usage of a mobile device, and will ensure the test journey is covered.
Disable 2FA for certain Users in the test environment, so that you can
use those user credentials in the automation.
Disable 2FA in your test environment.
Disable 2FA if you login from certain IPs. That way we can configure our
test machine IPs to avoid this.
8 - Legacy
Documentation related to the legacy components of Selenium. Meant to be kept purely for historical reasons and not as a incentive to use deprecated components.
8.1 - Selenium RC (Selenium 1)
The original version of Selenium
Introduction
Selenium RC was the main Selenium project for a long time, before the
WebDriver/Selenium merge brought up Selenium 2, a more powerful tool.
It is worth to highlight that Selenium 1 is not supported anymore.
How Selenium RC Works
First, we will describe how the components of Selenium RC operate and the role each plays in running
your test scripts.
RC Components
Selenium RC components are:
The Selenium Server which launches and kills browsers, interprets and runs the Selenese commands passed from the test program, and acts as an HTTP proxy, intercepting and verifying HTTP messages passed between the browser and the AUT.
Client libraries which provide the interface between each programming language and the Selenium RC Server.
Here is a simplified architecture diagram:
The diagram shows the client libraries communicate with the
Server passing each Selenium command for execution. Then the server passes the
Selenium command to the browser using Selenium-Core JavaScript commands. The
browser, using its JavaScript interpreter, executes the Selenium command. This
runs the Selenese action or verification you specified in your test script.
Selenium Server
Selenium Server receives Selenium commands from your test program,
interprets them, and reports back to your program the results of
running those tests.
The RC server bundles Selenium Core and automatically injects
it into the browser. This occurs when your test program opens the
browser (using a client library API function).
Selenium-Core is a JavaScript program, actually a set of JavaScript
functions which interprets and executes Selenese commands using the
browser’s built-in JavaScript interpreter.
The Server receives the Selenese commands from your test program
using simple HTTP GET/POST requests. This means you can use any
programming language that can send HTTP requests to automate
Selenium tests on the browser.
Client Libraries
The client libraries provide the programming support that allows you to
run Selenium commands from a program of your own design. There is a
different client library for each supported language. A Selenium client
library provides a programming interface (API), i.e., a set of functions,
which run Selenium commands from your own program. Within each interface,
there is a programming function that supports each Selenese command.
The client library takes a Selenese command and passes it to the Selenium Server
for processing a specific action or test against the application under test
(AUT). The client library
also receives the result of that command and passes it back to your program.
Your program can receive the result and store it into a program variable and
report it as a success or failure,
or possibly take corrective action if it was an unexpected error.
So to create a test program, you simply write a program that runs
a set of Selenium commands using a client library API. And, optionally, if
you already have a Selenese test script created in the Selenium-IDE, you can
generate the Selenium RC code. The Selenium-IDE can translate (using its
Export menu item) its Selenium commands into a client-driver’s API function
calls. See the Selenium-IDE chapter for specifics on exporting RC code from
Selenium-IDE.
Installation
Installation is rather a misnomer for Selenium. Selenium has a set of libraries available
in the programming language of your choice. You could download them from the downloads page.
Once you’ve chosen a language to work with, you simply need to:
Install the Selenium RC Server.
Set up a programming project using a language specific client driver.
Installing Selenium Server
The Selenium RC server is simply a Java jar file (selenium-server-standalone-.jar), which doesn’t
require any special installation. Just downloading the zip file and extracting the
server in the desired directory is sufficient.
Running Selenium Server
Before starting any tests you must start the server. Go to the directory
where Selenium RC’s server is located and run the following from a command-line
console.
This can be simplified by creating
a batch or shell executable file (.bat on Windows and .sh on Linux) containing the command
above. Then make a shortcut to that executable on your
desktop and simply double-click the icon to start the server.
For the server to run you’ll need Java installed
and the PATH environment variable correctly configured to run it from the console.
You can check that you have Java correctly installed by running the following
on a console.
java -version
If you get a version number (which needs to be 1.5 or later), you’re ready to start using Selenium RC.
Using the Java Client Driver
Download Selenium java client driver zip from the SeleniumHQ downloads page.
Extract selenium-java-.jar file
Open your desired Java IDE (Eclipse, NetBeans, IntelliJ, Netweaver, etc.)
Create a java project.
Add the selenium-java-.jar files to your project as references.
Add to your project classpath the file selenium-java-.jar.
From Selenium-IDE, export a script to a Java file and include it in your Java
project, or write your Selenium test in Java using the selenium-java-client API.
The API is presented later in this chapter. You can either use JUnit, or TestNg
to run your test, or you can write your own simple main() program. These concepts are
explained later in this section.
Run Selenium server from the console.
Execute your test from the Java IDE or from the command-line.
For details on Java test project configuration, see the Appendix sections
Configuring Selenium RC With Eclipse and Configuring Selenium RC With Intellij.
Using the Python Client Driver
Install Selenium via PIP, instructions linked at SeleniumHQ downloads page
Either write your Selenium test in Python or export
a script from Selenium-IDE to a python file.
Run Selenium server from the console
Execute your test from a console or your Python IDE
For details on Python client driver configuration, see the appendix Python Client Driver Configuration.
Download and install NUnit (
Note: You can use NUnit as your test engine. If you’re not familiar yet with
NUnit, you can also write a simple main() function to run your tests;
however NUnit is very useful as a test engine.)
Open your desired .Net IDE (Visual Studio, SharpDevelop, MonoDevelop)
Create a class library (.dll)
Add references to the following DLLs: nmock.dll, nunit.core.dll, nunit.
framework.dll, ThoughtWorks.Selenium.Core.dll, ThoughtWorks.Selenium.IntegrationTests.dll
and ThoughtWorks.Selenium.UnitTests.dll
Write your Selenium test in a .Net language (C#, VB.Net), or export
a script from Selenium-IDE to a C# file and copy this code into the class file
you just created.
Write your own simple main() program or you can include NUnit in your project
for running your test. These concepts are explained later in this chapter.
Run Selenium server from console
Run your test either from the IDE, from the NUnit GUI or from the command line
For specific details on .NET client driver configuration with Visual Studio, see the appendix
.NET client driver configuration.
Using the Ruby Client Driver
If you do not already have RubyGems, install it from RubyForge.
Run gem install selenium-client
At the top of your test script, add require "selenium/client"
Write your test script using any Ruby test harness (eg Test::Unit,
Mini::Test or RSpec).
Run Selenium RC server from the console.
Execute your test in the same way you would run any other Ruby
script.
For details on Ruby client driver configuration, see the Selenium-Client documentation_
From Selenese to a Program
The primary task for using Selenium RC is to convert your Selenese into a programming
language. In this section, we provide several different language-specific examples.
Sample Test Script
Let’s start with an example Selenese test script. Imagine recording
the following test with Selenium-IDE.
Here is the test script exported (via Selenium-IDE) to each of the supported
programming languages. If you have at least basic knowledge of an object-
oriented programming language, you will understand how Selenium
runs Selenese commands by reading one of these
examples. To see an example in a specific language, select one of these buttons.
CSharp
usingSystem;usingSystem.Text;usingSystem.Text.RegularExpressions;usingSystem.Threading;usingNUnit.Framework;usingSelenium;namespaceSeleniumTests{ [TestFixture]publicclassNewTest{privateISeleniumselenium;privateStringBuilderverificationErrors; [SetUp]publicvoidSetupTest(){selenium=newDefaultSelenium("localhost",4444,"*firefox","http://www.google.com/");selenium.Start();verificationErrors=newStringBuilder();} [TearDown]publicvoidTeardownTest(){try{selenium.Stop();}catch(Exception){// Ignore errors if unable to close the browser}Assert.AreEqual("",verificationErrors.ToString());} [Test]publicvoidTheNewTest(){selenium.Open("/");selenium.Type("q","selenium rc");selenium.Click("btnG");selenium.WaitForPageToLoad("30000");Assert.AreEqual("selenium rc - Google Search",selenium.GetTitle());}}}
Java
/** Add JUnit framework to your classpath if not already there
* for this example to work
*/packagecom.example.tests;importcom.thoughtworks.selenium.*;importjava.util.regex.Pattern;publicclassNewTestextendsSeleneseTestCase{publicvoidsetUp()throwsException{setUp("http://www.google.com/","*firefox");}publicvoidtestNew()throwsException{selenium.open("/");selenium.type("q","selenium rc");selenium.click("btnG");selenium.waitForPageToLoad("30000");assertTrue(selenium.isTextPresent("Results * for selenium rc"));}}
Php
<?phprequire_once'PHPUnit/Extensions/SeleniumTestCase.php';classExampleextendsPHPUnit_Extensions_SeleniumTestCase{functionsetUp(){$this->setBrowser("*firefox");$this->setBrowserUrl("http://www.google.com/");}functiontestMyTestCase(){$this->open("/");$this->type("q","selenium rc");$this->click("btnG");$this->waitForPageToLoad("30000");$this->assertTrue($this->isTextPresent("Results * for selenium rc"));}}?>
Python
fromseleniumimportseleniumimportunittest,time,reclassNewTest(unittest.TestCase):defsetUp(self):self.verificationErrors=[]self.selenium=selenium("localhost",4444,"*firefox","http://www.google.com/")self.selenium.start()deftest_new(self):sel=self.seleniumsel.open("/")sel.type("q","selenium rc")sel.click("btnG")sel.wait_for_page_to_load("30000")self.failUnless(sel.is_text_present("Results * for selenium rc"))deftearDown(self):self.selenium.stop()self.assertEqual([],self.verificationErrors)
Ruby
require"selenium/client"require"test/unit"classNewTest<Test::Unit::TestCasedefsetup@verification_errors=[]if$selenium@selenium=$seleniumelse@selenium=Selenium::Client::Driver.new("localhost",4444,"*firefox","http://www.google.com/",60);@selenium.startend@selenium.set_context("test_new")enddefteardown@selenium.stopunless$seleniumassert_equal[],@verification_errorsenddeftest_new@selenium.open"/"@selenium.type"q","selenium rc"@selenium.click"btnG"@selenium.wait_for_page_to_load"30000"assert@selenium.is_text_present("Results * for selenium rc")endend
In the next section we’ll explain how to build a test program using the generated code.
Programming Your Test
Now we’ll illustrate how to program your own tests using examples in each of the
supported programming languages.
There are essentially two tasks:
Generate your script into a programming
language from Selenium-IDE, optionally modifying the result.
Write a very simple main program that executes the generated code.
Optionally, you can adopt a test engine platform like JUnit or TestNG for Java,
or NUnit for .NET if you are using one of those languages.
Here, we show language-specific examples. The language-specific APIs tend to
differ from one to another, so you’ll find a separate explanation for each.
Java
C#
Python
Ruby
Perl, PHP
Java
For Java, people use either JUnit or TestNG as the test engine. Some development environments like Eclipse have direct support for these via
plug-ins. This makes it even easier. Teaching JUnit or TestNG is beyond the scope of
this document however materials may be found online and there are publications
available. If you are already a “java-shop” chances are your developers will
already have some experience with one of these test frameworks.
You will probably want to rename the test class from “NewTest” to something
of your own choosing. Also, you will need to change the browser-open
parameters in the statement:
The Selenium-IDE generated code will look like this. This example
has comments added manually for additional clarity.
packagecom.example.tests;// We specify the package of our testsimportcom.thoughtworks.selenium.*;// This is the driver's import. You'll use this for instantiating a// browser and making it do what you need.importjava.util.regex.Pattern;// Selenium-IDE add the Pattern module because it's sometimes used for // regex validations. You can remove the module if it's not used in your // script.publicclassNewTestextendsSeleneseTestCase{// We create our Selenium test casepublicvoidsetUp()throwsException{setUp("http://www.google.com/","*firefox");// We instantiate and start the browser}publicvoidtestNew()throwsException{selenium.open("/");selenium.type("q","selenium rc");selenium.click("btnG");selenium.waitForPageToLoad("30000");assertTrue(selenium.isTextPresent("Results * for selenium rc"));// These are the real test steps}}
C#
The .NET Client Driver works with Microsoft.NET.
It can be used with any .NET testing framework
like NUnit or the Visual Studio 2005 Team System.
Selenium-IDE assumes you will use NUnit as your testing framework.
You can see this in the generated code below. It includes the using statement
for NUnit along with corresponding NUnit attributes identifying
the role for each member function of the test class.
You will probably have to rename the test class from “NewTest” to
something of your own choosing. Also, you will need to change the browser-open
parameters in the statement:
usingSystem;usingSystem.Text;usingSystem.Text.RegularExpressions;usingSystem.Threading;usingNUnit.Framework;usingSelenium;namespaceSeleniumTests{ [TestFixture]publicclassNewTest{privateISeleniumselenium;privateStringBuilderverificationErrors; [SetUp]publicvoidSetupTest(){selenium=newDefaultSelenium("localhost",4444,"*iehta","http://www.google.com/");selenium.Start();verificationErrors=newStringBuilder();} [TearDown]publicvoidTeardownTest(){try{selenium.Stop();}catch(Exception){// Ignore errors if unable to close the browser}Assert.AreEqual("",verificationErrors.ToString());} [Test]publicvoidTheNewTest(){// Open Google search engine. selenium.Open("http://www.google.com/");// Assert Title of page.Assert.AreEqual("Google",selenium.GetTitle());// Provide search term as "Selenium OpenQA"selenium.Type("q","Selenium OpenQA");// Read the keyed search term and assert it.Assert.AreEqual("Selenium OpenQA",selenium.GetValue("q"));// Click on Search button.selenium.Click("btnG");// Wait for page to load.selenium.WaitForPageToLoad("5000");// Assert that "www.openqa.org" is available in search results.Assert.IsTrue(selenium.IsTextPresent("www.openqa.org"));// Assert that page title is - "Selenium OpenQA - Google Search"Assert.AreEqual("Selenium OpenQA - Google Search",selenium.GetTitle());}}}
You can allow NUnit to manage the execution
of your tests. Or alternatively, you can write a simple main() program that
instantiates the test object and runs each of the three methods, SetupTest(),
TheNewTest(), and TeardownTest() in turn.
Python
Pyunit is the test framework to use for Python.
The basic test structure is:
fromseleniumimportselenium# This is the driver's import. You'll use this class for instantiating a# browser and making it do what you need.importunittest,time,re# This are the basic imports added by Selenium-IDE by default.# You can remove the modules if they are not used in your script.classNewTest(unittest.TestCase):# We create our unittest test casedefsetUp(self):self.verificationErrors=[]# This is an empty array where we will store any verification errors# we find in our testsself.selenium=selenium("localhost",4444,"*firefox","http://www.google.com/")self.selenium.start()# We instantiate and start the browserdeftest_new(self):# This is the test code. Here you should put the actions you need# the browser to do during your test.sel=self.selenium# We assign the browser to the variable "sel" (just to save us from # typing "self.selenium" each time we want to call the browser).sel.open("/")sel.type("q","selenium rc")sel.click("btnG")sel.wait_for_page_to_load("30000")self.failUnless(sel.is_text_present("Results * for selenium rc"))# These are the real test stepsdeftearDown(self):self.selenium.stop()# we close the browser (I'd recommend you to comment this line while# you are creating and debugging your tests)self.assertEqual([],self.verificationErrors)# And make the test fail if we found that any verification errors# were found
Ruby
Old (pre 2.0) versions of Selenium-IDE generate Ruby code that requires the old Selenium
gem. Therefore, it is advisable to update any Ruby scripts generated by the
IDE as follows:
On line 1, change require "selenium" to require "selenium/client"
On line 11, change Selenium::SeleniumDriver.new to
Selenium::Client::Driver.new
You probably also want to change the class name to something more
informative than “Untitled,” and change the test method’s name to
something other than “test_untitled.”
Here is a simple example created by modifying the Ruby code generated
by Selenium IDE, as described above.
# load the Selenium-Client gemrequire"selenium/client"# Load Test::Unit, Ruby's default test framework.# If you prefer RSpec, see the examples in the Selenium-Client# documentation.require"test/unit"classUntitled<Test::Unit::TestCase# The setup method is called before each test.defsetup# This array is used to capture errors and display them at the# end of the test run.@verification_errors=[]# Create a new instance of the Selenium-Client driver.@selenium=Selenium::Client::Driver.new\:host=>"localhost",:port=>4444,:browser=>"*chrome",:url=>"http://www.google.com/",:timeout_in_second=>60# Start the browser session@selenium.start# Print a message in the browser-side log and status bar# (optional).@selenium.set_context("test_untitled")end# The teardown method is called after each test.defteardown# Stop the browser session.@selenium.stop# Print the array of error messages, if any.assert_equal[],@verification_errorsend# This is the main body of your test.deftest_untitled# Open the root of the site we specified when we created the# new driver instance, above.@selenium.open"/"# Type 'selenium rc' into the field named 'q'@selenium.type"q","selenium rc"# Click the button named "btnG"@selenium.click"btnG"# Wait for the search results page to load.# Note that we don't need to set a timeout here, because that# was specified when we created the new driver instance, above.@selenium.wait_for_page_to_loadbegin# Test whether the search results contain the expected text.# Notice that the star (*) is a wildcard that matches any# number of characters.assert@selenium.is_text_present("Results * for selenium rc")rescueTest::Unit::AssertionFailedError# If the assertion fails, push it onto the array of errors.@verification_errors<<$!endendend
Perl, PHP
The members of the documentation team
have not used Selenium RC with Perl or PHP. If you are using Selenium RC with either of
these two languages please contact the Documentation Team (see the chapter on contributing).
We would love to include some examples from you and your experiences, to support Perl and PHP users.
Learning the API
The Selenium RC API uses naming conventions
that, assuming you understand Selenese, much of the interface will be self-explanatory. Here, however, we explain the most critical and
possibly less obvious aspects.
Each of these examples opens the browser and represents that browser
by assigning a “browser instance” to a program variable. This
program variable is then used to call methods from the browser.
These methods execute the Selenium commands, i.e. like open or type or the verify
commands.
The parameters required when creating the browser instance
are:
host
Specifies the IP address of the computer where the server is located. Usually, this is
the same machine as where the client is running, so in this case localhost is passed. In some clients this is an optional parameter.
port
Specifies the TCP/IP socket where the server is listening waiting
for the client to establish a connection. This also is optional in some
client drivers.
browser
The browser in which you want to run the tests. This is a required
parameter.
url
The base url of the application under test. This is required by all the
client libs and is integral information for starting up the browser-proxy-AUT communication.
Note that some of the client libraries require the browser to be started explicitly by calling
its start() method.
Running Commands
Once you have the browser initialized and assigned to a variable (generally
named “selenium”) you can make it run Selenese commands by calling the respective
methods from the browser variable. For example, to call the type method
of the selenium object:
selenium.type("field-id","string to type")
In the background the browser will actually perform a type operation,
essentially identical to a user typing input into the browser, by using the locator and the string you specified during the method call.
Reporting Results
Selenium RC does not have its own mechanism for reporting results. Rather, it allows
you to build your reporting customized to your needs using features of your
chosen programming language. That’s great, but what if you simply want something
quick that’s already done for you? Often an existing library or test framework can
meet your needs faster than developing your own test reporting code.
Test Framework Reporting Tools
Test frameworks are available for many programming languages. These, along with
their primary function of providing a flexible test engine for executing your tests,
include library code for reporting results. For example, Java has two
commonly used test frameworks, JUnit and TestNG. .NET also has its own, NUnit.
We won’t teach the frameworks themselves here; that’s beyond the scope of this
user guide. We will simply introduce the framework features that relate to Selenium
along with some techniques you can apply. There are good books available on these
test frameworks however along with information on the internet.
Test Report Libraries
Also available are third-party libraries specifically created for reporting
test results in your chosen programming language. These often support a
variety of formats such as HTML or PDF.
What’s The Best Approach?
Most people new to the testing frameworks will begin with the framework’s
built-in reporting features. From there most will examine any available libraries
as that’s less time consuming than developing your own. As you begin to use
Selenium no doubt you will start putting in your own “print statements” for
reporting progress. That may gradually lead to you developing your own
reporting, possibly in parallel to using a library or test framework. Regardless,
after the initial, but short, learning curve you will naturally develop what works
best for your own situation.
Test Reporting Examples
To illustrate, we’ll direct you to some specific tools in some of the other languages
supported by Selenium. The ones listed here are commonly used and have been used
extensively (and therefore recommended) by the authors of this guide.
Test Reports in Java
If Selenium Test cases are developed using JUnit then JUnit Report can be used
to generate test reports.
If Selenium Test cases are developed using TestNG then no external task
is required to generate test reports. The TestNG framework generates an
HTML report which list details of tests.
ReportNG is a HTML reporting plug-in for the TestNG framework.
It is intended as a replacement for the default TestNG HTML report.
ReportNG provides a simple, colour-coded view of the test results.
Logging the Selenese Commands
Logging Selenium can be used to generate a report of all the Selenese commands
in your test along with the success or failure of each. Logging Selenium extends
the Java client driver to add this Selenese logging ability.
Test Reports for Python
When using Python Client Driver then HTMLTestRunner can be used to
generate a Test Report.
Test Reports for Ruby
If RSpec framework is used for writing Selenium Test Cases in Ruby
then its HTML report can be used to generate a test report.
Adding Some Spice to Your Tests
Now we’ll get to the whole reason for using Selenium RC, adding programming logic to your tests.
It’s the same as for any program. Program flow is controlled using condition statements
and iteration. In addition you can report progress information using I/O. In this section
we’ll show some examples of how programming language constructs can be combined with
Selenium to solve common testing problems.
You will find as you transition from the simple tests of the existence of
page elements to tests of dynamic functionality involving multiple web-pages and
varying data that you will require programming logic for verifying expected
results. Basically, the Selenium-IDE does not support iteration and
standard condition statements. You can do some conditions by embedding JavaScript
in Selenese parameters, however
iteration is impossible, and most conditions will be much easier in a programming language. In addition, you may need exception handling for
error recovery. For these reasons and others, we have written this section
to illustrate the use of common programming techniques to
give you greater ‘verification power’ in your automated testing.
The examples in this section are written
in C# and Java, although the code is simple and can be easily adapted to the other supported
languages. If you have some basic knowledge
of an object-oriented programming language you shouldn’t have difficulty understanding this section.
Iteration
Iteration is one of the most common things people need to do in their tests.
For example, you may want to to execute a search multiple times. Or, perhaps for
verifying your test results you need to process a “result set” returned from a database.
Using the same Google search example we used earlier, let’s
check the Selenium search results. This test could use the Selenese:
open
/
type
q
selenium rc
clickAndWait
btnG
assertTextPresent
Results * for selenium rc
type
q
selenium ide
clickAndWait
btnG
assertTextPresent
Results * for selenium ide
type
q
selenium grid
clickAndWait
btnG
assertTextPresent
Results * for selenium grid
The code has been repeated to run the same steps 3 times. But multiple
copies of the same code is not good program practice because it’s more
work to maintain. By using a programming language, we can iterate
over the search results for a more flexible and maintainable solution.
In C#
// Collection of String values.String[]arr={"ide","rc","grid"};// Execute loop for each String in array 'arr'.foreach(Stringsinarr){sel.open("/");sel.type("q","selenium "+s);sel.click("btnG");sel.waitForPageToLoad("30000");assertTrue("Expected text: "+s+" is missing on page.",sel.isTextPresent("Results * for selenium "+s));}
Condition Statements
To illustrate using conditions in tests we’ll start with an example.
A common problem encountered while running Selenium tests occurs when an
expected element is not available on page. For example, when running the
following line:
selenium.type("q", "selenium " +s);
If element ‘q’ is not on the page then an exception is
thrown:
This can cause your test to abort. For some tests that’s what you want. But
often that is not desirable as your test script has many other subsequent tests
to perform.
A better approach is to first validate whether the element is really present
and then take alternatives when it it is not. Let’s look at this using Java.
// If element is available on page then perform type operation.if(selenium.isElementPresent("q")){selenium.type("q","Selenium rc");}else{System.out.printf("Element: "+q+" is not available on page.")}
The advantage of this approach is to continue with test execution even if some UI
elements are not available on page.
Executing JavaScript from Your Test
JavaScript comes very handy in exercising an application which is not directly supported
by Selenium. The getEval method of Selenium API can be used to execute JavaScript from
Selenium RC.
Consider an application having check boxes with no static identifiers.
In this case one could evaluate JavaScript from Selenium RC to get ids of all
check boxes and then exercise them.
publicstaticString[]getAllCheckboxIds(){Stringscript="var inputId = new Array();";// Create array in java script.script+="var cnt = 0;";// Counter for check box ids. script+="var inputFields = new Array();";// Create array in java script.script+="inputFields = window.document.getElementsByTagName('input');";// Collect input elements.script+="for(var i=0; i<inputFields.length; i++) {";// Loop through the collected elements.script+="if(inputFields[i].id !=null "+"&& inputFields[i].id !='undefined' "+"&& inputFields[i].getAttribute('type') == 'checkbox') {";// If input field is of type check box and input id is not null.script+="inputId[cnt]=inputFields[i].id ;"+// Save check box id to inputId array."cnt++;"+// increment the counter."}"+// end of if."}";// end of for.script+="inputId.toString();";// Convert array in to string. String[]checkboxIds=selenium.getEval(script).split(",");// Split the string.returncheckboxIds;}
You’ll see a list of all the options you can use with the server and a brief
description of each. The provided descriptions will not always be enough, so we’ve
provided explanations for some of the more important options.
Proxy Configuration
If your AUT is behind an HTTP proxy which requires authentication then you should
configure http.proxyHost, http.proxyPort, http.proxyUser and http.proxyPassword
using the following command.
If you are using Selenium 1.0 you can probably skip this section, since multiwindow mode is
the default behavior. However, prior to version 1.0, Selenium by default ran the
application under test in a sub frame as shown here.
Some applications didn’t run correctly in a sub frame, and needed to be
loaded into the top frame of the window. The multi-window mode option allowed
the AUT to run in a separate window rather than in the default
frame where it could then have the top frame it required.
For older versions of Selenium you must specify multiwindow mode explicitly
with the following option:
-multiwindow
As of Selenium RC 1.0, if you want to run your test within a
single frame (i.e. using the standard for earlier Selenium versions)
you can state this to the Selenium Server using the option
-singlewindow
Specifying the Firefox Profile
Firefox will not run two instances simultaneously unless you specify a
separate profile for each instance. Selenium RC 1.0 and later runs in a
separate profile automatically, so if you are using Selenium 1.0, you can
probably skip this section. However, if you’re using an older version of
Selenium or if you need to use a specific profile for your tests
(such as adding an https certificate or having some addons installed), you will
need to explicitly specify the profile.
First, to create a separate Firefox profile, follow this procedure.
Open the Windows Start menu, select “Run”, then type and enter one of the
following:
firefox.exe -profilemanager
firefox.exe -P
Create the new profile using the dialog. Then when you run Selenium Server,
tell it to use this new Firefox profile with the server command-line option
-firefoxProfileTemplate and specify the path to the profile using its filename
and directory path.
-firefoxProfileTemplate "path to the profile"
Warning: Be sure to put your profile in a new folder separate from the default!!!
The Firefox profile manager tool will delete all files in a folder if you
delete a profile, regardless of whether they are profile files or not.
This will automatically launch your HTML suite, run all the tests and save a
nice HTML report with the results.
Note: When using this option, the server will start the tests and wait for a
specified number of seconds for the test to complete; if the test doesn’t
complete within that amount of time, the command will exit with a non-zero
exit code and no results file will be generated.
This command line is very long so be careful when
you type it. Note this requires you to pass in an HTML
Selenese suite, not a single test. Also be aware the -htmlSuite option is incompatible with -interactive
You cannot run both at the same time.
Selenium Server Logging
Server-Side Logs
When launching Selenium server the -log option can be used to record
valuable debugging information reported by the Selenium Server to a text file.
This log file is more verbose than the standard console logs (it includes DEBUG
level logging messages). The log file also includes the logger name, and the ID
number of the thread that logged the message. For example:
JavaScript on the browser side (Selenium Core) also logs important messages;
in many cases, these can be more useful to the end-user than the regular Selenium
Server logs. To access browser-side logs, pass the -browserSideLog
argument to the Selenium Server.
-browserSideLog must be combined with the -log argument, to log
browserSideLogs (as well as all other DEBUG level logging messages) to a file.
Specifying the Path to a Specific Browser
You can specify to Selenium RC a path to a specific browser. This is useful if
you have different versions of the same browser and you wish to use a specific
one. Also, this is used to allow your tests to run against a browser not
directly supported by Selenium RC. When specifying the run mode, use the
*custom specifier followed by the full path to the browser’s executable:
*custom <path to browser>
Selenium RC Architecture
Note: This topic tries to explain the technical implementation behind
Selenium RC. It’s not fundamental for a Selenium user to know this, but
could be useful for understanding some of the problems you might find in the
future.
To understand in detail how Selenium RC Server works and why it uses proxy injection
and heightened privilege modes you must first understand the same origin policy_.
The Same Origin Policy
The main restriction that Selenium faces is the
Same Origin Policy. This security restriction is applied by every browser
in the market and its objective is to ensure that a site’s content will never
be accessible by a script from another site. The Same Origin Policy dictates that
any code loaded within the browser can only operate within that website’s domain.
It cannot perform functions on another website. So for example, if the browser
loads JavaScript code when it loads www.mysite.com, it cannot run that loaded code
against www.mysite2.com–even if that’s another of your sites. If this were possible,
a script placed on any website you open would be able to read information on
your bank account if you had the account page
opened on other tab. This is called XSS (Cross-site Scripting).
To work within this policy, Selenium-Core (and its JavaScript commands that
make all the magic happen) must be placed in the same origin as the Application
Under Test (same URL).
Historically, Selenium-Core was limited by this problem since it was implemented in
JavaScript. Selenium RC is not, however, restricted by the Same Origin Policy. Its
use of the Selenium Server as a proxy avoids this problem. It, essentially, tells the
browser that the browser is working on a single “spoofed” website that the Server
provides.
Note: You can find additional information about this topic on Wikipedia
pages about Same Origin Policy and XSS.
Proxy Injection
The first method Selenium used to avoid the The Same Origin Policy was Proxy Injection.
In Proxy Injection Mode, the Selenium Server acts as a client-configured HTTP
proxy1, that sits between the browser and the Application Under Test2.
It then masks the AUT under a fictional URL (embedding
Selenium-Core and the set of tests and delivering them as if they were coming
from the same origin).
Here is an architectural diagram.
As a test suite starts in your favorite language, the following happens:
The client/driver establishes a connection with the selenium-RC server.
Selenium RC server launches a browser (or reuses an old one) with a URL
that injects Selenium-Core’s JavaScript into the browser-loaded web page.
The client-driver passes a Selenese command to the server.
The Server interprets the command and then triggers the corresponding
JavaScript execution to execute that command within the browser.
Selenium-Core instructs the browser to act on that first instruction, typically opening a page of the
AUT.
The browser receives the open request and asks for the website’s content from
the Selenium RC server (set as the HTTP proxy for the browser to use).
Selenium RC server communicates with the Web server asking for the page and once
it receives it, it sends the page to the browser masking the origin to look
like the page comes from the same server as Selenium-Core (this allows
Selenium-Core to comply with the Same Origin Policy).
The browser receives the web page and renders it in the frame/window reserved
for it.
Heightened Privileges Browsers
This workflow in this method is very similar to Proxy Injection but the main
difference is that the browsers are launched in a special mode called Heightened
Privileges, which allows websites to do things that are not commonly permitted
(as doing XSS_, or filling file upload inputs and pretty useful stuff for
Selenium). By using these browser modes, Selenium Core is able to directly open
the AUT and read/interact with its content without having to pass the whole AUT
through the Selenium RC server.
Here is the architectural diagram.
As a test suite starts in your favorite language, the following happens:
The client/driver establishes a connection with the selenium-RC server.
Selenium RC server launches a browser (or reuses an old one) with a URL
that will load Selenium-Core in the web page.
Selenium-Core gets the first instruction from the client/driver (via another
HTTP request made to the Selenium RC Server).
Selenium-Core acts on that first instruction, typically opening a page of the
AUT.
The browser receives the open request and asks the Web Server for the page.
Once the browser receives the web page, renders it in the frame/window reserved
for it.
Handling HTTPS and Security Popups
Many applications switch from using HTTP to HTTPS when they need to send
encrypted information such as passwords or credit card information. This is
common with many of today’s web applications. Selenium RC supports this.
To ensure the HTTPS site is genuine, the browser will need a security
certificate. Otherwise, when the browser accesses the AUT using HTTPS, it will
assume that application is not ’trusted’. When this occurs the browser
displays security popups, and these popups cannot be closed using Selenium RC.
When dealing with HTTPS in a Selenium RC test, you must use a run mode that supports this and handles
the security certificate for you. You specify the run mode when your test program
initializes Selenium.
In Selenium RC 1.0 beta 2 and later use *firefox or *iexplore for the run
mode. In earlier versions, including Selenium RC 1.0 beta 1, use *chrome or
*iehta, for the run mode. Using these run modes, you will not need to install
any special security certificates; Selenium RC will handle it for you.
In version 1.0 the run modes *firefox or *iexplore are
recommended. However, there are additional run modes of *iexploreproxy and
*firefoxproxy. These are provided for backwards compatibility only, and
should not be used unless required by legacy test programs. Their use will
present limitations with security certificate handling and with the running
of multiple windows if your application opens additional browser windows.
In earlier versions of Selenium RC, *chrome or *iehta were the run modes that
supported HTTPS and the handling of security popups. These were considered ‘experimental
modes although they became quite stable and many people used them. If you are using
Selenium 1.0 you do not need, and should not use, these older run modes.
Security Certificates Explained
Normally, your browser will trust the application you are testing
by installing a security certificate which you already own. You can
check this in your browser’s options or Internet properties (if you don’t
know your AUT’s security certificate ask your system administrator).
When Selenium loads your browser it injects code to intercept
messages between the browser and the server. The browser now thinks
untrusted software is trying to look like your application. It responds by alerting you with popup messages.
To get around this, Selenium RC, (again when using a run mode that support
this) will install its own security certificate, temporarily, to your
client machine in a place where the browser can access it. This tricks the
browser into thinking it’s accessing a site different from your AUT and effectively suppresses the popups.
Another method used with earlier versions of Selenium was to
install the Cybervillians security certificate provided with your Selenium
installation. Most users should no longer need to do this however; if you are
running Selenium RC in proxy injection mode, you may need to explicitly install this
security certificate.
Supporting Additional Browsers and Browser Configurations
The Selenium API supports running against multiple browsers in addition to
Internet Explorer and Mozilla Firefox. See the https://selenium.dev website for
supported browsers. In addition, when a browser is not directly supported,
you may still run your Selenium tests against a browser of your choosing by
using the “*custom” run-mode (i.e. in place of *firefox or *iexplore) when
your test application starts the browser. With this, you pass in the path to
the browsers executable within the API call. This can also be done from the
Server in interactive mode.
Running Tests with Different Browser Configurations
Normally Selenium RC automatically configures the browser, but if you launch
the browser using the “*custom” run mode, you can force Selenium RC
to launch the browser as-is, without using an automatic configuration.
For example, you can launch Firefox with a custom configuration like this:
Note that when launching the browser this way, you must manually
configure the browser to use the Selenium Server as a proxy. Normally this just
means opening your browser preferences and specifying “localhost:4444” as
an HTTP proxy, but instructions for this can differ radically from browser to
browser. Consult your browser’s documentation for details.
Be aware that Mozilla browsers can vary in how they start and stop.
One may need to set the MOZ_NO_REMOTE environment variable to make Mozilla browsers
behave a little more predictably. Unix users should avoid launching the browser using
a shell script; it’s generally better to use the binary executable (e.g. firefox-bin) directly.
Troubleshooting Common Problems
When getting started with Selenium RC there’s a few potential problems
that are commonly encountered. We present them along with their solutions here.
Unable to Connect to Server
When your test program cannot connect to the Selenium Server, Selenium throws an exception in your test program.
It should display this message or a similar one:
"Unable to connect to remote server (Inner Exception Message:
No connection could be made because the target machine actively
refused it )"(using .NET and XP Service Pack 2)
If you see a message like this, be sure you started the Selenium Server. If
so, then there is a problem with the connectivity between the Selenium Client
Library and the Selenium Server.
When starting with Selenium RC, most people begin by running their test program
(with a Selenium Client Library) and the Selenium Server on the same machine. To
do this use “localhost” as your connection parameter.
We recommend beginning this way since it reduces the influence of potential networking problems
which you’re getting started. Assuming your operating system has typical networking
and TCP/IP settings you should have little difficulty. In truth, many people
choose to run the tests this way.
If, however, you do want to run Selenium Server
on a remote machine, the connectivity should be fine assuming you have valid TCP/IP
connectivity between the two machines.
If you have difficulty connecting, you can use common networking tools like ping,
telnet, ifconfig(Unix)/ipconfig (Windows), etc to ensure you have a valid
network connection. If unfamilar with these, your system administrator can assist you.
Unable to Load the Browser
Ok, not a friendly error message, sorry, but if the Selenium Server cannot load the browser
you will likely see this error.
(500) Internal Server Error
This could be caused by
Firefox (prior to Selenium 1.0) cannot start because the browser is already open and you did
not specify a separate profile. See the section on Firefox profiles under Server Options.
The run mode you’re using doesn’t match any browser on your machine. Check the parameters you
passed to Selenium when you program opens the browser.
You specified the path to the browser explicitly (using “*custom”–see above) but the path is
incorrect. Check to be sure the path is correct. Also check the user group to be sure there are
no known issues with your browser and the “*custom” parameters.
Selenium Cannot Find the AUT
If your test program starts the browser successfully, but the browser doesn’t
display the website you’re testing, the most likely cause is your test
program is not using the correct URL.
This can easily happen. When you use Selenium-IDE to export your script,
it inserts a dummy URL. You must manually change the URL to the correct one
for your application to be tested.
Firefox Refused Shutdown While Preparing a Profile
This most often occurs when you run your Selenium RC test program against Firefox,
but you already have a Firefox browser session running and, you didn’t specify
a separate profile when you started the Selenium Server. The error from the
test program looks like this:
Error: java.lang.RuntimeException: Firefox refused shutdown while preparing a profile
Here’s the complete error message from the server:
16:20:03.919 INFO - Preparing Firefox profile...
16:20:27.822 WARN - GET /selenium-server/driver/?cmd=getNewBrowserSession&1=*fir
efox&2=http%3a%2f%2fsage-webapp1.qa.idc.com HTTP/1.1
java.lang.RuntimeException: Firefox refused shutdown while preparing a profile
at org.openqa.selenium.server.browserlaunchers.FirefoxCustomProfileLaunc
her.waitForFullProfileToBeCreated(FirefoxCustomProfileLauncher.java:277) ...
Caused by: org.openqa.selenium.server.browserlaunchers.FirefoxCustomProfileLaunc
her$FileLockRemainedException: Lock file still present! C:\DOCUME~1\jsvec\LOCALS
~1\Temp\customProfileDir203138\parent.lock
To resolve this, see the section on Specifying a Separate Firefox Profile
Versioning Problems
Make sure your version of Selenium supports the version of your browser. For
example, Selenium RC 0.92 does not support Firefox 3. At times you may be lucky
(I was). But don’t forget to check which
browser versions are supported by the version of Selenium you are using. When in
doubt, use the latest release version of Selenium with the most widely used version
of your browser.
Error message: “(Unsupported major.minor version 49.0)” while starting server
This error says you’re not using a correct version of Java.
The Selenium Server requires Java 1.5 or higher.
To check double-check your java version, run this from the command line.
java -version
You should see a message showing the Java version.
java version "1.5.0_07" Java(TM)2 Runtime Environment, Standard Edition (build 1.5.0_07-b03) Java HotSpot(TM) Client VM (build 1.5.0_07-b03, mixed mode)
If you see a lower version number, you may need to update the JRE,
or you may simply need to add it to your PATH environment variable.
404 error when running the getNewBrowserSession command
If you’re getting a 404 error while attempting to open a page on
“http://www.google.com/selenium-server/", then it must be because the Selenium
Server was not correctly configured as a proxy. The “selenium-server” directory
doesn’t exist on google.com; it only appears to exist when the proxy is
properly configured. Proxy Configuration highly depends on how the browser is
launched with firefox, iexplore, opera, or custom.
iexplore: If the browser is launched using *iexplore, you could be
having a problem with Internet Explorer’s proxy settings. Selenium
Server attempts To configure the global proxy settings in the Internet
Options Control Panel. You must make sure that those are correctly
configured when Selenium Server launches the browser. Try looking at
your Internet Options control panel. Click on the “Connections” tab
and click on “LAN Settings”.
If you need to use a proxy to access the application you want to test,
you’ll need to start Selenium Server with “-Dhttp.proxyHost”;
see the Proxy Configuration_ for more details.
You may also try configuring your proxy manually and then launching
the browser with *custom, or with *iehta browser launcher.
custom: When using *custom you must configure the proxy correctly(manually),
otherwise you’ll get a 404 error. Double-check that you’ve configured your proxy
settings correctly. To check whether you’ve configured the proxy correctly is to
attempt to intentionally configure the browser incorrectly. Try configuring the
browser to use the wrong proxy server hostname, or the wrong port. If you had
successfully configured the browser’s proxy settings incorrectly, then the
browser will be unable to connect to the Internet, which is one way to make
sure that one is adjusting the relevant settings.
For other browsers (*firefox, *opera) we automatically hard-code
the proxy for you, and so there are no known issues with this functionality.
If you’re encountering 404 errors and have followed this user guide carefully
post your results to user group for some help from the user community.
Permission Denied Error
The most common reason for this error is that your session is attempting to violate
the same-origin policy by crossing domain boundaries (e.g., accesses a page from
http://domain1 and then accesses a page from http://domain2) or switching protocols
(moving from http://domainX to https://domainX).
This error can also occur when JavaScript attempts to find UI objects
which are not yet available (before the page has completely loaded), or
are no longer available (after the page has started
to be unloaded). This is most typically encountered with AJAX pages
which are working with sections of a page or subframes that load and/or reload
independently of the larger page.
This error can be intermittent. Often it is impossible to reproduce the problem
with a debugger because the trouble stems from race conditions which
are not reproducible when the debugger’s overhead is added to the system.
Permission issues are covered in some detail in the tutorial. Read the section
about the The Same Origin Policy, Proxy Injection carefully.
Handling Browser Popup Windows
There are several kinds of “Popups” that you can get during a Selenium test.
You may not be able to close these popups by running Selenium commands if
they are initiated by the browser and not your AUT. You may
need to know how to manage these. Each type of popup needs to be addressed differently.
HTTP basic authentication dialogs: These dialogs prompt for a
username/password to login to the site. To login to a site that requires
HTTP basic authentication, use a username and password in the URL, as
described in RFC 1738_, like this: open(“http://myusername:myuserpassword@myexample.com/blah/blah/blah").
SSL certificate warnings: Selenium RC automatically attempts to spoof SSL
certificates when it is enabled as a proxy; see more on this
in the section on HTTPS. If your browser is configured correctly,
you should never see SSL certificate warnings, but you may need to
configure your browser to trust our dangerous “CyberVillains” SSL certificate
authority. Again, refer to the HTTPS section for how to do this.
modal JavaScript alert/confirmation/prompt dialogs: Selenium tries to conceal
those dialogs from you (by replacing window.alert, window.confirm and
window.prompt) so they won’t stop the execution of your page. If you’re
seeing an alert pop-up, it’s probably because it fired during the page load process,
which is usually too early for us to protect the page. Selenese contains commands
for asserting or verifying alert and confirmation popups. See the sections on these
topics in Chapter 4.
On Linux, why isn’t my Firefox browser session closing?
On Unix/Linux you must invoke “firefox-bin” directly, so make sure that
executable is on the path. If executing Firefox through a
shell script, when it comes time to kill the browser Selenium RC will kill
the shell script, leaving the browser running. You can specify the path
to firefox-bin directly, like this.
Check Firefox profile folder -> prefs.js -> user_pref(“browser.startup.page”, 0);
Comment this line like this: “//user_pref(“browser.startup.page”, 0);” and try again.
Is it ok to load a custom pop-up as the parent page is loading (i.e., before the parent page’s javascript window.onload() function runs)?
No. Selenium relies on interceptors to determine window names as they are being loaded.
These interceptors work best in catching new windows if the windows are loaded AFTER
the onload() function. Selenium may not recognize windows loaded before the onload function.
Firefox on Linux
On Unix/Linux, versions of Selenium before 1.0 needed to invoke “firefox-bin”
directly, so if you are using a previous version, make sure that the real
executable is on the path.
On most Linux distributions, the real firefox-bin is located on:
/usr/lib/firefox-x.x.x/
Where the x.x.x is the version number you currently have. So, to add that path
to the user’s path. you will have to add the following to your .bashrc file:
exportPATH="$PATH:/usr/lib/firefox-x.x.x/"
If necessary, you can specify the path to firefox-bin directly in your test,
like this:
"*firefox /usr/lib/firefox-x.x.x/firefox-bin"
IE and Style Attributes
If you are running your tests on Internet Explorer and you cannot locate
elements using their style attribute.
For example:
//td[@style="background-color:yellow"]
This would work perfectly in Firefox, Opera or Safari but not with IE.
IE interprets the keys in @style as uppercase. So, even if the
source code is in lowercase, you should use:
//td[@style="BACKGROUND-COLOR:yellow"]
This is a problem if your test is intended to work on multiple browsers, but
you can easily code your test to detect the situation and try the alternative
locator that only works in IE.
Error encountered - “Cannot convert object to primitive value” with shut down of *googlechrome browser
To avoid this error you have to start browser with an option that disables same origin policy checks:
Error encountered in IE - “Couldn’t open app window; is the pop-up blocker enabled?”
To avoid this error you have to configure the browser: disable the popup blocker
AND uncheck ‘Enable Protected Mode’ option in Tools » Options » Security.
The proxy is a third person in the middle that passes the ball between the two parts. It acts as a “web server” that delivers the AUT to the browser. Being a proxy gives Selenium Server the capability of “lying” about the AUT’s real URL. ↩︎
The browser is launched with a configuration profile that has set localhost:4444 as the HTTP proxy, this is why any HTTP request that the browser does will pass through Selenium server and the response will pass through it and not from the real server. ↩︎
8.2 - Selenium 2
Selenium 2 was a rewrite of Selenium 1 that was implemented with WebDriver code.
8.2.1 - Migrating from RC to WebDriver
Information on Updating from Selenium 1 to Selenium 2.
How to Migrate to Selenium WebDriver
A common question when adopting Selenium 2 is what’s the correct thing to do
when adding new tests to an existing set of tests? Users who are new to the
framework can begin by using the new WebDriver APIs for writing their tests.
But what of users who already have suites of existing tests? This guide is
designed to demonstrate how to migrate your existing tests to the new APIs,
allowing all new tests to be written using the new features offered by WebDriver.
The method presented here describes a piecemeal migration to the WebDriver
APIs without needing to rework everything in one massive push. This means
that you can allow more time for migrating your existing tests, which
may make it easier for you to decide where to spend your effort.
This guide is written using Java, because this has the best support for
making the migration. As we provide better tools for other languages,
this guide shall be expanded to include those languages.
Why Migrate to WebDriver
Moving a suite of tests from one API to another API requires an enormous
amount of effort. Why would you and your team consider making this move?
Here are some reasons why you should consider migrating your Selenium Tests
to use WebDriver.
Smaller, compact API. WebDriver’s API is more Object Oriented than the
original Selenium RC API. This can make it easier to work with.
Better emulation of user interactions. Where possible, WebDriver makes
use of native events in order to interact with a web page. This more closely
mimics the way that your users work with your site and apps. In addition,
WebDriver offers the advanced user interactions APIs which allow you to
model complex interactions with your site.
Support by browser vendors. Opera, Mozilla and Google are all active
participants in WebDriver’s development, and each have engineers working
to improve the framework. Often, this means that support for WebDriver
is baked into the browser itself: your tests run as fast and as stably as
possible.
Before Starting
In order to make the process of migrating as painless as possible, make
sure that all your tests run properly with the latest Selenium release.
This may sound obvious, but it’s best to have it said!
Getting Started
The first step when starting the migration is to change how you obtain
your instance of Selenium. When using Selenium RC, this is done like so:
Once your tests execute without errors, the next stage is to migrate
the actual test code to use the WebDriver APIs. Depending on how well
abstracted your code is, this might be a short process or a long one.
In either case, the approach is the same and can be summed up simply:
modify code to use the new API when you come to edit it.
If you need to extract the underlying WebDriver implementation from
the Selenium instance, you can simply cast it to WrapsDriver:
This allows you to continue passing the Selenium instance around as
normal, but to unwrap the WebDriver instance as required.
At some point, you’re codebase will mostly be using the newer APIs.
At this point, you can flip the relationship, using WebDriver throughout
and instantiating a Selenium instance on demand:
This relies on the fact that “type” simply replaces the content of the
identified element without also firing all the events that would normally
be fired if a user interacts with the page. The final direct invocations
of “key*” cause the JS handlers to fire as expected.
When using the WebDriverBackedSelenium, the result of filling in the form
field would be “exciting texttt”: not what you’d expect! The reason for this
is that WebDriver more accurately emulates user behavior, and so will have
been firing events all along.
This same fact may sometimes cause a page load to fire earlier than it would
do in a Selenium 1 test. You can tell that this has happened if a
“StaleElementException” is thrown by WebDriver.
WaitForPageToLoad Returns Too Soon
Discovering when a page load is complete is a tricky business. Do we mean
“when the load event fires”, “when all AJAX requests are complete”, “when
there’s no network traffic”, “when document.readyState has changed” or something
else entirely?
WebDriver attempts to simulate the original Selenium behavior, but this doesn’t
always work perfectly for various reasons. The most common reason is that it’s
hard to tell the difference between a page load not having started yet, and a
page load having completed between method calls. This sometimes means that
control is returned to your test before the page has finished (or even started!)
loading.
The solution to this is to wait on something specific. Commonly, this might be
for the element you want to interact with next, or for some Javascript variable
to be set to a specific value. An example would be:
This may look complex, but it’s almost all boiler-plate code. The only
interesting bit is that the “ExpectedCondition” will be evaluated repeatedly
until the “apply” method returns something that is neither “null”
nor Boolean.FALSE.
Of course, adding all these “wait” calls may clutter up your code. If
that’s the case, and your needs are simple, consider using the implicit waits:
By doing this, every time an element is located, if the element is not present,
the location is retried until either it is present, or until 30 seconds have
passed.
Finding By XPath or CSS Selectors Doesn’t Always Work, But It Does In Selenium 1
In Selenium 1, it was common for xpath to use a bundled library rather than
the capabilities of the browser itself. WebDriver will always use the native
browser methods unless there’s no alternative. That means that complex xpath
expressions may break on some browsers.
CSS Selectors in Selenium 1 were implemented using the Sizzle library. This
implements a superset of the CSS Selector spec, and it’s not always clear where
you’ve crossed the line. If you’re using the WebDriverBackedSelenium and use a
Sizzle locator instead of a CSS Selector for finding elements, a warning will
be logged to the console. It’s worth taking the time to look for these,
particularly if tests are failing because of not being able to find elements.
There is No Browserbot
Selenium RC was based on Selenium Core, and therefore when you executed
Javascript, you could access bits of Selenium Core to make things easier.
As WebDriver is not based on Selenium Core, this is no longer possible.
How can you tell if you’re using Selenium Core? Simple! Just look to see
if your “getEval” or similar calls are using “selenium” or “browserbot”
in the evaluated Javascript.
You might be using the browserbot to obtain a handle to the current window
or document of the test. Fortunately, WebDriver always evaluates JS in the
context of the current window, so you can use “window” or “document” directly.
Alternatively, you might be using the browserbot to locate elements.
In WebDriver, the idiom for doing this is to first locate the element,
and then pass that as an argument to the Javascript. Thus:
The Java and .NET versions of WebDriver provide implementations of the existing Selenium API. In Java, it is used like so:
// You may use any WebDriver implementation. Firefox is used here as an example
WebDriver driver = new FirefoxDriver();
// A "base url", used by selenium to resolve relative URLs
String baseUrl = "http://www.google.com";
// Create the Selenium implementation
Selenium selenium = new WebDriverBackedSelenium(driver, baseUrl);
// Perform actions with selenium
selenium.open("http://www.google.com");
selenium.type("name=q", "cheese");
selenium.click("name=btnG");
// And get the underlying WebDriver implementation back. This will refer to the
// same WebDriver instance as the "driver" variable above.
WebDriver driverInstance = ((WebDriverBackedSelenium) selenium).getUnderlyingWebDriver();
Pros
Allows for WebDriver and Selenium to live side-by-side.
Provides a simple mechanism for a managed migration from the existing Selenium API to WebDriver’s.
Does not require the standalone Selenium RC server to be run
Cons
Does not implement every method
But we’d love feedback!
Does also emulate Selenium Core
So more advanced Selenium usage (that is, using “browserbot” or other built-in Javascript methods from Selenium Core) may need work
Some methods may be slower due to underlying implementation differences
Does not support Selenium’s “user extensions” (i.e., user-extensions.js)
Notes
After creating a WebDriverBackedSelenium instance with a given Driver, one does not have to call start() - as the creation of the Driver already started the session. At the end of the test, stop() should be called instead of the Driver’s quit() method.
This is more similar to WebDriver’s behaviour - as creating a Driver instance starts a session, yet it has to be terminated explicitly with a call to quit().
Backing Selenium with RemoteWebDriver
Starting with release 2.19, WebDriverBackedSelenium can be used from any language supported by WebDriver and Selenium.
Provided you keep a reference to the original WebDriver and Selenium objects you created, you can use even the two APIs interchangeably. The magic is the “*webdriver” browser name passed to the Selenium instance, and that you pass the WebDriver instance when calling start().
In languages where DefaultSelenium doesn’t have start(driver), you can connect the WebDriver and Selenium objects together yourself, by supplying the WebDriver session ID to the Selenium object.
WebDriver doesn’t support as many browsers as Selenium does, so in order to provide that support while still using the webdriver API, you can make use of the SeleneseCommandExecutor It is done like this:
Capabilities capabilities = new DesiredCapabilities()
capabilities.setBrowserName("safari");
CommandExecutor executor = new SeleneseCommandExecutor("http:localhost:4444/", "http://www.google.com/", capabilities);
WebDriver driver = new RemoteWebDriver(executor, capabilities);
There are currently some major limitations with this approach, notably that findElements doesn’t work as expected. Also, because we’re using Selenium Core for the heavy lifting of driving the browser, you are limited by the Javascript sandbox.
8.2.3 - Legacy Firefox Driver
The legacy Firefox Driver was developed as a browser extension by the Selenium Developers. Firefox updated their security model, so it no longer works. You now need to use geckodriver.
Firefox driver is included in the selenium-server-stanalone.jar available in the downloads.
The driver comes in the form of an xpi (firefox extension) which is added to the firefox
profile when you start a new instance of FirefoxDriver.
Pros
Runs in a real browser and supports Javascript
Faster than the InternetExplorerDriver
Cons
Slower than the HtmlUnitDriver
Important System Properties
The following system properties (read using System.getProperty() and set using System.setProperty() in Java code or the “-DpropertyName=value” command line flag) are used by the FirefoxDriver:
Property
What it means
webdriver.firefox.bin
The location of the binary used to control firefox.
webdriver.firefox.marionette
Boolean value, if set on standalone-server will ignore any “marionette” desired capability requested and force firefox to use GeckoDriver (true) or Legacy Firefox Driver (false)
webdriver.firefox.profile
The name of the profile to use when starting firefox. This defaults to webdriver creating an anonymous profile
webdriver.firefox.useExisting
Never use in production Use a running instance of firefox if one is present
webdriver.firefox.logfile
Log file to dump firefox stdout/stderr to
Normally the Firefox binary is assumed to be in the default location for your particular operating system:
The FirefoxDriver is largely written in the form of a Firefox extension. Language bindings control the driver by connecting over a socket and sending commands (described in the JsonWireProtocol page) in UTF-8. The extension makes use of the XPCOM primitives offered by Firefox in order to do its work. The important thing to notice is that the command names map directly on to methods exposed on the “FirefoxDriver.prototype” in the javascript code.
Working on the FirefoxDriver Code
Firstly, make sure that there’s no old version of the FirefoxDriver installed:
Delete the existing WebDriver profile if there is one. Delete the files too (it’s an option that’s offered when you delete the profile in the profile manager)
Secondly, take a look at the Mozilla Developer Center, particularly the section to do with setting up an extension development environment. You should now be ready to edit code. It’s best to create a test around the area of code that you’re working on, and to run this using the SingleTestSuite. The FirefoxDriver logs errors to Firefox’s error console (“Tools->Error Console”), so if a test fails, that’s a great place to start looking.
To actually log information to the console, use the “Utils.dumpn()” method in your javascript code. If you find that you’d like to examine an object in detail, use the “Utils.dump()” method, which will report which interfaces an object implements, as well as outputting as much information as it can to the console..
Flow of Control: Starting Firefox
The following steps are performed when instantiating an instance of the FirefoxDriver:
Grab the “locking port”
8.2.4 - Selenium grid 2
Selenium Grid 2 supported WebDriver and Selenium RC. It was replaced by Grid 3 which removed RC code. Grid 3 was completely rewritten for the new Grid 4.
This documentation previously located on the wiki You can read our documentation for more information about Grid 4
Introduction
Grid allows you to :
scale by distributing tests on several machines ( parallel execution )
manage multiple environments from a central point, making it easy to run the tests against a vast combination of browsers / OS.
minimize the maintenance time for the grid by allowing you to implement custom hooks to leverage virtual infrastructure for instance.
Quick Start
This example will show you how to start the Selenium 2 Hub, and register both a WebDriver node and a Selenium 1 RC legacy node. We’ll also show you how to call the grid from Java. The hub and nodes are shown here running on the same machine, but of course you can copy the selenium-server-standalone to multiple machines.
Note: The selenium-server-standalone package includes the Hub, WebDriver, and legacy RC needed to run the grid. Ant is not required anymore. You can download the selenium-server-standalone-*.jar from http://selenium-release.storage.googleapis.com/index.html
This walk-through assumes you already have Java installed.
Step 1: Start the hub
The Hub is the central point that will receive all the test request and distribute them the the right nodes.
Open a command prompt and navigate to the directory where you copied the selenium-server-standalone file. Type the following command:
The hub will automatically start-up using port 4444 by default. To change the default port, you can add the optional parameter -port when you run the command.
You can view the status of the hub by opening a browser window and navigating to:
http://localhost:4444/grid/console
Step 2: Start the nodes
Regardless on whether you want to run a grid with new WebDriver functionality, or a grid with Selenium 1 RC functionality, or both at the same time, you use the same selenium-server-standalone jar file to start the nodes.
Note: The port defaults to 5555 if not specified whenever the “-role” option is provided and is not hub.
For backwards compatibility “wd” and “rc” roles are still a valid subset of the “node” role. But those roles limit the types of remote connections to their corresponding API, while “node” allows both RC and WebDriver remote connections.
Using grid to run tests
( using java as an example )
Now that the grid is in-place, we need to access the grid from our test cases. For the Selenium 1 RC nodes, you can continue to use the DefaultSelenium object and pass in the hub information:
Selenium selenium = new DefaultSelenium(“localhost”, 4444, “*firefox”, “http://www.google.com”);
For WebDriver nodes, you will need to use the RemoteWebDriver and the DesiredCapabilities object to define which browser, version and platform you wish to use.
Create the target browser capabilities you want to run the tests against:
WebDriver driver = new RemoteWebDriver(new URL("http://localhost:4444/wd/hub"), capability);
The hub will then assign the test to a matching node.
A node matches if all the requested capabilities are met. To request specific capabilities on the grid, specify them before passing it into the WebDriver object.
The capabilities that are not specified will be ignored.
If you specify capabilities that do not exist on your grid (for example, your test specifies Firefox version 4.0, but have no Firefox 4 instance) then there will be no match and the test will fail to run.
Configuring the nodes
The node can be configured in 2 different ways; one is by specifying
command-line parameters, the other is by specifying a JSON file.
Configuring the nodes by command line
By default, starting the node allows for concurrent use of 11
browsers…: 5 Firefox, 5 Chrome, 1 Internet Explorer. The maximum number of concurrent tests is set to 5 by default. To change this and other browser settings, you can pass in parameters to each -browser switch (each switch represents a node based on your parameters). If you use the -browser parameter, the default browsers will be ignored and only what you specify command line will be used.
This setting starts 5 Firefox 3.6 nodes on a Linux machine.
If your remote machine has multiple versions of Firefox you’d like to use, you can map the location of each binary to a particular version on the same machine:
-host <IP | hostname> specify the hostname or IP. usually not needed and determined automatically. For exotic network configuration, network with VPN, specifying the host might be necessary.
-timeout 30 (300 is default) The timeout in seconds before the hub automatically releases a node that hasn’t received any requests for more than the specified number of seconds. After this time, the node will be released for another test in the queue. This helps to clear client crashes without manual intervention. To remove the timeout completely, specify -timeout 0 and the hub will never release the node.
Note: This is NOT the WebDriver timeout for all ”wait for WebElement” type of commands.
-maxSession 5 (5 is default) The maximum number of browsers that can run in parallel on the node. This is different from the maxInstance of supported browsers (Example: For a node that supports Firefox 3.6, Firefox 4.0 and Internet Explorer 8, maxSession=1 will ensure that you never have more than 1 browser running. With maxSession=2 you can have 2 Firefox tests at the same time, or 1 Internet Explorer and 1 Firefox test).
-browser < params > If -browser is not set, a node will start with 5 firefox, 1 chrome, and 1 internet explorer instance (assuming it’s on a windows box). This parameter can be set multiple times on the same line to define multiple types of browsers.
Parameters allowed for -browser:
browserName={android, chrome, firefox, htmlunit, internet explorer, iphone, opera}
version={browser version}
firefox_binary={path to executable binary}
chrome_binary={path to executable binary}
maxInstances={maximum number of browsers of this type}
platform={WINDOWS, LINUX, MAC}
-registerCycle N = how often in ms the node will try to register itself again. Allow to restart the hub without having to restart the nodes.
Really large (>50 node) Hub installations may need to increase the jetty threads by setting -DPOOL_MAX=512 (or larger) on the java command line.
Configuring timeouts (Version 2.21 required)
Timeouts in the grid should normally be handled through webDriver.manage().timeouts(), which will control how the different operations time out.
To preserve run-time integrity of a grid with selenium-servers, there are two other timeout values that can be set.
On the hub, setting the -timeout command line option to “30” seconds will ensure all resources are reclaimed 30 seconds after a client crashes. On the hub you can also set -browserTimeout 60 to make the maximum time a node is willing to hang inside the browser 60 seconds. This will ensure all resources are reclaimed slightly after 60 seconds. All the nodes use these two values from the hub if they are set. Locally set parameters on a single node has precedence, it is generally recommended not to set these timeouts on the node.
The browserTimeout should be:
Higher than the socket lock timeout (45 seconds)
Generally higher than values used in webDriver.manage().timeouts(), since this mechanism is a “last line of defense”.
Upon detecting anomalous usage patterns, the hub can give the following message:
Client requested session XYZ that was terminated due to REASON
Reason
Cause/fix
TIMEOUT
The session timed out because the client did not access it within the timeout. If the client has been somehow suspended, this may happen when it wakes up
BROWSER_TIMEOUT
The node timed out the browser because it was hanging for too long (parameter browserTimeout)
ORPHAN
A client waiting in queue has given up once it was offered a new session
CLIENT_STOPPED_SESSION
The session was stopped using an ordinary call to stop/quit on the client. Why are you using it again??
CLIENT_GONE
The client process (your code) appears to have died or otherwise not responded to our requests, intermittent network issues may also cause
FORWARDING_TO_NODE_FAILED
The hub was unable to forward to the node. Out of memory errors/node stability issues or network problems
CREATIONFAILED
The node failed to create the browser. This can typically happen when there are environmental/configuration problems on the node. Try using the node directly to track problem.
PROXY_REREGISTRATION
The session has been discarded because the node has re-registered on the grid (in mid-test)
Tips for running with grid
If your tests are running in parallel, make sure that each thread deallocates its webdriver resource independently of any other tests running on other threads. Starting 1 browser per thread at the start of the test-run and deallocating all browsers at the end is not a good idea. (If one test-case decides to consume abnormal amounts of time you may get timeouts on all the other tests because they’re waiting for the slow test. This can be very confusing)
This section describes the PLATFORM option used in configuring Selenium Grid Nodes and [DesiredCapabilities] object.
History of Platforms
When requesting a new WebDriver session from the Grid, user can specify the [DesiredCapabilities] of the remote browser. Things such as the browser name, version, and platform are among the list of options that can be specified by the test. Specifying desired.
The following code demonstrates the DesiredCapability of Internet Explorer, version 9, on Windows XP platform:
The request for a new session with specified DesiredCapability is sent to the Grid Hub, which will look through all of the registered nodes to see if any of them match the specification given by the test. If no node matches the specification, a CapabilityNotPresentOnTheGridException will be returned.
It is a common misconception that the PLATFORM determines the ability to choose the Operating System on which the new session will be created. In this situation, platform and operating system are not the same, thus specifying the platform to “Windows 2003 Server” will not allow you to choose between a Windows XP, Vista, and 2003 server. This misconception can be born from platforms such as Mac OSX and Linux, where the name of the platform matches the name of the Operating System.
In case of Selenium Grid, platform refers to the underlying interactions between the Driver Atoms and the web browser. Mac OSX and Linux based Operating Systems (Centos, Ubuntu, Debian, etc..) have a relatively stable communication with the web browsers such as Firefox and Chrome. Thus the platform names are simple to understand, as seen in the example bellow:
capability.setPlatform(Platform.MAC); //Set platform to OSX
capability.setPlatform(Platform.LINUX); // Set platform to Linux based systems
The prior to release of Vista, Windows based Operating Systems only had one platform, shown here:
capability.setPlatform(Platform.WINDOWS); //Set platform to Windows
However, with the introduction of UAC in Windows Vista, there were major changes done to the underlying interactions between WebDriver and Internet Explorer. To work around the UAC constrains a new platform was added to nodes with Windows based Operating systems:
capability.setPlatform(Platform.VISTA); //Set platform to VISTA
With the release of Windows 8, another major overhaul happened in how the WebDriver communicates with Internet Explorer, thus a new platform was added for Windows 8 based nodes:
capability.setPlatform(Platform.WIN8); //Set platform to Windows 8
Similar story happened with introduction of Windows 8.1, in this example the platform is set to Windows 8.1:
capability.setPlatform(Platform.WIN8_1); //Set platform to Windows 8.1
Operating System Platforms
The following list demonstrates some of the Operating Systems, and what Platform they are part of:
MAC****All OSX Operating Systems LINUX
Centos
Ubuntu
UNIXSolarisBSD XP
Windows Server 2003
Windows XP
Windows NT
VISTAWindows VistaWindows 2008 Server****Windows 7 WIN8
Windows 2012 Server
Windows 8
WIN8_1****Windows 8.1
Families
Different platforms are grouped into “Families” of platform. For example, Win8 and XP platforms are a part of the WINDOWS family. Similarly ANDROID and LINUX are part of the UNIX family.
Choosing Platform and Platform Family
When setting a platform on the [DesiredCapabilities] object, we can set an individual platform or family of platforms. For example:
capability.setPlatform(Platform.VISTA); //Will return a node with Windows Vista or 2008 Server or Windows 7 Operating System.
capability.setPlatform(Platform.XP); //Will return a node with Windows XP or 2003 Server or Windows 2000 Professional Operating System.
capability.setPlatform(Platform.WINDOWS); //Will return a node with ANY Windows Operating System
More Information
For more information on the latest platforms, please view this file:
org.openqa.selenium.Platform.java
8.2.5 - History of Grid Platforms
Information for working with platform names in Grid 2.
This documentation previously located on the wiki You can read more about Grid 2
Selenium Grid Platforms
This section describes the PLATFORM option used in configuring Selenium Grid Nodes and [DesiredCapabilities] object.
History of Platforms
When requesting a new WebDriver session from the Grid, user can specify the [DesiredCapabilities] of the remote browser. Things such as the browser name, version, and platform are among the list of options that can be specified by the test. Specifying desired.
The following code demonstrates the DesiredCapability of Internet Explorer, version 9, on Windows XP platform:
The request for a new session with specified DesiredCapability is sent to the Grid Hub, which will look through all of the registered nodes to see if any of them match the specification given by the test. If no node matches the specification, a CapabilityNotPresentOnTheGridException will be returned.
It is a common misconception that the PLATFORM determines the ability to choose the Operating System on which the new session will be created. In this situation, platform and operating system are not the same, thus specifying the platform to “Windows 2003 Server” will not allow you to choose between a Windows XP, Vista, and 2003 server. This misconception can be born from platforms such as Mac OSX and Linux, where the name of the platform matches the name of the Operating System.
In case of Selenium Grid, platform refers to the underlying interactions between the Driver Atoms and the web browser. Mac OSX and Linux based Operating Systems (Centos, Ubuntu, Debian, etc..) have a relatively stable communication with the web browsers such as Firefox and Chrome. Thus the platform names are simple to understand, as seen in the example bellow:
capability.setPlatform(Platform.MAC); //Set platform to OSX
capability.setPlatform(Platform.LINUX); // Set platform to Linux based systems
The prior to release of Vista, Windows based Operating Systems only had one platform, shown here:
capability.setPlatform(Platform.WINDOWS); //Set platform to Windows
However, with the introduction of UAC in Windows Vista, there were major changes done to the underlying interactions between WebDriver and Internet Explorer. To work around the UAC constrains a new platform was added to nodes with Windows based Operating systems:
capability.setPlatform(Platform.VISTA); //Set platform to VISTA
With the release of Windows 8, another major overhaul happened in how the WebDriver communicates with Internet Explorer, thus a new platform was added for Windows 8 based nodes:
capability.setPlatform(Platform.WIN8); //Set platform to Windows 8
Similar story happened with introduction of Windows 8.1, in this example the platform is set to Windows 8.1:
capability.setPlatform(Platform.WIN8_1); //Set platform to Windows 8.1
Operating System Platforms
The following list demonstrates some of the Operating Systems, and what Platform they are part of:
MAC****All OSX Operating Systems LINUX
Centos
Ubuntu
UNIXSolarisBSD XP
Windows Server 2003
Windows XP
Windows NT
VISTAWindows VistaWindows 2008 Server****Windows 7 WIN8
Windows 2012 Server
Windows 8
WIN8_1****Windows 8.1
Families
Different platforms are grouped into “Families” of platform. For example, Win8 and XP platforms are a part of the WINDOWS family. Similarly ANDROID and LINUX are part of the UNIX family.
Choosing Platform and Platform Family
When setting a platform on the [DesiredCapabilities] object, we can set an individual platform or family of platforms. For example:
capability.setPlatform(Platform.VISTA); //Will return a node with Windows Vista or 2008 Server or Windows 7 Operating System.
capability.setPlatform(Platform.XP); //Will return a node with Windows XP or 2003 Server or Windows 2000 Professional Operating System.
capability.setPlatform(Platform.WINDOWS); //Will return a node with ANY Windows Operating System
More Information
For more information on the latest platforms, please view this file:
The server will always run on the machine with the browser you want to
test. The server can be used either from the command line or through code
configuration.
Starting the server from the command line
Once you have downloaded selenium-server-standalone-{VERSION}.jar,
place it on the computer with the browser you want to test. Then, from
the directory with the jar, run the following:
The caller is expected to terminate each session properly, calling
either Selenium#stop() or WebDriver#quit.
The selenium-server keeps in-memory logs for each ongoing session,
which are cleared when Selenium#stop() or WebDriver#quit is called. If
you forget to terminate these sessions, your server may leak memory. If
you keep extremely long-running sessions, you will probably need to
stop/quit every now and then (or increase memory with -Xmx jvm option).
Timeouts (from version 2.21)
The server has two different timeouts, which can be set as follows:
Controls how long the browser is allowed to hang (value in seconds).
timeout
Controls how long the client is allowed to be gone
before the session is reclaimed (value in seconds).
The system property selenium.server.session.timeout
is no longer supported as of 2.21.
Please note that the browserTimeout
is intended as a backup timeout mechanism
when the ordinary timeout mechanism fails,
which should be used mostly in grid/server environments
to ensure that crashed/lost processes do not stay around for too long,
polluting the runtime environment.
Configuring the server programmatically
In theory, the process is as simple as mapping the DriverServlet to
a URL, but it is also possible to host the page in a lightweight
container, such as Jetty, configured entirely in code.
Download the selenium-server.zip and unpack.
Put the JARs on the CLASSPATH.
Create a new class called AppServer.
Here, we are using Jetty, so you will need to download
that as well:
This page tries to summarize additional constraints that arise when running Selenium2 in parallel.
WebDriver instantiation
While an individual WebDriver instance cannot be shared among threads, it is easy to create multiple WebDriver instances.
Ephemeral sockets
There is a general problem of TCP/IP v4, where the TCP/IP stack uses ephemeral ports when making a connection between two sockets. The typical symptom of this is that connection failures start appearing after a short time of running, often a minute or two. The message will vary somewhat but it always appears after some time, and if you reduce the number of browsers it will eventually work fine.
Wikipedia on Ephemeral ports or a quick google of “ephemeral sockets ” will tell you what your current OS delivers and how to set it.
Currently (2.13.0) it seems like a firefox running at full blast consumes something in the range of 2000 ephemeral ports per firefox; your mileage will vary here. This means you can
run out of ephemeral port on Windows XP with as litttle as 2 browsers, maybe even 1 if you for instance iterate extermly quickly .
Will it be fixed ?
The solution to the ephemeral socket problem is HTTP1.1 keep alive on the connections. Firefox does not support keep-alive as of version 2.13.0.
The means you can use the java client to scale out to remote boxes running selenium server and never have any problems on the central build server. You may need to solve socket problems on the remote boxes though.
Microsoft Windows
If you are using the old versions of Windows (<=2003, inc XP) you should not be
waiting for port usage to get low enough to fit in this space. That may simply never happen, although some combinations probably will. See http://support.microsoft.com/kb/196271 on how to adjust it.
If you for technical reasons cannot adjust the port range on your Windows machine you will not be able to run more than 2-3 firefox browsers.
Avoiding the socket lock
Starting new browsers between each test class/test method is slow, and the socket lock also uses Ephemeral sockets, worsening the problem described above.
If you’re using a suite-less test setup (like many JUnit4 users), you often start/stop the browsers in @BeforeClass/@AfterClass methods. Another option is to start the browsers in @BeforeClass and use something like JUnit/TestNG run listeners to shut down all the browsers at the end of the test run. Maven surefire supports run listeners for both JUnit and TestNG.
(TODO: Strategies to disable the socket lock and manage the ports yourself)
Native events
Due to a shared file in the native events logic, the firefox driver should probably not be using native events when running concurrently. (Watch this issue).
8.2.8 - Stealing focus from Firefox in Linux
How to work with Native Events in the Legacy Firefox extension.
This page describes an essential component of the native events implementation on Linux - focus maintaining.
In order for native events to be processed in Firefox, it must always retain focus.
In case the user decides to switch to another window (a thing which could be understood),
Firefox must not know it lost focus.
Solution overview
Basic idea
The basic idea is to get between the XLib (X-Windows client library) layer and the application. X-Windows notifies the application of events (user input, windows being destroyed, mouse movements) by asynchronous events. The events that indicate loss of focus FocusOut are discarded. The idea is based on Jordan Sissel’s implementation of a pre-loaded library that over-rides XNextEvent - see http://www.semicomplete.com/blog/geekery/xsendevent-xdotool-and-ld_preload.html.
Extension
This simple implementation works well as long as there’s one browser window. When multiple windows are involved, several challenges arise:
Even though new windows may be opened, native events must continue to flow to the active window. However, most window managers will give focus to newly-opened windows.
Window Switching: When wishing to switch to another window, the focus has to be moved. This requires cooperation between WebDriver’s Firefox extension and this component.
Closing windows: When a window is closed, focus must move to another window. By design, WebDriver does not guarantee anything if the active window is closed - until a new window is being switched to. In this situation, special care must be taken.
Interaction with other components
The basic idea requires no interaction with other components of WebDriver.
However, when multiple windows are involved - creating, switching or destroying, this component should be aware of it.
New window creation cannot be tracked - as it may happen as a side effect of many operations.
Switching and closing can be tracked.
Involved technologies
To understand this solution, one should be familiar with X-Windows and its events.
Knowledge of the GDK event processing loop is also useful.
Implementation Details
All of this describes the code in firefox/src/cpp/linux-specific/x_ignore_nofocus.c.
The shared library
Hijacking the events is done by over-riding XNextEvent.
A shared library containing a modified implementation of XNextEvent is loaded using LD_PRELOAD.
The modified function opens /usr/lib/libX11.so.6 and invokes the real function.
Then the event that the real function returns (i.e. the real event) is inspected.
Identifying events
Under the basic idea, FocusOut events will be simply discarded. However, window switching complicates matters.
Data structure
There’s a global data structure that remembers the following information:
The active window ID (if there is such one at the moment)
The ID of a new window that’s being created (again, if exists)
If window switching is in progress.
If window closing is in progress.
Was the focus given to another window and should be stolen back to the active one?
Was a FocusIn event already received by the active window?
Did we set the currently active window as a result of a close operation?
Firefox starts up
FocusIn event arrives and the active window ID is 0. A new active window is set. Note that during the creation of the main window, another sub-window is created and a FocusOut event is sent to the active window. Fortunately, this FocusOut event indicates that the focus is going to move to a sub-window (identified by NotifyInferior) so it is allowed.
The user has switched to another window
This is indicated by a FocusOut event with a detail field that is neither NotifyAncestor nor NotifyInferior. This event is simply discarded and replaced with a KeymapNotify event, which is promptly discarded by GDK.
A new window is being created
This condition is identified by a ReparentNotify event. When this happens, the new_window field will be set to the ID of the newly created window. Subsequent FocusOut events will be allowed - during the new window creation events will flow as usual (FocusOut event from the active window, FocusIn event to the new window, FocusOut to the new window and FocusIn to a sub-window of the new window). After the sub-window of the new window receives FocusIn, a call to XSetInputFocus will be issued to return the focus to the active window.
A window switch occurs
During a window switch events will flow as normal. A window switch is considered done when the sub-window of a window receives the FocusIn event. A window switch starts by identifying the file /tmp/switch_window_started. In this file, a switch: string following a window ID is written (the ID is just for debugging purpose). This will change the active window ID to 0 and the state to “during switch”. During a switch (or when there’s no active window) no events are discarded.
A window is being closed
Very similar to window switching (also identified by reading the file). However, it is indicated that the window is being closed - in case it was closed, no focus stealing will take place. In addition, the DestroyNotify event is being identified to find out when the active window is being closed (explicitly by the user or implicitly by some other operation that is not an explicit call to close). In this case, the active window ID will be set to 0 as well.
This page details how WebDriver is able to accept untrusted SSL certificates, allowing users to test trusted sites in a testing environment, where valid certificates usually do not exist. This feature is turned on by default for all supported browsers (Currently Firefox).
Firefox
Outline of solution
Firefox has an interface for overriding invalid certificates, called nsICertOverrideService. Implement this interface as a proxy to the original service - unless untrusted certificates are allowed. In that case, when asked about a certificate (a call to hasMatchingOverride for an invalid certificate) - indicate it’s trusted.
Implementation details
Implementing the idea is mostly straightforward - badCertListener.js is a stand-alone module, that, when loaded, registers a factory for returning an instance of the service. The interesting function is hasMatchingOverride:
It’s impossible to just set them all, since Firefox expects a perfect match between the offences generated by the certificate and the function’s return value: (security/manager/ssl/src/SSLServerCertVerification.cpp:302):
if (overrideService)
{
PRBool haveOverride;
PRBool isTemporaryOverride; // we don't care
nsrv = overrideService->HasMatchingOverride(hostString, port,
ix509,
&overrideBits,
&isTemporaryOverride,
&haveOverride);
if (NS_SUCCEEDED(nsrv) && haveOverride)
{
// remove the errors that are already overriden
remaining_display_errors -= overrideBits;
}
}
if (!remaining_display_errors) {
// all errors are covered by override rules, so let's accept the cert
return SECSuccess;
}
The exact mapping of violation to error code can be easily seen at security/manager/pki/resources/content/exceptionDialog.js (in Firefox source):
The SSL status can be obtained from "@mozilla.org/security/recentbadcerts;1" usually - However, the certificate (and its status) are added to this service only after the call to hasMatchingOverride, so there is no easy way to find out the certificate’s SSLStatus. Instead, the checks have to be executed manually.
Two checks are carried out:
Calling nsIX509Cert.verifyForUsage
Comparing hostname against nsIX509Cert.commonName. If those are not equal, ERROR_MISMATCH is set.
The second check indicates whether ERROR_MISMATCH should be set.
The first check should indicate whether ERROR_UNTRUSTED and ERROR_TIME should be set. Unfortunately, it does not work reliably when the certificate expired and is from an untrusted issuer. When the certificate has expired, the return code would be CERT_EXPIRED even if it is also untrusted. For this reason, the FirefoxDriver assumes that certificates will be untrusted - it always sets the ERROR_UNTRUSTED bit - the other two will be set only if the conditions for them are met.
This could pose a problem for someone testing a site with a valid certificate that does not match the host name it’s served from (e.g. test environment serving production certificates). An additional feature for FirefoxProfile was added: FirefoxProfile.setAssumeUntrustedCertificateIssuer. Calling this function with false will turn the ERROR_UNTRUSTED bit off and allow a user to work in such situation.
HTMLUnit
Not tested yet.
IE
Not implemented yet.
Chrome
Not implemented yet.
8.2.10 - WebDriver For Mobile Browsers
Describes how Selenium 2 supported Android and iOS before Appium was created
We provide mobile drivers for two major mobile platforms: Android and iOS (iPhone & iPad).
They can be run on real devices and in an Android emulator or in the iOS Simulator, as appropriate. They are packaged as an app. The app needs to be installed on the emulator or device. The app embeds a RemoteWebDriver server and a light-weight HTTP server which receive, and respond to, requests from WebDriver Clients i.e. from your automated tests.
The connection between the server on the mobile platform and your tests uses an IP connection. The connection may need to be configured. For Android you can connect establish an IP connection over USB.
In some cases your existing WebDriver tests may run successfully e.g. where a common web site serves mobile and desktop users and where the UI is relatively straight-forward. However in other cases you may end up needing to create specific tests for the mobile site; particularly when the site provides specific capabilities, user interfaces, etc. for mobile browsers.
Even when a common web site serves both desktop and mobile browsers, you may want to consider writing specific tests that incorporate factors such as the screen-size of the mobile devices, and different ways users are likely to interact with your web site or web app.
Headless WebKit WebDriver. Many mobile browsers are WebKit based. Headless WebKit provides a fast light-weight solution.
These projects don’t appear to be active, however they may provide a starting point for future work on these platforms.
8.2.11 - Frequently Asked Questions for Selenium 2
Items of interest for moving from Selenium 1 to Selenium 2
This documentation previously located on the wiki \
Q: What is WebDriver?
A: WebDriver is a tool for writing automated tests of websites. It aims to mimic the behaviour of a real user, and as such interacts with the HTML of the application.
A: The aim is the same (to allow you to test your webapp), but the implementation is different. Rather than running as a Javascript application within the browser (with the limitations this brings, such as the “same origin” problem), WebDriver controls the browser itself. This means that it can take advantage of any facilities offered by the native platform.
Q: What is Selenium 2.0?
A: WebDriver is part of Selenium. The main contribution that WebDriver makes is its API and the native drivers.
Q: How do I migrate from using the original Selenium APIs to the new WebDriver APIs?
A: The existing drivers are the ChromeDriver, InternetExplorerDriver, FirefoxDriver, OperaDriver and HtmlUnitDriver. For more information about each of these, including their relative strengths and weaknesses, please follow the links to the relevant pages. There is also support for mobile testing via the AndroidDriver, OperaMobileDriver and IPhoneDriver.
Q: What does it mean to be “developer focused”?
A: We believe that within a software application’s development team, the people who are best placed to build the tools that everyone else can use are the developers. Although it should be easy to use WebDriver directly, it should also be easy to use it as a building block for more sophisticated tools. Because of this, WebDriver has a small API that’s easy to explore by hitting the “autocomplete” button in your favourite IDE, and aims to work consistently no matter which browser implementation you use.
Q: How do I execute Javascript directly?
A: We believe that most of the time there is a requirement to execute Javascript there is a failing in the tool being used: it hasn’t emitted the correct events, has not interacted with a page correctly, or has failed to react when an XmlHttpRequest returns. We would rather fix WebDriver to work consistently and correctly than rely on testers working out which Javascript method to call.
We also realise that there will be times when this is a limitation. As a result, for those browsers that support it, you can execute Javascript by casting the WebDriver instance to a JavascriptExecutor (http://selenium.googlecode.com/svn/trunk/docs/api/java/org/openqa/selenium/JavascriptExecutor.html). In Java, this looks like:
Other language bindings will follow a similar approach. Take a look at the UsingJavascript page for more information.
Q: Why is my Javascript execution always returning null?
A: You need to return from your javascript snippet to return a value, so:
js.executeScript("document.title");
will return null, but:
js.executeScript("return document.title");
will return the title of the document.
Q: My XPath finds elements in one browser, but not in others. Why is this?
A: The short answer is that each supported browser handles XPath slightly differently, and you’re probably running into one of these differences. The long answer is on the XpathInWebDriver page.
Q: The InternetExplorerDriver does not work well on Vista. How do I get it to work as expected?
A: The InternetExplorerDriver requires that all security domains are set to the same value (either trusted or untrusted) If you’re not in a position to modify the security domains, then you can override the check like this:
As can be told by the name of the constant, this may introduce flakiness in your tests. If all sites are in the same protection domain, you should be okay.
Q: What about support for languages other than Java?
A: Python, Ruby, C# and Java are all supported directly by the development team. There are also webdriver implementations for PHP and Perl. Support for a pure JS API is also planned.
Q: How do I handle pop up windows?
A: WebDriver offers the ability to cope with multiple windows. This is done by using the “WebDriver.switchTo().window()” method to switch to a window with a known name. If the name is not known, you can use “WebDriver.getWindowHandles()” to obtain a list of known windows. You may pass the handle to “switchTo().window()”.
Q: Does WebDriver support Javascript alerts and prompts?
A: Yes, using the Alerts API (http://selenium.googlecode.com/svn/trunk/docs/api/java/org/openqa/selenium/Alert.html):
// Get a handle to the open alert, prompt or confirmation
Alert alert = driver.switchTo().alert();
// Get the text of the alert or prompt
alert.getText();
// And acknowledge the alert (equivalent to clicking "OK")
alert.accept();
Q: Does WebDriver support file uploads?
A: Yes.
You can’t interact with the native OS file browser dialog directly, but we do some magic so that if you call WebElement#sendKeys("/path/to/file") on a file upload element, it does the right thing. Make sure you don’t WebElement#click() the file upload element, or the browser will probably hang.
Handy hint: You can’t interact with hidden elements without making them un-hidden. If your element is hidden, it can probably be un-hidden with some code like:
Q: The “onchange” event doesn’t fire after a call “sendKeys”
A: WebDriver leaves the focus in the element you called “sendKeys” on. The “onchange” event will only fire when focus leaves that element. As such, you need to move the focus, perhaps using a “click” on another element.
Q: Can I run multiple instances of the WebDriver sub-classes?
A: Each instance of an HtmlUnitDriver, ChromeDriver and FirefoxDriver is completely independent of every other instance (in the case of firefox and chrome, each instance has its own anonymous profile it uses). Because of the way that Windows works, there should only ever be a single InternetExplorerDriver instance at one time. If you need to run more than one instance of the InternetExplorerDriver at a time, consider using the Remote!WebDriver and virtual machines.
Q: I need to use a proxy. How do I configure that?
A: Proxy configuration is done via the org.openqa.selenium.Proxy class like so:
Proxy proxy = new Proxy();
proxy.setProxyAutoconfigUrl("http://youdomain/config");
// We use firefox as an example here.
DesiredCapabilities capabilities = DesiredCapabilities.firefox();
capabilities.setCapability(CapabilityType.PROXY, proxy);
// You could use any webdriver implementation here
WebDriver driver = new FirefoxDriver(capabilities);
Q: How do I handle authentication with the HtmlUnitDriver?
A: When creating your instance of the HtmlUnitDriver, override the “modifyWebClient” method, for example:
WebDriver driver = new HtmlUnitDriver() {
protected WebClient modifyWebClient(WebClient client) {
// This class ships with HtmlUnit itself
DefaultCredentialsProvider creds = new DefaultCredentialsProvider();
// Set some example credentials
creds.addCredentials("username", "password");
// And now add the provider to the webClient instance
client.setCredentialsProvider(creds);
return client;
}
};
Q: Is WebDriver thread-safe?
A: WebDriver is not thread-safe. Having said that, if you can serialise access to the underlying driver instance, you can share a reference in more than one thread. This is not advisable. You /can/ on the other hand instantiate one WebDriver instance for each thread.
Q: How do I type into a contentEditable iframe?
A: Assuming that the iframe is named “foo”:
driver.switchTo().frame("foo");
WebElement editable = driver.switchTo().activeElement();
editable.sendKeys("Your text here");
Sometimes this doesn’t work, and this is because the iframe doesn’t have any content. On Firefox you can execute the following before “sendKeys”:
This is needed because the iframe has no content by default: there’s nothing to send keyboard input to. This method call inserts an empty tag, which sets everything up nicely.
Remember to switch out of the frame once you’re done (as all further interactions will be with this specific frame):
driver.switchTo().defaultContent();
Q: WebDriver fails to start Firefox on Linux due to java.net.SocketException
A: If, when running WebDriver on Linux, Firefox fails to start and the error looks like:
Caused by: java.net.SocketException: Invalid argument
at java.net.PlainSocketImpl.socketBind(Native Method)
at java.net.PlainSocketImpl.bind(PlainSocketImpl.java:365)
at java.net.Socket.bind(Socket.java:571)
at org.openqa.selenium.firefox.internal.SocketLock.isLockFree(SocketLock.java:99)
at org.openqa.selenium.firefox.internal.SocketLock.lock(SocketLock.java:63)
It may be caused due to IPv6 settings on the machine. Execute:
sudo sysctl net.ipv6.bindv6only=0
To get the socket to bind both to IPv6 and IPv4 addresses of the host with the same calls.
More permanent solution is disabling this behaviour by editing /etc/sysctl.d/bindv6only.conf
Q: WebDriver fails to find elements / Does not block on page loads
A: This problem can manifest itself in various ways:
Using WebDriver.findElement(…) throws ElementNotFoundException, but the element is clearly there - inspecting the DOM (using Firebug, etc) clearly shows it.
Calling Driver.get returns once the HTML has been loaded - but Javascript code triggered by the onload event was not done, so the page is incomplete and some elements cannot be found.
Clicking on an element / link triggers an operation that creates new element. However, calling findElement(s) after click returns does not find it. Isn’t click supposed to be blocking?
How do I know when a page has finished loading?
Explanation:
WebDriver has a blocking API, generally. However, under some conditions it is possible for a get call to return before the page has finished loading. The classic example is Javascript starting to run after the page has loaded (triggered by onload). Browsers (e.g. Firefox) will notify WebDriver when the basic HTML content has been loaded, which is when WebDriver returns. It’s difficult (if not impossible) to know when Javascript has finished executing, since JS code may schedule functions to be called in the future, depend on server response, etc. This is also true for clicking - when the platform supports native events (Windows, Linux) clicking is done by sending a mouse click event with the element’s coordinates at the OS level - WebDriver cannot track the exact sequence of operations this click creates. For this reason, the blocking API is imperfect - WebDriver cannot wait for all conditions to be met before the test proceeds because it does not know them. Usually, the important matter is whether the element involved in the next interaction is present and ready.
Solution:
Use the Wait class to wait for a specific element to appear. This class simply calls findElement over and over, discarding the NoSuchElementException each time, until the element is found (or a timeout has expired). Since this is the behaviour desired by default for many users, a mechanism for implicitly-waiting for elements to appear has been implemented. This is accessible through the WebDriver.manage().timeouts() call. (This was previously tracked on issue 26).
Q: How can I trigger arbitrary events on the page?
A: WebDriver aims to emulate user interaction - so the API reflects the ways a user can interact with various elements.
Triggering a specific event cannot be achieved directly using the API, but one can use the Javascript execution abilities to call methods on an element.
Q: Why is it not possible to interact with hidden elements?
A: Since a user cannot read text in a hidden element, WebDriver will not allow access to it as well.
However, it is possible to use Javascript execution abilities to call getText directly from the element:
WebElement element = ...;
((JavascriptExecutor) driver).executeScript("return arguments[0].getText();", element);
Q: How do I start Firefox with an extension installed?
A:
FirefoxProfile profile = new FirefoxProfile()
profile.addExtension(....);
WebDriver driver = new FirefoxDriver(profile);
Q: I’d like it if WebDriver did….
A: If there’s something that you’d like WebDriver to do, or you’ve found a bug, then please add an add an issue to the WebDriver project page.
Q: Selenium server sometimes takes a long time to start a new session ?
A: If you’re running on linux, you will need to increase the amount of entropy available for secure random number generation. Most linux distros can install a package called “randomsound” to do this.
Q: What’s the Selenium WebDriver API equivalent to TextPresent ?
A:
driver.findElement(By.tagName("body")).getText()
will get you the text of the page. To verifyTextPresent/assertTextPresent, from that you can use your favourite test framework to assert on the text. To waitForTextPresent, you may want to investigate the WebDriverWait class.
Q: The socket lock seems like a bad design. I can make it better
A: the socket lock that guards the starting of firefox is constructed with the following design constraints:
It is shared among all the language bindings; ruby, java and any of the other bindings can coexist at the same time on the same machine.
Certain critical parts of starting firefox must be exclusive-locked on the machine in question.
The socket lock itself is not the primary bottleneck, starting firefox is.
The SocketLock is an implementation of the Lock interface. This allows
for a pluggable strategy for your own implementation of it. To switch
to a different implementation, subclass the FirefoxDriver and override
the “obtainLock” method.
Q: Why do I get a UnicodeEncodeError when I send_keys in python
A: You likely don’t have a Locale set on your system. Please set a locale LANG=en_US.UTF-8 and LC_CTYPE=“en_US.UTF-8” for example.
8.2.12 - Selenium 2.0 Team
This is who you can blame for the Selenium 2 release.
If you’ve ever wondered who to thank (or blame!) for Selenium, then you’ve come to the right place. This page introduces you to the contributors and shows you what they’re working on.
SimonStewart: Original WebDriver developer and leading the Selenium 2 effort. He works mainly with Java and can be seen all over the code base, patching holes and adding features. By day he works as a Software Engineer in Test at Google. By night, he hacks on the crazy fun build grammar.
Julian Harty: Dabbled with WebDriver since 2007 mainly finding ways to make the code real and useful by testing it, and by documenting it. Currently working at eBay to find ways to make software testing more efficient and effective. He’s also involved in various open source initiatives, accessibility software, and writing material. Search for “Julian Harty” in your favorite search engine to track down his public work.
Jari Bakken: Has been working on WebDriver since late 2009, developed and now maintaining all things Ruby. Lead developer of Celerity and watir-webdriver and a committer on the Watir project. Day job is as a test engineer for classified ads website FINN.no, and by night I try to make use of my degree in jazz guitar.
David Burns: Has been working with Selenium 1 for about 4 years and with WebDriver since the beginning of 2010 and now maintaining the .NET and Python bindings. Senior Software Engineer in Test at Mozilla helping lead the Test Automation on Web propjects from within WebQA.
Anthony Long: Has been working with Selenium since 2008, and is currently working to improve the Selenium Python bindings. Anthony is the organizer of Quality Assurance and author of numerous python modules for use in the Quality Assurance field. He has used selenium extensively as a QA Lead at HUGE and most recently and currently, at AdMeld.
Jim Evans: Started working with the WebDriver and Selenium since the end of 2009, working mostly on the .NET bindings. His test automation experience includes 12 years at Microsoft, and has worked for the past 7 years as a Senior QA Engineer at Numara Software. When he’s not hacking code, he enjoys spending time with his family and performing as a singer and songwriter.
8.3 - Selenium 3
Selenium 3 was the implementation of WebDriver without the Selenium RC Code. It has since been replaced with Selenium 4, which implements the W3C WebDriver specification.
8.3.1 - Grid 3
Selenium Grid 3 supported WebDriver without Selenium RC code. Grid 3 was completely rewritten for the new Grid 4.
You can read our documentation for more information about Grid 4
Selenium Grid is a smart proxy server
that allows Selenium tests to route commands to remote web browser instances.
Its aim is to provide an easy way to run tests in parallel on multiple machines.
With Selenium Grid,
one server acts as the hub that routes JSON formatted test commands
to one or more registered Grid nodes.
Tests contact the hub to obtain access to remote browser instances.
The hub has a list of registered servers that it provides access to,
and allows control of these instances.
Selenium Grid allows us to run tests in parallel on multiple machines,
and to manage different browser versions and browser configurations centrally
(instead of in each individual test).
Selenium Grid is not a silver bullet.
It solves a subset of common delegation and distribution problems,
but will for example not manage your infrastructure,
and might not suit your specific needs.
8.3.2 - Setting up your own Grid 3
Quick start guide for setting up Grid 3.
To use Selenium Grid,
you need to maintain your own infrastructure for the nodes.
As this can be a cumbersome and time intense effort,
many organizations use IaaS providers
such as Amazon EC2 and Google Compute
to provide this infrastructure.
Other options include using providers such as Sauce Labs or Testing Bot
who provide a Selenium Grid as a service in the cloud.
It is certainly possible to also run nodes on your own hardware.
This chapter will go into detail about the option of running your own grid,
complete with its own node infrastructure.
Quick start
This example will show you how to start the Selenium 2 Grid Hub,
and register both a WebDriver node and a Selenium 1 RC legacy node.
We will also show you how to call the grid from Java.
The hub and nodes are shown here running on the same machine,
but of course you can copy the selenium-server-standalone to multiple machines.
The selenium-server-standalone package includes the hub,
WebDriver, and legacy RC needed to run the Grid,
ant is not required anymore.
You can download the selenium-server-standalone.jar from
https://selenium.dev/downloads/.
Step 1: Start the Hub
The Hub is the central point that will receive test requests
and distribute them to the right nodes.
The distribution is done on a capabilities basis,
meaning a test requiring a set of capabilities
will only be distributed to nodes offering that set or subset of capabilities.
Because a test’s desired capabilities are just what the name implies, desired,
the hub cannot guarantee that it will locate a node
fully matching the requested desired capabilities set.
Open a command prompt
and navigate to the directory where you copied
the selenium-server-standalone.jar file.
You start the hub by passing the -role hub flag
to the standalone server:
The Hub will listen to port 4444 by default.
You can view the status of the hub by opening a browser window and navigating to
http://localhost:4444/grid/console.
To change the default port,
you can add the optional -port flag
with an integer representing the port to listen to when you run the command.
Also, all of the other options you see in the JSON config file (seen below)
are possible command-line flags.
You certainly can get by with only the simple command shown above,
but if you need more advanced configuration,
you can also specify a JSON format config file, for convenience,
to configure the hub when you start it.
You can do it like so:
Below you will see an example of a hubConfig.json file.
We will go into more detail on how to provide node configuration files in step 2.
{"_comment":"Configuration for Hub - hubConfig.json","host":ip,"maxSession":5,"port":4444,"cleanupCycle":5000,"timeout":300000,"newSessionWaitTimeout":-1,"servlets":[],"prioritizer":null,"capabilityMatcher":"org.openqa.grid.internal.utils.DefaultCapabilityMatcher","throwOnCapabilityNotPresent":true,"nodePolling":180000,"platform":"WINDOWS"}
Step 2: Start the Nodes
Regardless of whether you want to run a grid with new WebDriver functionality,
or a grid with Selenium 1 RC functionality,
or both at the same time,
you use the same selenium-server-standalone.jar file to start the nodes:
If a port is not specified through the -port flag,
a free port will be chosen. You can run multiple nodes on one machine
but if you do so, you need to be aware of your systems memory resources
and problems with screenshots if your tests take them.
Configuration of Node with options
As mentioned, for backwards compatibility
“wd” and “rc” roles are still a valid subset of the “node” role.
But those roles limit the types of remote connections to their corresponding API,
while “node” allows both RC and WebDriver remote connections.
Passing JVM properties (using the -D flag
before the -jar argument)
on the command line as well,
and these will be picked up and propagated to the nodes:
-Dwebdriver.chrome.driver=chromedriver.exe
Configuration of Node with JSON
You can also start grid nodes that are configured
with a JSON configuration file
{"capabilities":[{"browserName":"firefox","acceptSslCerts":true,"javascriptEnabled":true,"takesScreenshot":false,"firefox_profile":"","browser-version":"27","platform":"WINDOWS","maxInstances":5,"firefox_binary":"","cleanSession":true},{"browserName":"chrome","maxInstances":5,"platform":"WINDOWS","webdriver.chrome.driver":"C:/Program Files (x86)/Google/Chrome/Application/chrome.exe"},{"browserName":"internet explorer","maxInstances":1,"platform":"WINDOWS","webdriver.ie.driver":"C:/Program Files (x86)/Internet Explorer/iexplore.exe"}],"configuration":{"_comment":"Configuration for Node","cleanUpCycle":2000,"timeout":30000,"proxy":"org.openqa.grid.selenium.proxy.WebDriverRemoteProxy","port":5555,"host":ip,"register":true,"hubPort":4444,"maxSession":5}}
A note about the -host flag
For both hub and node, if the -host flag is not specified,
0.0.0.0 will be used by default. This will bind to all the
public (non-loopback) IPv4 interfaces of the machine. If you have a special
network configuration or any component that creates extra network interfaces,
it is advised to set the -host flag with a value that allows the
hub/node to be reachable from a different machine.
Specifying the port
The default TCP/IP port used by the hub is 4444. If you need to change the port
please use above mentioned configurations.
Troubleshooting
Using Log file
For advanced troubleshooting you can specify a log file to log system messages.
Start Selenium GRID hub or node with -log argument. Please see the below example:
Docker provides a convenient way to
provision and scale Selenium Grid infrastructure in a unit known as a container.
Containers are standardised units of software that contain everything required
to run the desired application, including all dependencies, in a reliable and repeatable
way on different machines.
The Selenium project maintains a set of Docker images which you can download
and run to get a working grid up and running quickly. Nodes are available for
both Firefox and Chrome. Full details of how to provision a grid can be found
within the Docker Selenium
repository.
Prerequisite
The only requirement to run a Grid is to have Docker installed and working.
Install Docker.
8.3.3 - Components of Grid 3
Description of Hub and Nodes for Grid 3.
Hub
Intermediary and manager
Accepts requests to run tests
Takes instructions from client and executes them remotely on the nodes
Manages threads
A Hub is a central point where all your tests are sent.
Each Selenium Grid consists of exactly one hub. The hub needs to be reachable
from the respective clients (i.e. CI server, Developer machine etc.)
The hub will connect one or more nodes
that tests will be delegated to.
Nodes
Where the browsers live
Registers itself to the hub and communicates its capabilities
Receives requests from the hub and executes them
Nodes are different Selenium instances
that will execute tests on individual computer systems.
There can be many nodes in a grid.
The machines which are nodes do not need to be the same platform
or have the same browser selection as that of the hub or the other nodes.
A node on Windows might have the capability of
offering Internet Explorer as a browser option,
whereas this wouldn’t be possible on Linux or Mac.
8.4 - Legacy Selenium IDE
Selenium IDE was the original Firefox extension for Record and Playback.
Introduction
The Selenium-IDE (Integrated Development Environment) is the tool you use to
develop your Selenium test cases. It’s an easy-to-use Firefox plug-in and is
generally the most efficient way to develop test cases. It also contains a
context menu that allows you to first select a UI element from the browser’s
currently displayed page and then select from a list of Selenium commands with
parameters pre-defined according to the context of the selected UI element.
This is not only a time-saver, but also an excellent way of learning Selenium
script syntax.
This chapter is all about the Selenium IDE and how to use it effectively.
Installing the IDE
Using Firefox, first, download the IDE from the SeleniumHQ downloads page
Firefox will protect you from installing addons from unfamiliar locations, so
you will need to click ‘Allow’ to proceed with the installation, as shown in
the following screenshot.
When downloading from Firefox, you’ll be presented with the following window.
Select Install Now. The Firefox Add-ons window pops up, first showing a progress bar,
and when the download is complete, displays the following.
Restart Firefox. After Firefox reboots you will find the Selenium-IDE listed under
the Firefox Tools menu.
Opening the IDE
To run the Selenium-IDE, simply select it from the Firefox Tools menu. It opens
as follows with an empty script-editing window and a menu for loading, or
creating new test cases.
IDE Features
Menu Bar
The File menu has options for Test Case and Test Suite (suite of Test Cases).
Using these you can add a new Test Case, open a Test Case, save a Test Case,
export Test Case in a language of your choice. You can also open the recent
Test Case. All these options are also available for Test Suite.
The Edit menu allows copy, paste, delete, undo, and select all operations for
editing the commands in your test case. The Options menu allows the changing of
settings. You can set the timeout value for certain commands, add user-defined
user extensions to the base set of Selenium commands, and specify the format
(language) used when saving your test cases. The Help menu is the standard
Firefox Help menu; only one item on this menu–UI-Element Documentation–pertains
to Selenium-IDE.
Toolbar
The toolbar contains buttons for controlling the execution of your test cases,
including a step feature for debugging your test cases. The right-most button,
the one with the red-dot, is the record button.
Speed Control: controls how fast your test case runs.
Run All: Runs the entire test suite when a test suite with multiple test cases is loaded.
Run: Runs the currently selected test. When only a single test is loaded
this button and the Run All button have the same effect.
Pause/Resume: Allows stopping and re-starting of a running test case.
Step: Allows you to “step” through a test case by running it one command at a time.
Use for debugging test cases.
TestRunner Mode: Allows you to run the test case in a browser loaded with the
Selenium-Core TestRunner. The TestRunner is not commonly used now and is likely
to be deprecated. This button is for evaluating test cases for backwards
compatibility with the TestRunner. Most users will probably not need this
button.
Apply Rollup Rules: This advanced feature allows repetitive sequences of
Selenium commands to be grouped into a single action. Detailed documentation on
rollup rules can be found in the UI-Element Documentation on the Help menu.
Test Case Pane
Your script is displayed in the test case pane. It has two tabs, one for
displaying the command and their parameters in a readable “table” format.
The other tab - Source displays the test case in the native format in which the
file will be stored. By default, this is HTML although it can be changed to a
programming language such as Java or C#, or a scripting language like Python.
See the Options menu for details. The Source view also allows one to edit the
test case in its raw form, including copy, cut and paste operations.
The Command, Target, and Value entry fields display the currently selected
command along with its parameters. These are entry fields where you can modify
the currently selected command. The first parameter specified for a command in
the Reference tab of the bottom pane always goes in the Target field. If a
second parameter is specified by the Reference tab, it always goes in the Value
field.
If you start typing in the Command field, a drop-down list will be populated
based on the first characters you type; you can then select your desired
command from the drop-down.
Log/Reference/UI-Element/Rollup Pane
The bottom pane is used for four different functions–Log, Reference,
UI-Element, and Rollup–depending on which tab is selected.
Log
When you run your test case, error messages and information messages showing
the progress are displayed in this pane automatically, even if you do not first
select the Log tab. These messages are often useful for test case debugging.
Notice the Clear button for clearing the Log. Also notice the Info button is a
drop-down allowing selection of different levels of information to log.
Reference
The Reference tab is the default selection whenever you are entering or
modifying Selenese commands and parameters in Table mode. In Table mode, the
Reference pane will display documentation on the current command. When entering
or modifying commands, whether from Table or Source mode, it is critically
important to ensure that the parameters specified in the Target and Value
fields match those specified in the parameter list in the Reference pane. The
number of parameters provided must match the number specified, the order of
parameters provided must match the order specified, and the type of parameters
provided must match the type specified. If there is a mismatch in any of these
three areas, the command will not run correctly.
While the Reference tab is invaluable as a quick reference, it is still often
necessary to consult the Selenium Reference document.
UI-Element and Rollup
Detailed information on these two panes (which cover advanced features) can be
found in the UI-Element Documentation on the Help menu of Selenium-IDE.
Building Test Cases
There are three primary methods for developing test cases. Frequently, a test
developer will require all three techniques.
Recording
Many first-time users begin by recording a test case from their interactions
with a website. When Selenium-IDE is first opened, the record button is ON by
default. If you do not want Selenium-IDE to begin recording automatically you
can turn this off by going under Options > Options… and deselecting “Start
recording immediately on open.”
During recording, Selenium-IDE will automatically insert commands into your
test case based on your actions. Typically, this will include:
clicking a link - click or clickAndWait commands
entering values - type command
selecting options from a drop-down listbox - select command
clicking checkboxes or radio buttons - click command
Here are some “gotchas” to be aware of:
The type command may require clicking on some other area of the web page for it
to record.
Following a link usually records a click command. You will often need to change
this to clickAndWait to ensure your test case pauses until the new page is
completely loaded. Otherwise, your test case will continue running commands
before the page has loaded all its UI elements. This will cause unexpected test
case failures.
Adding Verifications and Asserts With the Context Menu
Your test cases will also need to check the properties of a web-page. This
requires assert and verify commands. We won’t describe the specifics of these
commands here; that is in the chapter on Selenium Commands – “Selenese”. Here
we’ll simply describe how to add them to your test case.
With Selenium-IDE recording, go to the browser displaying your test application
and right click anywhere on the page. You will see a context menu showing
verify and/or assert commands.
The first time you use Selenium, there may only be one Selenium command listed.
As you use the IDE however, you will find additional commands will quickly be
added to this menu. Selenium-IDE will attempt to predict what command, along
with the parameters, you will need for a selected UI element on the current
web-page.
Let’s see how this works. Open a web-page of your choosing and select a block
of text on the page. A paragraph or a heading will work fine. Now, right-click
the selected text. The context menu should give you a verifyTextPresent command
and the suggested parameter should be the text itself.
Also, notice the Show All Available Commands menu option. This shows many, many
more commands, again, along with suggested parameters, for testing your
currently selected UI element.
Try a few more UI elements. Try right-clicking an image, or a user control like
a button or a checkbox. You may need to use Show All Available Commands to see
options other than verifyTextPresent. Once you select these other options, the
more commonly used ones will show up on the primary context menu. For example,
selecting verifyElementPresent for an image should later cause that command to
be available on the primary context menu the next time you select an image and
right-click.
Again, these commands will be explained in detail in the chapter on Selenium
commands. For now though, feel free to use the IDE to record and select
commands into a test case and then run it. You can learn a lot about the
Selenium commands simply by experimenting with the IDE.
Editing
Insert Command
Table View
Select the point in your test case where you want to insert the command. To do
this, in the Test Case Pane, left-click on the line where you want to insert a
new command. Right-click and select Insert Command; the IDE will add a blank
line just ahead of the line you selected. Now use the command editing text
fields to enter your new command and its parameters.
Source View
Select the point in your test case where you want to insert the command. To do
this, in the Test Case Pane, left-click between the commands where you want to
insert a new command, and enter the HTML tags needed to create a 3-column row
containing the Command, first parameter (if one is required by the Command),
and second parameter (again, if one is required to locate an element) and third
parameter(again, if one is required to have a value). Example:
Comments may be added to make your test case more readable. These comments are
ignored when the test case is run.
Comments may also be used to add vertical white space (one or more blank lines)
in your tests; just create empty comments. An empty command will cause an error
during execution; an empty comment won’t.
Table View
Select the line in your test case where you want to insert the comment.
Right-click and select Insert Comment. Now use the Command field to enter the
comment. Your comment will appear in purple text.
Source View
Select the point in your test case where you want to insert the comment. Add an
HTML-style comment, i.e., <!-- your comment here -->.
Edit a Command or Comment
Table View
Simply select the line to be changed and edit it using the Command, Target,
and Value fields.
Source View
Since Source view provides the equivalent of a WYSIWYG (What You See is What
You Get) editor, simply modify which line you wish–command, parameter, or comment.
Opening and Saving a Test Case
Like most programs, there are Save and Open commands under the File menu.
However, Selenium distinguishes between test cases and test suites. To save
your Selenium-IDE tests for later use you can either save the individual test
cases, or save the test suite. If the test cases of your test suite have not
been saved, you’ll be prompted to save them before saving the test suite.
When you open an existing test case or suite, Selenium-IDE displays its
Selenium commands in the Test Case Pane.
Running Test Cases
The IDE allows many options for running your test case. You can run a test case
all at once, stop and start it, run it one line at a time, run a single command
you are currently developing, and you can do a batch run of an entire test
suite. Execution of test cases is very flexible in the IDE.
Run a Test Case
Click the Run button to run the currently displayed test case.
Run a Test Suite
Click the Run All button to run all the test cases in the currently loaded test
suite.
Stop and Start
The Pause button can be used to stop the test case while it is running. The
icon of this button then changes to indicate the Resume button. To continue
click Resume.
Stop in the Middle
You can set a breakpoint in the test case to cause it to stop on a particular
command. This is useful for debugging your test case. To set a breakpoint,
select a command, right-click, and from the context menu select Toggle
Breakpoint.
Start from the Middle
You can tell the IDE to begin running from a specific command in the middle of
the test case. This also is used for debugging. To set a startpoint, select a
command, right-click, and from the context menu select Set/Clear Start Point.
Run Any Single Command
Double-click any single command to run it by itself. This is useful when
writing a single command. It lets you immediately test a command you are
constructing, when you are not sure if it is correct. You can double-click it
to see if it runs correctly. This is also available from the context menu.
Using Base URL to Run Test Cases in Different Domains
The Base URL field at the top of the Selenium-IDE window is very useful for
allowing test cases to be run across different domains. Suppose that a site
named http://news.portal.com had an in-house beta site named
http://beta.news.portal.com. Any test cases for these sites that begin with an
open statement should specify a relative URL as the argument to open rather
than an absolute URL (one starting with a protocol such as http: or https:).
Selenium-IDE will then create an absolute URL by appending the open command’s
argument onto the end of the value of Base URL. For example, the test case
below would be run against http://news.portal.com/about.html:
Selenium commands, often called selenese, are the set of commands that run your
tests. A sequence of these commands is a test script. Here we explain those
commands in detail, and we present the many choices you have in testing your
web application when using Selenium.
Selenium provides a rich set of commands for fully testing your web-app in
virtually any way you can imagine. The command set is often called selenese.
These commands essentially create a testing language.
In selenese, one can test the existence of UI elements based on their HTML
tags, test for specific content, test for broken links, input fields, selection
list options, submitting forms, and table data among other things. In addition
Selenium commands support testing of window size, mouse position, alerts, Ajax
functionality, pop up windows, event handling, and many other web-application
features. The Command Reference lists all the available commands.
A command tells Selenium what to do. Selenium commands come in three “flavors”:
Actions, Accessors, and Assertions.
Actions are commands that generally manipulate the state of the application.
They do things like “click this link” and “select that option”. If an Action
fails, or has an error, the execution of the current test is stopped.
Many Actions can be called with the “AndWait” suffix, e.g. “clickAndWait”. This
suffix tells Selenium that the action will cause the browser to make a call to
the server, and that Selenium should wait for a new page to load.
Accessors examine the state of the application and store the results in
variables, e.g. “storeTitle”. They are also used to automatically generate
Assertions.
Assertions are like Accessors, but they verify that the state of the
application conforms to what is expected. Examples include “make sure the page
title is X” and “verify that this checkbox is checked”.
All Selenium Assertions can be used in 3 modes: “assert”, “verify”, and ”
waitFor”. For example, you can “assertText”, “verifyText” and “waitForText”.
When an “assert” fails, the test is aborted. When a “verify” fails, the test
will continue execution, logging the failure. This allows a single “assert” to
ensure that the application is on the correct page, followed by a bunch of
“verify” assertions to test form field values, labels, etc.
“waitFor” commands wait for some condition to become true (which can be useful
for testing Ajax applications). They will succeed immediately if the condition
is already true. However, they will fail and halt the test if the condition
does not become true within the current timeout setting (see the setTimeout
action below).
Script Syntax
Selenium commands are simple, they consist of the command and two parameters.
For example:
verifyText
//div//a[2]
Login
The parameters are not always required; it depends on the command. In some
cases both are required, in others one parameter is required, and in still
others the command may take no parameters at all. Here are a couple more
examples:
goBackAndWait
verifyTextPresent
Welcome to My Home Page
type
id=phone
(555) 666-7066
type
id=address1
${myVariableAddress}
The command reference describes the parameter requirements for each command.
Parameters vary, however they are typically:
a locator for identifying a UI element within a page.
a text pattern for verifying or asserting expected page content
a text pattern or a Selenium variable for entering text in an input field or
for selecting an option from an option list.
Locators, text patterns, Selenium variables, and the commands themselves are
described in considerable detail in the section on Selenium Commands.
Selenium scripts that will be run from Selenium-IDE will be stored in an HTML
text file format. This consists of an HTML table with three columns. The first
column identifies the Selenium command, the second is a target, and the final
column contains a value. The second and third columns may not require values
depending on the chosen Selenium command, but they should be present. Each
table row represents a new Selenium command. Here is an example of a test that
opens a page, asserts the page title and then verifies some content on the page:
Rendered as a table in a browser this would look like the following:
open
/download/
assertTitle
Downloads
verifyText
//h2
Downloads
The Selenese HTML syntax can be used to write and run tests without requiring
knowledge of a programming language. With a basic knowledge of selenese and
Selenium-IDE you can quickly produce and run testcases.
Test Suites
A test suite is a collection of tests. Often one will run all the tests in a
test suite as one continuous batch-job.
When using Selenium-IDE, test suites also can be defined using a simple HTML
file. The syntax again is simple. An HTML table defines a list of tests where
each row defines the filesystem path to each test. An example tells it all.
<html><head><title>Test Suite Function Tests - Priority 1</title></head><body><table><tr><td><b>Suite Of Tests</b></td></tr><tr><td><ahref="./Login.html">Login</a></td></tr><tr><td><ahref="./SearchValues.html">Test Searching for Values</a></td></tr><tr><td><ahref="./SaveValues.html">Test Save</a></td></tr></table></body></html>
A file similar to this would allow running the tests all at once, one after
another, from the Selenium-IDE.
Test suites can also be maintained when using Selenium-RC. This is done via
programming and can be done a number of ways. Commonly Junit is used to
maintain a test suite if one is using Selenium-RC with Java. Additionally, if
C# is the chosen language, Nunit could be employed. If using an interpreted
language like Python with Selenium-RC then some simple programming would be
involved in setting up a test suite. Since the whole reason for using
Selenium-RC is to make use of programming logic for your testing this usually
isn’t a problem.
Commonly Used Selenium Commands
To conclude our introduction of Selenium, we’ll show you a few typical Selenium
commands. These are probably the most commonly used commands for building
tests.
open
opens a page using a URL.
click/clickAndWait
performs a click operation, and optionally waits for a new page to load.
verifyTitle/assertTitle
verifies an expected page title.
verifyTextPresent
verifies expected text is somewhere on the page.
verifyElementPresent
verifies an expected UI element, as defined by its HTML tag, is present on the
page.
verifyText
verifies expected text and its corresponding HTML tag are present on the page.
verifyTable
verifies a table’s expected contents.
waitForPageToLoad
pauses execution until an expected new page loads. Called automatically when
clickAndWait is used.
waitForElementPresent
pauses execution until an expected UI element, as defined by its HTML tag, is
present on the page.
Verifying Page Elements
Verifying UI elements on a web page is probably the most common feature of your
automated tests. Selenese allows multiple ways of checking for UI elements. It
is important that you understand these different methods because these methods
define what you are actually testing.
For example, will you test that…
an element is present somewhere on the page?
specific text is somewhere on the page?
specific text is at a specific location on the page?
For example, if you are testing a text heading, the text and its position at
the top of the page are probably relevant for your test. If, however, you are
testing for the existence of an image on the home page, and the web designers
frequently change the specific image file along with its position on the page,
then you only want to test that an image (as opposed to the specific image
file) exists somewhere on the page.
Assertion or Verification?
Choosing between “assert” and “verify” comes down to convenience and management
of failures. There’s very little point checking that the first paragraph on the
page is the correct one if your test has already failed when checking that the
browser is displaying the expected page. If you’re not on the correct page,
you’ll probably want to abort your test case so that you can investigate the
cause and fix the issue(s) promptly. On the other hand, you may want to check
many attributes of a page without aborting the test case on the first failure
as this will allow you to review all failures on the page and take the
appropriate action. Effectively an “assert” will fail the test and abort the
current test case, whereas a “verify” will fail the test and continue to run
the test case.
The best use of this feature is to logically group your test commands, and
start each group with an “assert” followed by one or more “verify” test
commands. An example follows:
Command
Target
Value
open
/download/
assertTitle
Downloads
verifyText
//h2
Downloads
assertTable
1.2.1
Selenium IDE
verifyTable
1.2.2
June 3, 2008
verifyTable
1.2.3
1.0 beta 2
The above example first opens a page and then “asserts” that the correct page
is loaded by comparing the title with the expected value. Only if this passes
will the following command run and “verify” that the text is present in the
expected location. The test case then “asserts” the first column in the second
row of the first table contains the expected value, and only if this passed
will the remaining cells in that row be “verified”.
verifyTextPresent
The command verifyTextPresent is used to verify specific text exists somewhere
on the page. It takes a single argument–the text pattern to be verified. For
example:
Command
Target
Value
verifyTextPresent
Marketing Analysis
This would cause Selenium to search for, and verify, that the text string
“Marketing Analysis” appears somewhere on the page currently being tested. Use
verifyTextPresent when you are interested in only the text itself being present
on the page. Do not use this when you also need to test where the text occurs
on the page.
verifyElementPresent
Use this command when you must test for the presence of a specific UI element,
rather than its content. This verification does not check the text, only the
HTML tag. One common use is to check for the presence of an image.
Command
Target
Value
verifyElementPresent
//div/p/img
This command verifies that an image, specified by the existence of an
HTML tag, is present on the page, and that it follows a
tag and a
tag. The first (and only) parameter is a locator for telling the Selenese
command how to find the element. Locators are explained in the next section.
verifyElementPresent can be used to check the existence of any HTML tag within
the page. You can check the existence of links, paragraphs, divisions
,
etc. Here are a few more examples.
Command
Target
Value
verifyElementPresent
//div/p
verifyElementPresent
//div/a
verifyElementPresent
id=Login
verifyElementPresent
link=Go to Marketing Research
verifyElementPresent
//a[2]
verifyElementPresent
//head/title
These examples illustrate the variety of ways a UI element may be tested. Again,
locators are explained in the next section.
verifyText
Use verifyText when both the text and its UI element must be tested. verifyText
must use a locator. If you choose an XPath or DOM locator, you can verify that
specific text appears at a specific location on the page relative to other UI
components on the page.
Command
Target
Value
verifyText
//table/tr/td/div/p
This is my text and it occurs right after the div inside the table.
Locating Elements
For many Selenium commands, a target is required. This target identifies an
element in the content of the web application, and consists of the location
strategy followed by the location in the format locatorType=location. The
locator type can be omitted in many cases. The various locator types are
explained below with examples for each.
Locating by Identifier
This is probably the most common method of locating elements and is the
catch-all default when no recognized locator type is used. With this strategy,
the first element with the id attribute value matching the location will be used. If
no element has a matching id attribute, then the first element with a name
attribute matching the location will be used.
For instance, your page source could have id and name attributes
as follows:
The name locator type will locate the first element with a matching name
attribute. If multiple elements have the same value for a name attribute, then
you can use filters to further refine your location strategy. The default
filter type is value (matching the value attribute).
Note: Unlike some types of XPath and DOM locators, the three
types of locators above allow Selenium to test a UI element independent
of its location on
the page. So if the page structure and organization is altered, the test
will still pass. You may or may not want to also test whether the page
structure changes. In the case where web designers frequently alter the
page, but its functionality must be regression tested, testing via id and
name attributes, or really via any HTML property, becomes very important.
Locating by XPath
XPath is the language used for locating nodes in an XML document. As HTML can
be an implementation of XML (XHTML), Selenium users can leverage this powerful
language to target elements in their web applications. XPath extends beyond (as
well as supporting) the simple methods of locating by id or name
attributes, and opens up all sorts of new possibilities such as locating the
third checkbox on the page.
One of the main reasons for using XPath is when you don’t have a suitable id
or name attribute for the element you wish to locate. You can use XPath to
either locate the element in absolute terms (not advised), or relative to an
element that does have an id or name attribute. XPath locators can also be
used to specify elements via attributes other than id and name.
Absolute XPaths contain the location of all elements from the root (html) and
as a result are likely to fail with only the slightest adjustment to the
application. By finding a nearby element with an id or name attribute (ideally
a parent element) you can locate your target element based on the relationship.
This is much less likely to change and can make your tests more robust.
Since only xpath locators start with “//”, it is not necessary to include
the xpath= label when specifying an XPath locator.
xpath=/html/body/form[1] (3) - Absolute path (would break if the HTML was
changed only slightly)
//form[1] (3) - First form element in the HTML
xpath=//form[@id='loginForm'] (3) - The form element with attribute named ‘id’ and the value ’loginForm’
xpath=//form[input/@name='username'] (3) - First form element with an input child
element with attribute named ’name’ and the value ‘username’
//input[@name='username'] (4) - First input element with attribute named ’name’ and the value
‘username’
//form[@id='loginForm']/input[1] (4) - First input child element of the
form element with attribute named ‘id’ and the value ’loginForm’
//input[@name='continue'][@type='button'] (7) - Input with attribute named ’name’ and the value ‘continue’
and attribute named ’type’ and the value ‘button’
//form[@id='loginForm']/input[4] (7) - Fourth input child element of the
form element with attribute named ‘id’ and value ’loginForm’
These examples cover some basics, but in order to learn more, the
following references are recommended:
This is a simple method of locating a hyperlink in your web page by using the
text of the link. If two links with the same text are present, then the first
match will be used.
<html><body><p>Are you sure you want to do this?</p><ahref="continue.html">Continue</a><ahref="cancel.html">Cancel</a></body><html>
link=Continue (4)
link=Cancel (5)
Locating by DOM
The Document Object Model represents an HTML document and can be accessed
using JavaScript. This location strategy takes JavaScript that evaluates to
an element on the page, which can be simply the element’s location using the
hierarchical dotted notation.
Since only dom locators start with “document”, it is not necessary to include
the dom= label when specifying a DOM locator.
You can use Selenium itself as well as other sites and extensions to explore
the DOM of your web application. A good reference exists on W3Schools.
Locating by CSS
CSS (Cascading Style Sheets) is a language for describing the rendering of HTML
and XML documents. CSS uses Selectors for binding style properties to elements
in the document. These Selectors can be used by Selenium as another locating
strategy.
For more information about CSS Selectors, the best place to go is the W3C
publication. You’ll find additional
references there.
Implicit Locators
You can choose to omit the locator type in the following situations:
Locators without an explicitly defined locator strategy will default
to using the identifier locator strategy. See Locating by Identifier_.
Locators starting with “//” will use the XPath locator strategy.
See Locating by XPath_.
Locators starting with “document” will use the DOM locator strategy.
See Locating by DOM_
Matching Text Patterns
Like locators, patterns are a type of parameter frequently required by Selenese
commands. Examples of commands which require patterns are verifyTextPresent,
verifyTitle, verifyAlert, assertConfirmation, verifyText, and
verifyPrompt. And as has been mentioned above, link locators can utilize
a pattern. Patterns allow you to describe, via the use of special characters,
what text is expected rather than having to specify that text exactly.
There are three types of patterns: globbing, regular expressions, and exact.
Globbing Patterns
Most people are familiar with globbing as it is utilized in
filename expansion at a DOS or Unix/Linux command line such as ls *.c.
In this case, globbing is used to display all the files ending with a .c
extension that exist in the current directory. Globbing is fairly limited. Only two special characters are supported in the Selenium implementation:
* which translates to “match anything,” i.e., nothing, a single character, or many characters.
[ ] (character class) which translates to “match any single character
found inside the square brackets.” A dash (hyphen) can be used as a shorthand
to specify a range of characters (which are contiguous in the ASCII character
set). A few examples will make the functionality of a character class clear:
[aeiou] matches any lowercase vowel
[0-9] matches any digit
[a-zA-Z0-9] matches any alphanumeric character
In most other contexts, globbing includes a third special character, the ?.
However, Selenium globbing patterns only support the asterisk and character
class.
To specify a globbing pattern parameter for a Selenese command, you can
prefix the pattern with a glob: label. However, because globbing
patterns are the default, you can also omit the label and specify just the
pattern itself.
Below is an example of two commands that use globbing patterns. The
actual link text on the page being tested
was “Film/Television Department”; by using a pattern
rather than the exact text, the click command will work even if the
link text is changed to “Film & Television Department” or “Film and Television
Department”. The glob pattern’s asterisk will match “anything or nothing”
between the word “Film” and the word “Television”.
Command
Target
Value
click
link=glob:Film*Television Department
verifyTitle
glob:*Film*Television*
The actual title of the page reached by clicking on the link was “De Anza Film And
Television Department - Menu”. By using a pattern rather than the exact
text, the verifyTitle will pass as long as the two words “Film” and “Television” appear
(in that order) anywhere in the page’s title. For example, if
the page’s owner should shorten
the title to just “Film & Television Department,” the test would still pass.
Using a pattern for both a link and a simple test that the link worked (such as
the verifyTitle above does) can greatly reduce the maintenance for such
test cases.
Regular Expression Patterns
Regular expression patterns are the most powerful of the three types
of patterns that Selenese supports. Regular expressions
are also supported by most high-level programming languages, many text
editors, and a host of tools, including the Linux/Unix command-line
utilities grep, sed, and awk. In Selenese, regular
expression patterns allow a user to perform many tasks that would
be very difficult otherwise. For example, suppose your test needed
to ensure that a particular table cell contained nothing but a number.
regexp: [0-9]+ is a simple pattern that will match a decimal number of any length.
Whereas Selenese globbing patterns support only the *
and [ ] (character
class) features, Selenese regular expression patterns offer the same
wide array of special characters that exist in JavaScript. Below
are a subset of those special characters:
PATTERN
MATCH
.
any single character
[ ]
character class: any single character that appears inside the brackets
*
quantifier: 0 or more of the preceding character (or group)
+
quantifier: 1 or more of the preceding character (or group)
?
quantifier: 0 or 1 of the preceding character (or group)
{1,5}
quantifier: 1 through 5 of the preceding character (or group)
|
alternation: the character/group on the left or the character/group on the right
( )
grouping: often used with alternation and/or quantifier
Regular expression patterns in Selenese need to be prefixed with
either regexp: or regexpi:. The former is case-sensitive; the
latter is case-insensitive.
A few examples will help clarify how regular expression patterns can
be used with Selenese commands. The first one uses what is probably
the most commonly used regular expression pattern–.* (“dot star”). This
two-character sequence can be translated as “0 or more occurrences of
any character” or more simply, “anything or nothing.” It is the
equivalent of the one-character globbing pattern * (a single asterisk).
Command
Target
Value
click
link=glob:Film*Television Department
verifyTitle
regexp:.*Film.*Television.*
The example above is functionally equivalent to the earlier example
that used globbing patterns for this same test. The only differences
are the prefix (regexp: instead of glob:) and the “anything
or nothing” pattern (.* instead of just *).
The more complex example below tests that the Yahoo!
Weather page for Anchorage, Alaska contains info on the sunrise time:
Let’s examine the regular expression above one part at a time:
Sunrise: *
The string Sunrise: followed by 0 or more spaces
[0-9]{1,2}
1 or 2 digits (for the hour of the day)
:
The character : (no special characters involved)
[0-9]{2}
2 digits (for the minutes) followed by a space
[ap]m
“a” or “p” followed by “m” (am or pm)
Exact Patterns
The exact type of Selenium pattern is of marginal usefulness.
It uses no special characters at all. So, if you needed to look for
an actual asterisk character (which is special for both globbing and
regular expression patterns), the exact pattern would be one way
to do that. For example, if you wanted to select an item labeled
“Real *” from a dropdown, the following code might work or it might not.
The asterisk in the glob:Real * pattern will match anything or nothing.
So, if there was an earlier select option labeled “Real Numbers,” it would
be the option selected rather than the “Real *” option.
Command
Target
Value
select
//select
glob:Real *
In order to ensure that the “Real *” item would be selected, the exact:
prefix could be used to create an exact pattern as shown below:
Command
Target
Value
select
//select
exact:Real *
But the same effect could be achieved via escaping the asterisk in a
regular expression pattern:
Command
Target
Value
select
//select
regexp:Real \*
It’s rather unlikely that most testers will ever need to look for
an asterisk or a set of square brackets with characters inside them (the
character class for globbing patterns). Thus, globbing patterns and
regular expression patterns are sufficient for the vast majority of us.
The “AndWait” Commands
The difference between a command and its AndWait
alternative is that the regular command (e.g. click) will do the action and
continue with the following command as fast as it can, while the AndWait
alternative (e.g. clickAndWait) tells Selenium to wait for the page to
load after the action has been done.
The AndWait alternative is always used when the action causes the browser to
navigate to another page or reload the present one.
Be aware, if you use an AndWait command for an action that
does not trigger a navigation/refresh, your test will fail. This happens
because Selenium will reach the AndWait’s timeout without seeing any
navigation or refresh being made, causing Selenium to raise a timeout
exception.
The waitFor Commands in AJAX applications
In AJAX driven web applications, data is retrieved from server without
refreshing the page. Using andWait commands will not work as the page is not
actually refreshed. Pausing the test execution for a certain period of time is
also not a good approach as web element might appear later or earlier than the
stipulated period depending on the system’s responsiveness, load or other
uncontrolled factors of the moment, leading to test failures. The best approach
would be to wait for the needed element in a dynamic period and then continue
the execution as soon as the element is found.
This is done using waitFor commands, as waitForElementPresent or
waitForVisible, which wait dynamically, checking for the desired condition
every second and continuing to the next command in the script as soon as the
condition is met.
Sequence of Evaluation and Flow Control
When a script runs, it simply runs in sequence, one command after another.
Selenese, by itself, does not support condition statements (if-else, etc.) or
iteration (for, while, etc.). Many useful tests can be conducted without flow
control. However, for a functional test of dynamic content, possibly involving
multiple pages, programming logic is often needed.
When flow control is needed, there are three options:
a) Run the script using Selenium-RC and a client library such as Java or
PHP to utilize the programming language’s flow control features.
b) Run a small JavaScript snippet from within the script using the storeEval command.
c) Install the goto_sel_ide.js extension.
Most testers will export the test script into a programming language file that uses the
Selenium-RC API (see the Selenium-IDE chapter). However, some organizations prefer
to run their scripts from Selenium-IDE whenever possible (for instance, when they have
many junior-level people running tests for them, or when programming skills are
lacking). If this is your case, consider a JavaScript snippet or the goto_sel_ide.js extension.
Store Commands and Selenium Variables
You can use Selenium variables to store constants at the
beginning of a script. Also, when combined with a data-driven test design
(discussed in a later section), Selenium variables can be used to store values
passed to your test program from the command-line, from another program, or from
a file.
The plain store command is the most basic of the many store commands and can be used
to simply store a constant value in a Selenium variable. It takes two
parameters, the text value to be stored and a Selenium variable. Use the
standard variable naming conventions of only alphanumeric characters when
choosing a name for your variable.
Later in your script, you’ll want to use the stored value of your
variable. To access the value of a variable, enclose the variable in
curly brackets ({}) and precede it with a dollar sign like this.
Command
Target
Value
verifyText
//div/p
\${userName}
A common use of variables is for storing input for an input field.
Command
Target
Value
type
id=login
\${userName}
Selenium variables can be used in either the first or second parameter and
are interpreted by Selenium prior to any other operations performed by the
command. A Selenium variable may also be used within a locator expression.
An equivalent store command exists for each verify and assert command. Here
are a couple more commonly used store commands.
storeElementPresent
This corresponds to verifyElementPresent. It simply stores a boolean value–“true”
or “false”–depending on whether the UI element is found.
storeText
StoreText corresponds to verifyText. It uses a locator to identify specific
page text. The text, if found, is stored in the variable. StoreText can be
used to extract text from the page being tested.
storeEval
This command takes a script as its
first parameter. Embedding JavaScript within Selenese is covered in the next section.
StoreEval allows the test to store the result of running the script in a variable.
JavaScript and Selenese Parameters
JavaScript can be used with two types of Selenese parameters: script
and non-script (usually expressions). In most cases, you’ll want to access
and/or manipulate a test case variable inside the JavaScript snippet used as
a Selenese parameter. All variables created in your test case are stored in
a JavaScript associative array. An associative array has string indexes
rather than sequential numeric indexes. The associative array containing
your test case’s variables is named storedVars. Whenever you wish to
access or manipulate a variable within a JavaScript snippet, you must refer
to it as storedVars[‘yourVariableName’].
JavaScript Usage with Script Parameters
Several Selenese commands specify a script parameter including
assertEval, verifyEval, storeEval, and waitForEval.
These parameters require no special syntax. A Selenium-IDE
user would simply place a snippet of JavaScript code into
the appropriate field, normally the Target field (because
a script parameter is normally the first or only parameter).
The example below illustrates how a JavaScript snippet
can be used to perform a simple numerical calculation:
Command
Target
Value
store
10
hits
storeXpathCount
//blockquote
blockquotes
storeEval
storedVars[‘hits’].storedVars[‘blockquotes’]
paragraphs
This next example illustrates how a JavaScript snippet can include calls to
methods, in this case the JavaScript String object’s toUpperCase method
and toLowerCase method.
Command
Target
Value
store
Edith Wharton
name
storeEval
storedVars[’name’].toUpperCase()
uc
storeEval
storedVars[’name’].toUpperCase()
lc
JavaScript Usage with Non-Script Parameters
JavaScript can also be used to help generate values for parameters, even
when the parameter is not specified to be of type script. However, in this case, special syntax is required–the entire parameter
value must be prefixed by javascript{ with a trailing }, which encloses the JavaScript
snippet, as in javascript{*yourCodeHere*}.
Below is an example in which the type command’s second parameter
value is generated via JavaScript code using this special syntax:
Selenese has a simple command that allows you to print text to your test’s
output. This is useful for providing informational progress notes in your
test which display on the console as your test is running. These notes also can be
used to provide context within your test result reports, which can be useful
for finding where a defect exists on a page in the event your test finds a
problem. Finally, echo statements can be used to print the contents of
Selenium variables.
Command
Target
Value
echo
Testing page footer now.
echo
Username is \${userName}
Alerts, Popups, and Multiple Windows
Suppose that you are testing a page that looks like this.
<!DOCTYPE HTML><html><head><scripttype="text/javascript">functionoutput(resultText){document.getElementById('output').childNodes[0].nodeValue=resultText;}functionshow_confirm(){varconfirmation=confirm("Chose an option.");if(confirmation==true){output("Confirmed.");}else{output("Rejected!");}}functionshow_alert(){alert("I'm blocking!");output("Alert is gone.");}functionshow_prompt(){varresponse=prompt("What's the best web QA tool?","Selenium");output(response);}functionopen_window(windowName){window.open("newWindow.html",windowName);}</script></head><body><inputtype="button"id="btnConfirm"onclick="show_confirm()"value="Show confirm box"/><inputtype="button"id="btnAlert"onclick="show_alert()"value="Show alert"/><inputtype="button"id="btnPrompt"onclick="show_prompt()"value="Show prompt"/><ahref="newWindow.html"id="lnkNewWindow"target="_blank">New Window Link</a><inputtype="button"id="btnNewNamelessWindow"onclick="open_window()"value="Open Nameless Window"/><inputtype="button"id="btnNewNamedWindow"onclick="open_window('Mike')"value="Open Named Window"/><br/><spanid="output"></span></body></html>
The user must respond to alert/confirm boxes, as well as moving focus to newly
opened popup windows. Fortunately, Selenium can cover JavaScript pop-ups.
But before we begin covering alerts/confirms/prompts in individual detail, it is
helpful to understand the commonality between them. Alerts, confirmation boxes
and prompts all have variations of the following
Command
Description
assertFoo(pattern)
throws error if pattern doesn’t match the text of the pop-up
assertFooPresent
throws error if pop-up is not available
assertFooNotPresent
throws error if any pop-up is present
storeFoo(variable)
stores the text of the pop-up in a variable
storeFooPresent(variable)
stores the text of the pop-up in a variable and returns true or false
When running under Selenium, JavaScript pop-ups will not appear. This is because
the function calls are actually being overridden at runtime by Selenium’s own
JavaScript. However, just because you cannot see the pop-up doesn’t mean you don’t
have to deal with it. To handle a pop-up, you must call its assertFoo(pattern)
function. If you fail to assert the presence of a pop-up your next command will be
blocked and you will get an error similar to the following [error] Error: There was an unexpected Confirmation! [Chose an option.]
Alerts
Let’s start with alerts because they are the simplest pop-up to handle. To begin,
open the HTML sample above in a browser and click on the “Show alert” button. You’ll
notice that after you close the alert the text “Alert is gone.” is displayed on the
page. Now run through the same steps with Selenium IDE recording, and verify
the text is added after you close the alert. Your test will look something like
this:
Command
Target
Value
open
/
click
btnAlert
assertAlert
I’m blocking!
verifyTextPresent
Alert is gone.
You may be thinking “That’s odd, I never tried to assert that alert.” But this is
Selenium-IDE handling and closing the alert for you. If you remove that step and replay
the test you will get the following error [error] Error: There was an unexpected Alert! [I'm blocking!]. You must include an assertion of the alert to acknowledge
its presence.
If you just want to assert that an alert is present but either don’t know or don’t care
what text it contains, you can use assertAlertPresent. This will return true or false,
with false halting the test.
Confirmations
Confirmations behave in much the same way as alerts, with assertConfirmation and
assertConfirmationPresent offering the same characteristics as their alert counterparts.
However, by default Selenium will select OK when a confirmation pops up. Try recording
clicking on the “Show confirm box” button in the sample page, but click on the “Cancel” button
in the popup, then assert the output text. Your test may look something like this:
Command
Target
Value
open
/
click
btnConfirm
chooseCancelOnNextConfirmation
assertConfirmation
Choose an option.
verifyTextPresent
Rejected
The chooseCancelOnNextConfirmation function tells Selenium that all following
confirmation should return false. It can be reset by calling chooseOkOnNextConfirmation.
You may notice that you cannot replay this test, because Selenium complains that there
is an unhandled confirmation. This is because the order of events Selenium-IDE records
causes the click and chooseCancelOnNextConfirmation to be put in the wrong order (it makes sense
if you think about it, Selenium can’t know that you’re cancelling before you open a confirmation)
Simply switch these two commands and your test will run fine.
Prompts
Prompts behave in much the same way as alerts, with assertPrompt and assertPromptPresent
offering the same characteristics as their alert counterparts. By default, Selenium will wait for
you to input data when the prompt pops up. Try recording clicking on the “Show prompt” button in
the sample page and enter “Selenium” into the prompt. Your test may look something like this:
Command
Target
Value
open
/
answerOnNextPrompt
Selenium!
click
id=btnPrompt
assertPrompt
What’s the best web QA tool?
verifyTextPresent
Selenium!
If you choose cancel on the prompt, you may notice that answerOnNextPrompt will simply show a
target of blank. Selenium treats cancel and a blank entry on the prompt basically as the same thing.
Debugging
Debugging means finding and fixing errors in your test case. This is a normal
part of test case development.
We won’t teach debugging here as most new users to Selenium will already have
some basic experience with debugging. If this is new to you, we recommend
you ask one of the developers in your organization.
Breakpoints and Startpoints
The Sel-IDE supports the setting of breakpoints and the ability to start and
stop the running of a test case, from any point within the test case. That is, one
can run up to a specific command in the middle of the test case and inspect how
the test case behaves at that point. To do this, set a breakpoint on the
command just before the one to be examined.
To set a breakpoint, select a command, right-click, and from the context menu
select Toggle Breakpoint. Then click the Run button to run your test case from
the beginning up to the breakpoint.
It is also sometimes useful to run a test case from somewhere in the middle to
the end of the test case or up to a breakpoint that follows the starting point. For example, suppose your test case first logs into the website and then
performs a series of tests and you are trying to debug one of those tests. However, you only need to login once, but you need to keep rerunning your
tests as you are developing them. You can login once, then run your test case
from a startpoint placed after the login portion of your test case. That will
prevent you from having to manually logout each time you rerun your test case.
To set a startpoint, select a command, right-click, and from the context
menu select Set/Clear Start Point. Then click the Run button to execute the
test case beginning at that startpoint.
Stepping Through a Testcase
To execute a test case one command at a time (“step through” it), follow these
steps:
Start the test case running with the Run button from the toolbar.
Immediately pause the executing test case with the Pause button.
Repeatedly select the Step button.
Find Button
The Find button is used to see which UI element on the currently displayed
webpage (in the browser) is used in the currently selected Selenium command. This is useful when building a locator for a command’s first parameter (see the
section on :ref:locators <locators-section> in the Selenium Commands chapter).
It can be used with any command that identifies a UI element on a webpage,
i.e. click, clickAndWait, type, and certain assert and verify commands,
among others.
From Table view, select any command that has a locator parameter.
Click the Find button. Now look on the webpage: There should be a bright green rectangle
enclosing the element specified by the locator parameter.
Page Source for Debugging
Often, when debugging a test case, you simply must look at the page source (the
HTML for the webpage you’re trying to test) to determine a problem. Firefox
makes this easy. Simply right-click the webpage and select ‘View->Page Source. The HTML opens in a separate window. Use its Search feature (Edit=>Find)
to search for a keyword to find the HTML for the UI element you’re trying
to test.
Alternatively, select just that portion of the webpage for which you want to
see the source. Then right-click the webpage and select View Selection
Source. In this case, the separate HTML window will contain just a small
amount of source, with highlighting on the portion representing your
selection.
Locator Assistance
Whenever Selenium-IDE records a locator-type argument, it stores
additional information which allows the user to view other possible
locator-type arguments that could be used instead. This feature can be
very useful for learning more about locators, and is often needed to help
one build a different type of locator than the type that was recorded.
This locator assistance is presented on the Selenium-IDE window as a drop-down
list accessible at the right end of the Target field
(only when the Target field contains a recorded locator-type argument). Below is a snapshot showing the
contents of this drop-down for one command. Note that the first column of
the drop-down provides alternative locators, whereas the second column
indicates the type of each alternative.
Writing a Test Suite
A test suite is a collection of test cases which is displayed in the leftmost
pane in the IDE. The test suite pane can be manually opened or closed via selecting a small dot
halfway down the right edge of the pane (which is the left edge of the
entire Selenium-IDE window if the pane is closed).
The test suite pane will be automatically opened when an existing test suite
is opened or when the user selects the New Test Case item from the
File menu. In the latter case, the new test case will appear immediately
below the previous test case.
Selenium-IDE also supports loading pre-existing test cases by using the File
-> Add Test Case menu option. This allows you to add existing test cases to
a new test suite.
A test suite file is an HTML file containing a one-column table. Each
cell of each row in the
section contains a link to a test case.
The example below is of a test suite containing four test cases:
<html><head><metahttp-equiv="Content-Type"content="text/html; charset=UTF-8"><title>Sample Selenium Test Suite</title></head><body><tablecellpadding="1"cellspacing="1"border="1"><thead><tr><td>Test Cases for De Anza A-Z Directory Links</td></tr></thead><tbody><tr><td><ahref="./a.html">A Links</a></td></tr><tr><td><ahref="./b.html">B Links</a></td></tr><tr><td><ahref="./c.html">C Links</a></td></tr><tr><td><ahref="./d.html">D Links</a></td></tr></tbody></table></body></html>
Note: Test case files should not have to be co-located with the test suite file
that invokes them. And on Mac OS and Linux systems, that is indeed the
case. However, at the time of this writing, a bug prevents Windows users
from being able to place the test cases elsewhere than with the test suite
that invokes them.
User Extensions
User extensions are JavaScript files that allow one to create his or her own
customizations and features to add additional functionality. Often this is in
the form of customized commands although this extensibility is not limited to
additional commands.
There are a number of useful extensions_ created by users.
IMPORTANT: THIS SECTION IS OUT OF DATE–WE WILL BE REVISING THIS SOON.
Perhaps the most popular of all Selenium-IDE extensions
is one which provides flow control in the form of while loops and primitive
conditionals. This extension is the goto_sel_ide.js_. For an example
of how to use the functionality provided by this extension, look at the
page_ created by its author.
To install this extension, put the pathname to its location on your
computer in the Selenium Core extensions field of Selenium-IDE’s
Options=>Options=>General tab.
After selecting the OK button, you must close and reopen Selenium-IDE
in order for the extensions file to be read. Any change you make to an
extension will also require you to close and reopen Selenium-IDE.
Information on writing your own extensions can be found near the
bottom of the Selenium Reference_ document.
Sometimes it can prove very useful to debug step by step Selenium IDE and your
User Extension. The only debugger that appears able to debug
XUL/Chrome based extensions is Venkman which is supported in Firefox until version 32 included.
The step by step debug has been verified to work with Firefox 32 and Selenium IDE 2.9.0.
Format
Format, under the Options menu, allows you to select a language for saving
and displaying the test case. The default is HTML.
If you will be using Selenium-RC to run your test cases, this feature is used
to translate your test case into a programming language. Select the
language, e.g. Java, PHP, you will be using with Selenium-RC for developing
your test programs. Then simply save the test case using File=>Export Test Case As.
Your test case will be translated into a series of functions in the language you
choose. Essentially, program code supporting your test is generated for you
by Selenium-IDE.
Also, note that if the generated code does not suit your needs, you can alter
it by editing a configuration file which defines the generation process. Each supported language has configuration settings which are editable. This
is under the Options=>Options=>Formats tab.
Executing Selenium-IDE Tests on Different Browsers
While Selenium-IDE can only run tests against Firefox, tests
developed with Selenium-IDE can be run against other browsers, using a
simple command-line interface that invokes the Selenium-RC server. This topic
is covered in the :ref:Run Selenese tests <html-suite> section on Selenium-RC
chapter. The -htmlSuite command-line option is the particular feature of interest.
Troubleshooting
Below is a list of image/explanation pairs which describe frequent
sources of problems with Selenium-IDE:
Table view is not available with this format.
This message can be occasionally displayed in the Table tab when Selenium IDE is
launched. The workaround is to close and reopen Selenium IDE. See
issue 1008.
for more information. If you are able to reproduce this reliably then please
provide details so that we can work on a fix.
error loading test case: no command found
You’ve used File=>Open to try to open a test suite file. Use File=>Open
Test Suite instead.
An enhancement request has been raised to improve this error message. See
issue 1010.
This type of error may indicate a timing problem, i.e., the element
specified by a locator in your command wasn’t fully loaded when the command
was executed. Try putting a pause 5000 before the command to determine
whether the problem is indeed related to timing. If so, investigate using an
appropriate waitFor* or *AndWait command before the failing command.
Whenever your attempt to use variable substitution fails as is the
case for the open command above, it indicates
that you haven’t actually created the variable whose value you’re
trying to access. This is
sometimes due to putting the variable in the Value field when it
should be in the Target field or vice versa. In the example above,
the two parameters for the store command have been erroneously
placed in the reverse order of what is required.
For any Selenese command, the first required parameter must go
in the Target field, and the second required parameter (if one exists)
must go in the Value field.
error loading test case: [Exception… “Component returned failure code:
0x80520012 (NS_ERROR_FILE_NOT_FOUND) [nsIFileInputStream.init]” nresult:
“0x80520012 (NS_ERROR_FILE_NOT_FOUND)” location: “JS frame ::
chrome://selenium-ide/content/file-utils.js :: anonymous :: line 48” data: no]
One of the test cases in your test suite cannot be found. Make sure that the
test case is indeed located where the test suite indicates it is located. Also,
make sure that your actual test case files have the .html extension both in
their filenames, and in the test suite file where they are referenced.
An enhancement request has been raised to improve this error message. See
issue 1011.
Your extension file’s contents have not been read by Selenium-IDE. Be
sure you have specified the proper pathname to the extensions file via
Options=>Options=>General in the Selenium Core extensions field.
Also, Selenium-IDE must be restarted after any change to either an
extensions file or to the contents of the Selenium Core extensions
field.
8.4.1 - HTML runner
Execute HTML Selenium IDE exports from command line
Selenium HTML-runner allows you to run Test Suites from a
command line. Test Suites are HTML exports from Selenium IDE or
compatible tools.
Common information
Combination of releases of geckodriver / firefox /
selenium-html-runner matters. There might be a software
compatibility matrix somewhere.
selenium-html-runner runs only Test Suite (not Test Case -
for example an export from Monitis Transaction Monitor). Be
sure you comply with this.
For Linux users with no DISPLAY - you need to start html-runner
with Virtual display (search for xvfb)
[user@localhost ~]$ cat testsuite.html
<?xml version="1.0" encoding="UTF-8"?><!DOCTYPE html PUBLIC "-//W3C//DTD XHTML 1.0 Strict//EN" "http://www.w3.org/TR/xhtml1/DTD/xhtml1-strict.dtd"><htmlxmlns="http://www.w3.org/1999/xhtml"xml:lang="en"lang="en"><head><metacontent="text/html; charset=UTF-8"http-equiv="content-type"/><title>Test Suite</title></head><body><tableid="suiteTable"cellpadding="1"cellspacing="1"border="1"class="selenium"><tbody><tr><td><b>Test Suite</b></td></tr><tr><td><ahref="YOUR-TEST-SCENARIO.html">YOUR-TEST-SCENARIO</a></td></tr></tbody></table></body></html>
How to run selenium-html-runner headless
Now, the most important part, an example of how to run the
selenium-html-runner! Your experience might vary depending on software
combinations - geckodriver/FF/html-runner releases.
[user@localhost ~]$ xvfb-run java -Dwebdriver.gecko.driver=/home/mmasek/geckodriver.0.18.0 -jar selenium-html-runner-3.7.1.jar -htmlSuite "*firefox""https://YOUR-BASE-URL""$(pwd)/testsuite.html""results.html"; grep result: -A1 results.html/firefox.results.html
Multi-window mode is longer used as an option and will be ignored.
1510061109691 geckodriver INFO geckodriver 0.18.0
1510061109708 geckodriver INFO Listening on 127.0.0.1:2885
1510061110162 geckodriver::marionette INFO Starting browser /usr/bin/firefox with args ["-marionette"]1510061111084 Marionette INFO Listening on port 432291510061111187 Marionette WARN TLS certificate errors will be ignored for this session
Nov 07, 2017 1:25:12 PM org.openqa.selenium.remote.ProtocolHandshake createSession
INFO: Detected dialect: W3C
2017-11-07 13:25:12.714:INFO::main: Logging initialized @3915ms to org.seleniumhq.jetty9.util.log.StdErrLog
2017-11-07 13:25:12.804:INFO:osjs.Server:main: jetty-9.4.z-SNAPSHOT
2017-11-07 13:25:12.822:INFO:osjsh.ContextHandler:main: Started o.s.j.s.h.ContextHandler@87a85e1{/tests,null,AVAILABLE}2017-11-07 13:25:12.843:INFO:osjs.AbstractConnector:main: Started ServerConnector@52102734{HTTP/1.1,[http/1.1]}{0.0.0.0:31892}2017-11-07 13:25:12.843:INFO:osjs.Server:main: Started @4045ms
Nov 07, 2017 1:25:13 PM org.openqa.selenium.server.htmlrunner.CoreTestCase run
INFO: |open | /auth_mellon.php ||Nov 07, 2017 1:25:14 PM org.openqa.selenium.server.htmlrunner.CoreTestCase run
INFO: |waitForPageToLoad |3000||.
.
.etc
<td>result:</td>
<td>PASS</td>
8.4.2 - Legacy Selenium IDE Release Notes
Selenium IDE was the original Firefox extension for Record and Playback. Version 2.x was updated to support WebDriver.
Enh - Allow submission of diagnostic information via a gist.
Enh - Improved health logging, including alerts normally hidden.
2.8.0
New - Added visual assist option to help users requiring stronger constrast in colors, turned off by default. Turn it on from the Options dialog. - Issue 7696 (on Google Code)
New - Health Service to catch unhandled exceptions, statistics, metrics and diagnostics
Enh - Added Search Issues menu item in Help menu to make it easier to search all issues so that we do not get so many duplicate reports of the same issue
Fix - Fixed broken autocomplete - issue 7928 (on Google Code)
Fix - Fixed cancelling of select button when page is reloaded - issue 7793 (on Google Code)
Fix - Adding select button to the sidebar and reduced button size - issue 7815 (on Google Code)
2.7.0
Fix - Fixed switching between tabs in the bottom info panel in FF32 - issue 7824 (on Google Code)
Bug - Fixed regression with typing into file input fields - issue 3549 (on Google Code)
1.7.1
Bug - Fixed regression with stored variables - issue 3520 (on Google Code)
1.7.0
New - Added additional useful menu items to the help menu
New - Added support for Firefox 11
Bug - Stored variables can safely contain consecutive dollar signs - issue 834 (on Google Code)
Bug - Don’t trim whitespace when decoding HTML testcases - issue 755 (on Google Code)
New - Formatter menu items are now context sensitive - issue 3327 (on Google Code) and issue 3385 (on Google Code)
Bug - Fixed Ruby WebDriver test suite export - issue 3243 (on Google Code)
Bug - File extensions being added to all file pickers - issue 3336 (on Google Code)
Bug - Record interactions with elements with an id of ‘id’ - issue 3273 (on Google Code)
1.6.0
New - Added support for Firefox 10
New - Added keyboard shortcuts to launch Selenium IDE - issue 3028 (on Google Code)
Bug - Added break command to autocomplete list - issue 3046 (on Google Code)
Bug - Incorrect tooltip displayed in sidebar - issue 3098 (on Google Code)
Bug - Improved XPath locator recording when there are multiple matches - issue 3056 (on Google Code)
Bug - Locators can now be reordered on Mac - issue 3267 (on Google Code)
1.5.0
New - Added support for Firefox 9
Bug - Changes to user extensions weren’t being updated in Firefox 8 - issue 2801 (on Google Code)
Bug - Security error was thrown when trying to type into file (upload) input fields in Firefox 8 - issue 2826 (on Google Code)
Bug - Improved French locale - issue 1912 (on Google Code)
Bug - break command was failing - issue 725 (on Google Code)
Bug - source view is now fixed width (monospace) - issue 522 (on Google Code)
New - Implemented ‘select’ formatting for WebDriver bindings (Java, C#, Python, Ruby)
Bug - Fixed compile-time and run-time errors in the code formatted for WebDriverBackedSelenium
Bug - Fixed ‘baseUrl’ and ‘get’ formatting errors in various formatters to handle relative and absolute URLs
1.4.1
Bug - Apparently I shipped without switching all the version numbers correctly. (Adam)
1.4.0
New - Firefox 8 support (again, just a version max version bump)
1.3.0
Was going to be just a quick release to get
New - Firefox 7 support (again, just a version max version bump)
in, but then I got busy and didn’t push it when I had planned and so now
New - Order of locators can be controlled through a panel in options.
has leaked in. Most people will want to just leave this the way it is by default. This is brand-spanking-new and allows you to do visually what you could before using a somewhat arcane bit of JS in an extension.
1.2.0
Just a quick release primarily for
New - Firefox 6 support (which really was just changing the max version number)
But we also snuck in
Bug - Recorded CSS locator was not W3C clean wrt attributes
Bug - Deleting of cookies works properly if the cookie name is escaped (such as will ASP sites)
Bug - If the cookie value has an = in it, the whole cookie is now returned instead of just up to the =
You will also notice that the bundle now only has formatters for the officially supported languages of the project (Java, C#, Python, Ruby). If anyone from the Perl, Groovy or PHP camps wants to take on ownership of those formats we’ll happily help you out.
1.1.0
Hey! Look at that! A slightly more significant version bump! Any why is that? Well…
New - WebDriver exports for Ruby, Python, C# and Java
Which are the four supported languages of the Selenium project. This also means that Se-IDE is officially deprecating inclusion of the Groovy, Perl and PHP format plugins in the main release bundle. It would be outstanding if the community around those languages picks up their development and maintenance. Read more about the WebDriver exporters on Samit’s blog.
Of course, format switching is still in Experimental purgatory for at least this release. Losing people’s scripts because of bugs is not acceptable and we’re working on it. To ‘goal’ is to have them back for the next release.
Also included in this release are
New - setIndent(n) is now available to formats for greater control over formatting of export formats
Bug - There was a performance regression in deep in some shared code that has been addressed.
New - Rather than recording ‘foo’ for an element which and an id of ‘foo’ it is captured as ‘id=foo’ to be very specific as to which element would be interacted with
New - Same with ’name’
New - Popups (alerts, confirms, prompts) and new windows work again
1.0.12
This is a minor release with nothing too huge included. But because the last one didn’t get pushed to the world, it is important to make a note of a big change introduced in 1.0.11.
We have marked the changing of formats as Experimental due to a couple lose-all-your-data bugs. As a result it is disabled in the toolbar by default. To enable it, click the checkbox in the Options menu. And because we really don’t want you to lose your data, when you switch formats you will get a big warning box. This too can be disabled in the Options menu. But if you do both of these things and your script gets sent to the abyss, you have been warned. :)
Changes in this release include the following:
New - Firefox 5 support
New - When upgrading Se-IDE, the release notes (these) are shown on first start
Bug - some Java format changes
Bug - some PHP format changes
Bug - the ‘Find’ button works again
Bug - generated CSS is standards compliant
New - dropped support for FF 3.5 or older
1.0.11
It has been half a year since our last release of 1.0.10 and we have put a lot of effort to bring you this release. The summary of the contributions to this release is as follows:-
73% (22)
Samit Badle
16%( 5)
Adam Goucher
6% (2)
Dave Hunt
3% (1)
Santiago Suarez Ordoñez
3% (1)
Simon Stewart
Here is the list of changes excluding some minor fixes and code refactoring.
Main Features:
Firefox 4 support (Issue 1470 (on Google Code), Simon Stewart and Samit Badle)
New CSS locator builder! Selenium IDE will now create locators using CSS when recording (Santiago Suarez Ordoñez)
Added more power to the plugin developers through the new Util command builders support (Issue 442 (on Google Code), Samit Badle)
New command getCssCount (Adam Goucher)
Usability Improvements:
Selenium IDE is now available from the Web developer menu in Firefox 4 (Issue 1467 (on Google Code), Samit Badle)
Camel Case search in command text box has been improved allowing you to type vTP for verifyTextPresent command (Samit Badle with Dave Hunt)
Most actions in Selenium IDE are now accessible through the new Actions menu (Issue 1266 (on Google Code), Samit Badle and Dave Hunt)
Removed help menu items related to Firefox from Selenium IDE help menu (Issue 1704 (on Google Code), Samit Badle)
Less prompting when saving test suite (Issue 967 (on Google Code), Samit Badle)
A method to Reset IDE Window is now available through the Options menu for people having trouble when switching from multiple monitors (Issue 1249 (on Google Code), Samit Badle)
Show the name of the test case in save dialog (Issue 984 (on Google Code), Samit Badle)
The preferences for the current format will be automatically shown in options dialog (Samit Badle)
The plugins pane in the Options dialog now has a splitter (Samit Badle)
Default Timeout Value field in the Options dialog now mentions a unit (Issue 896 (on Google Code), Adam Goucher)
Introduced experimental features option to hide some unstable features (Samit Badle)
Bug Fixes:
Format changing is now marked as experimental due to possible issues, you can turn it on from the options dialog (Samit Badle)
Fixed the header issue on saving test case in another format (Issue 1164 (on Google Code), Samit Badle)
Improved alert on changing the format (Issue 1244 (on Google Code), Samit Badle)
Find button is back on Macs and uses a new way to highlight (Issue 1052 (on Google Code), Samit Badle)
Recording is possible in the middle of a script again (Issue 968 (on Google Code), Samit Badle)
Fixed the annoying skip over one command when recording in the middle of the script (Issue 745 (on Google Code), Samit Badle)
While recording, “clickAndWait” command becomes “click” is now fixed (Issue 419 (on Google Code), Samit Badle)
Selenium IDE bottom pane folding now works correctly (Issue 614 (on Google Code), Samit Badle)
Changed the ID of Selenium IDE menu from generic name to avoid clashes with other addons. (Issue 969 (on Google Code), Samit Badle)
Improvements/Fixes Related to Formatters:
Fixed support for stored variables in PHP formatter (Issue 970 (on Google Code), Samit Badle)
Allow formatters to customise how set* is handled (Adam Goucher)
Some bug fixes in PHP formatter (Issue 1281 (on Google Code), Adam Goucher)
Number type fix (Jeremy Herault)
New Java formatter: Webdriver backed Junit 4 formatter
New PHP formatter: Testing selenium formatter (Adam Goucher)
Known Issues:
Issue 1728 (on Google Code) - Firefox 4 eliminated support for the highlight. So the Find button has stopped working under Firefox 4 on Windows.
Issue 1729 (on Google Code) - The Plugin pane in the Options dialog is not shownig any text in Firefox 4 on Windows 7.
Issues have been reported in Selenium IDE on Ubuntu 11, which are not related to Selenium IDE. See comments on issue 1642 (on Google Code).
1.0.10
Another packaging problem broke the various things that used getText(). Which of course is one of the most commonly used bits of the API.
BUG - properly including se-core atoms
As a result, we’ve started to rebuild the test suite for things. It’s going to take awhile to get the coverage we’re hoping for, but it’ll be worth it if we can go at least 2 days after a release before becoming embarrassed.
What started out as a pretty major change in terms of packaging ended up including two significant bug fixes as well. Hopefully we avoid that sort of thing with the release. Not that I don’t expect it. :)
BUG - Sizzle CSS library not included
BUG - Recording works with FF 4.0b7
What 1.0.9 was supposed to only have was…
NEW - Formatters are all plugins. This effectively separates the development of an individual format from the development of the editor. Now, this means that when you install things for the first time you get a tonne of addons. That is ok. Don’t panic. Oh, and it also means if you don’t want them you have the option to. Not only does this mean fixes to formats get distributed sooner (PHP, I’m looking at you) but 3rd parties will be able to make better packaging choices by having the editor plus their formatters.
Other stuff
BUG - the JUnit 4 formatter doesn’t try to use a string as the port number
BUG - the window when creating new formats properly closes now
BUG - removed the ‘find’ button if on OSX since it doesn’t do anything on this platform (its a FF bug)
BUG - some hard coded strings have been internationalized
BUG - when switching build systems, the icons for menus and such got left out of the package
BUG - commands are trimmed of whitespace before executing which was sometimes a source of great confusion
BUG - now preserves whitespace when displaying diffs in the log
1.0.8
This release is primarily to get FF4 support out into the wild since it is getting to the advanced beta phase, but there is also a fair bit of other bug fixes in there as well. About 75% of the fixes in the release are directly the work of Samit Badle and the vast remainder by Jérémy Hérault.
NEW -This could arguably be considered a bug fix, but if you changed format from HTML to something else then made an edit and switched back again to HTML your script contents would be lost. At its heart, the HTML -> something conversion is one way and so there is now a warning about possibly losing your code. The warning only happens the first time though so you can still shoot yourself in the foot; its just harder
NEW - the ‘run in the selenium testrunner’ option has been removed. The supported methods in se-ide are the play single, play suite and if you need more there is always se-rc with a language binding or -htmlSuite
BUG - the base url wouldn’t change on occasion, much to the frustration of many
NEW - a JUnit 4 formatter was added
BUG - the RSpec formatter had some additional tweaks
BUG - test suite html can now have tests from different folders
BUG - test suite saving triggers got a bit of attention so add/delete/modify is a little more robust
NEW - if you resize your se-ide and/or move it around your screen, the size and position are saved between sessions
BUG - the logic around when to prompt for saving wasn’t really that nice, but its been fixed
NEW - uses ‘browser atoms’ like the rest of Selenium
NEW - CSS locator execution is handled through Sizzle
NEW - can now add multiple test cases to a suite at once
NEW - the case of the missing log messages is now solved
NEW - Firefox 4 support
1.0.7
Only a couple of things of note in this release to end-users which is somewhat silly since it is a month overdue, but that was due to some build changes that took a bit of work to get the kinks worked out. Should be ok now though.
NEW - you can now drag-and-drop command around instead of the cut-insert-paste dance that you used to have to do (Jérémy Hérault)
NEW - same thing with tests in the test suite panel (Jérémy Hérault)
NEW - an new optional parameter when registering you se-ide plugin to allow for command exporting. see http://adam.goucher.ca/?p=1456 for details (Adam Goucher)
NEW - Swedish locale sv-SE now has translations (Olle Jonsson)
BUG - Some people were reporting an annoying popup when starting se-ide without any plugins installed (Adam oucher)
1.0.6
The big thing in this release is that the scary log message that was showing up on ‘open’ is fixed. The other big things are:
BUG - The scary log message that was happening when you used ‘open’ has had its underlying cause fixed (Adam Goucher, Jérémy Hérault)
BUG - fixed a build issue with FF 3.6 and type-ahead for commands (Jérémy Hérault)
BUG - there was a packaging issue around user-extensions (Adam Goucher)
BUG - ide won’t put ’name=’ as the Target when recording a selectWindow (David Burns)
BUG - to avoid confusion, when viewing formatter source, if it is read-only the button says ‘ok’ and if it is editable then it is ‘save’ (Jérémy Hérault)
NEW - you can now set a preference on whether you want record to be on or off when you start ide (Adam Goucher)
NEW - se-ide plugin information is read from the plugin’s install.rdf (most people won’t care about this, but its pretty cool from a geek perspective)
1.0.5
One thing that does not really fit the BUG or NEW label is that the code for Se-IDE is now in the main repo rather than tucked away in a somewhat hidden location.
BUG - user formats were not appearing in the list (Adam Goucher)
BUG - constrained how iframes were loaded; which is why AMO was unhappy (Adam Goucher)
BUG - a whole bunch of tweaks to the existing formats (Dave Hunt)
BUG - a bunch of French translation fixes / additions (Jérémy Hérault)
BUG - the reload user extensions button only shows up if you have the developer tool checkbox checked (Jérémy Hérault)
BUG - labelling access keys on test runner (Olle Jonsson)
BUG - cleaned up a bunch of references from OpenQA to SeleniumHQ (Olle Jonsson)
BUG - had an = instead of == (Olle Jonsson)
BUG - adding a bunch of ;’s to make jslint shut up (Olle Jonsson)
BUG - getting rid of the ‘setting something that only has a getter’ message in Firefox 3.6 (Dan Fabulich)
NEW - self hosting of updates to avoid delays at AMO (Adam Goucher)
NEW - the version of se-ide is now in the title bar (Adam Goucher)
NEW - added some Se-IDE specific icons here and there (Adam Goucher, Dave Hunt)
NEW - preferences can now be Bool’s as well (Adam Goucher)
NEW - added addPlugin(id) to the plugin API (Adam Goucher)
NEW - added a new panel to the Options screen around plugins. It doesn’t do much now other than list the plugins that registered themselves through addPlugin, but should do more for 1.0.6 (Adam Goucher)
1.0.4
Selenium IDE 1.0.4 marks a resurgence in the project with releases planned for the middle of each month. Here are the changes that have happened between versions 1.0.2 and 1.0.4 of Selenium IDE. (Don’t ask what happened to version 1.0.3)
BUG - Supported Firefox version increased to include the 3.6 series (Santiago Suarez Ordoñez)
BUG - Removed the Ruby formatter that was flagged as ‘deprecated’ (Adam Goucher)
NEW - Ability to add custom user-extensions to extend the Selenium API through plugins to Selenium IDE (Adam Goucher)
NEW - Ability to add custom formatters to extend which languages are available to users through plugins to Selenium IDE (Adam Goucher)
NEW - Can now load changes to user extensions without having to restart Selenium IDE (Jérémy Hérault)
NEW - RSpec formatter
Acknowledgements
Version 1.0.4 would not have happened without the following assistance
Sauce Labs’ sponsoring of Adam Goucher to work on it
Jérémy Hérault and the SERLI team for their Helium plugin (which was the proof an API could / should be developed for Se-IDE)
Dave Hunt for his feedback on pre-release versions
For issues with this release or features you would like to see in future releases, please log them in the Google Code Issue tracker (https://github.com/SeleniumHQ/selenium/issues) using the ide label so they don’t get lost.
-adam
8.5 - JSON Wire Protocol Specification
The endpoints and payloads for the now-obsolete open source protocol that was the precursor to the W3C specification.
All implementations of WebDriver that communicate with the browser, or a RemoteWebDriver server shall use a common wire protocol. This wire protocol defines a RESTful web service using JSON over HTTP.
The protocol will assume that the WebDriver API has been “flattened”, but there is an expectation that client implementations will take a more Object-Oriented approach, as demonstrated in the existing Java API. The wire protocol is implemented in request/response pairs of “commands” and “responses”.
Terms and Concepts
Client
The machine on which the WebDriver API is being used.
Session
The machine running the RemoteWebDriver. This term may also refer to a specific browser that implements the wire protocol directly, such as the FirefoxDriver or IPhoneDriver.
The server should maintain one browser per session. Commands sent to a session will be directed to the corresponding browser.
WebElement
An object in the WebDriver API that represents a DOM element on the page.
WebElement JSON Object
The JSON representation of a WebElement for transmission over the wire. This object will have the following properties:
Key
Type
Description
ELEMENT
string
The opaque ID assigned to the element by the server. This ID should be used in all subsequent commands issued against the element.
Capabilities JSON Object
Not all server implementations will support every WebDriver feature. Therefore, the client and server should use JSON objects with the properties listed below when describing which features a session supports.
Key
Type
Description
browserName
string
The name of the browser being used; should be one of {android, chrome, firefox, htmlunit, internet explorer, iPhone, iPad, opera, safari}.
version
string
The browser version, or the empty string if unknown.
platform
string
A key specifying which platform the browser is running on. This value should be one of {WINDOWS|XP|VISTA|MAC|LINUX|UNIX}. When requesting a new session, the client may specify ANY to indicate any available platform may be used.
javascriptEnabled
boolean
Whether the session supports executing user supplied JavaScript in the context of the current page.
takesScreenshot
boolean
Whether the session supports taking screenshots of the current page.
handlesAlerts
boolean
Whether the session can interact with modal popups, such as window.alert and window.confirm.
databaseEnabled
boolean
Whether the session can interact database storage.
locationContextEnabled
boolean
Whether the session can set and query the browser's location context.
applicationCacheEnabled
boolean
Whether the session can interact with the application cache.
browserConnectionEnabled
boolean
Whether the session can query for the browser's connectivity and disable it if desired.
cssSelectorsEnabled
boolean
Whether the session supports CSS selectors when searching for elements.
webStorageEnabled
boolean
Whether the session supports interactions with storage objects.
rotatable
boolean
Whether the session can rotate the current page's current layout between portrait and landscape orientations (only applies to mobile platforms).
acceptSslCerts
boolean
Whether the session should accept all SSL certs by default.
nativeEvents
boolean
Whether the session is capable of generating native events when simulating user input.
proxy
proxy object
Details of any proxy to use. If no proxy is specified, whatever the system's current or default state is used. The format is specified under Proxy JSON Object.
unexpectedAlertBehaviour
string
What the browser should do with an unhandled alert before throwing out the UnhandledAlertException. Possible values are "accept", "dismiss" and "ignore"
elementScrollBehavior
integer
Allows the user to specify whether elements are scrolled into the viewport for interaction to align with the top (0) or bottom (1) of the viewport. The default value is to align with the top of the viewport. Supported in IE and Firefox (since 2.36)
Desired Capabilities
A Capabilities JSON Object sent by the client describing the capabilities a new session created by the server should possess. Any omitted keys implicitly indicate the corresponding capability is irrelevant. More at DesiredCapabilities.
Actual Capabilities
A Capabilities JSON Object returned by the server describing what features a session actually supports.
Any omitted keys implicitly indicate the corresponding capability is not supported.
Cookie JSON Object
A JSON object describing a Cookie.
Key
Type
Description
name
string
The name of the cookie.
value
string
The cookie value.
path
string
(Optional) The cookie path.1
domain
string
(Optional) The domain the cookie is visible to.1
secure
boolean
(Optional) Whether the cookie is a secure cookie.1
httpOnly
boolean
(Optional) Whether the cookie is an httpOnly cookie.1
expiry
number
(Optional) When the cookie expires, specified in seconds since midnight, January 1, 1970 UTC.1
1 When returning Cookie objects, the server should only omit an optional field if it is incapable of providing the information.
Log Entry JSON Object
A JSON object describing a log entry.
Key
Type
Description
timestamp
number
The timestamp of the entry.
level
string
The log level of the entry, for example, "INFO" (see log levels).
message
string
The log message.
Log Levels
Log levels in order, with finest level on top and coarsest level at the bottom.
Level
Description
ALL
All log messages. Used for fetching of logs and configuration of logging.
DEBUG
Messages for debugging.
INFO
Messages with user information.
WARNING
Messages corresponding to non-critical problems.
SEVERE
Messages corresponding to critical errors.
OFF
No log messages. Used for configuration of logging.
Log Type
The table below lists common log types. Other log types, for instance, for performance logging may also be available.
Log Type
Description
client
Logs from the client.
driver
Logs from the webdriver.
browser
Logs from the browser.
server
Logs from the server.
Proxy JSON Object
A JSON object describing a Proxy configuration.
Key
Type
Description
proxyType
string
(Required) The type of proxy being used. Possible values are: direct - A direct connection - no proxy in use, manual - Manual proxy settings configured, e.g. setting a proxy for HTTP, a proxy for FTP, etc, pac - Proxy autoconfiguration from a URL, autodetect - Proxy autodetection, probably with WPAD, system - Use system settings
proxyAutoconfigUrl
string
(Required if proxyType == pac, Ignored otherwise) Specifies the URL to be used for proxy autoconfiguration. Expected format example: http://hostname.com:1234/pacfile
ftpProxy, httpProxy, sslProxy, socksProxy
string
(Optional, Ignored if proxyType != manual) Specifies the proxies to be used for FTP, HTTP, HTTPS and SOCKS requests respectively. Behaviour is undefined if a request is made, where the proxy for the particular protocol is undefined, if proxyType is manual. Expected format example: hostname.com:1234
socksUsername
string
(Optional, Ignored if proxyType != manual and socksProxy is not set) Specifies SOCKS proxy username.
socksPassword
string
(Optional, Ignored if proxyType != manual and socksProxy is not set) Specifies SOCKS proxy password.
noProxy
string
(Optional, Ignored if proxyType != manual) Specifies proxy bypass addresses. Format is driver specific.
Messages
Commands
WebDriver command messages should conform to the HTTP/1.1 request specification. Although the server may be extended to respond to other content-types, the wire protocol dictates that all commands accept a content-type of application/json;charset=UTF-8. Likewise, the message bodies for POST and PUT request must use an application/json;charset=UTF-8 content-type.
Each command in the WebDriver service will be mapped to an HTTP method at a specific path. Path segments prefixed with a colon (:) indicate that segment is a variable used to further identify the underlying resource. For example, consider an arbitrary resource mapped as:
GET /favorite/color/:name
Given this mapping, the server should respond to GET requests sent to “/favorite/color/Jack” and “/favorite/color/Jill”, with the variable :name set to “Jack” and “Jill”, respectively.
Responses
Command responses shall be sent as HTTP/1.1 response messages. If the remote server must return a 4xx response, the response body shall have a Content-Type of text/plain and the message body shall be a descriptive message of the bad request. For all other cases, if a response includes a message body, it must have a Content-Type of application/json;charset=UTF-8 and will be a JSON object with the following properties:
Key
Type
Description
sessionId
string
null
status
number
A status code summarizing the result of the command. A non-zero value indicates that the command failed.
value
*
The response JSON value.
Response Status Codes
The wire protocol will inherit its status codes from those used by the InternetExplorerDriver:
Code
Summary
Detail
0
Success
The command executed successfully.
6
NoSuchDriver
A session is either terminated or not started
7
NoSuchElement
An element could not be located on the page using the given search parameters.
8
NoSuchFrame
A request to switch to a frame could not be satisfied because the frame could not be found.
9
UnknownCommand
The requested resource could not be found, or a request was received using an HTTP method that is not supported by the mapped resource.
10
StaleElementReference
An element command failed because the referenced element is no longer attached to the DOM.
11
ElementNotVisible
An element command could not be completed because the element is not visible on the page.
12
InvalidElementState
An element command could not be completed because the element is in an invalid state (e.g. attempting to click a disabled element).
13
UnknownError
An unknown server-side error occurred while processing the command.
15
ElementIsNotSelectable
An attempt was made to select an element that cannot be selected.
17
JavaScriptError
An error occurred while executing user supplied JavaScript.
19
XPathLookupError
An error occurred while searching for an element by XPath.
21
Timeout
An operation did not complete before its timeout expired.
23
NoSuchWindow
A request to switch to a different window could not be satisfied because the window could not be found.
24
InvalidCookieDomain
An illegal attempt was made to set a cookie under a different domain than the current page.
25
UnableToSetCookie
A request to set a cookie’s value could not be satisfied.
26
UnexpectedAlertOpen
A modal dialog was open, blocking this operation
27
NoAlertOpenError
An attempt was made to operate on a modal dialog when one was not open.
28
ScriptTimeout
A script did not complete before its timeout expired.
29
InvalidElementCoordinates
The coordinates provided to an interactions operation are invalid.
30
IMENotAvailable
IME was not available.
31
IMEEngineActivationFailed
An IME engine could not be started.
32
InvalidSelector
Argument was an invalid selector (e.g. XPath/CSS).
33
SessionNotCreatedException
A new session could not be created.
34
MoveTargetOutOfBounds
Target provided for a move action is out of bounds.
The client should interpret a 404 Not Found response from the server as an “Unknown command” response. All other 4xx and 5xx responses from the server that do not define a status field should be interpreted as “Unknown error” responses.
Error Handling
There are two levels of error handling specified by the wire protocol: invalid requests and failed commands.
Invalid Requests
All invalid requests should result in the server returning a 4xx HTTP response. The response Content-Type should be set to text/plain and the message body should be a descriptive error message. The categories of invalid requests are as follows:
Unknown Commands
If the server receives a command request whose path is not mapped to a resource in the REST service, it should respond with a 404 Not Found message.
Unimplemented Commands
Every server implementing the WebDriver wire protocol must respond to every defined command. If an individual command has not been implemented on the server, the server should respond with a 501 Not Implemented error message. Note this is the only error in the Invalid Request category that does not return a 4xx status code.
Variable Resource Not Found
If a request path maps to a variable resource, but that resource does not exist, then the server should respond with a 404 Not Found. For example, if ID my-session is not a valid session ID on the server, and a command is sent to GET /session/my-session HTTP/1.1, then the server should gracefully return a 404.
Invalid Command Method
If a request path maps to a valid resource, but that resource does not respond to the request method, the server should respond with a 405 Method Not Allowed. The response must include an Allows header with a list of the allowed methods for the requested resource.
Missing Command Parameters
If a POST/PUT command maps to a resource that expects a set of JSON parameters, and the response body does not include one of those parameters, the server should respond with a 400 Bad Request. The response body should list the missing parameters.
Failed Commands
If a request maps to a valid command and contains all of the expected parameters in the request body, yet fails to execute successfully, then the server should send a 500 Internal Server Error. This response should have a Content-Type of application/json;charset=UTF-8 and the response body should be a well formed JSON response object.
The response status should be one of the defined status codes and the response value should be another JSON object with detailed information for the failing command:
Key
Type
Description
message
string
A descriptive message for the command failure.
screen
string
(Optional) If included, a screenshot of the current page as a base64 encoded string.
class
string
(Optional) If included, specifies the fully qualified class name for the exception that was thrown when the command failed.
stackTrace
array
(Optional) If included, specifies an array of JSON objects describing the stack trace for the exception that was thrown when the command failed. The zeroeth element of the array represents the top of the stack.
Each JSON object in the stackTrace array must contain the following properties:
Key
Type
Description
fileName
string
The name of the source file containing the line represented by this frame.
className
string
The fully qualified class name for the class active in this frame. If the class name cannot be determined, or is not applicable for the language the server is implemented in, then this property should be set to the empty string.
methodName
string
The name of the method active in this frame, or the empty string if unknown/not applicable.
lineNumber
number
The line number in the original source file for the frame, or 0 if unknown.
Resource Mapping
Resources in the WebDriver REST service are mapped to individual URL patterns. Each resource may respond to one or more HTTP request methods. If a resource responds to a GET request, then it should also respond to HEAD requests. All resources should respond to OPTIONS requests with an Allow header field, whose value is a list of all methods that resource responds to.
If a resource is mapped to a URL containing a variable path segment name, that path segment should be used to further route the request. Variable path segments are indicated in the resource mapping by a colon-prefix. For example, consider the following:
/favorite/color/:person
A resource mapped to this URL should parse the value of the :person path segment to further determine how to respond to the request. If this resource received a request for /favorite/color/Jack, then it should return Jack’s favorite color. Likewise, the server should return Jill’s favorite color for any requests to /favorite/color/Jill.
Two resources may only be mapped to the same URL pattern if one of those resources’ patterns contains variable path segments, and the other does not. In these cases, the server should always route requests to the resource whose path is the best match for the request. Consider the following two resource paths:
/session/:sessionId/element/active
/session/:sessionId/element/:id
Given these mappings, the server should always route requests whose final path segment is active to the first resource. All other requests should be routed to second.
Set the amount of time, in milliseconds, that asynchronous scripts executed by /session/:sessionId/execute_async are permitted to run before they are aborted and a
Query the server's current status. The server should respond with a general "HTTP 200 OK" response if it is alive and accepting commands. The response body should be a JSON object describing the state of the server. All server implementations should return two basic objects describing the server's current platform and when the server was built. All fields are optional; if omitted, the client should assume the value is uknown. Furthermore, server implementations may include additional fields not listed here.
Key
Type
Description
build
object
build.version
string
A generic release label (i.e. "2.0rc3")
build.revision
string
The revision of the local source control client from which the server was built
build.time
string
A timestamp from when the server was built.
os
object
os.arch
string
The current system architecture.
os.name
string
The name of the operating system the server is currently running on: "windows", "linux", etc.
os.version
string
The operating system version.
Returns:
{object} An object describing the general status of the server.
/session
POST /session
Create a new session. The server should attempt to create a session that most closely matches the desired and required capabilities. Required capabilities have higher priority than desired capabilities and must be set for the session to be created.
JSON Parameters:
desiredCapabilities - {object} An object describing the session's desired capabilities.
requiredCapabilities - {object} An object describing the session's required capabilities (Optional).
Returns:
{object} An object describing the session's capabilities.
Potential Errors:
SessionNotCreatedException - If a required capability could not be set.
/sessions
GET /sessions
Returns a list of the currently active sessions. Each session will be returned as a list of JSON objects with the following keys:
{Array.<Object>} A list of the currently active sessions.
/session/:sessionId
GET /session/:sessionId
Retrieve the capabilities of the specified session.
URL Parameters:
:sessionId - ID of the session to route the command to.
Returns:
{object} An object describing the session's capabilities.
DELETE /session/:sessionId
Delete the session.
URL Parameters:
:sessionId - ID of the session to route the command to.
/session/:sessionId/timeouts
POST /session/:sessionId/timeouts
Configure the amount of time that a particular type of operation can execute for before they are aborted and a |Timeout| error is returned to the client.
URL Parameters:
:sessionId - ID of the session to route the command to.
JSON Parameters:
type - {string} The type of operation to set the timeout for. Valid values are: "script" for script timeouts, "implicit" for modifying the implicit wait timeout and "page load" for setting a page load timeout.
ms - {number} The amount of time, in milliseconds, that time-limited commands are permitted to run.
/session/:sessionId/timeouts/async_script
POST /session/:sessionId/timeouts/async_script
Set the amount of time, in milliseconds, that asynchronous scripts executed by /session/:sessionId/execute_async are permitted to run before they are aborted and a |Timeout| error is returned to the client.
URL Parameters:
:sessionId - ID of the session to route the command to.
JSON Parameters:
ms - {number} The amount of time, in milliseconds, that time-limited commands are permitted to run.
/session/:sessionId/timeouts/implicit_wait
POST /session/:sessionId/timeouts/implicit_wait
Set the amount of time the driver should wait when searching for elements. When searching for a single element, the driver should poll the page until an element is found or the timeout expires, whichever occurs first. When searching for multiple elements, the driver should poll the page until at least one element is found or the timeout expires, at which point it should return an empty list.
If this command is never sent, the driver should default to an implicit wait of 0ms.
URL Parameters:
:sessionId - ID of the session to route the command to.
JSON Parameters:
ms - {number} The amount of time to wait, in milliseconds. This value has a lower bound of 0.
/session/:sessionId/window_handle
GET /session/:sessionId/window_handle
Retrieve the current window handle.
URL Parameters:
:sessionId - ID of the session to route the command to.
Returns:
{string} The current window handle.
Potential Errors:
NoSuchWindow - If the currently selected window has been closed.
/session/:sessionId/window_handles
GET /session/:sessionId/window_handles
Retrieve the list of all window handles available to the session.
URL Parameters:
:sessionId - ID of the session to route the command to.
Returns:
{Array.<string>} A list of window handles.
/session/:sessionId/url
GET /session/:sessionId/url
Retrieve the URL of the current page.
URL Parameters:
:sessionId - ID of the session to route the command to.
Returns:
{string} The current URL.
Potential Errors:
NoSuchWindow - If the currently selected window has been closed.
POST /session/:sessionId/url
Navigate to a new URL.
URL Parameters:
:sessionId - ID of the session to route the command to.
JSON Parameters:
url - {string} The URL to navigate to.
Potential Errors:
NoSuchWindow - If the currently selected window has been closed.
/session/:sessionId/forward
POST /session/:sessionId/forward
Navigate forwards in the browser history, if possible.
URL Parameters:
:sessionId - ID of the session to route the command to.
Potential Errors:
NoSuchWindow - If the currently selected window has been closed.
/session/:sessionId/back
POST /session/:sessionId/back
Navigate backwards in the browser history, if possible.
URL Parameters:
:sessionId - ID of the session to route the command to.
Potential Errors:
NoSuchWindow - If the currently selected window has been closed.
/session/:sessionId/refresh
POST /session/:sessionId/refresh
Refresh the current page.
URL Parameters:
:sessionId - ID of the session to route the command to.
Potential Errors:
NoSuchWindow - If the currently selected window has been closed.
/session/:sessionId/execute
POST /session/:sessionId/execute
Inject a snippet of JavaScript into the page for execution in the context of the currently selected frame. The executed script is assumed to be synchronous and the result of evaluating the script is returned to the client.
The script argument defines the script to execute in the form of a function body. The value returned by that function will be returned to the client. The function will be invoked with the provided args array and the values may be accessed via the arguments object in the order specified.
Arguments may be any JSON-primitive, array, or JSON object. JSON objects that define a WebElement reference will be converted to the corresponding DOM element. Likewise, any WebElements in the script result will be returned to the client as WebElement JSON objects.
URL Parameters:
:sessionId - ID of the session to route the command to.
JSON Parameters:
script - {string} The script to execute.
args - {Array.<*>} The script arguments.
Returns:
{*} The script result.
Potential Errors:
NoSuchWindow - If the currently selected window has been closed.
StaleElementReference - If one of the script arguments is a WebElement that is not attached to the page's DOM.
JavaScriptError - If the script throws an Error.
/session/:sessionId/execute_async
POST /session/:sessionId/execute_async
Inject a snippet of JavaScript into the page for execution in the context of the currently selected frame. The executed script is assumed to be asynchronous and must signal that is done by invoking the provided callback, which is always provided as the final argument to the function. The value to this callback will be returned to the client.
Asynchronous script commands may not span page loads. If an unload event is fired while waiting for a script result, an error should be returned to the client.
The script argument defines the script to execute in teh form of a function body. The function will be invoked with the provided args array and the values may be accessed via the arguments object in the order specified. The final argument will always be a callback function that must be invoked to signal that the script has finished.
Arguments may be any JSON-primitive, array, or JSON object. JSON objects that define a WebElement reference will be converted to the corresponding DOM element. Likewise, any WebElements in the script result will be returned to the client as WebElement JSON objects.
URL Parameters:
:sessionId - ID of the session to route the command to.
JSON Parameters:
script - {string} The script to execute.
args - {Array.<*>} The script arguments.
Returns:
{*} The script result.
Potential Errors:
NoSuchWindow - If the currently selected window has been closed.
StaleElementReference - If one of the script arguments is a WebElement that is not attached to the page's DOM.
Timeout - If the script callback is not invoked before the timout expires. Timeouts are controlled by the /session/:sessionId/timeout/async_script command.
JavaScriptError - If the script throws an Error or if an unload event is fired while waiting for the script to finish.
/session/:sessionId/screenshot
GET /session/:sessionId/screenshot
Take a screenshot of the current page.
URL Parameters:
:sessionId - ID of the session to route the command to.
Returns:
{string} The screenshot as a base64 encoded PNG.
Potential Errors:
NoSuchWindow - If the currently selected window has been closed.
/session/:sessionId/ime/available_engines
GET /session/:sessionId/ime/available_engines
List all available engines on the machine. To use an engine, it has to be present in this list.
URL Parameters:
:sessionId - ID of the session to route the command to.
Returns:
{Array.<string>} A list of available engines
Potential Errors:
ImeNotAvailableException - If the host does not support IME
/session/:sessionId/ime/active_engine
GET /session/:sessionId/ime/active_engine
Get the name of the active IME engine. The name string is platform specific.
URL Parameters:
:sessionId - ID of the session to route the command to.
Returns:
{string} The name of the active IME engine.
Potential Errors:
ImeNotAvailableException - If the host does not support IME
/session/:sessionId/ime/activated
GET /session/:sessionId/ime/activated
Indicates whether IME input is active at the moment (not if it's available.
URL Parameters:
:sessionId - ID of the session to route the command to.
Returns:
{boolean} true if IME input is available and currently active, false otherwise
Potential Errors:
ImeNotAvailableException - If the host does not support IME
/session/:sessionId/ime/deactivate
POST /session/:sessionId/ime/deactivate
De-activates the currently-active IME engine.
URL Parameters:
:sessionId - ID of the session to route the command to.
Potential Errors:
ImeNotAvailableException - If the host does not support IME
/session/:sessionId/ime/activate
POST /session/:sessionId/ime/activate
Make an engines that is available (appears on the list returned by getAvailableEngines) active. After this call, the engine will be added to the list of engines loaded in the IME daemon and the input sent using sendKeys will be converted by the active engine. Note that this is a platform-independent method of activating IME (the platform-specific way being using keyboard shortcuts
URL Parameters:
:sessionId - ID of the session to route the command to.
JSON Parameters:
engine - {string} Name of the engine to activate.
Potential Errors:
ImeActivationFailedException - If the engine is not available or if the activation fails for other reasons.
ImeNotAvailableException - If the host does not support IME
/session/:sessionId/frame
POST /session/:sessionId/frame
Change focus to another frame on the page. If the frame id is null, the server should switch to the page's default content.
URL Parameters:
:sessionId - ID of the session to route the command to.
JSON Parameters:
id - {string|number|null|WebElement JSON Object} Identifier for the frame to change focus to.
Potential Errors:
NoSuchWindow - If the currently selected window has been closed.
NoSuchFrame - If the frame specified by id cannot be found.
/session/:sessionId/frame/parent
POST /session/:sessionId/frame/parent
Change focus to the parent context. If the current context is the top level browsing context, the context remains unchanged.
URL Parameters:
:sessionId - ID of the session to route the command to.
/session/:sessionId/window
POST /session/:sessionId/window
Change focus to another window. The window to change focus to may be specified by its server assigned window handle, or by the value of its name attribute.
URL Parameters:
:sessionId - ID of the session to route the command to.
JSON Parameters:
name - {string} The window to change focus to.
Potential Errors:
NoSuchWindow - If the window specified by name cannot be found.
DELETE /session/:sessionId/window
Close the current window.
URL Parameters:
:sessionId - ID of the session to route the command to.
Potential Errors:
NoSuchWindow - If the currently selected window is already closed
/session/:sessionId/window/:windowHandle/size
POST /session/:sessionId/window/:windowHandle/size
Change the size of the specified window. If the :windowHandle URL parameter is "current", the currently active window will be resized.
URL Parameters:
:sessionId - ID of the session to route the command to.
JSON Parameters:
width - {number} The new window width.
height - {number} The new window height.
GET /session/:sessionId/window/:windowHandle/size
Get the size of the specified window. If the :windowHandle URL parameter is "current", the size of the currently active window will be returned.
URL Parameters:
:sessionId - ID of the session to route the command to.
Returns:
{width: number, height: number} The size of the window.
Potential Errors:
NoSuchWindow - If the specified window cannot be found.
/session/:sessionId/window/:windowHandle/position
POST /session/:sessionId/window/:windowHandle/position
Change the position of the specified window. If the :windowHandle URL parameter is "current", the currently active window will be moved.
URL Parameters:
:sessionId - ID of the session to route the command to.
JSON Parameters:
x - {number} The X coordinate to position the window at, relative to the upper left corner of the screen.
y - {number} The Y coordinate to position the window at, relative to the upper left corner of the screen.
Potential Errors:
NoSuchWindow - If the specified window cannot be found.
GET /session/:sessionId/window/:windowHandle/position
Get the position of the specified window. If the :windowHandle URL parameter is "current", the position of the currently active window will be returned.
URL Parameters:
:sessionId - ID of the session to route the command to.
Returns:
{x: number, y: number} The X and Y coordinates for the window, relative to the upper left corner of the screen.
Potential Errors:
NoSuchWindow - If the specified window cannot be found.
/session/:sessionId/window/:windowHandle/maximize
POST /session/:sessionId/window/:windowHandle/maximize
Maximize the specified window if not already maximized. If the :windowHandle URL parameter is "current", the currently active window will be maximized.
URL Parameters:
:sessionId - ID of the session to route the command to.
Potential Errors:
NoSuchWindow - If the specified window cannot be found.
/session/:sessionId/cookie
GET /session/:sessionId/cookie
Retrieve all cookies visible to the current page.
URL Parameters:
:sessionId - ID of the session to route the command to.
NoSuchWindow - If the currently selected window has been closed.
POST /session/:sessionId/cookie
Set a cookie. If the cookie path is not specified, it should be set to "/". Likewise, if the domain is omitted, it should default to the current page's domain.
URL Parameters:
:sessionId - ID of the session to route the command to.
JSON Parameters:
cookie - {object} A JSON object defining the cookie to add.
DELETE /session/:sessionId/cookie
Delete all cookies visible to the current page.
URL Parameters:
:sessionId - ID of the session to route the command to.
Potential Errors:
InvalidCookieDomain - If the cookie's domain is not visible from the current page.
NoSuchWindow - If the currently selected window has been closed.
UnableToSetCookie - If attempting to set a cookie on a page that does not support cookies (e.g. pages with mime-type text/plain).
/session/:sessionId/cookie/:name
DELETE /session/:sessionId/cookie/:name
Delete the cookie with the given name. This command should be a no-op if there is no such cookie visible to the current page.
URL Parameters:
:sessionId - ID of the session to route the command to.
:name - The name of the cookie to delete.
Potential Errors:
NoSuchWindow - If the currently selected window has been closed.
/session/:sessionId/source
GET /session/:sessionId/source
Get the current page source.
URL Parameters:
:sessionId - ID of the session to route the command to.
Returns:
{string} The current page source.
Potential Errors:
NoSuchWindow - If the currently selected window has been closed.
/session/:sessionId/title
GET /session/:sessionId/title
Get the current page title.
URL Parameters:
:sessionId - ID of the session to route the command to.
Returns:
{string} The current page title.
Potential Errors:
NoSuchWindow - If the currently selected window has been closed.
/session/:sessionId/element
POST /session/:sessionId/element
Search for an element on the page, starting from the document root. The located element will be returned as a WebElement JSON object. The table below lists the locator strategies that each server should support. Each locator must return the first matching element located in the DOM.
Strategy
Description
class name
Returns an element whose class name contains the search value; compound class names are not permitted.
css selector
Returns an element matching a CSS selector.
id
Returns an element whose ID attribute matches the search value.
name
Returns an element whose NAME attribute matches the search value.
link text
Returns an anchor element whose visible text matches the search value.
partial link text
Returns an anchor element whose visible text partially matches the search value.
tag name
Returns an element whose tag name matches the search value.
xpath
Returns an element matching an XPath expression.
URL Parameters:
:sessionId - ID of the session to route the command to.
JSON Parameters:
using - {string} The locator strategy to use.
value - {string} The The search target.
Returns:
{ELEMENT:string} A WebElement JSON object for the located element.
Potential Errors:
NoSuchWindow - If the currently selected window has been closed.
NoSuchElement - If the element cannot be found.
XPathLookupError - If using XPath and the input expression is invalid.
/session/:sessionId/elements
POST /session/:sessionId/elements
Search for multiple elements on the page, starting from the document root. The located elements will be returned as a WebElement JSON objects. The table below lists the locator strategies that each server should support. Elements should be returned in the order located in the DOM.
Strategy
Description
class name
Returns all elements whose class name contains the search value; compound class names are not permitted.
css selector
Returns all elements matching a CSS selector.
id
Returns all elements whose ID attribute matches the search value.
name
Returns all elements whose NAME attribute matches the search value.
link text
Returns all anchor elements whose visible text matches the search value.
partial link text
Returns all anchor elements whose visible text partially matches the search value.
tag name
Returns all elements whose tag name matches the search value.
xpath
Returns all elements matching an XPath expression.
URL Parameters:
:sessionId - ID of the session to route the command to.
JSON Parameters:
using - {string} The locator strategy to use.
value - {string} The The search target.
Returns:
{Array.<{ELEMENT:string}>} A list of WebElement JSON objects for the located elements.
Potential Errors:
NoSuchWindow - If the currently selected window has been closed.
XPathLookupError - If using XPath and the input expression is invalid.
/session/:sessionId/element/active
POST /session/:sessionId/element/active
Get the element on the page that currently has focus. The element will be returned as a WebElement JSON object.
URL Parameters:
:sessionId - ID of the session to route the command to.
Returns:
{ELEMENT:string} A WebElement JSON object for the active element.
Potential Errors:
NoSuchWindow - If the currently selected window has been closed.
/session/:sessionId/element/:id
GET /session/:sessionId/element/:id
Describe the identified element.
Note: This command is reserved for future use; its return type is currently undefined.
URL Parameters:
:sessionId - ID of the session to route the command to.
:id - ID of the element to route the command to.
Potential Errors:
NoSuchWindow - If the currently selected window has been closed.
StaleElementReference - If the element referenced by :id is no longer attached to the page's DOM.
/session/:sessionId/element/:id/element
POST /session/:sessionId/element/:id/element
Search for an element on the page, starting from the identified element. The located element will be returned as a WebElement JSON object. The table below lists the locator strategies that each server should support. Each locator must return the first matching element located in the DOM.
Strategy
Description
class name
Returns an element whose class name contains the search value; compound class names are not permitted.
css selector
Returns an element matching a CSS selector.
id
Returns an element whose ID attribute matches the search value.
name
Returns an element whose NAME attribute matches the search value.
link text
Returns an anchor element whose visible text matches the search value.
partial link text
Returns an anchor element whose visible text partially matches the search value.
tag name
Returns an element whose tag name matches the search value.
xpath
Returns an element matching an XPath expression. The provided XPath expression must be applied to the server "as is"; if the expression is not relative to the element root, the server should not modify it. Consequently, an XPath query may return elements not contained in the root element's subtree.
URL Parameters:
:sessionId - ID of the session to route the command to.
:id - ID of the element to route the command to.
JSON Parameters:
using - {string} The locator strategy to use.
value - {string} The The search target.
Returns:
{ELEMENT:string} A WebElement JSON object for the located element.
Potential Errors:
NoSuchWindow - If the currently selected window has been closed.
StaleElementReference - If the element referenced by :id is no longer attached to the page's DOM.
NoSuchElement - If the element cannot be found.
XPathLookupError - If using XPath and the input expression is invalid.
/session/:sessionId/element/:id/elements
POST /session/:sessionId/element/:id/elements
Search for multiple elements on the page, starting from the identified element. The located elements will be returned as a WebElement JSON objects. The table below lists the locator strategies that each server should support. Elements should be returned in the order located in the DOM.
Strategy
Description
class name
Returns all elements whose class name contains the search value; compound class names are not permitted.
css selector
Returns all elements matching a CSS selector.
id
Returns all elements whose ID attribute matches the search value.
name
Returns all elements whose NAME attribute matches the search value.
link text
Returns all anchor elements whose visible text matches the search value.
partial link text
Returns all anchor elements whose visible text partially matches the search value.
tag name
Returns all elements whose tag name matches the search value.
xpath
Returns all elements matching an XPath expression. The provided XPath expression must be applied to the server "as is"; if the expression is not relative to the element root, the server should not modify it. Consequently, an XPath query may return elements not contained in the root element's subtree.
URL Parameters:
:sessionId - ID of the session to route the command to.
:id - ID of the element to route the command to.
JSON Parameters:
using - {string} The locator strategy to use.
value - {string} The The search target.
Returns:
{Array.<{ELEMENT:string}>} A list of WebElement JSON objects for the located elements.
Potential Errors:
NoSuchWindow - If the currently selected window has been closed.
StaleElementReference - If the element referenced by :id is no longer attached to the page's DOM.
XPathLookupError - If using XPath and the input expression is invalid.
/session/:sessionId/element/:id/click
POST /session/:sessionId/element/:id/click
Click on an element.
URL Parameters:
:sessionId - ID of the session to route the command to.
:id - ID of the element to route the command to.
Potential Errors:
NoSuchWindow - If the currently selected window has been closed.
StaleElementReference - If the element referenced by :id is no longer attached to the page's DOM.
ElementNotVisible - If the referenced element is not visible on the page (either is hidden by CSS, has 0-width, or has 0-height)
/session/:sessionId/element/:id/submit
POST /session/:sessionId/element/:id/submit
Submit a FORM element. The submit command may also be applied to any element that is a descendant of a FORM element.
URL Parameters:
:sessionId - ID of the session to route the command to.
:id - ID of the element to route the command to.
Potential Errors:
NoSuchWindow - If the currently selected window has been closed.
StaleElementReference - If the element referenced by :id is no longer attached to the page's DOM.
/session/:sessionId/element/:id/text
GET /session/:sessionId/element/:id/text
Returns the visible text for the element.
URL Parameters:
:sessionId - ID of the session to route the command to.
:id - ID of the element to route the command to.
Potential Errors:
NoSuchWindow - If the currently selected window has been closed.
StaleElementReference - If the element referenced by :id is no longer attached to the page's DOM.
/session/:sessionId/element/:id/value
POST /session/:sessionId/element/:id/value
Send a sequence of key strokes to an element.
Any UTF-8 character may be specified, however, if the server does not support native key events, it should simulate key strokes for a standard US keyboard layout. The Unicode Private Use Area code points, 0xE000-0xF8FF, are used to represent pressable, non-text keys (see table below).
Key
Code
NULL
U+E000
Cancel
U+E001
Help
U+E002
Back space
U+E003
Tab
U+E004
Clear
U+E005
Return1
U+E006
Enter1
U+E007
Shift
U+E008
Control
U+E009
Alt
U+E00A
Pause
U+E00B
Escape
U+E00C
Key
Code
Space
U+E00D
Pageup
U+E00E
Pagedown
U+E00F
End
U+E010
Home
U+E011
Left arrow
U+E012
Up arrow
U+E013
Right arrow
U+E014
Down arrow
U+E015
Insert
U+E016
Delete
U+E017
Semicolon
U+E018
Equals
U+E019
Key
Code
Numpad 0
U+E01A
Numpad 1
U+E01B
Numpad 2
U+E01C
Numpad 3
U+E01D
Numpad 4
U+E01E
Numpad 5
U+E01F
Numpad 6
U+E020
Numpad 7
U+E021
Numpad 8
U+E022
Numpad 9
U+E023
Key
Code
Multiply
U+E024
Add
U+E025
Separator
U+E026
Subtract
U+E027
Decimal
U+E028
Divide
U+E029
Key
Code
F1
U+E031
F2
U+E032
F3
U+E033
F4
U+E034
F5
U+E035
F6
U+E036
F7
U+E037
F8
U+E038
F9
U+E039
F10
U+E03A
F11
U+E03B
F12
U+E03C
Command/Meta
U+E03D
1 The return key is not the same as the enter key.
The server must process the key sequence as follows:
Each key that appears on the keyboard without requiring modifiers are sent as a keydown followed by a key up.
If the server does not support native events and must simulate key strokes with JavaScript, it must generate keydown, keypress, and keyup events, in that order. The keypress event should only be fired when the corresponding key is for a printable character.
If a key requires a modifier key (e.g. "!" on a standard US keyboard), the sequence is: modifier down, key down, key up, modifier up, where key is the ideal unmodified key value (using the previous example, a "1").
Modifier keys (Ctrl, Shift, Alt, and Command/Meta) are assumed to be "sticky"; each modifier should be held down (e.g. only a keydown event) until either the modifier is encountered again in the sequence, or the NULL (U+E000) key is encountered.
Each key sequence is terminated with an implicit NULL key. Subsequently, all depressed modifier keys must be released (with corresponding keyup events) at the end of the sequence.
URL Parameters:
:sessionId - ID of the session to route the command to.
:id - ID of the element to route the command to.
JSON Parameters:
value - {Array.<string>} The sequence of keys to type. An array must be provided. The server should flatten the array items to a single string to be typed.
Potential Errors:
NoSuchWindow - If the currently selected window has been closed.
StaleElementReference - If the element referenced by :id is no longer attached to the page's DOM.
ElementNotVisible - If the referenced element is not visible on the page (either is hidden by CSS, has 0-width, or has 0-height)
/session/:sessionId/keys
POST /session/:sessionId/keys
Send a sequence of key strokes to the active element. This command is similar to the send keys command in every aspect except the implicit termination: The modifiers are not released at the end of the call. Rather, the state of the modifier keys is kept between calls, so mouse interactions can be performed while modifier keys are depressed.
URL Parameters:
:sessionId - ID of the session to route the command to.
JSON Parameters:
value - {Array.<string>} The keys sequence to be sent. The sequence is defined in thesend keys command.
Potential Errors:
NoSuchWindow - If the currently selected window has been closed.
/session/:sessionId/element/:id/name
GET /session/:sessionId/element/:id/name
Query for an element's tag name.
URL Parameters:
:sessionId - ID of the session to route the command to.
:id - ID of the element to route the command to.
Returns:
{string} The element's tag name, as a lowercase string.
Potential Errors:
NoSuchWindow - If the currently selected window has been closed.
StaleElementReference - If the element referenced by :id is no longer attached to the page's DOM.
/session/:sessionId/element/:id/clear
POST /session/:sessionId/element/:id/clear
Clear a TEXTAREA or text INPUT element's value.
URL Parameters:
:sessionId - ID of the session to route the command to.
:id - ID of the element to route the command to.
Potential Errors:
NoSuchWindow - If the currently selected window has been closed.
StaleElementReference - If the element referenced by :id is no longer attached to the page's DOM.
ElementNotVisible - If the referenced element is not visible on the page (either is hidden by CSS, has 0-width, or has 0-height)
InvalidElementState - If the referenced element is disabled.
/session/:sessionId/element/:id/selected
GET /session/:sessionId/element/:id/selected
Determine if an OPTION element, or an INPUT element of type checkbox or radiobutton is currently selected.
URL Parameters:
:sessionId - ID of the session to route the command to.
:id - ID of the element to route the command to.
Returns:
{boolean} Whether the element is selected.
Potential Errors:
NoSuchWindow - If the currently selected window has been closed.
StaleElementReference - If the element referenced by :id is no longer attached to the page's DOM.
/session/:sessionId/element/:id/enabled
GET /session/:sessionId/element/:id/enabled
Determine if an element is currently enabled.
URL Parameters:
:sessionId - ID of the session to route the command to.
:id - ID of the element to route the command to.
Returns:
{boolean} Whether the element is enabled.
Potential Errors:
NoSuchWindow - If the currently selected window has been closed.
StaleElementReference - If the element referenced by :id is no longer attached to the page's DOM.
/session/:sessionId/element/:id/attribute/:name
GET /session/:sessionId/element/:id/attribute/:name
Get the value of an element's attribute.
URL Parameters:
:sessionId - ID of the session to route the command to.
:id - ID of the element to route the command to.
Returns:
{string|null} The value of the attribute, or null if it is not set on the element.
Potential Errors:
NoSuchWindow - If the currently selected window has been closed.
StaleElementReference - If the element referenced by :id is no longer attached to the page's DOM.
/session/:sessionId/element/:id/equals/:other
GET /session/:sessionId/element/:id/equals/:other
Test if two element IDs refer to the same DOM element.
URL Parameters:
:sessionId - ID of the session to route the command to.
:id - ID of the element to route the command to.
:other - ID of the element to compare against.
Returns:
{boolean} Whether the two IDs refer to the same element.
Potential Errors:
NoSuchWindow - If the currently selected window has been closed.
StaleElementReference - If either the element refered to by :id or :other is no longer attached to the page's DOM.
/session/:sessionId/element/:id/displayed
GET /session/:sessionId/element/:id/displayed
Determine if an element is currently displayed.
URL Parameters:
:sessionId - ID of the session to route the command to.
:id - ID of the element to route the command to.
Returns:
{boolean} Whether the element is displayed.
Potential Errors:
NoSuchWindow - If the currently selected window has been closed.
StaleElementReference - If the element referenced by :id is no longer attached to the page's DOM.
/session/:sessionId/element/:id/location
GET /session/:sessionId/element/:id/location
Determine an element's location on the page. The point (0, 0) refers to the upper-left corner of the page. The element's coordinates are returned as a JSON object with x and y properties.
URL Parameters:
:sessionId - ID of the session to route the command to.
:id - ID of the element to route the command to.
Returns:
{x:number, y:number} The X and Y coordinates for the element on the page.
Potential Errors:
NoSuchWindow - If the currently selected window has been closed.
StaleElementReference - If the element referenced by :id is no longer attached to the page's DOM.
/session/:sessionId/element/:id/location_in_view
GET /session/:sessionId/element/:id/location_in_view
Determine an element's location on the screen once it has been scrolled into view.
Note: This is considered an internal command and should only be used to determine an element's location for correctly generating native events.
URL Parameters:
:sessionId - ID of the session to route the command to.
:id - ID of the element to route the command to.
Returns:
{x:number, y:number} The X and Y coordinates for the element.
Potential Errors:
NoSuchWindow - If the currently selected window has been closed.
StaleElementReference - If the element referenced by :id is no longer attached to the page's DOM.
/session/:sessionId/element/:id/size
GET /session/:sessionId/element/:id/size
Determine an element's size in pixels. The size will be returned as a JSON object with width and height properties.
URL Parameters:
:sessionId - ID of the session to route the command to.
:id - ID of the element to route the command to.
Returns:
{width:number, height:number} The width and height of the element, in pixels.
Potential Errors:
NoSuchWindow - If the currently selected window has been closed.
StaleElementReference - If the element referenced by :id is no longer attached to the page's DOM.
/session/:sessionId/element/:id/css/:propertyName
GET /session/:sessionId/element/:id/css/:propertyName
Query the value of an element's computed CSS property. The CSS property to query should be specified using the CSS property name, not the JavaScript property name (e.g. background-color instead of backgroundColor).
URL Parameters:
:sessionId - ID of the session to route the command to.
:id - ID of the element to route the command to.
Returns:
{string} The value of the specified CSS property.
Potential Errors:
NoSuchWindow - If the currently selected window has been closed.
StaleElementReference - If the element referenced by :id is no longer attached to the page's DOM.
/session/:sessionId/orientation
GET /session/:sessionId/orientation
Get the current browser orientation. The server should return a valid orientation value as defined in ScreenOrientation: {LANDSCAPE|PORTRAIT}.
URL Parameters:
:sessionId - ID of the session to route the command to.
Returns:
{string} The current browser orientation corresponding to a value defined in ScreenOrientation: {LANDSCAPE|PORTRAIT}.
Potential Errors:
NoSuchWindow - If the currently selected window has been closed.
POST /session/:sessionId/orientation
Set the browser orientation. The orientation should be specified as defined in ScreenOrientation: {LANDSCAPE|PORTRAIT}.
URL Parameters:
:sessionId - ID of the session to route the command to.
JSON Parameters:
orientation - {string} The new browser orientation as defined in ScreenOrientation: {LANDSCAPE|PORTRAIT}.
Potential Errors:
NoSuchWindow - If the currently selected window has been closed.
/session/:sessionId/alert_text
GET /session/:sessionId/alert_text
Gets the text of the currently displayed JavaScript alert(), confirm(), or prompt() dialog.
URL Parameters:
:sessionId - ID of the session to route the command to.
Returns:
{string} The text of the currently displayed alert.
Potential Errors:
NoAlertPresent - If there is no alert displayed.
POST /session/:sessionId/alert_text
Sends keystrokes to a JavaScript prompt() dialog.
URL Parameters:
:sessionId - ID of the session to route the command to.
JSON Parameters:
text - {string} Keystrokes to send to the prompt() dialog.
Potential Errors:
NoAlertPresent - If there is no alert displayed.
/session/:sessionId/accept_alert
POST /session/:sessionId/accept_alert
Accepts the currently displayed alert dialog. Usually, this is equivalent to clicking on the 'OK' button in the dialog.
URL Parameters:
:sessionId - ID of the session to route the command to.
Potential Errors:
NoAlertPresent - If there is no alert displayed.
/session/:sessionId/dismiss_alert
POST /session/:sessionId/dismiss_alert
Dismisses the currently displayed alert dialog. For confirm() and prompt() dialogs, this is equivalent to clicking the 'Cancel' button. For alert() dialogs, this is equivalent to clicking the 'OK' button.
URL Parameters:
:sessionId - ID of the session to route the command to.
Potential Errors:
NoAlertPresent - If there is no alert displayed.
/session/:sessionId/moveto
POST /session/:sessionId/moveto
Move the mouse by an offset of the specificed element. If no element is specified, the move is relative to the current mouse cursor. If an element is provided but no offset, the mouse will be moved to the center of the element. If the element is not visible, it will be scrolled into view.
URL Parameters:
:sessionId - ID of the session to route the command to.
JSON Parameters:
element - {string} Opaque ID assigned to the element to move to, as described in the WebElement JSON Object. If not specified or is null, the offset is relative to current position of the mouse.
xoffset - {number} X offset to move to, relative to the top-left corner of the element. If not specified, the mouse will move to the middle of the element.
yoffset - {number} Y offset to move to, relative to the top-left corner of the element. If not specified, the mouse will move to the middle of the element.
/session/:sessionId/click
POST /session/:sessionId/click
Click any mouse button (at the coordinates set by the last moveto command). Note that calling this command after calling buttondown and before calling button up (or any out-of-order interactions sequence) will yield undefined behaviour).
URL Parameters:
:sessionId - ID of the session to route the command to.
JSON Parameters:
button - {number} Which button, enum: {LEFT = 0, MIDDLE = 1 , RIGHT = 2}. Defaults to the left mouse button if not specified.
/session/:sessionId/buttondown
POST /session/:sessionId/buttondown
Click and hold the left mouse button (at the coordinates set by the last moveto command). Note that the next mouse-related command that should follow is buttonup . Any other mouse command (such as click or another call to buttondown) will yield undefined behaviour.
URL Parameters:
:sessionId - ID of the session to route the command to.
JSON Parameters:
button - {number} Which button, enum: {LEFT = 0, MIDDLE = 1 , RIGHT = 2}. Defaults to the left mouse button if not specified.
/session/:sessionId/buttonup
POST /session/:sessionId/buttonup
Releases the mouse button previously held (where the mouse is currently at). Must be called once for every buttondown command issued. See the note in click and buttondown about implications of out-of-order commands.
URL Parameters:
:sessionId - ID of the session to route the command to.
JSON Parameters:
button - {number} Which button, enum: {LEFT = 0, MIDDLE = 1 , RIGHT = 2}. Defaults to the left mouse button if not specified.
/session/:sessionId/doubleclick
POST /session/:sessionId/doubleclick
Double-clicks at the current mouse coordinates (set by moveto).
URL Parameters:
:sessionId - ID of the session to route the command to.
/session/:sessionId/touch/click
POST /session/:sessionId/touch/click
Single tap on the touch enabled device.
URL Parameters:
:sessionId - ID of the session to route the command to.
JSON Parameters:
element - {string} ID of the element to single tap on.
/session/:sessionId/touch/down
POST /session/:sessionId/touch/down
Finger down on the screen.
URL Parameters:
:sessionId - ID of the session to route the command to.
JSON Parameters:
x - {number} X coordinate on the screen.
y - {number} Y coordinate on the screen.
/session/:sessionId/touch/up
POST /session/:sessionId/touch/up
Finger up on the screen.
URL Parameters:
:sessionId - ID of the session to route the command to.
JSON Parameters:
x - {number} X coordinate on the screen.
y - {number} Y coordinate on the screen.
session/:sessionId/touch/move
POST session/:sessionId/touch/move
Finger move on the screen.
URL Parameters:
:sessionId - ID of the session to route the command to.
JSON Parameters:
x - {number} X coordinate on the screen.
y - {number} Y coordinate on the screen.
session/:sessionId/touch/scroll
POST session/:sessionId/touch/scroll
Scroll on the touch screen using finger based motion events. Use this command to start scrolling at a particular screen location.
URL Parameters:
:sessionId - ID of the session to route the command to.
JSON Parameters:
element - {string} ID of the element where the scroll starts.
xoffset - {number} The x offset in pixels to scroll by.
yoffset - {number} The y offset in pixels to scroll by.
session/:sessionId/touch/scroll
POST session/:sessionId/touch/scroll
Scroll on the touch screen using finger based motion events. Use this command if you don't care where the scroll starts on the screen.
URL Parameters:
:sessionId - ID of the session to route the command to.
JSON Parameters:
xoffset - {number} The x offset in pixels to scrollby.
yoffset - {number} The y offset in pixels to scrollby.
session/:sessionId/touch/doubleclick
POST session/:sessionId/touch/doubleclick
Double tap on the touch screen using finger motion events.
URL Parameters:
:sessionId - ID of the session to route the command to.
JSON Parameters:
element - {string} ID of the element to double tap on.
session/:sessionId/touch/longclick
POST session/:sessionId/touch/longclick
Long press on the touch screen using finger motion events.
URL Parameters:
:sessionId - ID of the session to route the command to.
JSON Parameters:
element - {string} ID of the element to long press on.
session/:sessionId/touch/flick
POST session/:sessionId/touch/flick
Flick on the touch screen using finger motion events. This flickcommand starts at a particulat screen location.
URL Parameters:
:sessionId - ID of the session to route the command to.
JSON Parameters:
element - {string} ID of the element where the flick starts.
xoffset - {number} The x offset in pixels to flick by.
yoffset - {number} The y offset in pixels to flick by.
speed - {number} The speed in pixels per seconds.
session/:sessionId/touch/flick
POST session/:sessionId/touch/flick
Flick on the touch screen using finger motion events. Use this flick command if you don't care where the flick starts on the screen.
URL Parameters:
:sessionId - ID of the session to route the command to.
JSON Parameters:
xspeed - {number} The x speed in pixels per second.
yspeed - {number} The y speed in pixels per second.
/session/:sessionId/location
GET /session/:sessionId/location
Get the current geo location.
URL Parameters:
:sessionId - ID of the session to route the command to.
Returns:
{latitude: number, longitude: number, altitude: number} The current geo location.
POST /session/:sessionId/location
Set the current geo location.
URL Parameters:
:sessionId - ID of the session to route the command to.
JSON Parameters:
location - {latitude: number, longitude: number, altitude: number} The new location.
/session/:sessionId/local_storage
GET /session/:sessionId/local_storage
Get all keys of the storage.
URL Parameters:
:sessionId - ID of the session to route the command to.
Returns:
{Array.<string>} The list of keys.
Potential Errors:
NoSuchWindow - If the currently selected window has been closed.
POST /session/:sessionId/local_storage
Set the storage item for the given key.
URL Parameters:
:sessionId - ID of the session to route the command to.
JSON Parameters:
key - {string} The key to set.
value - {string} The value to set.
Potential Errors:
NoSuchWindow - If the currently selected window has been closed.
DELETE /session/:sessionId/local_storage
Clear the storage.
URL Parameters:
:sessionId - ID of the session to route the command to.
Potential Errors:
NoSuchWindow - If the currently selected window has been closed.
/session/:sessionId/local_storage/key/:key
GET /session/:sessionId/local_storage/key/:key
Get the storage item for the given key.
URL Parameters:
:sessionId - ID of the session to route the command to.
:key - The key to get.
Potential Errors:
NoSuchWindow - If the currently selected window has been closed.
DELETE /session/:sessionId/local_storage/key/:key
Remove the storage item for the given key.
URL Parameters:
:sessionId - ID of the session to route the command to.
:key - The key to remove.
Potential Errors:
NoSuchWindow - If the currently selected window has been closed.
/session/:sessionId/local_storage/size
GET /session/:sessionId/local_storage/size
Get the number of items in the storage.
URL Parameters:
:sessionId - ID of the session to route the command to.
Returns:
{number} The number of items in the storage.
Potential Errors:
NoSuchWindow - If the currently selected window has been closed.
/session/:sessionId/session_storage
GET /session/:sessionId/session_storage
Get all keys of the storage.
URL Parameters:
:sessionId - ID of the session to route the command to.
Returns:
{Array.<string>} The list of keys.
Potential Errors:
NoSuchWindow - If the currently selected window has been closed.
POST /session/:sessionId/session_storage
Set the storage item for the given key.
URL Parameters:
:sessionId - ID of the session to route the command to.
JSON Parameters:
key - {string} The key to set.
value - {string} The value to set.
Potential Errors:
NoSuchWindow - If the currently selected window has been closed.
DELETE /session/:sessionId/session_storage
Clear the storage.
URL Parameters:
:sessionId - ID of the session to route the command to.
Potential Errors:
NoSuchWindow - If the currently selected window has been closed.
/session/:sessionId/session_storage/key/:key
GET /session/:sessionId/session_storage/key/:key
Get the storage item for the given key.
URL Parameters:
:sessionId - ID of the session to route the command to.
:key - The key to get.
Potential Errors:
NoSuchWindow - If the currently selected window has been closed.
WebDriver session ID for the session. Readonly and only returned if the server implements a server-side webdriver-backed selenium.
webdriver.remote.quietExceptions
boolean
Disable automatic screnshot capture on exceptions. This is False by default.
Grid Specific
Key
Type
Description
path
string
Path to route request to, or maybe listen on.
seleniumProtocol
string
Which protocol to use. Accepted values: WebDriver, Selenium.
maxInstances
integer
Maximum number of instances to allow to connect to grid
environment
string
Possible duplicate of browserName? See RegistrationRequest
Selenium RC Specific
Key
Type
Description
proxy_pac
boolean
Legacy proxy mechanism. Do not use.
commandLineFlags
string
Flags to pass to browser command line.
executablePath
string
Path to browser executable.
timeoutInSeconds
long integer
Timeout to wait for the browser to launch, in seconds.
onlyProxySeleniumTraffic
boolean
Whether to only proxy selenium traffic. See browserlaunchers.Proxies
avoidProxy
boolean
??? See browserlaunchers.Proxies
proxyEverything
boolean
??? See browserlaunchers.Proxies
proxyRequired
boolean
??? See browserlaunchers.Proxies
browserSideLog
boolean
??? See AbstractBrowserLauncher.
optionsSet
boolean
??? See BrowserOptions.
singleWindow
boolean
Whether to enable single window mode.
dontInjectRegex
javascript RegExp
Regular expression that proxy injection mode can use to know when to bypss injection. Ignored if not in proxy injection mode.
userJSInjection
boolean
??? Whether to inject user JS. Ignored if not in proxy injection mode.
userExtensions
string
Path to a JavaScript file that will be loaded into selenium.
Selenese-Backed-WebDriver specific
Key
Type
Description
selenium.server.url
string
URL of Selenium server to use, to back this WebDriver
Firefox specific
Key
Type
Description
captureNetworkTraffic
boolean
Whether to capture network traffic.
addCustomRequestHeaders
boolean
Whether to add custom request headers.
trustAllSSLCertificates
boolean
Whether to trust all SSL certificates.
changeMaxConnections
boolean
??? See FirefoxChromeLauncher.
firefoxProfileTemplate
string
??? See FirefoxChromeLauncher.
profile
string
??? See FirefoxChromeLauncher
FirefoxProfile settings
Preferences accepted by the FirefoxProfile with special meaning, in the WebDriver API:
Key
Type
Description
webdriver_accept_untrusted_certs
boolean
Whether to trust all SSL certificates. TODO: Maybe in some way different to the acceptSslCerts or trustAllSSLCertificates capabilities.
webdriver_assume_untrusted_issuer
boolean
Whether to trust all SSL certificate issuers. TODO: Maybe in some way different to the acceptSslCerts or trustAllSSLCertificates capabilities.
webdriver.log.driver
string
Level at which to log FirefoxDriver logging statements to a temporary file, so that they can be retrieved by a getLogs command. Available options; DEBUG, INFO, WARNING, ERROR, OFF. Defaults to OFF.
webdriver.log.file
string
Path to file to which to copy firefoxdriver logging output. Defaults to no file (like /dev/null).
webdriver.load.strategy
string
Experimental API. Defines different strategies for how long to wait until a page is loaded. Values: unstable, conservative. Defaults to conservative.
webdriver_firefox_port
integer
Port to listen on for WebDriver commands. Defaults to 7055.
IE specific
Key
Type
Description
killProcessesByName
boolean
Whether to try to kill processes by name, instead (or addition) to killing processes we happen to have handles to.
honorSystemProxy
boolean
Whether to honor the system proxy.
ensureCleanSession
boolean
Whether to make sure the session has no cookies or temporary internet files on Windows. I believe this is passed to the IEDriver as well, but ignored by it.
Safari specific
Key
Type
Description
honorSystemProxy
boolean
Whether to honour the sysem proxy.
ensureCleanSession
boolean
Whether to make sure the session has no cookies, cache entries. And that any registry and proxy settings are restored after the session.
8.7 - Legacy developer documentation
Information of interest to developers of Selenium
8.7.1 - Crazy Fun Build Tool
The original Selenium Build Tool that grew from nothing to be extremely unwieldy, making it both crazy and “fun” to work with.
WebDriver is a large project: if we tried to push everything into a single monolithic build file it eventually becomes unmanageable. We know this. We’ve tried it. So we broke the single Rakefile into a series of build.desc files. Each of these describe a part of the build.
Let’s take a look at a build.desc file. This is part of the main test build.desc:
This highlights most of the key concepts. Firstly, it declares target, in this case there is a single java_test target.
Each target has a name attribute.
Target Names
The combination of the location of the “build.desc” file and the name are used to derive the rake tasks that are generated. All task names are prefixed with “//” followed by the path to the directory containing the “build.desc” file relative to the Rakefile, followed by a “:” and then the name of the target within the “build.desc”. An example makes this far clearer :)
The rake task generated by this example is //java/client/test/org/openqa/selenium:single
Short Target Names
As a shortcut, if a target is named after the directory containing the “build.desc” file, you can omit the part of the rake task name after the colon. In our example: //java/server/src/org/openqa/selenium/server is the same as //java/server/src/org/openqa/selenium/server:server.
Implicit Targets
Some build rules supply implicit targets, and provide related extensions to a normal build target. Examples include generating archives of source code, or running tests. These are declared by appending a further colon and the name of the implicit target to the full name of a build rule. In our example, you could run the tests using “//java/client/test/org/openqa/selenium:single:run”
Each of the rules described below have a list of implicit targets that are associated with them.
Outputs
Each target specified in a “build.desc” file produces one and only one output. This is important. Keep it in mind. Generally, all output files are placed in the “build” directory, relative to the rake task name. In our example, the output of “//java/org/openqa/selenium/server” would be found in “build/java/org/openqa/selenium/server.jar”. Build rules should output the names and locations of any files that they generate.
Dependencies
Take a look at the “deps” section of the “single” target above. The ":tests" is a reference to a target in the current “build.desc” file, in this case, it’s a “java_library” target immediately above. You’ll also see that there’s a reference to several full paths. For example "//java/server/src/org/openqa/selenium/server" This refers to another target defined in a crazy fun build.desc file.
Browsers
The py_test and js_test rules have special handling for running the same tests in multiple browsers. Relevant browser-specific meta-data is held in rake-tasks/browsers.rb. The general way to use this is to append _browsername to the target name; without the _browsername suffix, the tests will be run for all browsers.
As an example, if we had a js_test rule //foo/bar, we would run its tests in firefox by running the target //foo/bar_ff:run or we would run in all available browsers by running the target //foo/bar:run
Build Targets
You can list all the build targets using the -T option. e.g.
./go -T
Being a brief description of the available targets that you can use.
Common Attributes
The following attributes are required for all build targets:
Attribute Name
Type
Meaning
name
string
Used to derive the rake target and (often) the name of the generated binary
The following attributes are commonly used:
Attribute Name
Type
Meaning
srcs
array
The raw source to be build for this target
deps
array
Prerequisites of this target
java_library
Output: JAR file named after the “name” attribute if the “srcs” attribute is set.
Implicit Targets: run (if “main” attribute specifiec), project, project-srcs, uber, zip
Required Attributes: “name” and at least one of “srcs” or “deps”.
Attribute Name
Type
Meaning
deps
array
As above
srcs
array
As above
resources
array
Any resources that should be copied into the jar file.
main
string
The full classname of the main class of the jar (used for creating executable jars)
java_test
Output: JAR file named after the “name” attribute if the “srcs” attribute is set.
Implicit Targets: run, project, project-srcs, uber, zip
Required Attributes: “name” and at least one of “srcs” or “deps”.
Attribute Name
Type
Meaning
deps
array
As above.
srcs
array
As above.
resources
array
Any resources that should be copied into the jar file.
main
string
The alternative class to use for running these tests.
args
string
The argument line to pass to the main class
sysproperties
array
An array of maps containing System properties that should be set
js_deps
Output: Marker file to indicate task is up to date.
Implicit Targets: None
Required Attributes: “name” and “srcs”
Attribute Name
Type
Meaning
name
string
As above
srcs
array
As above
deps
array
As above
js_binary
Output: A monolithic JS file containing all dependencies and sources compiled using the closure compiler without optimizations.
Implicit Targets: None
Required Attributes: At least one of srcs or deps.
Attribute Name
Type
Meaning
name
string
As above
srcs
array
As above
deps
array
As above
js_fragment
Output: Source of an anonymous function representing the exported function, compiled by the closure compiler with all optimizations turned on.
Implicit Targets: None
Required Attributes: name, module, function, deps
Attribute Name
Type
Meaning
name
string
As above
module
string
The name of the module containing the function
function
string
The full name of the function to export
deps
array
As above
js_fragment_header
Output: A C header file with all js_fragment dependencies declared as constants.
Implicit Targets: None
Required Attributes: name, deps
Attribute Name
Type
Meaning
name
string
As above
srcs
array
As above
deps
array
As above
js_test
Output:
Implicit Targets:_BROWSER:run, run
Required Attributes: None.
Attribute Name
Type
Meaning
deps
array
As above.
srcs
array
As above.
path
string
The path at which to expect the test files to be hosted on the test server.
browsers
array
List of browsers, from rake_tasks/browsers.rb, to run the tests in. Will only attempt to run tests in those browsers which are available on the system. If absent, defaults to all browsers on the system.
Assuming browsers = [‘ff’, ‘chrome’], for target //foo, the implicit targets: //foo_ff:run and //foo_chrome:run will be generated, which run the tests in each of those browsers, and the implicit target //foo:run will be generated, which runs the tests in both ff and chrome.
py_test
Output: Creates the directory structure required to run the listed python tests.
Implicit Targets:_BROWSER:run, run
Required Attributes: name.
Attribute Name
Type
Meaning
deps
array
Other py_test rule(s), whose tests should also be run.
common_tests
array
Test file(s) to be run in all browsers. These tests will be passed through a template, with browser-specific substitutions, so that they are laid out properly for each browser in the python output file tree.
BROWSER_specific_tests
array
Test file(s) to be run only in browser BROWSER.
resources
array
Resources which should be copied to the python directory structure.
browsers
array
List of browsers, from rake_tasks/browsers.rb, to run the tests in. Will only attempt to run tests in those browsers which are available on the system. If absent, defaults to all browsers on the system.
Note: Every py_test invocation is performed in a new virtualenv.
rake_task
Output: A crazy fun build rule that can be referred to “blow the escape” hatch and use ordinary rake targets.
Implicit Targets: None
Required Attributes: name, task_name, out.
Attribute Name
Type
Meaning
name
string
As above
task_name
string
The ordinary rake target to call
out
string
The file that is generated, relative to the Rakefile
gcc_library
Output: Shared library file named after the “name” attribute if the “srcs” attribute is set.
Implicit Targets: None.
Required Attributes: “name” and “srcs”.
Attribute Name
Type
Meaning
srcs
array
As above
arch
string
“amd64” for 64-bit builds, “i386” for 32-bit builds.
args
string
Arguments to the compiler (-I flags, for example).
link_args
string
Arguments to the linker (-l flags, for example)
Note: When building a new library for the first time, the build will succeed but copying to pre-built will fail with a similar message:
cp build/cpp/amd64/libimetesthandler64.so
go aborted!
can't convert nil into String
Solution: Copy the just-built library to the appropriate prebuilt folder (cpp/prebuilt/arch/).
8.7.2 - Buck Build Tool
Buck is a build tool from Facebook that we were working with to replace Crazy fun. We have since replaced it with Bazel.
The easiest thing to do is to just run “./go”. The build process will download the right version of Buck for you so long as there’s no .nobuckcheck file in the root of the project. The download ends up in buck-out/crazy-fun/HASH/buck.pex where HASH is the value of the current buck version (given in the .buckversion file in the root of the project.
If you’d like to build and run our fork of Buck, then:
git clone https://github.com/SeleniumHQ/buck.git
cd buck && ant
export PATH=`pwd`/bin:$PATH
cd ~/src/selenium
buck build chrome firefox htmlunit remote leg-rc
buck test --all
Updating the buck.pex
Should you need to update the version of Buck that is downloaded:
Checkout the source to Buck and build the PEX: buck build --show-output buck
Figure out the git hash of the version you’ve just built. Normally that’ll be the HEAD of master. Put that full hash into the .buckversion of the main selenium project.
Put the md5 hash of the PEX into the .buckhash file in the main selenium project.
Create a new release of SeleniumHQ’s Buck fork on GitHub. The name is buck-release-$VERSION, where $VERSION is whatever’s in .buckversion in the main selenium project.
Upload the PEX to the release, and make the release public.
Commit the changes to the main selenium project and push them.
8.7.3 - Adding new drivers to Selenium 2 code
Instructions for how to create tests for new drivers for Selenium 2.
This documentation previously located on the wiki \
Introduction
WebDriver has a comprehensive suite of tests that describe the expected behavior of a new implementation. We’ll assume that you’re implementing the driver in Java for the sake of simplicity, but you can take a look at any of the existing implementations for how we handle more complex builds or other languages once you’ve read this.
Writing a New WebDriver Implementation
Create New Top-Level Directories
Create a new top-level folder, parallel to “common” and “firefox”, named after your browser. In this, create a “src/java” and a “test/java” directory. It should be obvious what goes where.
Set Up a Test Suite
Copy one of the existing test suites to your test tree, and modify it for your new browser. This will probably cause you to modify the “Ignore.java” class, which is to be expected, and to add a holding class for your implementation in the source tree. You must include the “common” directory in order to pick up all the tests. For now, as long as nothing causes a fatal crash, leave the tests as they are.
Once you’ve added the test suite, add a “build.desc” CrazyFunBuild file in the top level of your project. Model it after the one in the “htmlunit” directory. You should then be able to run your tests from the command line using the “go” script.
At this point, we expect total and catastrophic failure when tests are being run.
Start Implementing
If your browser runs out of process, it is strongly encouraged to make use of the JsonWireProtocol. This will make the client-side (the APIs that users use) relatively cheap to implement, and means that you get Java, C#, Ruby and Python support for significantly less effort since you can extend the remote client.
Implementation Tips
Where to Start
As mentioned, has a suite of tests. The suggested order to make these pass is roughly:
ElementFindingTest — needed because element location is key
PageLoadingTest
ChildrenFindingTest — more finding elements
FormHandlingTest
FrameSwitchingTest
ExecutingJavascriptTest
JavascriptEnabledDriverTest
At this point, you’ll have a reasonably complete working driver. After that, it’s probably best to get the user interactions correct:
CorrectEventFiringTest
TypingTest
Before spelunking into the cutting-edge stuff:
AlertsTest
It’s not necessary to get every test working in a class before moving on. I tend to go as far down a class as I can, and then switch to the next class on the list when the going gets tough. This allows you to maintain reasonable velocity and still cover the basics.
Running a Single Test
It’s far from ideal, but the method we use is to modify the SingleTestSuite class in the common project, and then modify the module it’s run from via the IDE’s UI (that is, just go into the launch configuration (in IDEA) and modify the module used: don’t move the file!) This class should be self-explanatory.
Ignoring Tests
At some point you’ll want to stop running tests on an ad-hoc basis and make use of a continuous build product to ensure that you’re not introducing regressions. At this point, the process is to run the tests from the command line. This will generate a list of failing tests. Go through each of these tests and add or modify the “@Ignore” associated with the test. Re-run the tests. It may take a few iterations, but your build will eventually go green. Nice.
The build makes use of ant behind the scenes and stores logs in “build/build_log.xml” and the test logs in “build/test_logs”
We used to have a Jenkins CI tool that executed unit tests and ran integration tests on Sauce Labs. We moved all of the tests to Travis, and now execute everything with Github Actions.
We have a number of Google Compute Engine virtual machines running Ubuntu, currently hosted at {0..29}.ci.seleniumhq.org - they have publicly addressable DNS set up to point ab.{0..29}.ci.seleniumhq.org pointing at them as well, so that cookie tests can do subdomain lookups.
One of these machines, ci.seleniumhq.org, is running jenkins. If you want a login on jenkins, get in touch with juangj. The Build All Java job polls SCM for changes, and does the following:
Does a clean build of the ‘release’ target, any tests which are going to be run, and any artifacts (e.g. the IEDriverServer executable) which will be required to run those tests
Zips up the IEDriverServer and publishes it to http://ci.seleniumhq.org/IEDriverServer-Win32-r${REVISION}.zip - this is copied down directly by SauceLabs to run IE tests
This machine is backed by a 1TB persistent disk, which can hold many build artifacts, but they should be cleared out occasionally (particularly when moving disk between zones).
When this build is successful, it triggers downstream builds for each OS/browser/test combination we care about. It also triggers a downstream clean build to ensure our maven poms are still in order (“Maven build”).
Apart from “Maven build” which runs on the same build node as the compile (a beefy, 8-CPU machine with 32GB RAM), all downstream builds run on separate build nodes.
The downstream builds are configured using environment variables, as per the SauceDriver class. The downstream builds download the selenium-trunk tar from the build master, and then run tests (which should already have been compiled by the Build All Java rule). Two of these downstream builds are special; “HtmlUnit Java Tests” and “Small Tests” just run headless locally. The others use SauceLabs.
A note about networking: The build nodes are set up on an internal network 10.1.0/24, so network communication between them is incredibly fast and free.
When a non-headless browser test is running, the test-file servlet hosts the test files on ports determined by an environment variable (231${EXECUTOR_NUMBER} and 241${EXECUTOR_NUMBER} - EXECUTOR_NUMBER is currently always equal to 0). The hostname used by tests is set by an environment variable (ab.${NODE_NAME}.ci.seleniumhq.org where NODE_NAME in {0..29}). A browser is requested from SauceLabs using our credentials (stored in jenkins-wide environment variables, set on the System Configuration page). Jenkins is currently set to run three test-classes at a time in parallel, per test run, again on the System Configuration page.
The tests are run, and the results get notified to IRC.
Thanks to SauceLabs and Google for donating the infrastructure to run all of these tests.
FAQ
I want to run my tests on Sauce like Jenkins does (my tests are failing on CI, but work fine on my machine!)
I want to add a new browser (Firefox has released a new version!)
Jenkins doesn’t have a great concept of templates. I (dawagner) have some selenium scripts which automate the UI of Jenkins, to create new jobs using canned settings. If you want to do it manually, here are roughly the steps to take:
Find the most similar config(s) you want to copy. If it’s a new Firefox release, find the latest firefox (which should have roughly 6 builds associated with it: Javascript + Java {Windows,Linux} **{Native,Synthesized}
For each of those builds, create a New Job (menu on the left hand side of the home page, when logged in)
Name the job in the style of the others. Select “Copy existing job”, and enter the job you’re copying.
Scroll through the job it’s pre-populated. Replace the version numbers, browser name, and any other details that need replacing. For firefox updates, there are currently three places you should be replacing the number (the “browser_version” field, and two in the Build Execute Shell)
Save
Go to the Build All Java task, configure it, add your new build to the “Projects to build” field where there are many others listed.**
If it’s a firefox update, you probably also want to delete an existing build.
8.7.5 - Google Summer of Code 2011
Selenium encouraged users to take advantage of this program.
Since 2005, Google has administered Google Summer of Code Program to encourage student participation in open source development. The program has several goals:
Inspire young developers to begin participating in open source development
Provide students in Computer Science and related fields the opportunity to do work related to their academic pursuits during the summer
Give students more exposure to real-world software development scenarios (e.g., distributed development, software licensing questions, mailing-list etiquette, etc.)
Get more open source code created and released for the benefit of all
Help open source projects identify and bring in new developers and committers
Google will pay successful student contributors a $5000 USD stipend, enabling them to focus on their coding projects for three months. The deadline for application is April 8, 2011.
When participating in the Selenium - Google Summer of Code program, students will learn that testing, and building automated testing tools, can be both fun and an integral part of delivering high quality software. The collaborative effort with Selenium contributors can provide you with a new toolset to develop and document a set of components used by thousands of people. You will gain valuable professional experience towards your career development and ultimately help drive higher quality web applications everywhere.
Please Email questions to GSoC coordinator Adam Goucher
Student Eligibility
18 years of age or older by April 26, 2010
Currently enrolled in an accredited institution such as colleges, university, master programs, PhD programs and undergraduate programs
Residents and nationals of countries other than Iran, Syria, Cuba, Sudan, North Korea and Myanmar (Burma) with whom we are prohibited by U.S. law from engaging in commerce
Strong skills in some or more of the following: Web Application Development, JavaScript, Python, Flash, iPhone / Android
Ability to work full-time from May 24 – August 20, 2010 (students residing in SF Bay Area may have an opportunity to work on-site from time to time with some of our mentors)
More info on Student Eligibility can be found here
If you meet the above requirements, we’d love to have you apply to Selenium for this year’s Google Summer of Code.
Next steps and deadlines
Read Expectations to understand what is expected of you.
Read Applications to find out what to put on your application.
Take a look at the Project Ideas. If any interest you, feel free to contact the proposer for details. You can also discuss your own project ideas with the people mentioned or talk about them on our developer mailing list or on IRC #selenium on freenode
Submit your application directly to Google before April 8, 2011. You can modify your application with your mentors’ feedback after your initial submission, the final version of your application is due April 23, 2011.
Selenium GSoC team will finish reviewing applications and match students with mentors by April 23, 2011.
Google announces accepted students on April 26, 2011.
Please Email questions to GSoC coordinator Adam Goucher
Project Ideas
These are project ideas proposed by mentors. Please send a post to the developer mailing list if you are interested in it or email GSoC coordinator Adam Goucher.
A Scriptable Proxy
Mentor
Patrick Lightbody(?)
Difficulty
<unknown>
Description
Selenium is a browser control framework, but sometimes you want to do things to/with the traffic generates. The ‘right’ way to do this is to put a proxy in the middle and use its API to do get / fiddle with the traffic information. This project extends the BrowserMob proxy to add the APIs that users of Selenium would need.
Tags Se-RC, Se2
Image Based Locators
Mentor
<unknown>
Difficulty
<unknown>
Description
Sikuli gets a lot of play for its ability to interact with items on the page based on Images. This project would add Image Based Locators to the list of available ones.
Tags Se-RC, Se2, Se-IDE
Selenese Runner
Mentor
Adam Goucher
Difficulty
<unknown>
Description
It is possible to run Selenese scripts outside of Se-IDE with the -htmlSuite option on the server. There are a number of downsides to this, like the need to start/stop the server constantly. This project will create a standalone ‘runner’ for Selenese scripts to interact with the server – and remove the related code from the server.
Tags Se-RC, Se, Se-IDE
Perspective mentors
It’s not too late to apply to be a mentor, if you are interested, please add your project idea here and discuss logistics with Adam Goucher
Expectations
Summary
This page covers, in detail, the expectations for Google Summer of Code students in regards to communication. This is useful for Selenium projects which haven’t codified their expectations–they can point to this document and use it as is.
The Google Summer of Code coding period is very short. On top of that, many students haven’t done a lot of real-world development/engineering work previously; one of the primary purposes of the program is to introduce students to F/OSS and real-world development scenarios. On top of that, most mentors and students are in different locations–so face-to-face time is difficult. Because of this, it’s vitally important to the success of the GSoC project for all expectations to be specified before students begin coding on May 26th. This should be the first step in a long series of frequent communication between student and mentor(s).
This document walks through various expectations for students and mentors, as well as addressing various ways to communicate effectively.
40 hour work week
Students are expected to work at least 40 hours a week on their GSoC project. This is essentially a full-time job.
The benefits for the GSoC project are huge:
the chance to become part of a project community over the long term–this can lead to involvement with other projects, social network, good friends, valuable resources, …
the chance to work with real developers on a real project
the end result of the student’s project can be used for resume material that is available for all future employers to see
The final point is an important one for a beginning developer. Employers greatly appreciate having a referenceable body of work when looking at potential employees. Your code says more about your abilities than any amount of algorithms on a whiteboard can.
And of course, the program will provide you with 5000 USD in income and a really cool t-shirt.
Some GsoC students have become prominent technology bloggers, committers to open source projects, speakers at conferences, mentors for other students, and more…
Self-motivation and steady schedule
The student is expected to be self-motivated. The mentor may push the student to excel, but if the student is not self-motivated to work, then the student probably won’t get much out of participating. The student should schedule time to work on the project each day and keep to a regular schedule. It’s not acceptable to fiddle around for days on end and then pull an all-nighter just before deadlines. It will show in your code.
Regular Weekly Meeting and Frequent Communication with mentor
Regular weekly meeting with your mentor is a must. The planned meeting should cover:
what you’re currently working on
how far you’ve gotten
how you’re implementing it
what you plan on working on next
what issues have come up
what you did to get around them
what’s blocking you if you’re stuck
code review, when applicable
The mentor is one of the most valuable resources for GSoC projects. The mentor is both a solid developer and a solid engineer. The mentor likely has worked on the project for long enough to know the history of decisions, how things are architected, the other people involved, the process for doing things, and all other cultural lore that will help the student be most successful.
Before the GSoC project starts, the mentor and student should iron out answers to the following questions:
When is the regular, scheduled communication scheduled? Weekly? Every two days? Mondays, Wednesdays, Fridays?
What is the best medium to use for regular, scheduled communication? VOIP? Telephone call? Face-to-face?
What is the best medium to use for non-scheduled communication? Email? Instant messenger?
DO:
be considerate of your time and your mentor’s time and plan for your regular meeting
Consider emailing the answers to the above agenda ahead of time so you can spend your time productively on coming up with solutions, code reviews, and planning for the next milestones.
talk to your mentors and developers on the mailing list / IRC frequently, outside of your planned meeting
your mentor is not the only person that can help you out and keep you stay on track, Selenium has a nice community and you will learn a lot from the other people as well.
let your mentor know what your schedule is
Are you going on vacation, moving, writing papers for class? If your mentor doesn’t know where you’ll be or to expect a lag in your productivity, your mentor can’t help you course correct or plan accordingly.
AVOID:
going for more than a week without communicating with your mentor
The project timeline doesn’t allow for unplanned gaps in communication.
Version control
Students should be using version control for their project.
DO:
commit-early/commit-often
This allows issues to be caught quickly and prevents the dreaded one-massive-commit-before-deadline.
use quality commit messages
Bad examples:
Fixed a bug. Tweaks.
Good examples:
Fixed a memory leak where the thingamajig wasn’t getting freed after the parent doohicky was freed. Fixed bug #902 (on Google Code) by changing the comparison used for duplicate removal. Implemented Joe’s good idea about rendering in a separate buffer and then swapping the buffer in after rendering is complete. Improved HTML by simplifying tables.
refer to specific bug numbers, links, and issues as much as possible
The history in version control is frequently the best timeline log of what happened, why, and who did it.
AVOID:
checking in multiple non-related changes in one big commit
If something is bad about one of the changes and someone needs to roll it back, it’s more difficult to do so.
checking in changes that haven’t been tested
Communication with project
Most F/OSS projects have mailing lists for project members and the community and/or have IRC channels to communicate. These communication channels allow the student to keep in touch with the other project members and are an incredibly valuable resource. Other members of the project may be better versed in various parts of the project, they may provide a fallback if the mentor isn’t available, and they may be a good sounding board for figuring out the specific behavior for features. You are assigned a mentor, but the whole community is there to help you learn. Make use of all the resources at your disposal.
Shyness is a common problem for students who are new to open source development. At the beginning of the project, the student is encouraged to send a “Hello! I’m … and I’m working on a GSoC project on … and here’s a link to the proposal.” email to project mailing lists and encouraged to log in and say “hi” on IRC. Break the ice early–it makes the rest of the project easier. If you don’t know where you announce yourself, ask your mentor.
Project mailing lists
Mailing lists are a great way to work out feature specifications and expected behavior.
Often mailing lists are archived and the archives are a rich source of information regarding prior discussions, decisions, and technical errata.
DO:
search through the archives for answers before asking on the list
be courteous at all times
be specific
Cite data, references, and use links wherever possible when discussing technical things.
be patient
Don’t expect an answer within minutes or hours; people often read their mailing-list messages once per day.
AVOID:
being rude
Since most mailing lists are archived or recorded, it’s likely anything you say will be available for everyone to see forever; exercise good manners in all aspects of life.
saying things with all capital letters and excessive punctuation
This is perceived as shouting
getting into heated arguments
If someone insults you, it’s best to ignore it.
IRC
Most F/OSS projects have an IRC channel and some have more than one. People from the project and its community “hang out” on these channels and talk about various things. Some projects have regularly scheduled meetings to cover the status of the project, how development is going, status of major blocking bugs, map out future plans, …
If the project has an IRC channel, it’s a good idea to hang out there. This allows the student to interact with the community and also a forum for working out problems and ideas in real time.
DO:
hang out on the project IRC channels when you’re working on the project
take time to interact with people who are on the IRC channel This builds community and it’s easier to get help from people who are familiar with you than people who aren’t.
AVOID:
saying things with all capital letters and excessive punctuation This is perceived as shouting.
poor grammar It makes it harder for other people to understand what you’re trying to say.
being rude
We’re all real people with real feelings and if you’re rude it’s likely people will interact with you and help you less; also it’s not uncommon for IRC history to be recorded and archived for all to see forever.
It’s a good idea for the student to maintain design documents during the course of the GSoC project. These design documents should cover:
the project plan, with additional detail to flesh out the original program application
deviations from the project plan and how and why the original design plan changed
any issues that could not be worked out or overcome
possible future directions
any resources used or relevant specifications
The student and mentor should work out what design documents should be maintained during the course of the GSoC.
One thing to note is that the student shouldn’t spend all his/her time doing design documents. It’s important to keep track of the design, but it’s also important to get some code done. The mentor should be able to help the student strike a balance between these two goals.
Blogging
Students should get in the habit of blogging about about his/her work at least once every two weeks. Historically, students who do learn much faster, are more productive, and develop a stronger tie to the community. Some have gone on to become contributors, others have given talks / presentations at conferences. How would you like to see your career grow?
Application
Evaluation Criteria
We recognized that very few students have exposures to Selenium during their studies and will therefore evaluate you based on your:
ability to think, learn, and reason
talents (what have you accomplished thus far, programming and otherwise)
attitude, communications, ability to work well with the community and your mentor
availability and commitment to succeeding in GSoC and potential for continuous involvement with community
in a nutshell, what makes you a good person to lead that project initiative :-)
As long as you get your application in before April 9, you will have until April 18 to fine-tune your proposal with our mentors.
Preparing Your Proposal
Here are some questions to get you started. You don’t have to follow it and your application will still be considered, but it’s a good place to start.
Feel free to include anything else you feel is important. One liner answers are not likely going to be considered. In the meanwhile, do feel free to introduce yourself to the community and discuss your project proposal by writing to our developer mailing list.
General Questions:
Give us a short introduction of yourself.
Email address and phone number we can reach you at.
What are you studying? What year of study will you be in September 2010?
How much time can you devote to Summer of code? What else are you doing this summer?
Your Experience:
How did you get started with programming? How long have you been doing it? Why do you love it? Any personal projects you can show us? Have you participated in coding contests / taught / mentor other students?
What are your programming interests? Are you a C guy - do you like to get down and dirty with the linux kernel? Do you know more about Java than your peers? Or are you more of a python/ruby person? What about JavaScript? You know, what’s your style?
Have you worked for a sofware company as a programmer before?
Have you worked on an open source project before? Which ones? Describe your participation
Do you have a blog? A resume?
What makes you a good person for Google Summer of Code? What do you want to get out of it?
Project Questions:
What idea did you choose?
Elaborate on the idea and describe what you would like to accomplish during the summer. This question is especially important if you have your own idea instead of picking one from our list, as we want to have a good understanding of what you’re proposing so we can help you take the idea forward.
Give us a brief time-line of the project for the things you’d like to accomplish. It’s OK to include thinking time (“investigation”) in your work schedule. Work should include:
investigation
programming
documentation
dissemination
How do you plan to test your code? What version control and build systems do you plan to use?
If your project is very successful, do you wish to contributing to it further once Google Summer of Code is complete?
Sample Proposal Outline
A good proposal will have the following component:
Name and Contact Information. Include email, phone(s), IM, Skype, etc.
Title. One liner on the goal to your project.
Synopsis. Short summary, what would your project do?
Benefits to Community. Why would Google and Selenium be proud to sponsor this work? How would open source or society as a whole benefit?
Deliverables. We want to know that you have a plan and that at the end of the summer, something get delivered. :-) Give a brief, clear work breakdown structure with milestones and deadlines. Make sure to label deliverables as optional or required. You may want plan to start by producing some kind of whitepaper, or planning the project in traditional Software Engineering style. It’s OK to include thinking time (“investigation”) in your work schedule. Work should include:
investigation
programming
documentation
dissemination
Description. A small list of project details. Your mentors can give you some guidance on this, but start by letting us know you are thinking :-)
rough architecture
links to parallel projects that you may get insights from
what version control and build system do you plan to use
how do you plan to test
best practices to get your code accepted, etc.
Bio. Who are you? What makes you the best person to work on this project?
Summarize your education, work, and open source experience.
List your skills and give evidence of your qualifications. Convince us that you can do the work.
Any published papers, successful open source projects, etc? Please tell us!
Please list any non-Summer-of-Code plans you have for the Summer, especially employment and class-taking. Be specific about schedules and time commitments.
8.7.6 - Developer Tips
Details on how to execute Selenium Test Suite with Crazy Fun.
You can also run a single test directly from the command line by typing:
./go test_firefox method=foo
Not Halting On Errors Or Failures
The test suite will halt on errors and failures by default. You can disable this behaviour by setting the haltonerror or haltonfailure environmental variables to 0.
Reviewing the Logs For the Tests
When you run the tests, the test results don’t appear on the screen. They are written to the `./build/test_logs’ folder. A pair of files are written. Their names are relatively consistent and include the details of the tests which were run. The pair comprise a txt file and an xml file. The xml file contains more information about the runtime environment such as the path, Ant version, etc. These files are overwritten the next time the same test target is executed so you may want to archive results if they’re important to you.
Using Rake
Rake is very similar to using other build tools such as “make” or “ant”. You can specify a “target” to run by adding it as a parameter, and you can add more than one target at a time. Note that since WebDriver does not rely on ruby being installed and uses JRuby, rake should not be involved directly - use the go script instead. For example, in order to clean the build and then build and run the HtmlUnitDriver tests:
./go clean test_htmlunit
The default target that’s used will compile the code and run all the tests. More interesting targets are:
Target
Description
clean
Delete the contents of the build directory, removing all compiled artifacts
test
Compile the dependencies of and run all the tests for the HtmlUnitDriver, FirefoxDriver, and InternetExplorerDriver as well as the support library’s tests
firefox
Compile the FirefoxDriver
htmlunit
Compile the HtmlUnitDriver
ie
Compile the InternetExplorerDriver. This won’t compile the C++ on a non-Windows system, but will always compile the Java, no matter which OS you happen to be using
support
Guess what this does :)
test_htmlunit
Compile the dependencies and then run the tests for the HtmlUnitDriver. The same “test_x” pattern can be followed for all the compilation targets in this table.
Running a remote Debugger with Java tests
You can run the tests in debug mode and wait for a remote java listener (which one would setup in eclipse or intellij).
./go debug=true suspend=true test_firefox
Debugging the Firefox Driver
Getting output from the Firefox process itself
This is usually useful to debug issues with Firefox starting up. The Java system property webdriver.firefox.logfile will instruct the FirefoxDriver to redirect the output to a file:
A common technique used for debugging of the Firefox driver extension is debug statements. The two following methods can be used from almost any Javascript code inside the extension:
Logger.dumpn() - Logs a string into console (and converts arguments to strings). For example: Logger.dumpn("Found element: " + node).
Logger.dump() - Gets a single argument, an object, and dumps its entire contents: implemented interfaces, data fields, methods, etc.
Getting output from the error console to a file
To see output generated using the Logger utility, one has to open up Firefox’s error console - difficult or simply impossible on remote machines. Fortunately, there’s a way to get the contents of the output dumped to a file:
FirefoxProfile p = new FirefoxProfile();
p.setPreference("webdriver.log.file", "/tmp/firefox_console");
WebDriver driver = new FirefoxDriver(p);
...
The webdriver.log.file preference will instruct the Logger to dump all contents of the console to the specified file.
webdriver.log.file
Getting even more output to the command line
When suspecting additional logging from Firefox could be beneficial, one can crank debugging level all the way up:
export NSPR_LOG_MODULES=all:3
Setting this environment variable will cause Firefox to log additional messages to the console. Use this environment variable together with webdriver.firefox.logfile to get a hold of Firefox’s output to the console.
Debugging the Internet Explorer Driver
In order to get detailed information from IEDriverServer.exe you can run tests with the option devMode=true, this option will set logging level to DEBUG and redirect log output to the file iedriver.log
./go test_ie devMode=true
Adding a test
Most of WebDriver’s test cases live under java/client/test/org/openqa/selenium. For example, to demonstrate an issue with clicking on elements, a test case should be added to ClickTest. The test cases already have a driver instance - no need to create one.
The test use pages that are served by an in-process server, served from common/src/web. Their URLs are provided by the Pages class, so when adding a page and add it to the Pages class as well.
Manually interacting with RemoteWebDriverServer
We can use a web browser or tools such as telnet to interact with a RemoteWebDriverServer e.g. to debug the JSON protocol. Here’s a simple example of checking the status of a server installed on the local machine
In a web browser
http://localhost:8080/wd/hub/status/
In telnet
telnet localhost 8080
GET /wd/hub/status/ HTTP/1.0
On Macs and Unix in general try curl
curl http://localhost:8080/wd/hub/status
And on linux wget
wget http://localhost:8080/wd/hub/status
In all these cases the RemoteWebDriverServer should respond with
{status:0}
8.7.7 - Snapshot of Roadmaps for Selenium Releases
The list of plans and things to accomplish before a release
Preparation for Selenium 2
Date unknown
This documentation previously located on the wiki
The following issues need to be resolved before the final release:
Implement the local end requirements for the spec in selenium
Implement protocol conversion in the standalone server
Ship 4.0
9 - About this documentation
These docs, like the code itself, are maintained 100% by volunteers
within the Selenium community.
Many have been using it since its inception,
but many more have only been using it for a short while,
and have given their time to help improve the onboarding experience
for new users.
If there is an issue with the documentation, we want to know!
The best way to communicate an issue is to visit
https://github.com/seleniumhq/seleniumhq.github.io/issues
and search to see whether or not the issue has been filed already.
If not, feel free to open one!
Many members of the community
are present at the #selenium
Libera chat at Libera.chat.
Feel free to drop in and ask questions
and if you get help which you think could be of use within these documents,
be sure to add your contribution!
We can update these documents,
but it is much easier for everyone when we get contributions
from outside the normal committers.
9.1 - Copyright and attributions
Copyright, contributions and all attributions for the different projects under the Selenium umbrella.
The Documentation of Selenium
Every effort has been made to make this documentation
as complete and as accurate as possible,
but no warranty or fitness is implied.
The information provided is on an “as-is” basis.
The authors and the publisher shall have
neither liability nor responsibility to any person or entity
with respect to any loss or damages arising
from the information contained herein.
No patent liability is assumed with respect
to the use of the information contained herein.
All code and documentation originating from the Selenium project
is licensed under the Apache 2.0 license,
with the Software Freedom Conservancy
as the copyright holder.
Apache License
Version 2.0, January 2004
http://www.apache.org/licenses/
TERMS AND CONDITIONS FOR USE, REPRODUCTION, AND DISTRIBUTION
1. Definitions.
"License" shall mean the terms and conditions for use, reproduction,
and distribution as defined by Sections 1 through 9 of this document.
"Licensor" shall mean the copyright owner or entity authorized by
the copyright owner that is granting the License.
"Legal Entity" shall mean the union of the acting entity and all
other entities that control, are controlled by, or are under common
control with that entity. For the purposes of this definition,
"control" means (i) the power, direct or indirect, to cause the
direction or management of such entity, whether by contract or
otherwise, or (ii) ownership of fifty percent (50%) or more of the
outstanding shares, or (iii) beneficial ownership of such entity.
"You" (or "Your") shall mean an individual or Legal Entity
exercising permissions granted by this License.
"Source" form shall mean the preferred form for making modifications,
including but not limited to software source code, documentation
source, and configuration files.
"Object" form shall mean any form resulting from mechanical
transformation or translation of a Source form, including but
not limited to compiled object code, generated documentation,
and conversions to other media types.
"Work" shall mean the work of authorship, whether in Source or
Object form, made available under the License, as indicated by a
copyright notice that is included in or attached to the work
(an example is provided in the Appendix below).
"Derivative Works" shall mean any work, whether in Source or Object
form, that is based on (or derived from) the Work and for which the
editorial revisions, annotations, elaborations, or other modifications
represent, as a whole, an original work of authorship. For the purposes
of this License, Derivative Works shall not include works that remain
separable from, or merely link (or bind by name) to the interfaces of,
the Work and Derivative Works thereof.
"Contribution" shall mean any work of authorship, including
the original version of the Work and any modifications or additions
to that Work or Derivative Works thereof, that is intentionally
submitted to Licensor for inclusion in the Work by the copyright owner
or by an individual or Legal Entity authorized to submit on behalf of
the copyright owner. For the purposes of this definition, "submitted"
means any form of electronic, verbal, or written communication sent
to the Licensor or its representatives, including but not limited to
communication on electronic mailing lists, source code control systems,
and issue tracking systems that are managed by, or on behalf of, the
Licensor for the purpose of discussing and improving the Work, but
excluding communication that is conspicuously marked or otherwise
designated in writing by the copyright owner as "Not a Contribution."
"Contributor" shall mean Licensor and any individual or Legal Entity
on behalf of whom a Contribution has been received by Licensor and
subsequently incorporated within the Work.
2. Grant of Copyright License. Subject to the terms and conditions of
this License, each Contributor hereby grants to You a perpetual,
worldwide, non-exclusive, no-charge, royalty-free, irrevocable
copyright license to reproduce, prepare Derivative Works of,
publicly display, publicly perform, sublicense, and distribute the
Work and such Derivative Works in Source or Object form.
3. Grant of Patent License. Subject to the terms and conditions of
this License, each Contributor hereby grants to You a perpetual,
worldwide, non-exclusive, no-charge, royalty-free, irrevocable
(except as stated in this section) patent license to make, have made,
use, offer to sell, sell, import, and otherwise transfer the Work,
where such license applies only to those patent claims licensable
by such Contributor that are necessarily infringed by their
Contribution(s) alone or by combination of their Contribution(s)
with the Work to which such Contribution(s) was submitted. If You
institute patent litigation against any entity (including a
cross-claim or counterclaim in a lawsuit) alleging that the Work
or a Contribution incorporated within the Work constitutes direct
or contributory patent infringement, then any patent licenses
granted to You under this License for that Work shall terminate
as of the date such litigation is filed.
4. Redistribution. You may reproduce and distribute copies of the
Work or Derivative Works thereof in any medium, with or without
modifications, and in Source or Object form, provided that You
meet the following conditions:
(a) You must give any other recipients of the Work or
Derivative Works a copy of this License; and
(b) You must cause any modified files to carry prominent notices
stating that You changed the files; and
(c) You must retain, in the Source form of any Derivative Works
that You distribute, all copyright, patent, trademark, and
attribution notices from the Source form of the Work,
excluding those notices that do not pertain to any part of
the Derivative Works; and
(d) If the Work includes a "NOTICE" text file as part of its
distribution, then any Derivative Works that You distribute must
include a readable copy of the attribution notices contained
within such NOTICE file, excluding those notices that do not
pertain to any part of the Derivative Works, in at least one
of the following places: within a NOTICE text file distributed
as part of the Derivative Works; within the Source form or
documentation, if provided along with the Derivative Works; or,
within a display generated by the Derivative Works, if and
wherever such third-party notices normally appear. The contents
of the NOTICE file are for informational purposes only and
do not modify the License. You may add Your own attribution
notices within Derivative Works that You distribute, alongside
or as an addendum to the NOTICE text from the Work, provided
that such additional attribution notices cannot be construed
as modifying the License.
You may add Your own copyright statement to Your modifications and
may provide additional or different license terms and conditions
for use, reproduction, or distribution of Your modifications, or
for any such Derivative Works as a whole, provided Your use,
reproduction, and distribution of the Work otherwise complies with
the conditions stated in this License.
5. Submission of Contributions. Unless You explicitly state otherwise,
any Contribution intentionally submitted for inclusion in the Work
by You to the Licensor shall be under the terms and conditions of
this License, without any additional terms or conditions.
Notwithstanding the above, nothing herein shall supersede or modify
the terms of any separate license agreement you may have executed
with Licensor regarding such Contributions.
6. Trademarks. This License does not grant permission to use the trade
names, trademarks, service marks, or product names of the Licensor,
except as required for reasonable and customary use in describing the
origin of the Work and reproducing the content of the NOTICE file.
7. Disclaimer of Warranty. Unless required by applicable law or
agreed to in writing, Licensor provides the Work (and each
Contributor provides its Contributions) on an "AS IS" BASIS,
WITHOUT WARRANTIES OR CONDITIONS OF ANY KIND, either express or
implied, including, without limitation, any warranties or conditions
of TITLE, NON-INFRINGEMENT, MERCHANTABILITY, or FITNESS FOR A
PARTICULAR PURPOSE. You are solely responsible for determining the
appropriateness of using or redistributing the Work and assume any
risks associated with Your exercise of permissions under this License.
8. Limitation of Liability. In no event and under no legal theory,
whether in tort (including negligence), contract, or otherwise,
unless required by applicable law (such as deliberate and grossly
negligent acts) or agreed to in writing, shall any Contributor be
liable to You for damages, including any direct, indirect, special,
incidental, or consequential damages of any character arising as a
result of this License or out of the use or inability to use the
Work (including but not limited to damages for loss of goodwill,
work stoppage, computer failure or malfunction, or any and all
other commercial damages or losses), even if such Contributor
has been advised of the possibility of such damages.
9. Accepting Warranty or Additional Liability. While redistributing
the Work or Derivative Works thereof, You may choose to offer,
and charge a fee for, acceptance of support, warranty, indemnity,
or other liability obligations and/or rights consistent with this
License. However, in accepting such obligations, You may act only
on Your own behalf and on Your sole responsibility, not on behalf
of any other Contributor, and only if You agree to indemnify,
defend, and hold each Contributor harmless for any liability
incurred by, or claims asserted against, such Contributor by reason
of your accepting any such warranty or additional liability.
END OF TERMS AND CONDITIONS
APPENDIX: How to apply the Apache License to your work.
To apply the Apache License to your work, attach the following
boilerplate notice, with the fields enclosed by brackets "[]"
replaced with your own identifying information. (Don't include
the brackets!) The text should be enclosed in the appropriate
comment syntax for the file format. We also recommend that a
file or class name and description of purpose be included on the
same "printed page" as the copyright notice for easier
identification within third-party archives.
Copyright [yyyy] [name of copyright owner]
Licensed under the Apache License, Version 2.0 (the "License");
you may not use this file except in compliance with the License.
You may obtain a copy of the License at
http://www.apache.org/licenses/LICENSE-2.0
Unless required by applicable law or agreed to in writing, software
distributed under the License is distributed on an "AS IS" BASIS,
WITHOUT WARRANTIES OR CONDITIONS OF ANY KIND, either express or implied.
See the License for the specific language governing permissions and
limitations under the License.
9.2 - Contributing to the Selenium site & documentation
Information on improving documentation and code examples for Selenium
Selenium is a big software project, its site and documentation are key
to understanding how things work and learning effective ways to exploit
its potential.
This project contains both Selenium’s site and documentation. This is
an ongoing effort (not targeted at any specific release) to provide
updated information on how to use Selenium effectively, how to get
involved and how to contribute to Selenium.
Contributions toward the site and docs follow the process described in
the below section about contributions.
The Selenium project welcomes contributions from everyone. There are a
number of ways you can help:
Report an issue
When reporting a new issues or commenting on existing issues please
make sure discussions are related to concrete technical issues with the
Selenium software, its site and/or documentation.
All of the Selenium components change quite fast over time, so this
might cause the documentation to be out of date. If you find this to
be the case, as mentioned, don’t hesitate to create an issue for that.
It also might be possible that you know how to bring up to date the
documentation, so please send us a pull request with the related
changes.
If you are not sure about what you have found is an issue or not,
please ask through the communication channels described at
https://selenium.dev/support.
We want to be able to run all of our code examples in the CI to ensure that people can copy and paste and
execute everything on the site. So we put the code where it belongs in the
examples directory.
Each page in the documentation correlates to a test file in each of the languages, and should follow naming conventions.
For instance examples for this page https://www.selenium.dev/documentation/webdriver/browsers/chrome/ get added in these
files:
Each example should get its own test. Ideally each test has an assertion that verifies the code works as intended.
Once the code is copied to its own test in the proper file, it needs to be referenced in the markdown file.
For example, the tab in Ruby would look like this:
The line numbers at the end represent only the line or lines of code that actually represent the item being displayed.
If a user wants more context, they can click the link to the GitHub page that will show the full context.
Make sure that if you add a test to the page that all the other line numbers in the markdown file are still
correct. Adding a test at the top of a page means updating every single reference in the documentation that has a line
number for that file.
Everything from the Creating Examples section applies, with one addition.
Make sure the tab includes text=true. By default, the tabs get formatted
for code, so to use markdown or other shortcode statements (like gh-codeblock) it needs to be declared as text.
For most examples, the tabpane declares the text=true, but if some of the tabs have code examples, the tabpane
cannot specify it, and it must be specified in the tabs that do not need automatic code formatting.
Contribution Mechanics
The Selenium project welcomes new contributors. Individuals making
significant and valuable contributions over time are made Committers
and given commit-access to the project.
This guide will guide you through the contribution process.
Step 1: Fork
Fork the project on GitHub
and check out your copy locally.
% git clone git@github.com:seleniumhq/seleniumhq.github.io.git
% cd seleniumhq.github.io
Dependencies: Hugo
We use Hugo and the Docsy theme
to build and render the site. You will need the “extended”
Sass/SCSS version of the Hugo binary to work on this site. We recommend
to use Hugo 0.110.0 or higher.
Please follow the Install Hugo
instructions from Docsy.
Step 2: Branch
Create a feature branch and start hacking:
% git checkout -b my-feature-branch
We practice HEAD-based development, which means all changes are applied
directly on top of dev.
Step 3: Make changes
The repository contains the site and docs. To make changes to the site,
work on the website_and_docs directory. To see a live preview of
your changes, run hugo server on the site’s root directory.
% cd website_and_docs
% hugo server
The project loads code from GitHub, if that code has been updated, and it isn’t
reflected in your preview, you can run hugo without the cache: hugo server --ignoreCache
See Style Guide for more information on our conventions for contribution
Step 4: Commit
First make sure git knows your name and email address:
Writing good commit messages is important. A commit message
should describe what changed, why, and reference issues fixed (if
any). Follow these guidelines when writing one:
The first line should be around 50 characters or less and contain a
short description of the change.
Keep the second line blank.
Wrap all other lines at 72 columns.
Include Fixes #N, where N is the issue number the commit
fixes, if any.
A good commit message can look like this:
explain commit normatively in one line
Body of commit message is a few lines of text, explaining things
in more detail, possibly giving some background about the issue
being fixed, etc.
The body of the commit message can be several paragraphs, and
please do proper word-wrap and keep columns shorter than about
72 characters or so. That way `git log` will show things
nicely even when it is indented.
Fixes #141
The first line must be meaningful as it’s what people see when they
run git shortlog or git log --oneline.
Step 5: Rebase
Use git rebase (not git merge) to sync your work from time to time.
% git fetch origin
% git rebase origin/trunk
Step 6: Test
Always remember to run the local server,
with this you can be sure that your changes have not broken anything.
Pull requests are usually reviewed within a few days. If there are
comments to address, apply your changes in new commits (preferably
fixups) and push to the same
branch.
Step 8: Integration
When code review is complete, a committer will take your PR and
integrate it on the repository’s trunk branch. Because we like to keep a
linear history on the trunk branch, we will normally squash and rebase
your branch history.
Communication
All details on how to communicate with the project contributors
and the community overall can be found at https://selenium.dev/support
9.3 - Style guide for Selenium documentation
Conventions for contributions to the Selenium documentation and code examples
Read our contributing documentation for complete instructions on
how to add content to this documentation.
Alerts
Alerts have been added to direct potential contributors to where specific content is missing.
{{<alert-content/>}}
or
{{<alert-content>}}
Additional information about what specific content is needed
{{</alert-content>}}
Which gets displayed like this:
Content Help
Note: This section needs additional and/or updated content
Additional information about what specific content is needed
Our documentation uses Title Capitalization for linkTitle which should be short
and Sentence capitalization for title which can be longer and more descriptive.
For example, a linkTitle of Special Heading might have a title of
The importance of a special heading in documentation
Line length
When editing the documentation’s source,
which is written in plain HTML,
limit your line lengths to around 100 characters.
Some of us take this one step further
and use what is called
semantic linefeeds,
which is a technique whereby the HTML source lines,
which are not read by the public,
are split at ‘natural breaks’ in the prose.
In other words, sentences are split
at natural breaks between clauses.
Instead of fussing with the lines of each paragraph
so that they all end near the right margin,
linefeeds can be added anywhere
that there is a break between ideas.
This can make diffs very easy to read
when collaborating through git,
but it is not something we enforce contributors to use.
Translations
Selenium now has official translators for each of the supported languages.
If you add a code example to the important_documentation.en.md file,
also add it to important_documentation.ja.md, important_documentation.pt-br.md,
important_documentation.zh-cn.md.
If you make text changes in the English version, just make a Pull Request.
The new process is for issues to be created and tagged as needs translation based on
changes made in a given PR.
Code examples
All references to code should be language independent,
and the code itself should be placed inside code tabs.
To generate the above tabs, this is what you need to write.
Note that the tabpane includes langEqualsHeader=true.
This auto-formats the code in each tab to match the header name,
and ensures that all tabs on the page with a language are set to the same thing.
To ensure that all code is kept up to date, our goal is to write the code in the repo where it
can be executed when Selenium versions are updated to ensure that everything is correct.
This code can be automatically displayed in the documentation using the gh-codeblock shortcode.
The shortcode automatically generates its own html, so we do not want it to auto-format with the language header.
If all tabs are using this shortcode, set text=true in the tabpane and remove langEqualsHeader=true.
If only some tabs are using this shortcode, keep langEqualsHeader=true in the tabpane and add text=true
to the tab. Note that the gh-codeblock line can not be indented at all.
One great thing about using gh-codeblock is that it adds a link to the full example.
This means you don’t have to include any additional context code, just the line(s) that
are needed, and the user can navigate to the repo to see how to use it.
If you want your example to include something other than code (default) or html (from gh-codeblock),
you need to first set text=true,
then change the Hugo syntax for the tabto use % instead of < and > with curly braces:
This is preferred to writing code comments because those will not be translated.
Only include the code that is needed for the documentation, and avoid over-explaining.
Finally, remember not to indent plain text or it will rendered as a codeblock.
9.4 - Musings about how things came to be
Details mostly of interest to Selenium devs about how and why certain parts of the project were created
This is a work in progress. Feel free to add things you know or remember.
How did the Automation Atoms come about?
On 2012-04-04, jimevans asked on the #selenium IRC channel:
“What I wanted to ask you about was the history of the automation atoms. I seem to remember them springing fully formed, as if from the head of Zeus, and I’m sure that wasn’t the case. Can you refresh my memory as to how the concept happened?”
simonstewart then proceeded to tell us a nice little story:
Sure. Are we sitting comfortably? Then I’ll begin. (Brit joke, there)
Imagine wavy lines as the screen dissolves and we’re transported back to when selenium and webdriver were different projects. Before the projects merged, there was an awful lot of congruent code in webdriver. Congruent, but not shared. The Firefox driver was in JS. The IE driver was mostly C++. The Chrome driver was mostly JS, but different JS from the Firefox driver. And HtmlUnit was unique.
We then added Selenium Core to the mix. Yet more JS that did basically the same thing.
Within Google, I was becoming the TL of the browser automation team. And was corralling a framework of our own into the mix. Which was written in JS, and had once been based on Core before it span off on its own path.
So: multiple codebases, lots of JS doing more or less the same thing. And loads of bugs. Weird mismatches of behaviour in edge-cases.
*shudder*
So I had a bit of a think. (Dangerous, I know) The idea was to extract the “best of breed” code from all three frameworks (Core, WebDriver and the Google tool). Break them down into code that could be shared. “The smallest, indivisible unit of browser automation” .
Or “atoms” for short.
These could be used as the basis the everything. Consistent behaviour between browsers. and apis. The other important point was that the JS code in webdriver and core was grown organically. Which is a polite way of saying “I’d rather never edit it again”. Which is a polite way of saying that it was of dubious quality . In places.
So: high quality was important. And I wanted the code broken up into modules. Because editing a 10k LOC file isn’t a bright idea.
Within Google we had a library called Closure. Which not only allowed modularization, but “denormalization” of modules into a single file via compilation. And I knew it was being open sourced. So we started building the library in the google codebase. (Where we had access to the unreleased library, code review tools and our amazing testing infrastructure). Using Closure Library.
“dom.js” was probably the first file I wrote. (We can check). Greg Dennis and Jason Leyba joined in the fun. And the atoms have been growing ever since.
Technically, we should be calling anything outside of “javascript/atoms” molecules. But then we can’t say that we have atomic drivers. and use imagery from the 50s to describe them.
*sigh*
jimevans replied: “molecular drivers?”
And simonstewart finished with:
Indeed :) The idea is that the atoms are the lowest level. And we compose the atoms to conform to the WebDriver or RC apis in “javascript/{selenium,webdriver}-atoms” respecitively. And then suck those in as necessary.
A Story of Crazy-Fun
Simon Stewart :
So, let’s go back to the very beginning of the project
When it was me, on my own (the webdriver project, that is, not selenium itself) I knew that I wanted to cover multiple different languages, and so wanted a build tool that could work with all of them That is, that didn't have a built in preference for one that made working with other languages painful ant is java biased. As is maven. nant and msbuild are .net biased rake, otoh, supports nothing very well But, and this is key, any valid rake script is also a valid ruby program It's possible to extend rake to build anything So: rake it was The initial rake file was pretty small and manageable But as the project grew, so did the Rakefile Until there was only person who could deal with it (me), and even then it was pretty shaky So, rather than have a project that couldn't be built, I extracted some helper methods to do some of the heavy lifting Which made the Rakefile comprehensible again But they project kept. getting. bigger And the Rakefile got harder and harder to grok At the time, I was working at Google, who have a wonderful build system Google's system is declarative and works across multiple different languages consistently And, most important, it breaks up the build from a single file into little fragments I asked the OSS chaps at Google if it was okay to open source the build grammar, and they gave it the green light So we layered that build grammar into the selenium codebase With one minor change (we handle dictionary args) But that grammar sits on top of rake still, after all this time And there's a problem And that's that rake is single threaded So our builds are constrained to run serially We could use "multitask" types to improve things, but when I've tried that things got very messy, very fast So, our next hurdle is that crazyfun.rb is slow: we need to go faster Which implies a rewrite of crazyfun I'm most comfortable in java So, I've spiked a new version in java that handles the java and js compilation It's significantly faster But, and this is also important, it's a spike The code was designed to be disposable. Now that things have been proved out, I'd really like to do a clean implementation But I'm torn Do I "finish" the new, very fast crazyfun java enough to replace the ruby version?
A story of driver executeables
jimevans noob_einsteinsfo: alright, story time, then. are we sitting comfortably? then we'll begin. noob_einsteinsfo: back when i first started working on the project (circa 2010), the drivers for all of the browsers were built and maintained by the project. at the time, that meant IE, firefox, and chrome. all of those drivers were packaged as part of the selenium standalone server, and were also packaged in with the various language bindings. this was a conscious decision, so that if one were running locally, there would be no need for the java runtime on the machine just to automate a given browser. there were two factors that led to the development of browser drivers as separate executables. as a quick aside, remember that the webdriver philosophy is to automate the browser using the "best-fit" mechanism for that particular browser. for IE, that means using the COM interfaces; for firefox at the time, that meant using a browser extension; for chrome, it also meant a browser extension. so that meant that the IE driver was developed as a DLL in C++ that was loaded by the language bindings, and communicated with via whatever native-code mechanism was provided by the language (JNI for java, P/Invoke for .NET, ctypes for python, etc.). it also meant that the firefox driver was developed as a browser extension that was packaged inside the various language bindings, and extracted, and used in a profile in firefox. as i said, the IE driver was implemented as a DLL, loaded and communicated with using different mechanisms for different language bindings. the problem is that each of those language-specific mechanisms had different load/unload semantics. ruby, for example, would never call the windows FreeLibrary API after loading the DLL into memory, making multiple instances really challenging. *process* semantics, however, as in, starting, stopping, and managing the lifetime of a process on the OS, whatever the OS, are remarkably similar across all languages. so when the IE driver rewrite was completed in 2010, the development team (me) decided to make it a separate executable, so that the load/unload semantics could be consistent no matter what language bindings one was using. concurrently with this, the chromium team made the decision to follow opera's lead and provide a driver implementation for chrome. an implementation that they would develop, enhance, and maintain going forward, relieving the selenium project of the burden of maintaining a chrome driver.
XgizmoX and that driver is part of the browser?
jimevans XgizmoX: not really, but i believe there may be some smarts built into chrome itself that knows when it's being automated via chromedriver. one of the googlers would be a better person to ask about that. anyway, knowing the different in shared library (.dll/.so/.dynlib) loading semantics, the chromium team (with my encouragement) decided to release their chromedriver implementation as a separate executable. fast-forward a couple of years, and you begin to see the effort to make webdriver a w3c standard. a working group with the w3c created a specification (still in progress, but getting close to finished with the first version), which codified the behavior of webdriver, and how a browser should react to its methods. furthermore, it standardized the protocol used to communicate between language bindings and a driver for a particular browser. i can't emphasize how important and groundbreaking this was. because the w3c and the webdriver working group within it are made up of representatives from the browser vendors themselves, it ensures that the solution will be supported directly by the browser vendors. mozilla created their webdriver implementation (geckodriver) for firefox. the most efficient mechanism for distribution of that browser driver, while maintaining the proper semantics for the language bindings, was to ship as a separate executable. note, this is a gross oversimplification of the geckodriver architecture; the actual executable acts as a relatively thin shim, translating from the wire protocol of the spec to their internal marionette protocol but the point still stands. anyway, the landscape is currently evolving regarding browser-vendor-provided driver implementation. microsoft has one for edge, apple has one for safari (10 and above), the chromium team (largely staffed by googlers) has one for chrome, and now mozilla has one for firefox. given the limited utility of the legacy firefox driver going forward, breaking it out into a separate executable would be wasted effort. this is particularly so, since all of the communication bits that are normally handled by the executable (listening for and responding to http requests from the language bindings) are handled entirely by the browser extension. \ there's literally no need for the legacy firefox driver to be a separate executable. moreover, making it independent of a language runtime would be a significant portion of work (because a .NET shop might reasonably balk at being required to install, say, the java runtime just to automate firefox) so historically speaking, noob-einsteinsfo, that's the general reason for why separate executables have become the norm, and why that paradigm wasn't extended to include the legacy firefox driver. does that make sense? okay. now. about geckodriver. the tale of geckodriver is intimately bound with the status of the aforementioned w3c webdriver spec. level 1 of the specification is mostly done, though it took a number of years of effort to get there. it took a large effort from some very smart people (AutomatedTester among them) to mold the initial documentation of what the webdriver open source software (OSS) project did into proper specification language that could be interpreted and turned into actionable stuff by a browser vendor or other implementor. when beginning the geckodriver (nee marionette) project, mozilla decided to base their implementation on the spec, and only the spec, not following the OSS implementation. this created something of a chicken-and-egg problem, in that while the spec language wasn't completed, it couldn't be implemented. it's only been in the last six months or so that the language concerning the advanced user interactions api (the Actions class in java and .NET) has been made robust enough to actually implement. accordingly, that's the single biggest missing chunk of functionality in geckodriver at present. it wasn't implementable via the spec, so it hasn't been implemented. i do know that it's a very high priority for AutomatedTester and his team to get that implementation done and available. as for why geckodriver is mandatory, and the default implementation for automating firefox in 3.x, that also comes down to some decisions made by mozilla.
TheSchaf so i guess there is no other choice than to use the old FF as long as required features are missing WhereIsMySpoon TheSchaf: if you need those features, yes or use another browser TheSchaf well, moveTo and sendKeys should be pretty basic :p
jimevans TheSchaf: element.sendKeys works just fine. it's Actions.sendKeys that would be broken. in firefox version fortysomething (i misremember the exact version), there was a feature added that blocked browser extensions that hadn't been signed by the mozilla security team. remember that the legacy firefox driver was built as a browser extension? well, with that feature of the browser enabled, the legacy driver couldn't be loaded by the browser. now, for several versions of firefox, it was possible to disable this feature of the browser, and allow unsigned extensions to continue to be loaded. and selenium did this, by virtue of the settings used in the anonymous profile the bindings created when launching firefox. until firefox 48, at which point, it was no longer possible to disable loading of unsigned extensions. at that point, geckodriver was the only way forward for that. now, two more slight points, then i'll be done with story time. first, by nature of what the legacy driver extension does, it's not possible to get it to pass the certification process of the mozilla security team. we asked, were denied, and were told it wouldn't happen ever, full stop. and that's perfectly reasonable, since what that extension does is a security hole big enough to drive a whole fleet of lorries through. second, it turns out there may, in fact, be a way to privately sign the legacy extension so that it can be loaded and used privately by versions of firefox 48 and higher. that's still a less-than-ideal approach, because there's no way that our merry band of open source developers can know how to automate firefox better than the development teams at mozilla, who create the browser in the first place. i totally get the frustration that geckodriver doesn't have the full feature parity of the legacy implementation, especially when it feels like one is being forced to move to it. raging at the selenium project about that decision is directing one's ire in entirely the wrong direction. however, before going off and saying horrible things about mozilla's decisions, do know that mozilla has several people who are constantly engaged in the project, a few of them right here in this very channel (AutomatedTester, davehunt, to name two). i'm sure i've glossed over or mischaracterized some of the historical details of these things, and i'm happy to be corrected. i'm old, after all, and the memory isn't what it used to be. but that, my friends, is the (not so very) short history of why we have separate executables for drivers, and why geckodriver is the way forward, and why a move to it was necessary when the move was made even though some functionality was lacking.
jimevans feels like he's become an unofficial historian of the webdriver project